Installing the Knowledge Uploader (Knowledge Import Tool)
•About the Knowledge Uploader (Knowledge Import Tool)
•Installing the Knowledge Uploader (Knowledge Import Tool)
•Initially Configuring and Logging Into the NXT Knowledge Import Tool
•Using the NXT Knowledge Import Tool
•Initially Configuring and Logging Into the Knowledge Import Tool
•Using the Knowledge Import Tool
About the Knowledge Uploader (Knowledge Import Tool)
You can import knowledge articles from HEAT Classic, ITSM, or a local or networked file system into Neurons for ITSM. Neurons for ITSM currently has two knowledge import tools: the NXT Knowledge Server Tool (for NXT formats such as ITSM or HEAT Classic) and the Knowledge Server Tool (to use with file systems). These tools are collectively called the Knowledge Uploader and are also called the Knowledge Import Tool.
For information about using these tools after you have installed and configured them, see Using the Knowledge Uploader in the Neurons for ITSM online help.
Installing the Knowledge Uploader (Knowledge Import Tool)
Most installations of Neurons for ITSM automatically include the Knowledge Uploader (also called the Knowledge Import Tool).
The following procedure is necessary only if you did not install the Knowledge Uploader when you installed Neurons for ITSM.
On the server or servers that you are going to use as the production environment, do the following:
1.Access the installation folder on the Software product CD or zip file and run IvantiServiceManager.exe. Right-click and select Run as Administrator to ensure proper installation.
The installer checks for the prerequisite software components. If any of those components is not installed, the system prompts you to install them now.
2.Click Install at the prompt. Installation of the prerequisite software can take several minutes. If you are prompted to restart the system, click Yes. The system displays the Welcome dialog box. The installer checks for space and other requirements before displaying the Next button.
3.Click Next. The system displays the License Agreement dialog box.
4.Choose I accept the terms in the license agreement and click Next. The system displays the Destination Folder dialog box.
5.Click Next to accept the default installation folder or click Change... and select a different folder. The system displays the Setup Type dialog box.
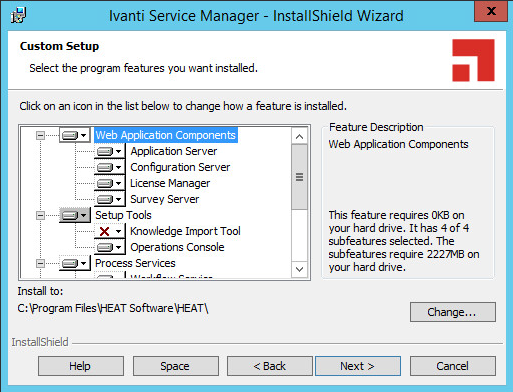
6.Select Custom in the Setup Type dialog box and click the Knowledge Import Tool under Setup Tools. See Custom Setup and the Knowledge Import Tool.
7.Click Next. The system displays the Ready to Install the Program dialog box.
8.Click Install. The system begins installing Neurons for ITSM and displays a status dialog box showing the installation progress of each component over the next few minutes.
When the installation is finished, the system displays the InstallShield Wizard Completed dialog box.
9.Click Finish. When the file installation is finished, the system displays the System Configuration Wizard.
10.Close the System Configuration Wizard, as there is no specific configuration for the Knowledge Uploader in the System Configuration Wizard.
The system now has two new applications on it. They are called Knowledge Import Tool and Knowledge Import Tool (NXT).
Initially Configuring and Logging Into the NXT Knowledge Import Tool
There are two knowledge tools. This topic is about the NXT Knowledge Import Tool and NOT the Knowledge Import Tool.
After you have installed Neurons for ITSM, including the Knowledge Uploader (also called the Knowledge Import Tool), do the following to initially configure and log into the NXT Knowledge Import Tool:
1.On the system where you installed Neurons for ITSM, open the application called Knowledge Import Tool NXT. The system displays the NXT Knowledge Server Configuration dialog box. See NXT Knowledge Server Configuration Dialog Box.

2.Enter information into the fields.
| Parameter | Description |
|---|---|
| Server Version |
The version of the NXT server that you are taking the knowledge articles from. To determine the server version, open the program and find the server information.
You can choose from any of the following: •Knowledge Service V5.0.4003.3 •Knowledge Service Plus V9.6.1.13 •Knowledge Service Plus V9.6.1.14 |
| Server Address |
Enter the following: •The protocol type (uses TCP by default) •The server path of the NXT server that you are taking the knowledge articles from •The port (uses 2242 by default) |
| User Name | The user name of a person who can access the NXT server that you are taking the knowledge articles from. |
| Password | The password associated with the user name. |
| Save password | Saves the password. |
To change these settings after the initial configuration, from the menu bar select Configuration > Configure NXT server.
3.Click Continue.
4. The system displays the Login dialog box. See Knowledge Server Tool Login.

5.Enter information into the fields.
| Parameter | Description |
|---|---|
| User Name | The user name of a person who can access Neurons for ITSM. |
| Password | The password associated with the user. |
| Tenant | The tenant to log into. You can select either ConfigDB to log into the configuration database or IvantiSM to log into Neurons for ITSM. |
| Save password | Saves the password. |
To change these settings after the initial configuration, from the menu bar select Configuration > Configure application server.
6.Click Continue. The system displays the Select role dialog box.
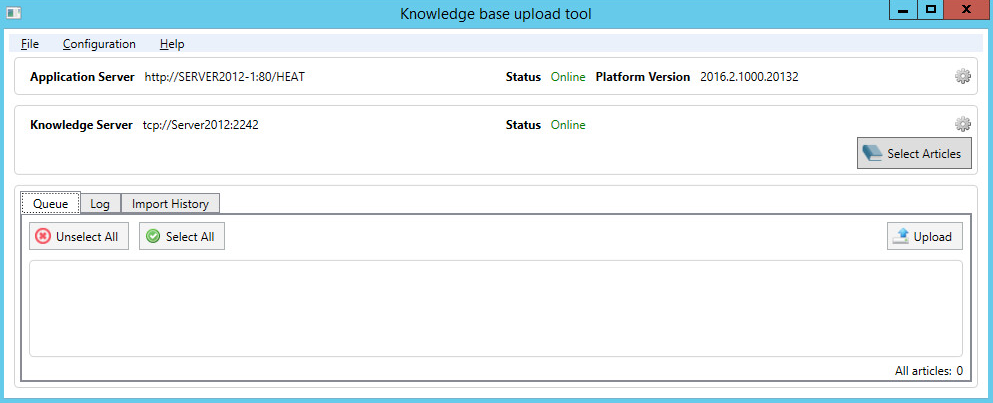
7.Select the role to log in as and click Continue. The system displays the Knowledge base upload tool page.
Knowledge Base Upload Tool
Using the NXT Knowledge Import Tool
There are two knowledge tools. This topic is about the NXT Knowledge Import Tool and NOT the Knowledge Import Tool.
Follow these steps to import knowledge into Neurons for ITSM.
1.Click Select Articles to select the knowledge articles to import. The system displays the NXT articles selection dialog box.
2.Expand the list to see where knowledge articles are located, and then highlight one or more articles.
Select the Knowledge Articles to Import

3.Click OK. The system lists the selected articles on the bottom part of the page.
4.Select the articles to upload and click Upload to launch the Article Creation wizard and start the upload process.
The Article Creation wizard page contains two main areas: a Selected Documents area on the left containing the list of files to import, and a Document Properties area on the right that contains two tabs. One tab is called Default Values and the other is called Selected Documents.
5.To remove a document from the Selected Documents section, check it and click Remove selected. By default, the knowledge uploader imports all of the documents in the Selected Documents, even if you do not select them.
6.Optionally, use the Document Properties section to specify the properties that the knowledge uploader displays together with the files in Neurons for ITSM. You can specify properties for all files (using the Default values tab) or for individual files (using the Selected Document tab after highlighting the file in the Selected Documents section).
You can specify these properties:
•Article Type: The article type. Select from Document, Error Message, Issue Resolution, Patch, Q&A, or Reference.
•Article Status: The status of the article. Select from Approved, Draft, Expired, Failed Review, Pending Review, Published, or Submitted.
•Target collection: The target. Select from Company Policy & Procedure, Customer Knowledge, Internal Knowledge, IT Knowledge, or Service Desk.
•Category: The category for this knowledge article.
•Subject: The subject of the article.
•Resolution: The resolution details if the knowledge article contains this information.
•Description: A description for the knowledge article.
7.Click Import. The system starts importing the selected knowledge articles.
If you select a file that has already been imported into the knowledge base, the system displays the Collision warning dialog box.
8.Depending on what you want to do with the file that has already been imported, click one of the following:
•Apply for all: Applies your choice to all previously imported files that are found during the import process.
•Update: Overwrites the file that already exists in the Knowledge Base with the file that is being imported.
•Create New: Does not overwrite the file being imported with the file that already exists in the Knowledge Base. After importing, there are two knowledge articles with the same name in the Knowledge Base.
•Cancel: Cancels the import process.
The system displays a dialog box with the status of the import.
9. Click OK.
10.Optionally, do the following:
•Review the import logs by clicking the Log tab. You can clear or save the log.
•Review the import history by clicking the Import History tab. Click a number in the Imported column to display more information about an import session.
Initially Configuring and Logging Into the Knowledge Import Tool
There are two knowledge tools. This topic is about the Knowledge Import Tool and NOT the NXT Knowledge Import Tool.
After you have installed Neurons for ITSM, including the Knowledge Uploader, do the following to initially configure and log into the Knowledge Import Tool:
1.On the system where you installed Neurons for ITSM, open the application called Knowledge Import Tool. The system displays the Select role dialog box.
2.Select the role to log in as and click Continue. The system displays the Knowledge base upload tool page.
Knowledge Base Upload Tool

Using the Knowledge Import Tool
There are two knowledge tools. This topic is about the Knowledge Import Tool and NOT the NXT Knowledge Import Tool.
Follow these steps to import knowledge into Neurons for ITSM.
1.Specify the article file type to search for, by doing the following:
| a. | Click the Settings icon  in the Looking for section. The system displays the File search filters dialog box. in the Looking for section. The system displays the File search filters dialog box. |
| b. | In the Add New drop-down list, select one or more file types: |
•Microsoft office documents: Files that have .doc, .docx, .xls, and .xlsx extensions.
•PDF files: Files that have a .pdf extension.
•Images: Files that have .bmp, .jpg, and .gif extensions.
| c. | Optionally, you can add more file types by clicking Custom. The system adds a line item to the filter list called Custom. Click the line item to open it for editing. You can change the filter name and specify one or more extensions. Click OK. The system adds the file types that you specified to the Looking for section. |
2.Specify which local or network folders to search for knowledge articles and then perform the search:
| a. | Click the Settings icon in the In Folders section. The system displays the Import folders dialog box. |
| b. | Click Add New. The system displays the Browse For Folder navigation dialog box. |
| c. | Navigate to a folder and highlight it. (To optionally add a new subfolder to the folder, click Make New Folder.) |
| d. | Click OK. The system adds the folder to the list of folders to search. If you created a new folder, the system adds it to the file system as an empty folder. |
| e. | Optionally, check Recursive for a folder to specify that the system should search the subfolders within the folder. |
| f. | Optionally, check Monitor for changes to configure the knowledge uploader to monitor all of the folders on the list for changes to the file types that you specified in step 1b. |
| g. | Repeat steps b-f to continue to add folders to the list as necessary. |
| h. | Click OK. |
The knowledge uploader performs the search and displays all of the files that meet the search criteria.
3.Select the files to upload:
| a. | If you think the contents of the scanned folders might have changed, click Rescan Folders to regenerate the file list. |
| b. | In the file list, check the files to upload, or click Select All to upload all of the files. |
| c. | Click Upload to launch the Article Creation wizard and start the upload process. |
The Article Creation wizard page contains two main areas: a Selected Documents area on the left containing the list of files to import, and a Document Properties area on the right that contains two tabs. One tab is called Default Values and the other is called Selected Documents.
4.To remove a document from the Selected Documents section, check it and click Remove selected. By default, the knowledge uploader imports all of the documents in the Selected Documents, even if you do not select them.
5.Optionally, use the Document Properties section to specify the properties that the knowledge uploader displays together with the files in Neurons for ITSM. You can specify properties for all files (using the Default values tab) or for individual files (using the Selected Document tab after highlighting the file in the Selected Documents section).
You can specify these properties:
•Article Type: The article type. Select from Document, Error Message, Issue Resolution, Patch, Q&A, or Reference.
•Article Status: The status of the article. Select from Approved, Draft, Expired, Failed Review, Pending Review, Published, or Submitted.
•Target collection: The target. Select from Company Policy & Procedure, Customer Knowledge, Internal Knowledge, IT Knowledge, or Service Desk.
•Category: The category for this knowledge article.
•Use file name as Subject: Check to use the article file name to fill in the Subject field.
•Subject: Only use this field if you did not check Use file name as Subject. Enter a subject for the article.
•Resolution: Enter the resolution if the knowledge article contains one.
•Description: Enter a description for the knowledge article.
6.Click Import. The import process begins.
If you select a file that has already been imported into the knowledge base, the system displays the Collision warning dialog box.
7.Depending on what you want to do with the file that has already been imported, click one of the following:
•Apply for all: Applies your choice to all previously imported files that are found during the import process.
•Update: Overwrites the file that already exists in the knowledge base with the file that is being imported.
•Create New: Does not overwrite the file being imported with the file that already exists in the knowledge base. After importing, there are two knowledge articles with the same name in the knowledge base.
•Cancel: Cancels the import process.
The system displays an Import dialog box with the status of the import.
8. Click OK.
9.Optionally, do the following:
•Review the import logs by clicking the Log tab. You can clear or save the log.
•Review the import history by clicking the Import History tab. Click a number in the Imported column to display more information about an import session.