Setting up Redis
You will have to setup Redis if you want to use the Chat service in Neurons for ITSM. All the different setup scenarios are explained below.
If you have installed Redis but not using the Chat service, you might consider uninstalling it. To uninstall refer to the section Uninstall Redis.
Different install and uninstall options and scenarios
•Upgrading/Installing Redis for existing/New customer:
•Installing Redis in Linux Container on Windows
•Installing Linux container on Windows Server with Docker
•Installing Redis 6.2.5 in Docker
•Installing Redis on Linux Machine
•Installing Redis on Linux Machine (Ubuntu)
•Establish the remote Redis Connection
•Uninstalling Redis from Windows Server (existing customer)
•Remote Redis Connection - using redis.bat script
•Remote Redis Connection from Windows UI
•Remote Redis Connection using redis-server.exe
•Uninstalling from Linux Container
Option 1 - Install Redis in Linux Container on Windows Server
Prerequisite:
Windows server - version 2019 or above with HyperV enabled.
For more information on Linux container requirements check out - Windows container requirements.
For upgrading your Windows Servers, check out this Windows Server Upgrade guide and look for target version you need to upgrade.
Installation steps:
Installing Linux container with docker on Windows Server
1.Open PowerShell as Administrator and run the following command:
Install-Module -Name DockerMsftProvider -Repository PSGallery -Force
This installs the Docker-Microsoft PackageManagement provider.
Sample Output
2.Install the preview build of Docker EE and run the following commands:
Install-Module DockerProvider
Install-Package Docker -ProviderName DockerProvider -RequiredVersion preview
3.Use “Yes” or “Y” to agree to install or use “A” to agree to all.
4.When the installation is complete, reboot the system.
5.To run Linux containers, enable LinuxKit system and use the following command:
[Environment]::SetEnvironmentVariable("LCOW_SUPPORTED", "1", "Machine")
6.Use the following command to restart the system/Docker service after the change:
Restart-Service docker
The Linux container should now successfully run on your Windows Server.
For more information, refer - How to run Docker Containers on Windows Server 2019
Installing Redis 6.2.5 in Docker
1.Open PowerShell as Administrator and run the following command:
docker run -d -p 6379:6379 --name redis-con redis:6.2.5
2.Check if it has successfully installed by executing the command - docker ps
Best Practices
•Run the command - docker update --restart always redis-con to always restart Redis Container whenever the docker/machine is restarted. If this is not enabled you have to enable Redis container manually everytime the docker/machine is restarted.
•Enable Authentication for Redis. Refer, Add Authentication to Redis.
Setting up Redis Authentication
Add Auth to Redis server
1.Open Powershell and run the command - docker exec -it redis-con sh.
This will give you Redis console.
2.Run Redis-cli to set password to Redis server.
3.Run this command to set Redis password - redis-cli Config Set requirepass <your-password>.
Your password is successfully set now.
4.To test run the command - redis-cli Auth <your-password>” it should return “Ok.
Set the password through SCW for the application to authenticate through Redis password.
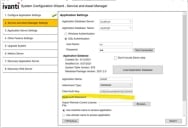
In step 2 of SCW configuration (Service and Asset Manager settings) in the field Redis Auth Password, enter the same password that is set in the redis-cli, and save it.
Once docker/Redis server/machine is restarted , the auth will be set back to noAuth, sensure to remember and update the password to redis server every time restarted.
Option 2 - Install Redis on Linux Machine
Prerequisite:
•Ubuntu 16.04 or above
Steps to install:
1.Execute the following commands:
Sudo apt update
Sudo apt install redis-server
2.Check if Redis is set up using the following command:
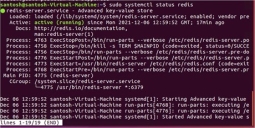
sudo systemctl status redis
If the result displays as Active: active (running) then Redis is successfully setup.
3.Edit the redis.conf file to make Redis port available to other servers (by default, the Redis port is on :6379) “sudo gedit /etc/redis/redis.conf” or “sudo nano /etc/redis/redis.conf”
4.Check for the line “bind 127.0.0.1” comment this line by prepending ‘#’
Since you have removed binding, it is highly recommended to add authentication to Redis Server.
5.Edit redi.conf “sudo gedit /etc/redis/redis.conf”
6.Search for requirepass foobared, replace foobared with your_passowrd.
7.Restart the Redis Server to apply changes.
“sudo systemctl restart redis.service”
8.Then follow “Remote Redis Connection” and “Set password through SCW for the application to authenticate through Redis password”
Establish the remote Redis Connection
1.Edit the .env file in the path “<install-Path>\Heat\Appserver\chat\.env”
2.Edit the attribute REDIS_HOST=localhost to REDIS_HOST=<remote-server-ip>
3.Save the file.
4.This will install redis successfully.
5.Check if Redis is up by using the command sudo systemctl status redis” – you should see the active (running status)
Uninstall Redis for Windows Server (Existing Customer)
This is a mandatory step for existing customers who have already installed Redis and are upgrading to the new version. Uninstall the obsolete Redis version from your machine by following the below server details and uninstall steps.
Redis server details:
| Version | 3.0.503 |
| Path | <install_path>\HEAT\Appserver\AppServer.Main\redis |
| Project | https://github.com/microsoftarchive/redis |
|
License |
https://github.com/microsoftarchive/redis/blob/3.0/license.txt |
Option 1 - Uninstall using redis.bat script
1.Run the following in Powershell with administrator privileges.
cd <install_path>\HEAT\Appserver\AppServer.Main\redis; .\redis.bat -p $(pwd) -c stop
2.Optional Step: Cleanup Redis installation files by using the below command:
.\redis.bat -p $(pwd) -c cleanup
Option 2 - Uninstall from Windows UI
1.Run the following in Powershell with administrator privileges:
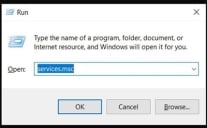
Run services.msc
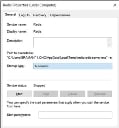
2.Locate Redis in the list and stop the service.
3.Right click > Properties, Change Startup type to Disabled.
Option 3 - Uninstall using redis-server.exe
Stop the service
Run the following in Powershell with administrator privileges.
.\redis-server.exe --service-stop
Uninstall service
Run the following in Powershell with administrator privileges.
.\redis-server.exe --service-uninstall redis.windows.conf
Uninstall Redis
If you do not want to use the Chat service, you may uninstall Redis by the following the below steps:
Option 1 - Uninstall Redis in container
Execute the following command:
Docker rm /redis-con
Option 2 - Uninstall Redis in Linux Machine
For ubuntu distributions
# if you use apt-get to install redis then use
sudo apt-get purge --auto-remove redis-server
# if you compiled redis manually then follow the
# steps below to remove it completely from linux/ubuntu
sudo service redis_version stop
# Now delete everything related to Redis server from /usr/local/bin/
sudo rm /usr/local/bin/redis-*
# Now delete Redis Configuration files directory and it’s content.
sudo rm -r /etc/redis/
# Delete existing Redis log files.
sudo rm /var/log/redis_*
# Delete existing Redis data directory and it’s content.
sudo rm -r /var/lib/redis/
# Delete existing Redis server init scripts
sudo rm /etc/init.d/redis_*
# Remove existing Redis PID files (Only if exists)
sudo rm /var/run/redis_*


