Optional SSL Configuration
The Metrics Server is not compatible with SSL if your Neurons for ITSM system has Windows authentication set up.
You can configure Neurons for ITSM for SSL. This configuration is optional. There are three scenarios:
•The Neurons for ITSM application database and the configuration database both use SSL. See Configuring SSL for the Configuration and Application Databases.
•The Neurons for ITSM application database uses SSL but the configuration database does not use SSL. See Configuring SSL for the Application Database Only.
•Neither the Neurons for ITSM application database nor the configuration database uses SSL. In this scenario, do not check SSL on any of the pages of the System Configuration Wizard.
For all fields in the System Configuration Wizard that ask for a server location, when using SSL, you must enter a fully-qualified domain name (FQDN). This is because SSL needs a certificate and the certificate authority requires an FQDN.
Configuring SSL for the Configuration and Application Databases
To configure both your Neurons for ITSM application database and the configuration database to use SSL, follow all of the steps in all of these sections:
•Configuring SSL in Microsoft IIS Manager
•Configuring SSL in the System Configuration Wizard
Before You Begin
•Ensure that https:\\localhost:443 displays the Microsoft IIS Manager welcome page.
•Ensure that your system has a valid certificate.
Configuring SSL in Microsoft IIS Manager
1.In Microsoft IIS Manager, navigate to Sites > Default Web Site and select SSL Settings.
2.On the SSL Settings page, check Require SSL and under client certificates, select Ignore.
3.Navigate to Sites > HEAT and select SSL Settings.
4.On the SSL Settings page, check Require SSL and under client certificates, select Ignore.
5.Navigate to Sites > CentralConfig and select SSL Settings.
6.On the SSL Settings page, check Require SSL and under client certificates, select Ignore.
7.Navigate to Sites > FRSSurveyProxy and select SSL Settings.
8.On the SSL Settings page, check Require SSL and under client certificates, select Ignore.
9.Add an SSL port by doing the following:
| a. | Navigate to Sites > Default Web Site, right click, and select Edit Bindings.... |
| b. | Click Add.... |
| c. | In the Add Site Binding dialog box, for the Type field, select HTTPS and in the SSL certificate field, select the certificate that you received from the certificate authority. The system automatically enters 443 for the port. |
| d. | In the IP Address field, enter a fully-qualified domain name. |
| e. | Click OK. |
10.Verify that you can access https://fully_qualified_domain_name.
Configuring SSL in the System Configuration Wizard
1.In the System Configuration Wizard, on the Configuration Application page, ensure that the value in the Configuration Server Domain Name field uses a fully-qualified domain name. Do not use a machine name.
Configuration Application Page

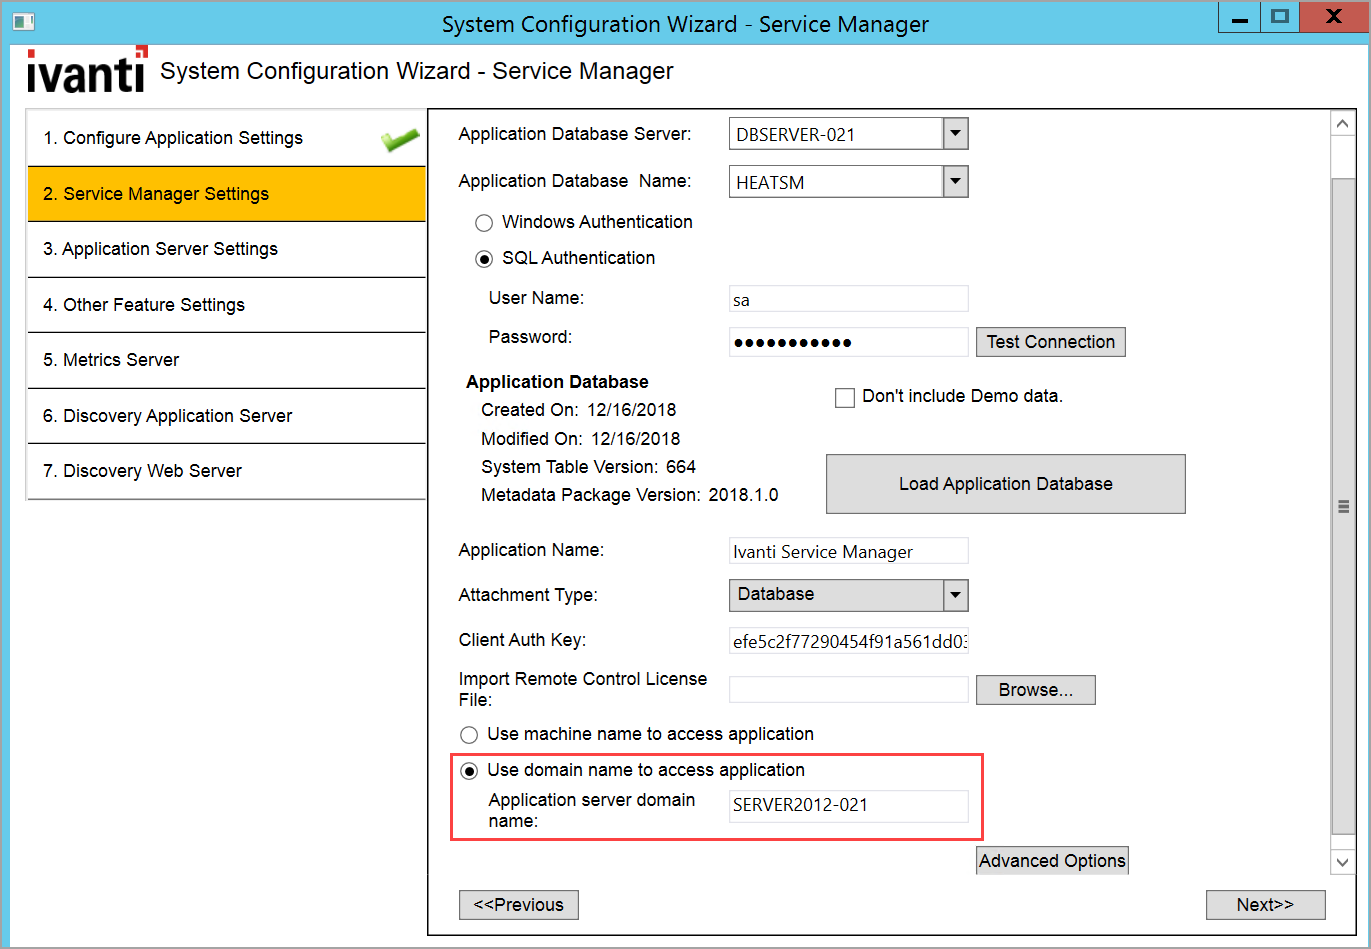
2.On the bottom of the Neurons for ITSM Application page, ensure that you check Use domain name to access Application and enter a fully-qualified domain name for the Neurons for ITSM application server. Do not use a machine name.
Neurons for ITSM Application Page
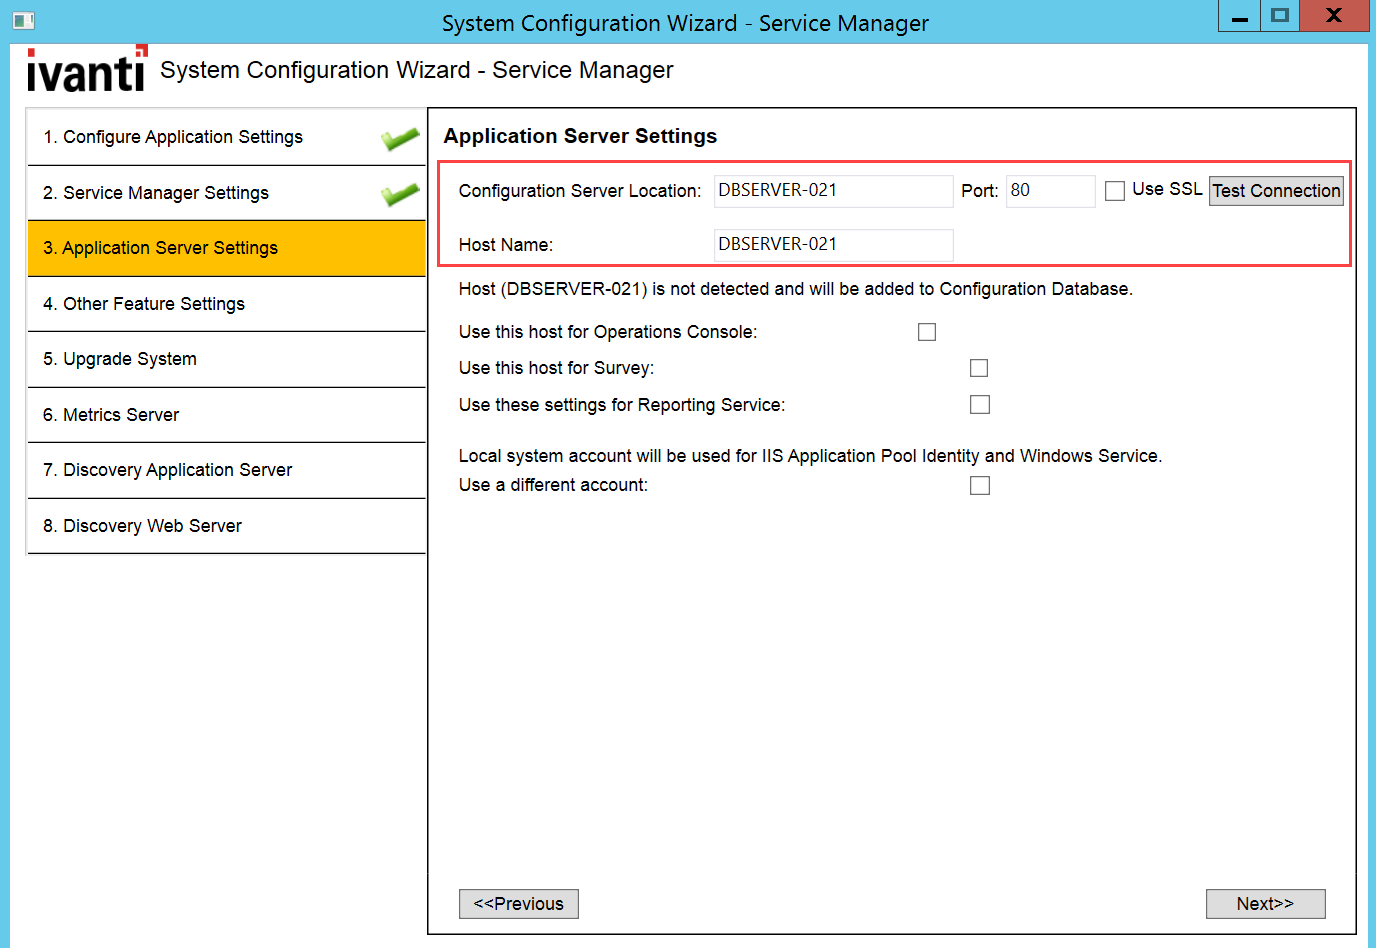
3.On the Application Server Settings page, do the following:
•Ensure that you enter the fully-qualified domain name in the Configuration Server Location field.
•Check Use SSL.
•Enter the fully-qualified domain name in the Host Name field.
Application Server Settings Page.
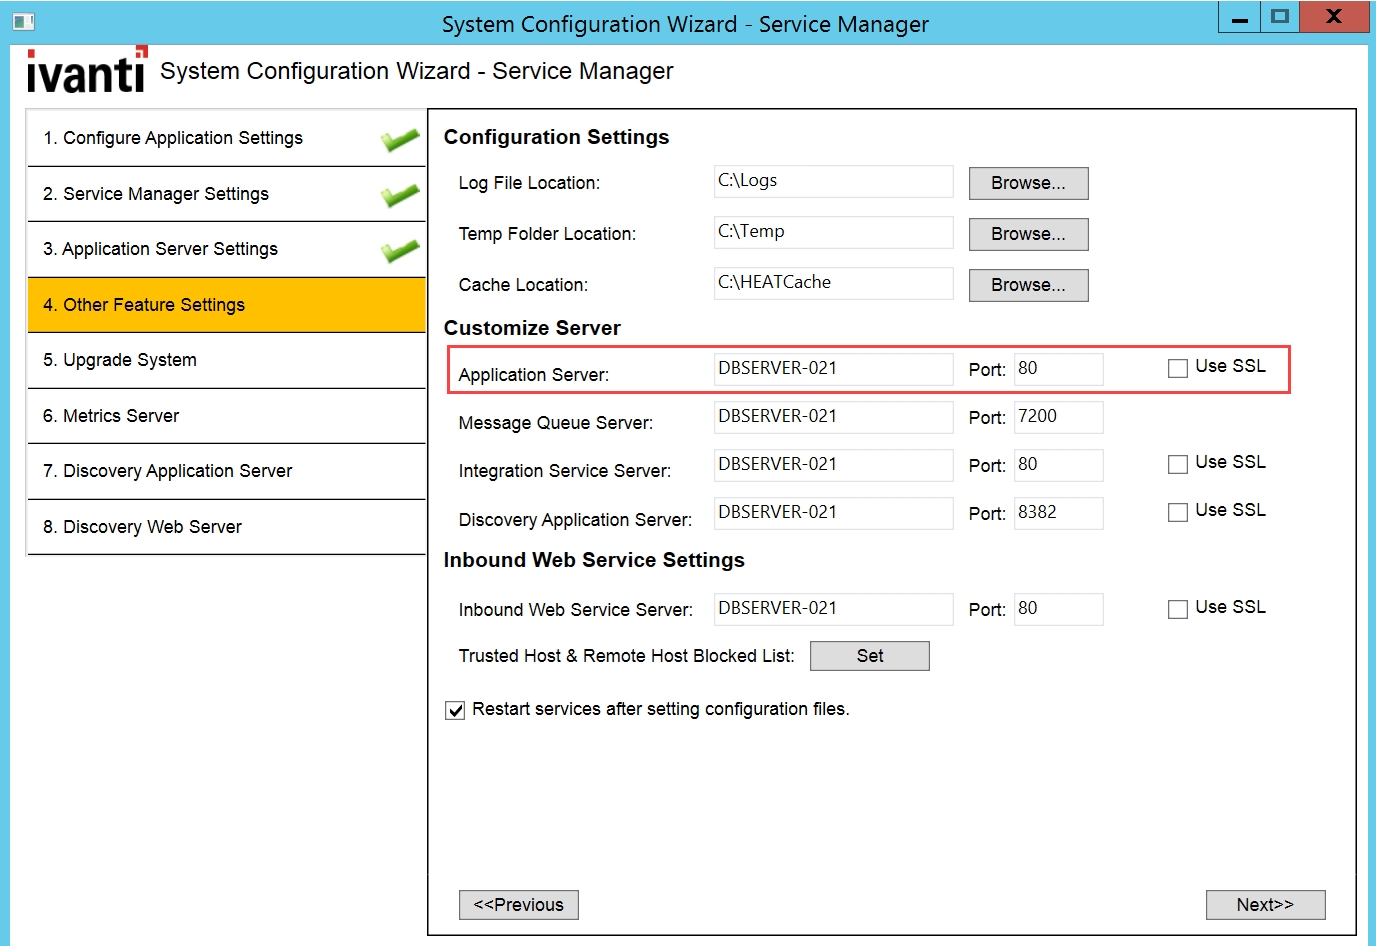
4.On the Other Feature Settings page, for the Neurons for ITSM application server, check Use SSL.
Other Feature Settings Page
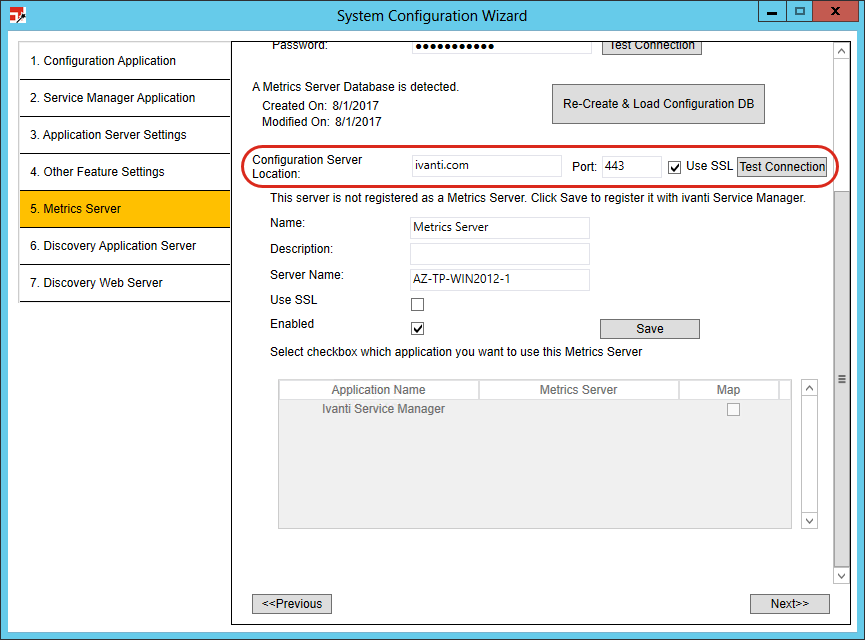
5.On the Metrics Server page, check Use SSL.
Metrics Server Page
Configuring SSL for the Application Database Only
To configure your Neurons for ITSM application database to use SSL but not the configuration database, follow all of the steps in all three sections:
•Configuring SSL in Microsoft IIS Manager
•Configuring SSL in the System Configuration Wizard
Before You Begin
•Ensure that https:\\localhost:443 displays the Microsoft IIS Manager welcome page.
•Ensure that your system has a valid certificate.
Configuring SSL in Microsoft IIS Manager
1.In Microsoft IIS Manager, navigate to Sites > Default Web Site and select SSL Settings
2.On the SSL Settings page, ensure that Require SSL is not checked. Under client certificates, select Ignore.
3.Navigate to Sites > HEAT and select SSL Settings.
4.On the SSL Settings page, check Require SSL and under client certificates, select Ignore.
5.Navigate to Sites > CentralConfig and select SSL Settings.
6.On the SSL Settings page, ensure that Require SSL is not checked. Under client certificates, select Ignore.
7.Navigate to Sites > FRSSurveyProxy and select SSL Settings.
8.On the SSL Settings page, check Require SSL and under client certificates, select Ignore.
9.Add an SSL port by doing the following:
| a. | Navigate to Sites > Default Web Site, right click, and select Edit Bindings.... |
| b. | Click Add.... |
| c. | In the Add Site Binding dialog box, for the Type field, select HTTPS and in the SSL certificate field, select the certificate that you received from the certificate authority. The system automatically enters 443 for the port. |
| d. | In the SSL certificate field, enter a fully-qualified domain name. |
| e. | Click OK. |
10.Double-click Configuration Editor.
The Configuration Editor dialog box opens.
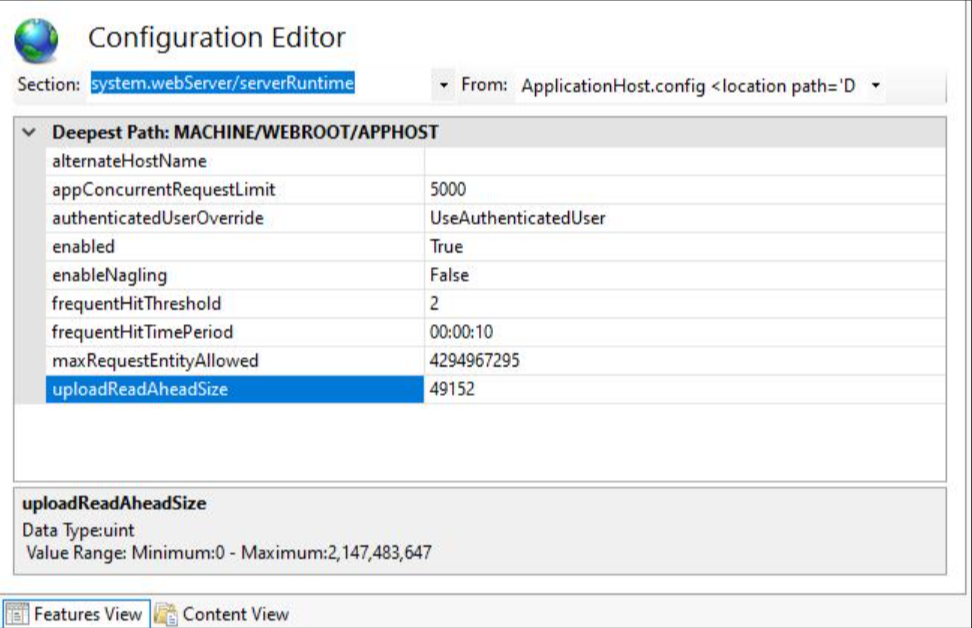
11.Select System.webServer and then select serverRuntime.
12.Modify the uploadReadAheadSize value to 2147483647.
13.Click Apply.
14.Verify if you can access https://local_host.
Configuring SSL in the System Configuration Wizard
1.In the System Configuration Wizard, on the Neurons for ITSM Application page, ensure that the Neurons for ITSM application database uses a fully-qualified domain name and not a machine name.
Neurons for ITSM Application Page
2.On the Application Server Settings page, do the following:
•Ensure that Use SSL is not checked.
•Ensure that you enter the fully-qualified domain name in the Configuration Server Location field.
•Ensure that you enter the host name, and not the fully-qualified domain name, in the Host Name field.
Application Server Settings Page
3.On the Other Feature Settings page, check Use SSL.
This is the only place in the System Configuration Wizard where you check Use SSL. Do not check Use SSL on any other page.
Other Feature Settings Page
Configuring SSL for Integration Service
Ivanti Integration Service by default configured to work on non-SSL port irrespective of the “SSL” check box is selected in System Config Wizard (SCW).
1.To make Integration Service work on SSL port, following steps to be performed on each server where Ivanti Integration Service is running.
2.Stop the Ivanti integration service.
3.Add the following entries at the end of appsettings.json of Integration Service.
The Default Path for Integration Service is “C:\Program Files\HEAT Software\HEAT\IntegrationServer\ appsettings.json”
"Kestrel": {
   "Endpoints": {
    "HttpsInlineCertFile": {
       "Url": "https://<IntegrationURL>:1213",
             "Certificate": {
          "Subject": "<SystemCertificate>",
          "Location": "LocalMachine
          "AllowInvalid": true
        }
       },
      }
     }
The IntegrationURL should be replaced with the actual integration URL configured in SCW. And the SystemCertificate should be replaced with the installed certificate name on server machine where the Integration Service is running.
4.Start the Integration Service.
5.Verify that https://<IntegrationURL>:1213/IntegrationService.svc is the correct URL.