Setting Up External Authentication with LDAP
To set up ITSM users for authentication via the Neurons Platform, refer to Setting up ITSM users for authentication via the Neurons Platform and Authentication. This feature is Early Access only and may not be available in your environment. For more information, please contact your Customer Success Manager.
•Setting Up Authentication for LDAP
Setting Up Authentication for LDAP
Use port 389 for LDAP (or port 636 for LDAPS). The protocol for LDAP is TCP.
1.From the Configuration Console, click Configure > Security Controls > Authentication Providers to open the Authentication Providers workspace.
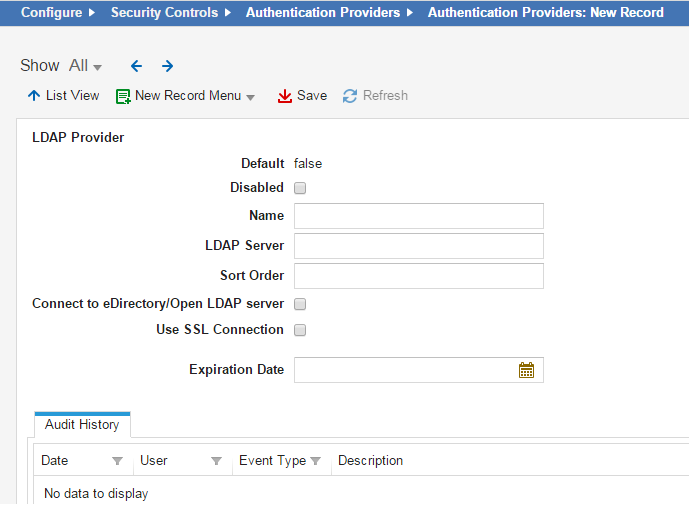
2.From the New Record Menu drop-down list, select New LDAP.
New LDAP Provider Page
3.Enter data into the fields.
| Field | Description |
|---|---|
| Default |
Specifies if this authentication provider is called.
Automatically set by the application. You change this in the list. To make this authentication provider the default, you must first change the Default setting for all other authentication providers to false and then change the Default setting for this authentication provider to true. |
| Disabled | Specifies if this authentication provider is disabled. |
|
Name |
The LDAP server name or alias. |
|
LDAP Server |
Name or IP address of the LDAP server used for authentication. If a non-standard LDAP port is used add it to the server name with a colon (serverName:port). |
|
Sort Order |
Specifies the sort order of this provider in relation to other providers assigned to a user. A value of 1 means that this provider is used first for authentication when logging in. If a login failure occurs (such as a server failure or incorrect password), the application uses the next provider in the sort order. The last successfully authenticated login is highlighted in the Enable External Auth area of the employee record. Use this field only if multiple authentication providers are configured. |
|
Connect to eDirectory Open LDAP Server: |
Connects to eDirectory and the Open LDAP server. |
|
Use SSL Connection |
Allows a connection to a LDAPS server. The target LDAP server should also be configured correctly as a trusted certificate authority. If using an LDAPS server that is not a trusted certificate authority, use the Browse button to locate a certificate file, which should contain the fully qualified domain name path of the LDAP profile. |
|
Expiration Date |
Specifies the date that the certificate expires. This field merely stores the date so that you can see when the current one expires and get another certificate before or when it expires. |
| Auto Provision Role |
Only displays if you check Auto Provisioning.
The role associated with the new user. |
| Auto Provision Status |
Only displays if you check Auto Provisioning.
|
| Auto Provision Team |
Only displays if you check Auto Provisioning.
The team associated with the new user. |
| Auto Provision User Business Object |
Only displays if you check Auto Provisioning.
The type of user record to create. Can be either employee or external contact. |
4.Click Save.
5.Log in to the Service Desk Console.
6.Open the Employee workspace. The application displays a list of employees.
7.Open the employee record to set up authentication for.
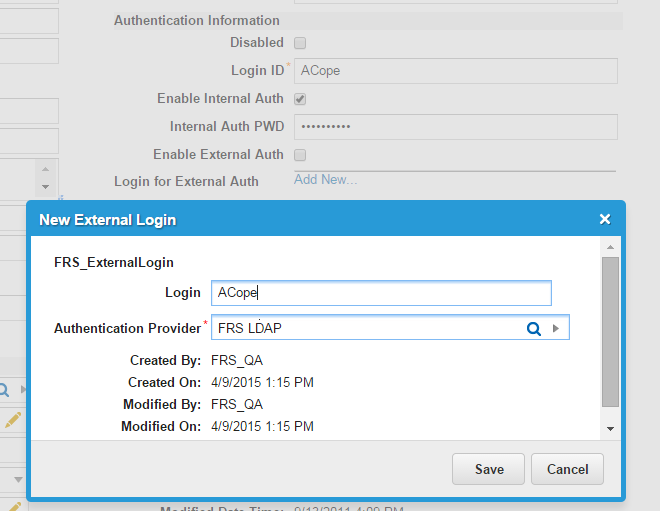
8.From the employee record, reference the newly created authentication provider. Ensure the following:
•The value of the Login ID field should be the ID to access LDAP (required).
•The Enable External Auth field is checked.
•The Login for External Auth field is populated and references the newly created authentication provider.
Edit External Login Window
Using LDAP Synchronization
If you enable external authentication, you must synchronize employee profiles from the LDAP directory server. For more information about LDAP synchronization, refer to Configuring LDAP Settings.

