Exchange Calendar Configuration
With the Exchange Calendar Configuration, administrators can synchronize the calendar items in Neurons for ITSM with your Office 365 calendar. This helps you receive notifications in your Office 365 account when a calendar item is created, deleted, or updated in Neurons for ITSM.
For Exchange calendar configuration, administrators can use either Exchange Web Service (EWS) or Microsoft Graph API as per their preference.
Prerequisites
Before the configuration of exchange calendar, ensure the following requirements are met:
•You must set up an application in the Azure portal to generate credentials such as Tenant ID, Client ID, and Client Secret Key, which are required for the Exchange Calendar configuration. You can obtain these credentials from Azure Active Directory, where the application is registered.
•In the Azure portal, go to Manage > API permissions > Microsoft Graph, and grant read and write permissions for the calendar.
For more information on application registration and calendar read/write permissions, see Importing Employees using the Azure AD Connector.
Configuring the Exchange Calendar
1.Log in to Neurons for ITSM as an Administrator.
2.From the workspace menu, click More and select Exchange Calendar Configuration.
The Exchange Calendar Configuration workspace is displayed, which have a default out-of-the-box configured record.
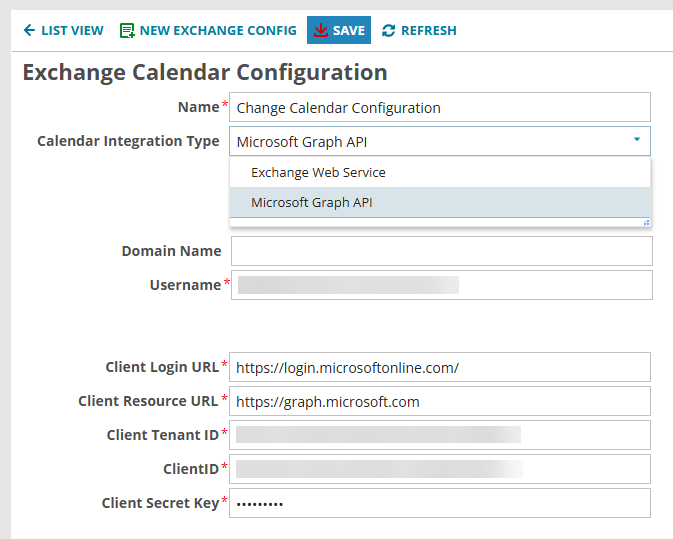
3.Double-click the default record to view and edit it.
Although you can create a New Exchange Configuration account, it is not advisable to do so. We suggest you to use the default record by editing the necessary fields, as all the required business rules for it are setup in the backend.
| Field | Description/Value |
|---|---|
| Name | Set out-of-the-box as Change Calendar Configuration. Do not modify the name. |
|
Calendar Integration Type |
From the dropdown, select either Exchange Web Service or Microsoft Graph API based on your preference. |
| Domain Name |
Provide a name for the domain (optional). This field is applicable for both Exchange Web Service and Microsoft Graph API. |
|
Username |
Enter the email address associated with the Exchange Calendar account. For example, [email protected]. This field is applicable for both Exchange Web Service and Microsoft Graph API. |
|
Password |
The password set for the user account. Do not set a new password here, provide the password of the Office 365 account that you are configuring for. This field is applicable only for Exchange Web Service with Plain as authentication method. |
|
Authentication |
Select either AuthLogin or Plain. This field is applicable only for Exchange Web Service. |
| Server URL |
Enter the URL of the Exchange Calendar server, which is https://outlook.office365.com/ This field is applicable only for Exchange Web Service. |
|
Folder Name |
Set out-of-the-box as calendar. Do not modify the name. This field is applicable only for Exchange Web Service. |
|
Exchange Version |
From the dropdown, select the Microsoft Exchange Version you are using. This field is applicable only for Exchange Web Service. |
|
Client Login URL |
Enter the endpoint URL, which is https://login.microsoftonline.com/. This can be obtained from the Azure Active Directory where you have registered an application. This field is applicable for both Exchange Web Service and Microsoft Graph API. For Exchange Web Service, this field shows only when AuthLogin is selected as authentication method. |
|
Client Resource URL |
For Exchange Web Service > AuthLogin authentication, enter https://outlook.office365.com. For Microsoft Graph API, enter https://graph.microsoft.com. This field is applicable for both Exchange Web Service and Microsoft Graph API. For Exchange Web Service, this field shows only when AuthLogin is selected as authentication method. |
|
Client Tenant ID |
Enter the directory (tenant) ID. This can be obtained from the Azure Active Directory where you have registered an application. See Prerequisites. This field is applicable for both Exchange Web Service and Microsoft Graph API. For Exchange Web Service, this field shows only when AuthLogin is selected as authentication method. |
|
Client ID |
Enter the application ID. This can be obtained from the Azure Active Directory where you have registered an application. See Prerequisites. This field is applicable for both Exchange Web Service and Microsoft Graph API. For Exchange Web Service, this field shows only when AuthLogin is selected as authentication method. |
|
Client Secret Key |
Enter the secret login key. This can be obtained from the Azure Active Directory where you have registered an application. See Prerequisites. This field is applicable for both Exchange Web Service and Microsoft Graph API. For Exchange Web Service, this field shows only when AuthLogin is selected as authentication method. |
Exchange Web Service using Auth Login
If you use Exchange Web Service for calendar integration type with AuthLogin as the Authentication, you need to activate/deactivate the following Web Service Connections and Workflows:
By default, Web Service Connections are deactivated.
1.Log in to Neurons for ITSM with Administrator user role.
2.Open the Configuration console > Extend > Integration Tools > Web Service Connections.
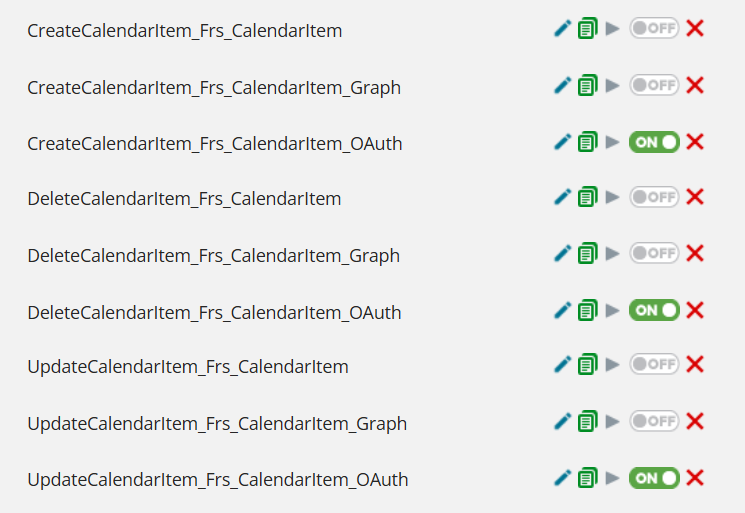
3.Activate the following connections using the toggle button:
•CreateCalendarItem_Frs_CalendarItem_OAuth
•DeleteCalendarItem_Frs_CalendarItem_OAuth
•UpdateCalendarItem_Frs_CalendarItem_OAuth
4.Ensure only the OAuth connections are activated. Deactivate the following other connections configured for Plain authentication and Microsoft Graph API using the toggle button:
•CreateCalendarItem_Frs_CalendarItem
•DeleteCalendarItem_Frs_CalendarItem
•UpdateCalendarItem_Frs_CalendarItem
•CreateCalendarItem_Frs_CalendarItem_Graph
•DeleteCalendarItem_Frs_CalendarItem_Graph
•UpdateCalendarItem_Frs_CalendarItem_Graph
5.From the Configuration console > Business Object > Frs_CalendarItem > Workflows.
6.Click the Delete icon  at the end of the row associated with the following fields to delete.
•Create Exchange Calendar Item
•Delete Calendar Item for Change
•Update Exchange Calendar Item
•Create Exchange Calendar Item Graph
•Delete Calendar Item for Change Graph
•Update Exchange Calendar Item Graph
7.Click Add New and add the following workflows:
•Create Exchange Calendar Item OAuth
•Delete Calendar Item for Change OAuth
•Update Exchange Calendar Item OAuth
Microsoft Graph API
If you use Microsoft Graph API for calendar integration type, you need to enable/disable the following Web Service Connections and Workflows:
By default, the Web Service Connections are deactivated.
1.Log in to Neurons for ITSM with Administrator user role.
2.Open the Configuration console > Extend > Integration Tools > Web Service Connections.
3.Activate the following connections using the toggle button:
•CreateCalendarItem_Frs_CalendarItem_Graph
•DeleteCalendarItem_Frs_CalendarItem_Graph
•UpdateCalendarItem_Frs_CalendarItem_Graph
4.Ensure only the Microsoft Graph API connections are activated. Deactivate the following other connections configured for Plain and Auth authentications using the toggle button:
•CreateCalendarItem_Frs_CalendarItem
•DeleteCalendarItem_Frs_CalendarItem
•UpdateCalendarItem_Frs_CalendarItem
•CreateCalendarItem_Frs_CalendarItem_OAuth
•DeleteCalendarItem_Frs_CalendarItem_OAuth
•UpdateCalendarItem_Frs_CalendarItem_OAuth
5.From the Configuration console > Business Object > Frs_CalendarItem > Workflows.
6.Click the Delete icon at the end of the row associated with the following fields to delete.
•Create Exchange Calendar Item
•Delete Calendar Item for Change
•Update Exchange Calendar Item
•Create Exchange Calendar Item OAuth
•Delete Calendar Item for Change OAuth
•Update Exchange Calendar Item OAuth
7.Click Add New and add the following workflows:
•Create Exchange Calendar Item Graph
•Delete Calendar Item for Change Graph
•Update Exchange Calendar Item Graph
For more information on how to synchronize the calendar items in Neurons for ITSM with your Office 365 calendar using Exchange Web Service or Microsoft Graph API, see Synchronize Calendar Item in ITSM with Office 365 using Exchange Calendar.