Voice
Preparing for Incoming Calls
Voice applications implement call processing scenarios specific to your business needs. Ivanti Voice provides multiple voice applications used to implement various call processing scenarios.
In addition, Ivanti Voice has a development tool called Application Builder that enables you to create new voice applications and edit existing applications.
After creating a voice application, you will use the Applications Selector to configure how and when Ivanti Voice uses the application.
Voice Application Support
Voice applications are telephony applications that answer calls and automate interactions with callers. Ivanti Voice uses multiple voice applications, each dictating a different call processing scenario that can include:
•Caller identification and authentication - The voice application can connect to customer information stored in a database and use the data to verify the caller’s identity. The voice application can also display the data to the contact center agent who receives the call, which saves time since the agents does not have to collect the information from the caller.
•Prompts - Communicate automatically with callers using audio prompts generated either by recorded audio files or a text-to-speech (TTS) engine. Use prompts to greet callers, convey menu options, request data, play hold music, etc. If your contact center receives calls from speakers of foreign languages, configure Ivanti Voice to dynamically play prompts in multiple languages.
•Data collection - Callers can input data into the voice application either by pressing numbers on a phone keypad or by speaking, if you have an integrated Automatic Speech Recognition (ASR) application. The voice application attaches this data to the call by setting call properties.
•Call routing - Call processing scenarios end with the voice application routing the call to a destination, which is usually an agent’s phone or voice mailbox. The voice application routes the call according to routing rules, which are conditional instructions that determine the destination of a call. Refer to Organizing the Contact Center for details. You can configure the voice application to route a call to:
•The agent who is most qualified to handle the call.
•The agent who has not taken a call for the longest period.
•The first available agent.
•Messaging - Callers can use the voice application to send voice mail and email to Ivanti Voice users.
Application Builder
The Application Builder is a development tool that lets you create multilingual voice applications by connecting and configuring blocks of code called building blocks (also referred to as "blocks").
The Ivanti Voice online help contains tutorials that demonstrate how to build a voice application. Refer to the online help topic "Voice Application Design: Application Builder: Application Builder Demonstrations" to view the tutorials.
Applications Page
To open Application Builder click Start > Programs > Ivanti > Communications Management > Management Portal > Application Builder.
Ivanti Voice ships with Common Data Speakers and Unified Messaging prompts in English (both US and UK). A Localization kit is available to enable you to expand your Ivanti Voice deployment to include other languages.
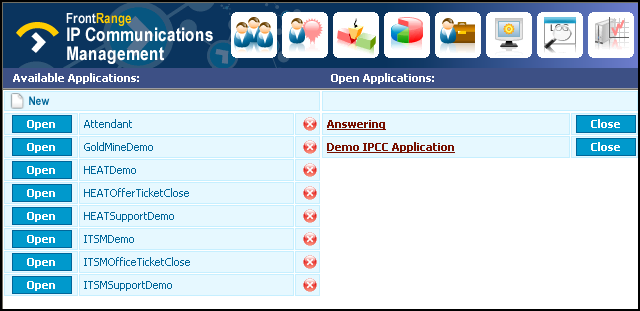
The applications page opens, displaying two columns:
•Available Applications - A list of applications available on this Ivanti Voice server.
•Open Applications - All applications currently open in the Application Builder. When you open an application, the application remains open until you close it. If you close the browser with the application still open, Application Builder closes the open application 20 minutes after you close the internet browser.
Use the applications page to:
•Open an Application. When you open an application, Ivanti Voice removes it from the list of applications in the Available Applications column.
•Delete an application.
•Close an application. When you close an open application, Ivanti Voice again displays the application in the Available Applications column.
•Create a New Application.
Application Building Blocks
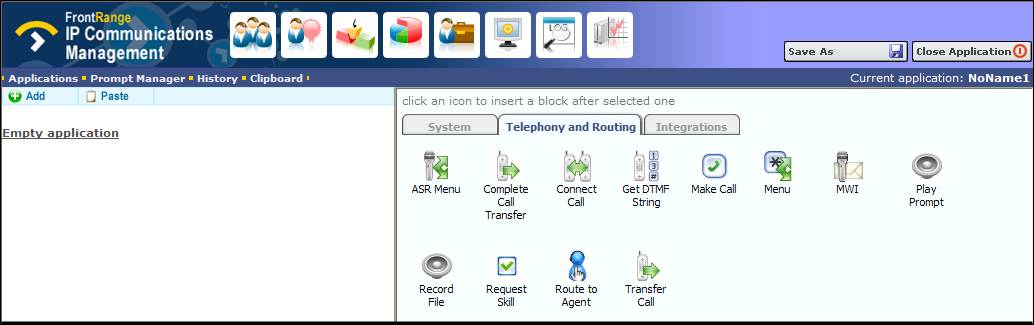
Application Builder has a graphical user interface you use to connect blocks to build your voice application. This is done within a flowchart that represents the sequence of call processing events in the call scenario. Different types of blocks perform different functions, such as recording voice messages, playing prompts, collecting input, etc.
Blocks are listed on two tabs: System and Telephony and Routing. If you choose to install integration options, you will also see the Integration tab and blocks.
For a complete list of blocks with block descriptions and configuration information, refer to the online help topic "Voice Application Design: Building Block Definitions."
Each block has its own configuration parameters, which appear in the edit pane when the block is added to the flowchart, or selected within the flowchart. The parameters specify, for example, which prompts to play, where to send voice mail, etc.
Create a New Application
The following procedure describes how to create a new voice application. Additional topics which explain in greater detail important aspects of creating a voice application include:
•Working in the Application Flowchart.
•Adding blocks to Conditional Exits.
•Working with Prompts.
•Best practices for creating voice applications. (Best Practices: Voice Applications)
To Create a New Application:
1.On the applications page, click the New icon above the list of applications. The new application opens. Notice that the flowchart is currently empty.
2.Click a tab in the edit pane to display the desired list of blocks.
3.Click a block icon. The block is added to the flowchart with the parameters displayed in the edit pane.
4.Configure the parameters for the block.
5.To add the next block to the flowchart, click the Add icon in the toolbar above the flowchart. The blocks are again displayed in the edit pane.
6.Click a block icon. The new block is added below the selected block in the flowchart.
7.Continue to add the blocks needed to complete the call flow.
8.When all blocks have been added and configured click the Save As button above the edit pane.
9.In the Save application as dialog box, type the name for the new application, then click
Save as.
10.Click the Close Application button. Your new application appears in the list on the applications page.
Open an Application
On the applications page, open an application by clicking the Open button next to the desired application. The left side displays the application flowchart, which depicts the flow of operation for the application. Labeled icons in the flowchart display the blocks comprising the application. The right side of the builder page features the edit pane, which displays editable fields of the block selected in the flowchart.
Working in the Application Flowchart
In the application flowchart, you can:
•Expand and collapse the branches in the flowchart by clicking the plus and minus signs.
•View and edit the properties of a block by selecting the block in the flowchart. The edit pane displays the editable properties of the selected block.
•Edit the flowchart by selecting a block and using the toolbar above the flowchart:

•Add - Displays all blocks in the edit pane. Select a block from the edit pane and the block is inserted into the flowchart below the currently selected block in the flowchart.
•Remove - Removes the selected block from the flowchart.
•Cut - Removes the selected block from the flowchart and places it on the clipboard.
•Copy - Copies the selected block to the clipboard.
•Paste - Inserts the clipboard contents below the selected block.
•Clipboard - Located above the toolbar; displays the last block you copied or cut.
•Applications - Located above the toolbar; returns you to the applications page, displaying the list of applications.
•Prompt Manager - Located above the toolbar; opens the Prompt Manager dialog box. Refer to the Prompts section for details.
•History - Located above the toolbar; enables you to retrieve an unsaved version of the open application. If the Management Portal session times out (after 20 minutes with no activity), the unsaved application is retrievable by clicking the History link and selecting the version in the Autosaved versions dialog box. You can then save your application by clicking Update and Commit Changes.
•Find text. When working in a complex application, it may be helpful to search for specific text within the flowchart. Click anywhere in the flowchart, press Ctrl+F to open a Find dialog box, type the text you want to search for, then click Next.
As you make changes to the flowchart and edit pane, the Application Builder displays one or more the following buttons above the edit pane:
•Commit Changes - Saves changes to the application. Click the appropriate Update button (there may be several on the edit pane) before clicking the Commit Changes button.
•Discard Changes - Discards the changes you made since last clicking the Commit Changes button.
•Save As - Saves the application under the specified name. You can also use this button to save a version of an existing application; this is helpful if you want to use the existing application as a basis for creating a new application.
To Add a Block to the Beginning of the Application Flowchart:
The Application Builder adds new blocks below the selected block in the flowchart, but it is possible to add a block at the beginning of the flowchart, above existing blocks.
1.Select the first block in the flowchart.
2.Click the Add icon in the toolbar above the flowchart.
3.In the edit pane, click the block you want to add to the beginning of the flowchart. The block appears in the flowchart beneath the first block.
4.Select the first block in the flowchart.
5.Click the Cut icon. The block is removed from the flowchart and copied to the clipboard. The block you added previously is now the first block, and is also the selected block.
6.Click the Paste icon. The block you cut is placed in the flowchart as the second block.
Conditional Exits
The voice application typically processes blocks sequentially; however, some blocks have multiple paths the voice application can take after processing the block. These paths are called conditional exits. Conditional exits enable you to determine how the voice application responds to certain conditions that may occur during the processing of a call, such as a database not opening when needed or an agent not responding to a call.
Each conditional exit appears in the flowchart as green text beneath the block to which it applies. A conditional exit may contain a flow of blocks to handle specific situations.
To Add Blocks to a Conditional Exit:
1.In the flowchart, select the conditional exit. The edit pane displays the available blocks.
2.In the edit pane, click to select the block that will start the flow initiated by the conditional exit. The block appears below the conditional exit in the flowchart.
3.Configure the block parameters.
4.Add more blocks as needed.
5.Click the Commit Changes button.
Prompts
Many blocks use voice prompts to request input from callers, inform callers about events, or play music while callers are waiting for an agent. These prompts can be either pre-recorded audio files or static prompts that Ivanti Voice generates using Text-to-Speech (TTS) functionality from textual prompt descriptions.
Ivanti recommends using TTS prompts during voice application development to focus on application functionality (rather than constant prompt recording and editing), and replacing the TTS prompts with prerecorded prompts once development is complete. For more information on TTS applications, refer to the Text-to-Speech (TTS) Voice Specification section.
The Prompt Manager dialog box in Application Builder (click the Prompt Manager link above the flowchart in an open application) lists all prompts the open voice application uses, and lets you set the languages in which the voice application can play prompts.
Languages
In the Prompt Manager dialog box, on the Languages tab, the Languages in use table lists the languages the voice application supports (i.e., every language in which the voice application can generate or play prompts).
The start-up language for an application is defined in the Default Language field. This is also the language used to display prompt contents in blocks, if the translation for that prompt exists in the application (if not, the prompt Description field will not display content). During run time, the language can be changed using the Set Prompt Language block (refer to the online help topic "Voice Application Design: Building Block Definitions: Set Prompt Language Block"). For example, if the Set Prompt Language block sets the voice application language to German, the voice application automatically plays the version of the prompt configured for German in the Prompt Manager dialog box.
To enable Ivanti Voice to generate prompts in a different language, install a TTS engine for that language. Note that a TTS engine is a third party software product; Ivanti Voice does not supply any TTS engines.
Languages can be added to the Languages in use table.
To Add a Language to the List:
1.In the Prompt Manager dialog box, on the Languages tab, select the language in the drop-down list below the Languages in use table.

2.Click the Add button.
To Remove a Language from the List:
•Click the red x icon to the right of the language.
Add Prompts
On the Prompts tab of the Prompt Manager dialog box, all prompts the voice application blocks can use are listed within a table. The left side lists the prompt language and the right side displays the prompt content. You can use the Prompt Manager to add and edit prompts.
To Add a Prompt to an Application or Edit a Prompt:
1.Click the Prompt Manager link above the flowchart in an open application. The Prompt Manager dialog box opens.
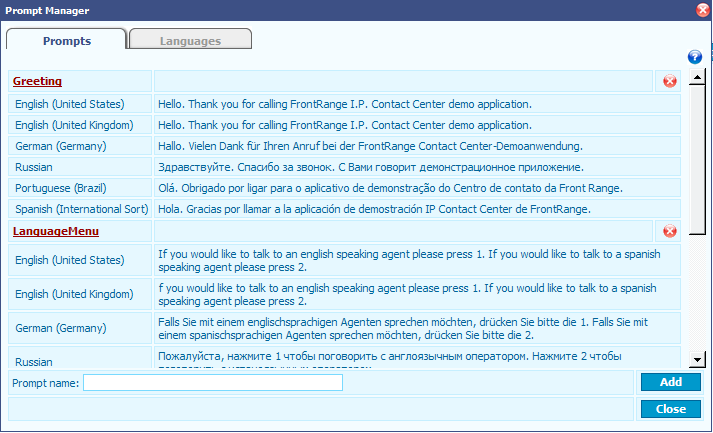
2.On the Prompts tab, type a name for the prompt in the Prompt name field (at the bottom).
3.Click the Add button. An new prompt appears in the table.
4.To configure what the prompt will play, click the prompt link. The Prompt Editor dialog box opens.
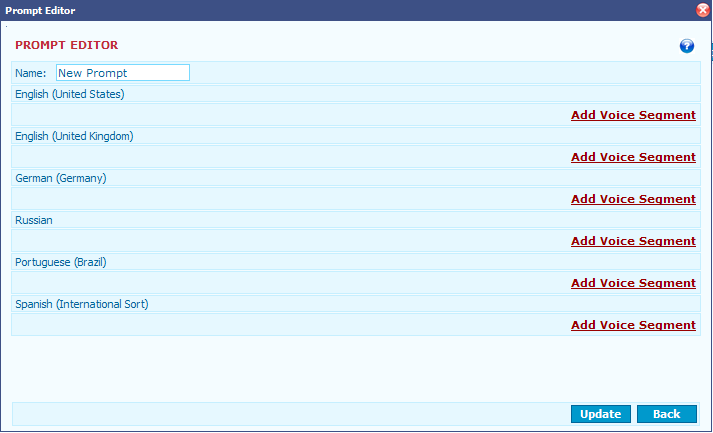
5.The Prompt Editor dialog box lists all languages from the Prompt Manager Languages tab (refer to the Languages section), enabling you to configure a version of the prompt in every language the voice application supports. Click the Add Voice Segment link to the right of the language.
6.In the drop-down list of the first field in the row, select the prompt segment type you want to configure (refer to the Prompt Segment Types and Descriptions section for details of each option). The screen refreshes to display fields relevant to the selected prompt segment.

7.Complete the fields for the prompt segment.
•Ivanti recommends using Voice segment types for most prompts.
•If you selected a Voice prompt segment, you can upload a .wav file for this segment by clicking the yellow folder icon that appears (this icon will only appear for Voice prompt segment types). After the file has been uploaded, a Play voice file icon will appear: click the icon to listen to the voice file.
•If needed, click the green + icon to add more prompt segments for the language.
•To delete a prompt segment, click the red x icon.
8.Repeat steps 5 through 7 to configure the prompt segments for each language for the prompt.
9.Click the Update button to apply the changes.
10.Click the Back button. The content of the prompt is displayed below the prompt name in the table. This prompt can now be used in blocks in the open application.
To Delete a Prompt from the List:
•Click the red x icon to the right of the prompt name.
To Edit an Existing Prompt:
•Click the prompt link, which opens the Prompt Editor dialog box, then make the necessary changes.
Prompt Segment Types and Descriptions
Each row of the Prompt Editor dialog box contains fields pertaining to prompt segments, which determine what the prompt plays for a particular language. The values of the prompt segment fields consist of static values and variables (such as interaction properties). There may be more than one prompt segment per language. When processing the prompt, the voice application reads the prompt segments in the order in which they are listed beneath each language, either by playing pre-recorded audio files or using the Common Data Speaker (CDS) functionality to read variables and the Text to Speech (TTS) functionality to read text.
The CDS functionality cannot play ordinals with more than ten digits or numbers with more than fifteen digits.
The following table describes each prompt segment type and its corresponding fields.
Ivanti recommends using Voice segment types for most prompts.
Prompt Segment Types | Descriptions and Fields |
Voice | A static voice prompt file. If the file does not exist, it is rendered automatically from text in the Content field, using an installed TTS engine for the language. To upload a .wav file for this segment, click the yellow folder icon (this icon only appears for Voice prompt segment types). After the file has been uploaded, a Play voice file icon appears: click the icon to listen to the voice file. |
Number | A number read by the CDS. This option has the following fields: •Property - The name of the interaction property containing the number. •Precision - The number of digits following the decimal point to be read by the CDS. The Ivanti Voice server rounds the number to the specified decimal place before playing. For example, 22.63 with a Precision value of 0 will be rounded to 23; 22.67 with a Precision value of 1 will be rounded to 22.7. •Gender/Category - Language-specific options (this field is not available for all languages). |
Ordinal | An ordinal (position in a numbered series) read by the CDS. This option has the following fields: •Property - The name of the interaction property containing the ordinal. •Gender/Category - Language-specific options (this field is not available for all languages). |
Currency | A monetary value with currency type read by the CDS. •Property - The name of the interaction property containing the monetary value. •Currency - The type of currency. |
Date | A calendar date read by the CDS. •Property - The name of the interaction property containing the date. •Format - The format of the date (optional); the default is %A%d%B%Y. May contain the following elements: - %A - Weekday name - %B - Month name (00-11) - %d - Day of month as decimal number (01 - 31) - %H - Hour in 24-hour format (00 - 23) - %M - Minute as decimal number (00 - 59) - %S - Second as decimal number (00 - 59) - %y - Year without century, as decimal number (00 - 99) - %Y - Year with century, as decimal number Entries are case-sensitive. |
Time | A timestamp read by the CDS. •Property - The name of the interaction property containing the timestamp. •Format - The format of the timestamp (optional); the default is %H%M%S. Entries are case-sensitive. |
Phone | A telephone number read by the CDS. •Property - The name of the interaction property containing the phone number. |
Characters | A string read by the CDS, character-by-character (spelled out). •Property - Enter the name of the interaction property containing the string to spell. •Case sensitive - Use this option to differentiate between upper-case and lower-case letters: if you select Yes, Uppercase will be stated for uppercase letters (lower case letters are indicated by the absence of the word Uppercase); if you select No, no differentiation will be stated. •Use phonetic - Use this option to enable English phonetic spelling (also known as the NATO phonetic alphabet) where words are utilized to represent the letters of the alphabet (such as alpha for a, bravo for b, etc.). |
Text | Text dynamically read by a TTS engine. •Property - Enter the name of the interaction property containing the text to be read. |
Local Voice File | The location of a prerecorded audio file the voice application plays, for prompts that can be re-recorded by using the Record File block, or modified by another application. •File path - The location of the folder containing the audio file. |
Select a Prompt
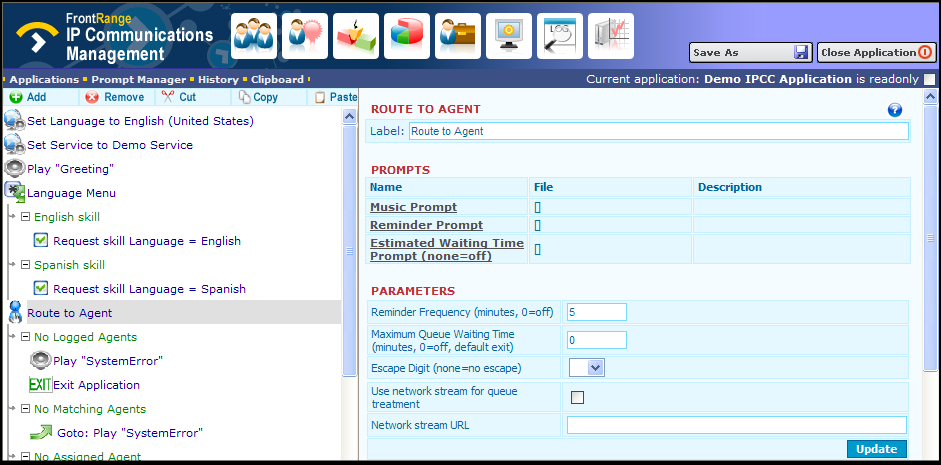
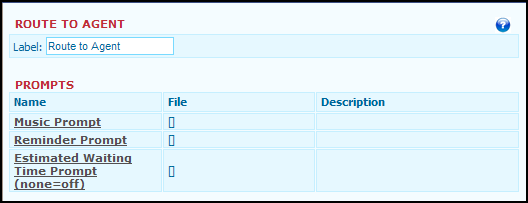
Blocks may use multiple prompts. For example, the Route to Agent block uses one prompt to play hold music, a second prompt to play a reminder message that repeats at specific intervals, and a third prompt that announces the estimated time it will take for an agent to answer the call.
If a block uses prompts, the edit pane for that block displays a Prompts table that lists all prompts for the block. The Prompts table contains the following columns:
•Name - The name reflects the purpose of the prompt. For example, the Route to Agent block uses the Music Prompt for hold music, the Reminder Prompt for the reminder message, and the Estimated Wait Time Prompt for the estimated time it will take an agent to answer the call. The prompt name cannot be changed.
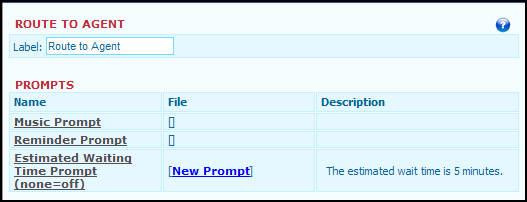
•File - The actual prompt the block uses. This is the name typed in the Prompt name field when it was added to the application and can be changed when editing the prompt. If a prompt has not yet been selected, empty brackets are displayed in the File field.
•Description - A read-only display of the prompt content (this is the message the prompt will play).
From the Prompts table, you can open the Prompt Browser dialog box to select the prompt Ivanti Voice plays for each purpose.
To Select a Prompt for Use in an Application:
1.In the edit pane of the block containing the prompt, click the link in the Name column of the Prompts table. For example, if you want to configure the hold music for the Route to Agent block, click the Music Prompt link. The Prompt Browser dialog box opens.
2.In the Prompt Browser dialog box, click the green + icon next to the prompt you want to use.

If no prompts are listed, then no prompts have been added to this application. Click the Add/Remove/Edit Prompts button to add prompts (you can also use this button to edit or delete existing prompts or you can click the Edit link to the right of an existing prompt). Refer to the "Add Prompts" section for information about adding, deleting, or editing prompts.
3.The Prompt Browser dialog box closes, and the name and description of the prompt you selected appears in the File and Description columns of the Prompts table. Notice you can click the link in the File column to edit the prompt if needed.
Most blocks do not have default prompts. The caller hears silence if the block is supposed to play a prompt but the prompt is not configured. Optional voice prompts are specifically marked as optional.
Prompt Storage
Prerecorded prompt files should be placed in the C:\Program Files\FrontRange Solutions\IPCommunicationsManagement\Applications\<applicationname>\Prompts\<languageID>\Recorded folder. Ivanti Voice automatically encodes the prompt into the required voice format as needed.
If you want to provide your own prompts encoded for each required format, place the files in the C:\Program Files\FrontRange Solutions\IPCommunicationsManagement\Applications\
<application name>\Prompts\<languageID>\<codec> folder.
Prerecorded Prompts
To Add Prerecorded Prompts to an Application:
1.Use a third-party audio application to record the prompt in each language the voice application uses; save the recordings as audio files.
2.Use a third-party application to encode a version of the audio file using each codec the voice application uses.
3.Copy the audio files into the appropriate directory (mentioned above in Prompt Storage).
4.Click the Update and Commit Changes buttons.
Best Practices: Voice Applications
Best Practice | Example/Comments |
Limit the number of options to four or five per branch. | It is acceptable to list four or five options that are available for selection by callers. If the list goes beyond five items, callers lose patience and interest. |
Minimize demands on the caller's memory. | First say the option, then specify the option key. For example, For Customer Care, press 1. |
Organize menu choices in a way that saves time for the caller. | Present the most likely menu choice first, the second most likely next, etc. |
Keep menu descriptions brief and to the point. | Instead of: If you wish to speak with a representative concerning your recent bill, press 4, use: For billing inquiries, press 4. |
Keep caller touch-tone input to a minimum. | It is acceptable to ask callers to enter a zip code or account number (even 16 to 20 characters long). It is inadvisable to ask callers to enter their complete address. |
Keep menu options consistent throughout a script and a company (common navigation techniques). | If the star (asterisk) key is used in one part of the voice application to reach an agent, use this consistently throughout the application. |
Use words, terms, and expressions that are commonly understood by the public. | Avoid using company or even industry-specific jargon (unless you are sure the customer is familiar with it): for example, use account number for the caller’s account rather than your company’s terminology for the account. |
Make it easy for callers to transfer from the voice application to an agent. | Tell callers throughout the script which key to press to transfer from the application to an agent. |
Select a voice with an accent that is acceptable to the customer base. | Avoid accents that may be difficult to understand outside the region. |
Set caller expectations for all fulfillment and actions requested within the voice application. | If it will take 10 business days for a copy of a requested document to reach a caller, provide that time frame. |
Do not use humor in voice applications. | Humor is personal (and culture-specific) - what is funny to one person may not be funny to someone else. |
Provide confirmation and feedback announcements. | If confirmation is needed, read back a caller’s entry to allow the caller to confirm it. Provide a feedback announcement such as Please wait while your information is located when necessary to apprise the caller that the information entered is being processed. |
Application Builder Applications: File Locations
Ivanti Voice stores voice applications you build with Application Builder in subfolders of the Program Files\FrontRange Solutions\IP Communications Management\Applications directory. Each application has a separate folder that shares its name. Inside the folder is an application.xml file containing the application flow, prompt directories, and automatic backups of unsaved application files Ivanti Voice creates if a user session expires without saving changes.
If you create an application outside of your production environment, copy its folder (and the folder contents) to the Program Files\FrontRange Solutions\IP Communications Management\
Applications directory of the Ivanti Voice server in your production system.
Applications Selector
Applications Selector is used to register voice applications with Ivanti Voice, and configure how and when Ivanti Voice uses voice applications.
Applications Selector lets you make multiple applications available to Ivanti Voice for call handling, and allows you to create multiple configurations for each application. Each configuration consists of the following:
•Start criteria - The conditions under which Ivanti Voice uses each application configuration. For example, you can configure Ivanti Voice to use one application configuration for calls with a DNIS of 415-555-1234 and another for calls with a DNIS of 510-555-1234.
•Initial interaction properties - The initial values for the application properties. For example, you can configure Ivanti Voice to initially set the NoAnswerTimeout property to 20 seconds when Ivanti Voice uses the application before noon, and to 30 when Ivanti Voice uses the application after noon.
Ivanti Voice automatically selects a voice application to answer each call according to criteria you specify. For example, you can specify criteria that directs Applications Selector to:
•Run one voice application on weekends and another on weekdays.
•Run a specific voice application when Ivanti Voice receives a call from a number with a certain prefix.
•Run one voice application during the day and another in the evening (for instance, if your business closes in the evenings).
•Dial the voice server. The system is pre-configured to dial 501 to reach the voice server, so you can use phone numbers starting with 501 for your voice applications. If you have outside phone numbers which need to reach a given voice application, consider adding 501 to the beginning of your inbound numbers using prefix manipulation. For instance, if you have an incoming phone number of (800) 555 -1200 for your support department, adding 501 in the incoming trunk prefix manipulation would then modify the incoming phone number to 501 800 555 1200. Then configure the voice application to start whenever a DNIS of 501 800 555 1200 is received.
The following simple scenario describes how the Applications Selector and a voice application work together in Ivanti Voice.
1.A call enters Ivanti Voice from a public network.
2.Applications Selector uses configured criteria to select the appropriate voice application to answer the call.
3.The selected voice application answers the call and initiates an automated call processing scenario.
4.The voice application attempts to deliver the call to a destination.
Configure an Application for Use
To open the Applications Selector, click Management Portal > System Configuration > Applications.
On the Applications Selector page, you can create a configuration (or multiple configurations) for any application in the drop-down list at the top of the page, which contains all delivered applications and those created in Application Builder.
The list at the bottom of the Applications Selector page displays all applications currently configured.
Depending on which Ivanti Voice components you choose to install, Ivanti Voice includes configurations for several default applications, including the HEAT, GoldMine, and ITSM demo applications.
The Start Criteria column lists one of the following for each application configuration:
•Selected Always - The application configuration is always enabled. Ivanti Voice will use this application if the start criteria for higher-priority applications is not met.
•Disabled - The application configuration exists but Ivanti Voice does not use it.
•View - The application configuration is available only when certain conditions are met. Click the View link to see the criteria Ivanti Voice uses to determine when to use the application.
To Create a Voice Application Configuration:
Before creating and configuring an application, you may want to view the Applications Selector tutorial in the online help; refer to the online help topic "Voice Application Selection: Applications Selector: Applications Selector Demonstration"
1.On the Applications Selector page, click the drop-down list at the top of the page (below the Entry Name field) to check that your application is listed. If your application is not listed, click the Reload button to refresh the list of available applications.
If you modify an application (in Application Builder, for example) after loading it in Applications Selector, reload it by selecting the application from the drop-down list and clicking the Reload button; otherwise, your changes may not take effect.

2.In the Entry Name field, type a name for the application configuration.
3.In the drop-down list, select the application.
4.Click the Add Application button. The application configuration properties page opens.
Ivanti Voice generates a unique ID for the application configuration (displayed in the CLSID field).
5.In the APPLICATION SELECTION CRITERIA section, do one of the following:
•Select Selected Always.
•Select Disabled.
•Select Criteria Builder.
6.If you selected the Criteria Builder option, you can then configure the specific circumstances for which Ivanti Voice uses the application. Otherwise, continue to step 7.
•Click the Add Column button to add AND conditions to the criteria, which appear as additional columns in the table (all AND conditions must be met). The Add new column dialog box opens. Select a Type and Property, then click Add. A new column is added. Click the link in the new column. The Set Condition dialog box opens, enabling you to configure the Type of condition (such as a specific value or a range), then specify the value for that Type. Click Set. Add more columns as needed to establish the application criteria. To delete a column, click the red x icon next to the column name.
•Click the Add Alternative button to add OR conditions to the criteria, which appear as additional rows in the table (the OR conditions are alternative conditions). The row appears with a link in each column. Click the link. The Set Condition dialog box opens, enabling you to configure the Type of condition (such as a specific value or a range), then specify the value for that Type. Click Set. Add more rows as needed to establish the application criteria. To delete a row, click the red x icon at the end of the row.
You can use call properties such as DNIS and ANI as variables; for example, configure the criteria so an application runs if Ivanti Voice receives a call with a DNIS of 501.
•The following example demonstrates how to configure start criteria:
Example: The following example demonstrates how to use the Criteria Builder to configure the start criteria for an application Ivanti Voice will use after 6:00 AM to calls placed to 800-555-1212. •Select the Criteria Builder radio button. •In the Call property:DNIS column, click the link. •In the Type field, select Value. •In the field that appears below the Type field, type the phone number 5018005551212 (the 501 is for the voice server) and click Set. •Click the Add Column button. The Add new column dialog box opens. •From the Type drop-down list, select Time. •Click Add. A Time column is added to the criteria. •Click the link. The Set condition dialog box opens. •From the Type drop-down list, select the greater than symbol (>). A format for setting military time appears. •Set the HH:MM for 06:00 and click Set. IPCM adds the Time criteria After ‘06:00’ to the column, meaning 6:00 AM (the criteria is red until the Update button is clicked). Note that in military time, 6:00 PM would be 18:00. •Click the Update button for the APPLICATION SELECTION CRITERIA section. |
7.Click the Update button for the APPLICATION SELECTION CRITERIA section.
8.In the Parameters section, the Single application instance option configures Ivanti Voice to direct inbound calls into the same instance of the application, as opposed to starting a new instance of the application for each inbound call. The need for this option is rare, but it is useful for some applications. For example, if your deployment uses a telephone conference call application, run the application as a single instance to process calls coming into the conference, setting this option for applications designed to handle multiple inbound calls (applications that are not designed to work with multiple inbound calls might fail if you set the option).
9.Click the Update button for the Parameters section.
10.In the Initial Interaction Property Values section, use the Property Name, Property Value, and Comment fields to configure initial values for application properties. For instance, if you use the Applications Selector to load multiple configurations of a voice application, use this section to define different initial properties for each application configuration.
11.Click Add.
12.Repeat steps 10 and 11 to add more properties as needed.
13.Click the Update button for the Initial Interaction Property Values section.
14.Click the Commit Changes button to apply the changes. The new application configuration is added to the Applications Selector page.
Order of Applications
With each incoming call, Ivanti Voice evaluates the start criteria of each application configuration on the page starting with the application at the top of the list, and selects the first application configuration with start criteria matching the call. Ivanti Voice then uses the application configuration to process the call.
To Change the Order of the Application Configurations:
1.On the Applications Selector page, click the radio button of the application configuration you want to reposition.
2.Click the Up or Down button below the table to reposition the selected application configuration, thereby changing the order in which Ivanti Voice evaluates the configurations.
3.Click the Commit Changes button to apply the changes.
To Delete an Application Configuration:
•Click the radio button to the left of the application configuration, then click the red x icon.
Application Builder Example
The following example demonstrates how to use Application Builder to build a simple voice application that plays a synthesized voice message for callers.
The Ivanti Voice online help contains tutorials that demonstrate how to build a voice application. Refer to the online help topic "Voice Application Design: Application Builder: Application Builder Demonstrations" to view the tutorials.
1.Open Application Builder (in the Management Portal, click Application Builder).
2.Click New. A new application opens.
3.On the Telephony and Routing tab, click the Play Prompt block. The block is added to the flowchart on the left and the edit pane on the right displays the block parameters.
4.In the edit pane, click the Prompt link in the Name column. The Prompt Browser dialog box opens.
5.Click the Add/Remove/Edit Prompts button.
6.On the Prompts tab, type HelloWorld in the Prompt name field (at the bottom of the dialog box).
7.Click Add. The prompt HelloWorld is now listed as a link.
8.Click the HelloWorld link. The Prompt Editor dialog box opens.
9.Click Add Voice Segment.
10.Make sure the Voice option is selected in the drop-down list. In the Content field, type Hello, World!
11.Click Update and Back. The content is now listed below the HelloWorld link.
12.Click Back and then click the green + icon to select the new prompt. Notice the prompt is now associated with the File named [HelloWorld] and a Description of Hello, World!.
13.Click Update. Notice in the flowchart the Play block symbol now contains the file name of the prompt: Play “HelloWorld”.
14.Click Save As. The Save application as dialog box opens.
15.In the New application name field, type Hello.
16.Click Save as.
17.Click Close Application. The Hello application you created appears in the applications list.
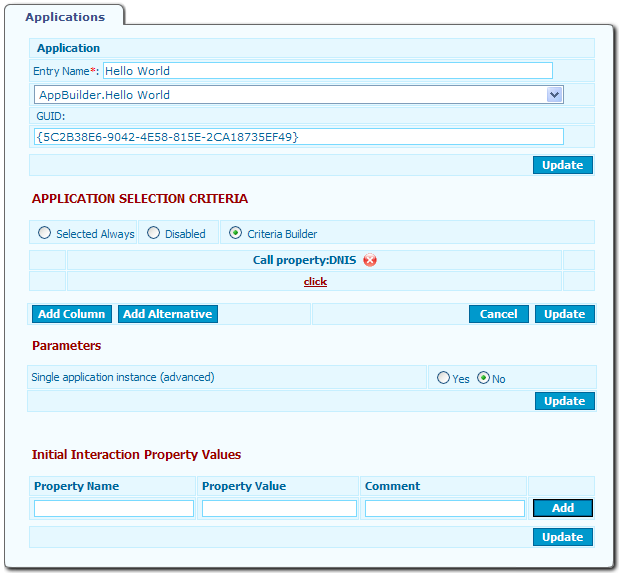
Applications Selector Example
The following example demonstrates how to register and configure the start criteria for the Hello application (from the previous example) using Applications Selector. In this example, the criteria for the voice application will specify this application is to be used for inbound calls to a specific toll-free number (800 555-1234) placed after 6:00 AM.
The Ivanti Voice online help contains a tutorial that demonstrates how to configure the start criteria for a voice application. Refer to the online help topic "Voice Application Selection: Applications Selector: Applications Selector Demonstration" to view the tutorial.
1.Select Start >Programs > Ivanti > Communication Management > Management Portal, then click System Configuration > Applications. The Applications Selector page opens.
2.Click Reload. The list refreshes and the newly created application is now listed in the drop-down list at the top of the Applications Selector page.
3.In the Entry Name field, type Hello (8005551234).
Using the toll-free number as part of the name enables you to see the criteria for this voice application at a glance. Otherwise you would need to click the View button to see the application criteria.
4.From the drop-down list, select AppBuilder:Hello.
5.Click Add Application. The application configuration properties page opens.
6.In the APPLICATION SELECTION CRITERIA section, select Criteria Builder.
7.In the Call property:DNIS column, click the link to specify the phone number for which this voice application will be used.
8.In the Set condition dialog box, select Value from the Type drop-down list, then type 8005551234 in the field that appears below it. Click Set. The value appears in the Call property:DNIS column.
9.Click the Add column button.
10.In the Add new column dialog box, select Time from the Type drop-down list, then click Add.
11.In the new Time column, click the link to specify the time of day this application will be used.
12.In the Set condition dialog box, select > from the Type drop-down list, then specify the time in the hours and minutes fields: 06:00. Click Set. The time value appears in the Time column
13.Click the Update button for the APPLICATION SELECTION CRITERIA section, then click the Commit Changes button to apply the change.
14.Select the Applications link in the left navigation panel to return to the Applications Selector page. The new application configuration, Hello (8005551234), is now included in the list.
15.Select the Hello (8005551234) radio button.
16.Click the Up button to move the application to the top of the list.
17.Click Commit Changes.
18.To see how the new call scenario works, dial into Ivanti Voice from another phone. You should hear the Hello, World! prompt.
Text-to-Speech (TTS) Voice Specification
Install at least one TTS engine for each language in which you want Ivanti Voice to generate dynamic prompts (for more information, refer to the Prompts section). Ivanti Voice switches TTS engines automatically if a situation occurs in which one TTS engine does not provide the necessary functionality. For example, if you have a TTS engine that does not support Russian and another TTS engine that does, Ivanti Voice switches to the TTS engine that supports Russian if Ivanti Voice needs to generate a Russian prompt.
You can install TTS engines before and after installing Ivanti Voice. If you install several TTS engines for one language, set one TTS engine as a default for that language:
1.In the Management Portal, click System Configuration > Voice Server > Advanced Configuration. The Voice Server Advanced Configuration page opens.
2.Click the AppServer tab.
3.In the TTSSpeaker drop-down list, select the voice the TTS engine will use as the default.
•The options in the TTSSpeaker drop-down list depend on the TTS engines installed and listed in the Windows Speech Properties dialog box: on the Text to Speech tab, you can specify the desired Voice selection option. Then, in Ivanti Voice, select the Use System Voice Selection option in the TTSSpeaker drop-down list to utilize the Windows setting.
•If you install a TTS engine after installing Ivanti Voice, you must restart the voice server for the TTS engine to appear as an option in the TTSSpeaker drop-down list.
4.Click the Update and Commit Changes buttons to apply the change.
5.Launch the Management Console (Start > Programs > Ivanti > Communications Management > Management Console) and restart the voice server:
Right-click the Voice Server icon and select Stop Application. The icon turns red, indicating the server has stopped.
Right-click the Voice Server icon and select Start Application. The icon turns green, indicating the server is running.
Was this article useful?
Copyright © 2019, Ivanti. All rights reserved.