Voice
Organizing the Contact Center
Process Overview
Using Ivanti Voice to organize your contact center involves the following process:
•User Profile Management - Create and configure users (including designating selected users as agents).
•Skill Configuration - Create skills and skill groups, which will be used to establish agent skill proficiency levels.
•Not Ready Reasons Configuration - Configure Not Ready reasons (or use the default reasons), so you can require Not Ready reasons when configuring agent groups and agents settings.
•Agent Groups - Create agent groups and designate users as agents.
•Configure Agent Properties - Configure agent settings and skills.
•System-Wide Agent Settings - Configure WrapUp Timeout options, Not Ready reason settings, and agent audit settings for all agents system-wide.
•Routing Rules - Create and configure rules for call routing.
•Services - Create services.
•Queues - Create and configure queues (optional - you can use the default queues).
User Profile Management
Ivanti Voice displays user profiles on the Management Portal Users page (Management Portal > System Configuration > Users).
Create Users
Ivanti Voice has four default users, including two agents (John and Peter), a manager with Quality Management privileges (if your Ivanti Voice installation has a license for Quality Management features), and an administrator with all privileges. You can delete these default users.
To Create Users:
1.In the Management Portal, click System Configuration > Users.
2.Create a login name for the user and type it in the empty field in the Login column.
Ivanti Voice logins (usernames) are case-sensitive and can consist of characters (a-z, A-Z), digits (0-9), underscores(_), periods (.), and dashes (-). All other characters are prohibited. The maximum username length is 128 characters.
3.Type the first name of the user in the empty field in the First Name column.
4.Type the last name of the user in the empty field in the Last Name column.
5.Type an extension in the Extension column. If you enter an extension which does not yet exist in the dial plan, the Management Portal will automatically add the extension into the dial plan. Be sure to configure the extension as described in the online help topic "SIP Soft Switch Configuration: Dial Plan Implementation."
6.By default, the user is searchable by name, enabling the voice Attendant and Answering applications to find the user by name. This setting can be changed on the General tab for the user (refer to the Configure the User Profile section).
7.If you have a Contact Center license:
•Select the Agent check box if you want the user to be an agent. Selecting the Agent check box automatically selects the Contact Center Agent role on the User’s General tab (refer to the Configure the User Profile section).
•If you select the Agent check box, you can also assign the agent to an agent group in the Agent Group drop-down list. If you have not yet created agent groups, you can assign the user to an agent group on the Agents/Skills/Services > Agents page (refer to the Add Agents to a Group section).
8.Click the Add button. Ivanti Voice displays a confirmation dialog box.
9.Click OK. Ivanti Voice adds the user to the table.
The default for the user UI Language is Automatic: the GUI language will be chosen based on the user's Windows local regional settings. If you need to specify a language for the user, click the login name link in the Login column to view that user’s properties page. On the General tab, select the specific language in the UI Language field from the list of languages supported by Ivanti Voice.
10.Click the Update and Commit Changes buttons to apply the changes.
Delete Users
To Delete Users:
1.In the Management Portal, click System Configuration>Users.
2.Click the red x icon at the end of the row containing the user’s information.
3.The Remove User dialog box opens, asking if you also want to remove the user’s extension (uncheck the box if you want to keep the extension in the dial plan). Click Remove.
4.Click OK to confirm the deletion.
5.Click the Update and Commit Changes buttons to apply the change.
Configure the User Profile
On the Management Portal Users page, click the login name link in the Login column to view that user’s properties pages:
•General Tab
•Address Book Tab
•Unified Messaging Tab
•Forwarding Tab
•Dialable PIN Tab
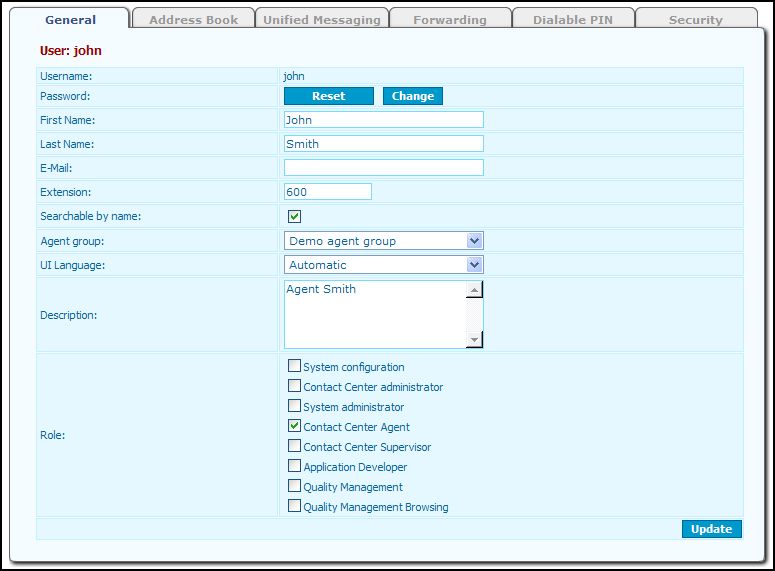
General Tab
The settings on the General tab page let you:
•Change or reset the user’s password.
•Enter contact information such as the user’s name and email address.
•Assign a dial plan extension to the user.
•Assign the user to an agent group if the user is an agent.
•Assign one or more roles to the user, determining the specific Ivanti Voice functionality the user can access.
Depending on the role of the user, users can access and modify their user properties by clicking Start > Programs > Ivanti > Management Portal > User Account,then clicking the General tab.
To Configure User Settings on the General Tab:
1.In the Management Portal, click System Configuration > Users.
2.In the Login column on the Users page, click the name of the user. The User properties page for that user opens.
3.Click the General tab. By default a user’s password is password. To change a user’s password, click the Change button. The Change Password dialog box opens.
•Type the new password in each field and click the Set button.
Ivanti Voice passwords are case-sensitive, and can consist of any character with an ASCII code from 1-127, including Latin characters, digits, and punctuation signs. All national characters (characters that do not appear in English) are prohibited, since all national characters have an ASCII code greater than 127. The maximum length for passwords is 32 characters.
•The Reset button is used to reset the user’s password to password.
For security reasons, Ivanti recommends you change the password of the default admin user before going live in a production environment.
4.Enter the user’s email address in the E-Mail field.
5.The Extension was entered on the Users page when you created the user. You can change it on the General tab if needed.
6.If needed, you can also change the Searchable by name setting on this tab: unchecking the box prevents the voice Attendant and Answering applications from finding the user by name.
7.If you have a Contact Center license, select the Agent check box if you want the user to be an agent (if you didn’t check this box when creating the user). Selecting the Agent check box automatically selects the Contact Center Agent role.
8.If this user is an agent, you can assign the user to an agent group by selecting the group in the Agent group field. You can also assign the user to an agent group on the Agents/Skills/Services > Agents page (refer to the Agent Groups section).
9.The default for the user UI Language is Automatic: the GUI language will be chosen based on the user's Windows local regional settings. If you need to specify a language for the user, select the specific language in the UI Language field from the list of languages supported by Ivanti Voice.
10.In the Role field, select the check box next to each role you want the user to have. If you assign a user one role that allows a privilege and a second role that denies that privilege, Ivanti Voice denies the user that privilege. If you assign a user one role that allows a privilege and a second role that neither allows nor denies that privilege (i.e., the privilege check box is not selected), Ivanti Voice grants the user the privilege. For more information on user roles, refer to Security Plan.
Currently, object access control is unavailable. For example, if a user has a role with the View queues privilege, that user can view all existing queues in the Contact Center. You cannot grant a user permission to view queue A, but not queue B. Such access control is handled within the configured object.
11.Click the Update and Commit Changes buttons to apply and apply the change.
Address Book Tab
On the Address Book page, users can populate their individual address books with contacts. Those contacts will be accessible to the user when logged in to and making calls from the Agent Dashboard softphone.
Unified Messaging Tab
For information on configuring the user Unified Messaging tab, refer to Office Phone System.
Forwarding Tab
The Forwarding page contains the same set of fields as the Forwarding tab for an extension in the dial plan. Refer to the online help topic "SIP Soft Switch Configuration: Configure Phone Entries: Forwarding" for more information on configuring the settings.
Dialable PIN Tab
The dialable PIN is used in conjunction with a user code to allow a user to log into a phone in the Ivanti Voice environment and override the original COR/forwarding configuration of the phone. Although the dialable PIN and the associated user are specified on the User Code properties page (System Configuration > SIP Soft Switch > User Codes), on the Dialable PIN page, the user can change the PIN which authorizes use of the user code. Refer to Office Phone System for more information.
Skill Configuration
In Ivanti Voice, you can set skills and skill proficiency levels for agents in your contact center. For example, to indicates an agent can speak English fluently, the agent may have an English skill level of 90. The skill values are set in range from 0 to 100 (it is convenient to think of them as percentages). If a skill is not defined for an agent, it is assumed to be 0.
Skills are arranged in skill groups. There are two default skill groups: Language and Technical Skills. You can use these default skill groups and the skills they include, or you can modify or delete the groups. English and Spanish are skills that are part of the Language default skill group; Software and Hardware are skills that are part of the Technical Skills default skill group.
You will use the skill groups to set agent skill proficiency levels when configuring agent properties (refer to the Agent Skills Tab section).
The Contact Center server displays skills and skill groups on the Skills and Skill Groups page (in the Management Portal, click Agents/Skills/Services > Skills and Skill Groups).
Working with Skills and Skill Groups
On the Skills and Skill Groups page, you can:
•Create Skills and Skill Groups
•Delete Skills
•Delete Skill Groups
•Edit Skill and Skill Group Names
Create Skills and Skill Groups
To Create a Skill Group:
1.In the Skills and Skill Groups page (in the Management Portal, click Agents/Skills/Services > Skills and Skill Groups), click the Create group button. A new skill group with the name New group appears at the bottom of the table on the Skills and Skill Groups page.
The Contact Center server does not let you create another group until you change the name of the new skill group from New group to a different name
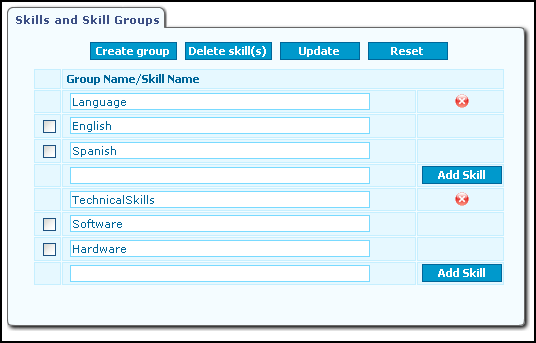
2.Highlight the name New group and type a name for the skill group.
Each skill group must have a unique name. There are no other restrictions for skill group names.
3.Click the Update and Commit Changes buttons to apply the change. Click the Discard Changes button if you want to undo the change.
4.To add a skill to this skill group, type a skill name in the field below the skill group name.
Each skill must have a unique name. Do not use the same name for multiple skills even if each skill is in a different group. There are no other restrictions for skill names. Also note that you cannot move the skill to another group once you create it. If you want the skill to appear under another skill group after creating the skill, you must delete the skill and recreate it in the other skill group.
5.Click the Add Skill button. The screen refreshes and the skill appears under the skill group name in the table.
6.Click the Commit Changes button.
Delete Skills
Deleting a skill from a skill group prevents you from assigning the skill to any more agents or using the skill in any more routing rules; however, the deletion does not remove the skill from agents to whom you already assigned the skill, nor does it remove the skill from existing routing rules.
To Delete Skills:
1.On the Skills and Skill Groups page (in the Management Portal, click Agents/Skills/Services > Skills and Skill Groups), select the check box next to each skill you want to delete.
2.Click the Delete skill(s) button. A dialog box opens, asking you to confirm the deletion.
3.Click Yes. The screen refreshes and the skill is deleted.
4.Click the Commit Changes button.
Delete Skill Groups
Deleting a skill group prevents you from assigning the skills in that skill group to any more agents, or using the skills in any more routing rules; however, the deletion does not remove the skills from agents to whom you already assigned the skill, nor does it remove the skill from existing routing rules.
To Delete Skill Groups:
1.On the Skills and Skill Groups page (in the Management Portal, click Agents/Skills/Services > Skills and Skill Groups), click the red x icon next to each skill group you want to delete. A confirmation dialog box opens.
2.Click Yes. The screen refreshes and the skill group is deleted.
3.Click the Commit Changes button.
Edit Skill and Skill Group Names
To Edit Names:
1.On the Skills and Skill Groups page (in the Management Portal, click Agents/Skills/Services > Skills and Skill Groups), edit the name of the skill or skill group.
Each skill and skill group must have a unique name. Do not use the same name for multiple skills even if each skill is in its own group. There are no other restrictions for skill and skill group names.
2.Click the Reset button to undo any changes made on the Skills and Skill Groups page (before clicking the Update button). Click the Update and Commit Changes buttons to apply the changes made.
Not Ready Reasons Configuration
The Agent Dashboard enables agents to manually indicate when they are in the Ready state (i.e., available to handle calls) or the Not Ready state. If an agent switches to the Not Ready state, the Agent Dashboard allows the agent to select a predefined Not Ready reason from the drop-down list next to the Not Ready button on the Agent Dashboard Agent State bar. Supervisors use the Agent Dashboard Quality Management tab to view currently selected Not Ready reasons.

Refer to the Agent Dashboard User’s Guide for more information about the Agent Dashboard.
You can add, edit, and delete Not Ready reasons as needed. The Contact Center server provides four default Not Ready reasons for all agents: Lunch, Break, Meeting, and Away from Desk.
You can also make it mandatory for agents to indicate a Not Ready reason. This can be done:
•At the agent level on the Agent Settings tab of the Agent Properties dialog box (refer to the Agent Settings Tab section).
•At the agent group level on the Agent Group Properties dialog box (refer to Create the Agent Groups section).
•System-wide on the Advanced Configuration page for the Contact Center server (refer to the System-Wide Agent Settings section).
To Edit, Add, or Delete Not Ready Reasons:
1.Click Agents/Skills/Services > 'Not Ready' Reasons. The ‘Not Ready’ Reasons page opens.
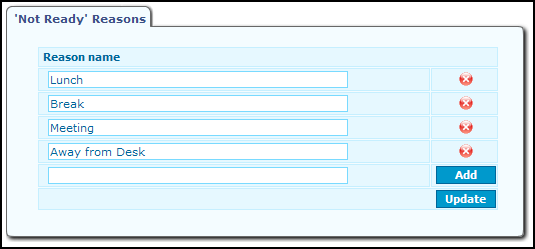
•Modify a Not Ready reason by changing the text in the Reason name field.
•Add a Not Ready reason by typing a Not Ready reason name in the blank field at the bottom of the Reason name column, and clicking the Add button.
•Delete a Not Ready reason by clicking the red x icon at the end of the row.
2.Click the Update and Commit Changes buttons to apply the change.
Agent Groups
The Contact Center server displays agent group configurations in a table on the Agents page (in the Management Portal, click Agents/Skills/Services > Agents).
The Ivanti Voice installation creates and the default groups Demo agent group (containing the default user John) and Ungrouped agents (which includes the default user Peter).
Use the Agents page to:
•Create Agent Groups
•Add Agents to a Group
•Move Agents to and from Agent Groups
•Delete Agent Groups
•Edit Agent Groups
•Designate users as agents: Add Agents
•Delete an Agent
•Disable Agents
You can also configure agent settings and skills from the Agents page; refer to the Configure Agent Properties section for details.
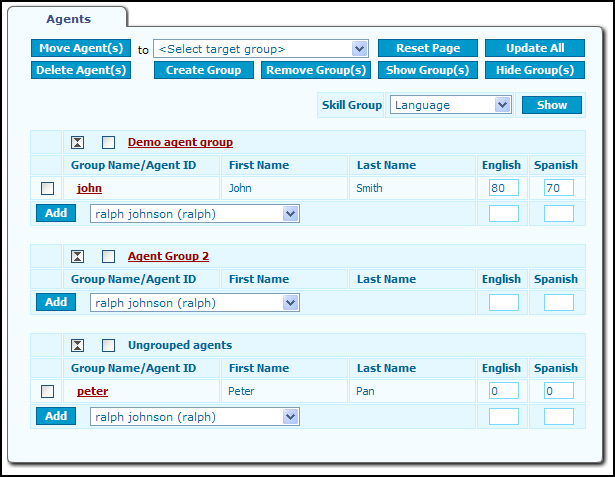
The names of agent groups appear in shaded rows in the table. The icon next to the group name shows  and hides
  the group members of each group. You can also select the check box next to an agent group name and click either the Show Group(s) or Hide Group(s) buttons at the top of the page.
Agent ID’s appear as links beneath the agent group to which they belong. To the right of the agent ID is the first and last name of the agent and agent’s proficiency levels for each skill in the selected skill group. To display skills belonging to another skill group, select that skill group from the Skill Group drop-down list above the list of groups and click the Show button. The page refreshes to display the skills from the other skill group.
The table lists ungrouped agents under the Ungrouped Agents heading and in the drop-down lists next to each Add button.
In order for a user to display in the drop-down list next to the Add button, the user must have the Contact Center Agent role and the Agent check box on the Users page is not selected. Refer to the User Profile Management section for more information.
Create Agent Groups
Some group settings, including Not Ready Reason Required, Agent WrapUp Timeout, Initial Agent Status, Initial Not Ready Reason, and Audit group agents, can also be configured at the agent level (refer to the Agent Settings Tab section) and system-wide (refer to the System-Wide Agent Settings section). The agent group setting overrides the system-wide setting and the agent setting overrides the agent group setting.
To Create an Agent Group:
1.On the Agents page (in the Management Portal, click Agents/Skills/Services > Agents), click the Create Group button. The New agent group dialog box opens.
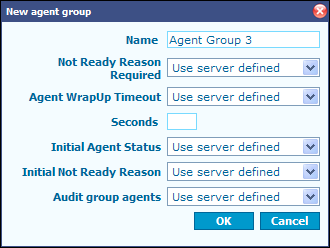
2.Type the name of the agent group you want to create
3.You can change the agent group Name, if needed.
4.In the Not Ready Reason Required field, you can specify if all agents in the group must indicate a Not Ready reason when switching to the Not Ready state:
•Use server defined - Use the Not Ready Reasons Are Required defined system-wide (refer to the System-Wide Agent Settings section).
•Required - The agent must indicate a Not Ready reason when switching to the Not Ready state.
•Not Required - The agent does not need to indicate a Not Ready reason when switching to the Not Ready state.
5.In the Agent WrapUp Timeout field, you can specify the automatic WrapUp Timeout for all agents in the group:
•Use server defined - Use the WrapUp Timeout defined system-wide (refer to the System-Wide Agent Settings section).
•Use group defined - Use the WrapUp Timeout defined for the agent group; the time frame (in seconds) is specified in the Seconds field.
•Disable - No limit on the WrapUp Timeout is imposed; the agent remains in the After-Call Work state until manually switching to the Ready state.
6.If you selected Use group defined in the WrapUp Timeout field, specify in the Seconds field the maximum amount of time the agent can spend in the After-Call Work state.
7.Specify the initial agent status upon login for all agents in the group:
•Use server defined - Use the Initial Agent Status defined system-wide (refer to the System-Wide Agent Settings section).
•Ready - Upon login, the agent status will be set to Ready.
•Not Ready - Upon login, the agent status will be set to Not Ready.
8.If you set the Initial Agent Status to Not Ready, you can specify the Not Ready reason default (if you created additional Not Ready reasons, or made changes to the names of the default reasons, they will appear in the list of options) for all agents in the group:
•Use server defined - Use the Initial Not Ready Reason defined system-wide (refer to the System-Wide Agent Settings section).
•<no reason>
•Lunch
•Break
•Meeting
•Away from Desk
9.In the Audit group agents field, specify if you want to record agent state changes in the Ivanti Voice database for historical reports:
•Use server defined - Use the Audit Agents option defined system-wide (refer to the System-Wide Agent Settings section).
•Yes - Select this option to enable auditing for all agents in the group.
•No - Select this option to disable auditing for all agents in the group.
10.Click the OK button. The new agent group appears on the Agents page.
11.Click the Commit Changes button on the Agents page to apply the change. Click the Discard Changes button if you want to undo the change.
Add Agents to a Group
To add an agent to a group, you will move them from the Ungrouped agents list to the new group. You can also select an agent group for an agent when configuring agent properties (refer to the Configure Agent Properties section).
To Add an Agent to a Group:
1.On the Agents page (in the Management Portal, click Agents/Skills/Services > Agents), select the check box next to the name of an agent in the Ungrouped agent list. You can select more than one agent.

2.In the field to the right of the Move Agent(s) button, select the agent group to which you want the agent to belong. Click the Move Agent(s) button. The screen refreshes and the table lists the agent as a member of that group.
3.Click the Commit Changes button to apply the change. Click the Discard Changes button if you want to undo the change.
Move Agents to and from Agent Groups
To Move Agents:
1.On the Agents page (in the Management Portal, click Agents/Skills/Services>Agents), select the check box next to the agent ID of each agent you want to move. You can also move an agent to another group when configuring agent properties (refer to the Configure Agent Properties section).
•To move an agent from one group to another, select the name of the agent group to which you want to move the selected agent in the <Select target group> drop-down list at the top of the page.
•To remove an agent from a group and add that agent to the Ungrouped agents list, select Ungrouped agents in the <Select target group> drop-down list at the top of the page.
2.Click the Move Agent(s) button. The screen refreshes and the selected agents reappear under the target agent group.
3.Click the Commit Changes button to apply the change. Click the Discard Changes button if you want to undo the change.
Edit Agent Groups
You can edit agent group properties as needed.
To Edit Agent Groups:
1.On the Agents page (in the Management Portal, click Agents/Skills/Services > Agents), click the name of the group you want to edit. The Agent group properties dialog box opens. The settings in this dialog box are identical to those in the New agent group dialog box.
2.Make the necessary changes.
3.Click the OK button.
4.Click the Commit Changes button on the Agents page to apply the change. Click the Discard Changes button if you want to undo the change.
Delete Agent Groups
When you delete an agent group, the agents in the deleted agent group become ungrouped agents.
To Delete Agent Groups:
1.On the Agents page (in the Management Portal, click Agents/Skills/Services > Agents), select the check box next to the name of each agent group you want to delete.
2.Click the Remove Group(s) button. A dialog box opens asking you to confirm the removal.
3.Click OK. The screen refreshes and the agent group is deleted.
4.Click the Commit Changes button on the Agents page to apply the change. Click the Discard Changes button if you want to undo the change.
Add Agents
When you add an agent, you actually designate an existing user as an agent.
Before adding a user as an agent, the user must have a user profile with the Contact Center Agent role assigned. Refer to the User Profile Management section for information.
The Contact Center server creates agent data for each user you designate as an agent, enabling the server to track the user’s state changes and route calls to the user.
To Designate a User as an Agent:
1.On the Agents page (in the Management Portal, click Agents/Skills/Services > Agents), do one of the following:
•Select the name of the user in the drop-down list next to the Add button under the agent group to which you want this agent to belong.
•Select the name of the user under the Ungrouped agents heading, if you don’t want this agent to belong to an agent group.
2.Click the Add button. The screen refreshes and the table lists the user as an agent, displaying the user’s agent ID, first name, last name as you configured it on the Users page (refer to the User Profile Management section). The user’s name no longer appears in the drop-down lists next to the Add buttons.
3.Click the Commit Changes button to apply your changes. Click the Discard Changes button if you want to undo your changes.
Delete an Agent
Deleting an agent is actually revoking a user’s designation as an agent. The user retains a user profile, but the Contact Center server deletes the agent information created for the user, and no longer tracks the user’s state changes nor routes calls to the user. If you no longer want the Contact Center server to route calls to the agent but you do not want to lose the agent’s data, disable the agent instead.
To Delete an Agent:
1.On the Agents page (in the Management Portal, click Agents/Skills/Services > Agents), select the check box next to the agent ID of each agent you want to delete.
2.Click the Delete Agent(s) button. A dialog box opens, asking you to confirm the agent deletion.
3.Click OK. The screen refreshes and the agent’s name is deleted from the table and reappears in the drop-down lists next to the Add buttons.
4.Click the Commit Changes button to apply the change. Click the Discard Changes button if you want to undo the change.
Disable Agents
You can disable an agent without deleting the agent from the system. This is useful if:
•You no longer want to route calls to the agent, but you do not want to lose the data the Contact Center server created for the agent.
•You are approaching the maximum number of enabled agents your license permits.
To Disable an Agent:
1.On the Agents page (in the Management Portal, click Agents/Skills/Services > Agents), click the name of the agent you want to disable or enable. The Agent Properties dialog box for the agent opens.

2.On the Agent settings tab, click the Disabled check box to disable the agent.
3.Click OK then click the Commit Changes button to apply the change, or click the Discard Changes button if you want to discard the change.
Configure Agent Properties
Click the Agent ID on the Agents page and the Agent Properties dialog box opens. The Agent Properties dialog box lets you perform some of the same functions as the Agents page, such as modifying the agent’s skill proficiency levels and moving the agent to another group.
You will see two tabs:
•Agent Settings Tab
•Agent Skills Tab
Agent Settings Tab
On the Agent Settings tab, you can configure the following:
•Enable Auditing - The Audited option allows you to configure the Contact Center server to record agent state changes in the Ivanti Voice database for historical reports. Agent audit settings can be configured:
•At the agent level on the Agent Properties dialog box, Agent Settings tab. Agent auditing is disabled by default for each agent.
•At the agent group level on the Agent Group Properties dialog box (refer to the "Create Agent Groups" section).
•System-wide on the Advanced Configuration page for the Contact Center server (refer to the "System-Wide Agent Settings" section).
The agent group setting overrides the system-wide setting and the agent setting overrides the agent group setting.
•Disable Agent - Use this option if you no longer want the Contact Center server to route calls to the agent but you do not want to lose the agent’s data.
•Specify Automatic WrapUp Timeout - After hanging up with a caller, the agent state switches automatically to the After-Call Work state, during which time the agent is unavailable to take calls while completing the after-call work related to the call. In the default configuration, the agent remains in the After-Call Work state until the agent manually switches to the Ready state; however, you can use the Agent WrapUp Timeout option to determine the maximum amount of time an agent can spend in the After-Call Work state. When the time expires, the server automatically switches the agent to the Ready state.
The Agent WrapUp Timeout can be configured:
•At the agent level on the Agent Properties dialog box, Agent Settings tab.
•At the agent group level on the Agent Group Properties dialog box (refer to the "Create Agent Groups" section).
•System-wide on the Advanced Configuration page for the Contact Center Server (refer to the "System-Wide Agent Settings" section).
The agent group parameter overrides the system-wide parameter and the agent parameter overrides the agent group parameter.
•Require a Not Ready Reason - The Agent Dashboard enables agents to manually indicate when they are in the Ready state (i.e., available to handle calls) or the Not Ready state. If an agent switches to the Not Ready state, the Agent Dashboard allows the agent to select a predefined Not Ready reason.
You can make it mandatory to indicate a Not Ready reason. This can be done:
•At the agent level on the Agent Properties dialog box, Agent Settings tab.
•At the agent group level on the Agent Group Properties dialog box (refer to the "Create Agent Groups" section).
•System-wide on the Advanced Configuration page for the Contact Center server (refer to the "System-Wide Agent Settings" section).
The agent group parameter overrides the system-wide parameter and the agent parameter overrides the agent group parameter.
To Configure Agent Settings:
1.Click the Agent ID link on the Agents page. The Agent Properties dialog box opens to the Agent Settings tab.
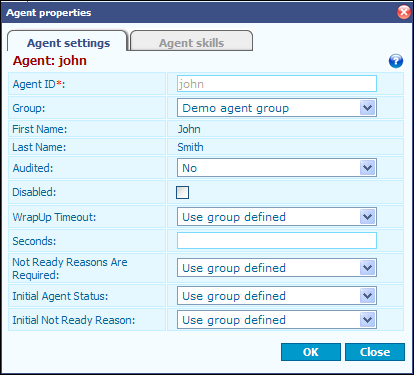
2.To move an agent to a different group, select that group from the Group drop-down list.
3.In the Audited field, specify if you want to record agent state changes in the Ivanti Voice database for historical reports:
•No - Select this option to disable auditing for this agent.
•Yes - Select this option to enable auditing for this agent.
•Use group defined - Use the Audit Group Agents option defined for the agent group to which this agent belongs (refer to the "Create Agent Groups" section).
4.To disable the agent, select the Disabled check box.
5.Specify the automatic WrapUp Timeout for an agent:
•Use group defined - Use the WrapUp Timeout defined for the agent group to which this agent belongs (refer to the "Create Agent Groups" section).
•Use agent defined - Use the WrapUp Timeout defined for this agent; the time frame (in seconds) is specified in the Seconds field.
•Disable - No limit on the WrapUp Timeout is imposed; the agent remains in the After-Call Work state until the agent manually switches to the Ready state.
6.If you selected Use agent defined in the WrapUp Timeout field, specify in the Seconds field the maximum amount of time the agent can spend in the After-Call Work state.
7.Specify if agent must indicate a Not Ready reason when switching to the Not Ready state:
•Use group defined - Use the Not Ready Reasons Are Required defined for the agent group to which this agent belongs (refer to the "Create Agent Groups" section).
•Required - The agent must indicate a Not Ready reason when switching to the Not Ready state.
•Not Required - The agent does not need to indicate a Not Ready reason when switching to the Not Ready state.
8.Specify the initial agent status upon login:
•Use group defined - Use the Initial Agent Status defined for the agent group to which this agent belongs (refer to the "Create Agent Groups" section).
•Ready - Upon login, the agent status will be set to Ready.
•Not Ready - Upon login, the agent status will be set to Not Ready.
9.If you set the Initial Agent Status to Not Ready, you can specify the Not Ready reason default (if you created additional Not Ready reasons, or made changes to the names of the default reasons, they will appear in the list of options):
•Use group defined - Use the Initial Not Ready Reason defined for the agent group to which this agent belongs (refer to the Create Agent Groups section).
•<no reason>
•Lunch
•Break
•Meeting
•Away from Desk
10.Click OK or click the Agent skills tab to configure the skills for this agent (refer to the Agent Skills Tab section for details).
11.If you click OK, the Agent Properties dialog box closes. Click the Commit Changes button to apply the change.
Agent Skills Tab
Both the Agent Properties dialog box and the Agents page have editable tables listing skills and skill proficiency levels. The Agent Properties dialog box lets you set skill proficiency levels at the agent level; the Agents page lets you set skill proficiency levels at the skill-group level. Both procedures are described below.
To Set Agent Skill Proficiency Levels on the Agent Skills Tab:
1.Click the Agent skills tab which displays the agent’s current skill proficiency levels (if any).
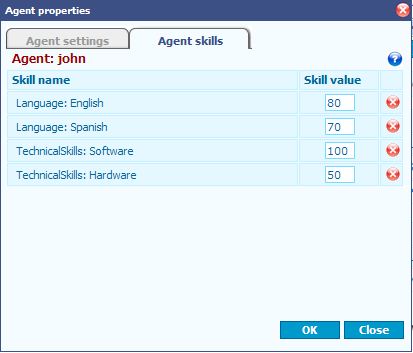
2.Do one or more of the following:
•Change the agent’s skill proficiency levels by editing the values in the Skill value column.
•Remove a skill from the agent’s skill set by clicking the red x icon next to the skill. A confirmation dialog box opens. Click OK.
Removing a skill on the Agent Properties dialog box only removes the skill from the agent’s skill set; it does not delete the skill from the system.
3.Click the Update and Commit Changes buttons to apply the change, or click the Discard Changes button if you want to discard the change.
To Set Skill-Group Skill Proficiency Levels on the Agents Page:
1.On the Agents page (in the Management Portal, click Agents/Skills/Services > Agents), in the Skill Group drop-down list select the skill group containing the skills for which you want to set proficiency levels.

2.Click the Show button. The skills for the skill group appear in columns on the right side of the table.
3.Change each agent’s skill proficiency levels by editing the values under each skill. A value of 0 indicates the agent does not have the skill.
4.Click the Update All and Commit Changes buttons to apply the changes. If you want to undo the change before clicking the Update All button, click the Discard Changes button.
System-Wide Agent Settings
The Advanced Configuration page for the Contact Center server enables you to configure system-wide agent settings, including the WrapUp Timeout option, Not Ready reason settings, and agent audit settings for all agents system-wide.
The agent group setting (refer to the Create Agent Groups section) overrides the system-wide setting, and the agent setting (refer to the Agent Settings Tab section) overrides the agent group setting.
For information regarding the other settings on this tab, not explained in the following procedures, refer to the online help topic "Contact Center Server Configuration: Additional Contact Center Configurations."
To Configure Agent WrapUp Timeout System-Wide:
1.In the Management Portal, click System Configuration > Contact Center Server > Advanced Configuration. The Advanced Configuration page opens.
2.In the Agent WrapUp Timeout field, select on if you want to enable the Agent Wrap-Up Timeout option for all agents system-wide, or off if you do not. The default setting is off (disabled), meaning that agents must manually set themselves to the Ready state after taking a call.
3.If you selected on in the Agent WrapUp Timeout field, specify in the Seconds field the number of seconds an agent can be in the After-Call Work state before the server automatically switches the agent to the Ready state.
4.Click the Update and Commit Changes buttons to apply the change, or click the Discard Changes button to discard the change.
To Configure System-Wide Not Ready Reason Settings:
1.In the Management Portal, click System Configuration > Contact Center Server > Advanced Configuration. The Advanced Configuration page opens.
2.In the Not Ready Reasons Are Mandatory field, select yes if you want it mandatory for all agents system-wide to designate a Not Ready reason, or no if you do not. The default setting is no (disabled), meaning agents do not have to specify a Not Ready reason.
3.In the Initial Agent Status field, select Ready if you want that status to be set for the agent upon login; select Not Ready if you want that status set for the agent upon login.
4.If you set the Initial Agent Status to Not Ready, you can specify the Not Ready reason default (if you created additional Not Ready reasons, or made changes to the names of the default reasons, they will appear in the list of options):
•<no reason>
•Lunch
•Break
•Meeting
•Away from Desk
5.Click the Update and Commit Changes buttons to apply the change, or click the Discard Changes button to discard the change.
To Configure System-Wide Agent Audit Settings:
1.In the Management Portal, click System Configuration > Contact Center Server > Advanced Configuration. The Advanced Configuration page opens.
2.In the Audit agents field, specify if you want to record agent state changes in the Ivanti Voice database for historical reports:
•Yes - Select this option to enable auditing for agents.
•No - Select this option to disable auditing for agents.
3.Click the Update and Commit Changes buttons to apply the change, or click the Discard Changes button to discard the change.
Routing Rules
A routing rule is a set of conditional instructions the system follows to determine the best destination for a call and how calls are prioritized. For example, you can configure a rule to route a call to:
•The agent who has the most qualified skill set to handle the call.
•The agent who has not taken a call for the longest period.
•The first available agent.
Ivanti Voice comes with one pre-configured default routing rule called the Generic skill-based matcher (refer to the Generic Skill-Based Routing information about how this type of rule operates), or you can create your own rules. You can also configure a rule to give priority to:
•A call that has been waiting in the queue for the longest amount of time.
•A call that is more urgent than other calls in the queue.
•A call from a gold-level account.
You can create multiple routing rules. When selecting which routing rule to apply to each call, the system analyzes the following:
•Criteria you establish in the routing rule configuration.
•Information the voice application provides about the call, which can consist of caller identification information, the reason for the call, etc. (for information on voice applications, refer to Preparing for Incoming Calls).
•Agent configuration, including each agent’s skill set.
There are two ways to create routing rules:
•Use the Application Builder to create a routing rule within a voice application by using the Route to Agent block (refer to the online help topic "Voice Application Design: Building Block Definitions: Route to Agent Block" for details).
•Create routing rules on the Routing Rules page (in the Management Portal, click Agents/Skills/Services > Routing Rules), then specify the desired rule in the voice application using the Route to Agent block.
Routing rules created on the Routing Rules page can be used by multiple voice applications; a routing rule created within an application in Application Builder can only be used by the voice application in which you create the rule.
Configure Routing Rules
Routing rules consist of one or more time intervals, referred to as escalation intervals, each containing a set of criteria for routing calls during that interval.
Each interval contains a default set of criteria:
•Customer Time In Queue - The total time the caller spent in the queue during a single call.
•Agent Idle Time - For an agent in the Ready, Not Ready, or Reserved states, the Contact Center server calculates idle time as the amount of time since the agent was last in the After-Call Work state. If the agent has not yet been in the After-Call Work state, the idle time is the amount of time since the agent logged in. The idle time resets to 0 when the agent logs into the system or enters the Busy state. The idle time begins to increment again when the agent leaves the After-Call Work state.
•Priority - The priority value of the call; the system uses this value to gauge the urgency or critical nature of the call. If your business needs require call prioritization, you can use the Set Interaction Property block in a voice application to set a value (from 0 to 100) for an interaction property named Priority (refer to the online help topic “Voice Application Design: Building Block Definitions: Set Interaction Property Block” for details). This criterion can then be used in an interval of the routing rule.
The voice application uses the Set Interaction Property block to set the priority.
Skill Requirement Criteria
You can also add skill requirements to the set of criteria for an interval. This criteria is based on the skill levels assigned to agents, in range of 0 to 100 (it is convenient to think of them as percentages). If a skill is not defined for an agent, the skill level is assumed to be 0. Skills are arranged in skill groups.
If the voice application allows caller input pertaining to skill requirements, the call will be routed accordingly.
For each interval, a set of skill requirements, thresholds, default skills and importance can be specified. Often, you configure the intervals to lower the skill thresholds over time, possibly dropping entire skill requirements. For example, after 45 seconds in queue, you may simply want the call answered, so you drop the Technical skill requirement. Or, in a routing rule with multiple skills such as Technical and Language skills, after 45 seconds you may drop the Technical skills requirement and leave only the Language requirement.
For each skill selected by a call, a Threshold can be defined in the routing rules. This will effectively limit available Ready agents to those who have requested skill values set higher than the thresholds. For example: Language Threshold = 60 means the routing searches for an agent with the requested language skill value of at least 60.
A threshold is set per skill group rather than per actual skill, because it is the skill group which is chosen in the voice application.
Criteria Importance
The criteria within each interval is listed in the order of Importance (highest to lowest) - a value you assign to each criterion when configuring the rule. The system uses this information to determine which call gets priority and which agent gets the call during each escalation interval in the rule.
Importance comes into play only if there are multiple agents for a call or multiple calls for an agent (for example, an agent who has just become Ready, with several calls in the queue). Importance is used to find the best possible match. The default set of criteria defined in the routing rule includes a level of importance for each of the following, which also enters into the overall calculation:
•Skill Requirement Importance - This importance factor controls how much weight is given to the skill set of the agent. The importance factor is multiplied by the agent skill level. If there are multiple skill requirements in an interval, the algorithm calculates the sum of the products derived by multiplying the importance factor by the skill level for each skill requirement.
•Customer Time In Queue Importance - This importance factor controls how much weight is given to the length of time a target has been queued vs. the call priority importance set, when choosing the next call to be delivered to the next available agent. The importance factor is multiplied by the time in queue for each call, expressed as a percentage. The call which has been in queue longest will have a normalized time in queue of 100, and all other calls will be represented as a percentage of the time in queue for that call.
•Agent Idle Time Importance - This importance factor controls how much weight is given to the length of time an agent has been ready vs. the importance of the skill set match, when choosing the next agent for this campaign. The importance factor is multiplied by the agent idle time, expressed as a percentage. The agent who has been idle the longest will have a normalized idle time of 100, and all other agents will be represented as a percentage of that agent’s idle time.
•Priority Importance - This importance factor controls how much weight the call’s priority will be given when determining which call will be selected for the next available agent. The importance factor is multiplied by the value of the priority interaction property set in the voice application.
Weight Calculation
To find the best match, the system first checks required skills (if the routing rule contains this criteria). If an agent’s skill level is lower than the threshold value for at least one skill in the rule, the agent is excluded as a match for the call. If agent skills are equal to or higher than the threshold value, the system uses agent skill level and skill importance, customer time in queue and its importance, idle time and its importance, and call priority and its importance to calculate the weight, which is a number that represents the best match between a single agent and a single call. The following equation is the calculation performed by the system:
where:
•Σ(Skill(i) * IFactorSkill (i)) is the sum of the products derived by multiplying the agent skill level by the skill importance value set for that skill, for as many skill requirements as are defined in the interval.
•TIQ * IFactorTIQ is the call time in queue multiplied by the time in queue importance value set in the interval.
•IdleTime * IFactorIT is the agent idle time multiplied by the idle time importance value set in the interval.
For the purposes of this calculation both time in queue and idle time are expressed as comparative percentages; for example, given that 2 calls are in the queue, one for 60 seconds and the other for 30 seconds, the time in queue for the first call will be 100, the second call 50. The same for idle time: if an agent has been idle for 2 minutes and another has been idle for 30 seconds, the idle time is expressed as 100 and 25, respectively.
•Priority * IFactorP is the call priority (the value of the priority interaction property set in the voice application) multiplied by the priority importance value set in the interval.
Criteria importance values set to 0 in a routing rule interval will not affect the weight calculation.
The higher the importance value of the criterion (compared with the other criteria in the interval), the less likely it is that criteria of lower importance will be considered. To achieve this result, it is recommended that importance values be set in powers of 100 (for example, 1, 100, 10000).
The use of powers of 100 in importance values for skills, for instance, means the most important skill group is of primary consideration, since the difference between the importance values is so great. However, if the difference between skill importance values is less, then the skills with lower importance values will also be considered.
In some cases, you may want the differential to be less, since some skills may offset other skill deficiencies. For example, in a given interval, language importance is set at 100, product importance is set to 300. That causes an agent with language skill level of 100 and product knowledge of 30 to be equal to an agent with language skills of 7 and product knowledge of 61 (using the weight equation: (100 x 100) + (300 x 30)/100 + 300 = 47.5 vs. (100 x 7) + (300 x 61)/100 + 300 = 47.5, assuming for this example that all other variables in the equation are 0).
Call Prioritization
You may want to create routing rules that give priority to certain calls in the queue, causing those calls to jump ahead of other calls in the queue. To achieve this, in the voice application, use the Set Interaction Property block to create an interaction property called Priority and assign the property a value between 0 and 100. For example, you might look up a customer’s SLA Priority using a Search block, and, based on the results, if the customer is Gold assign a Priority of 100, Silver assign a Priority of 50, and Bronze assign a priority of 1.
In the routing rules, give the Priority Importance setting a value of 100 and the Customer Time In Queue Importance setting a value of 1. This will reorder all calls by priority first and secondarily by time in queue.
Escalation Interval Time Frame
Each escalation interval is labeled with a time frame indicating where the interval occurs in the sequence. For example, typing 30 in the field to the right of the Last Interval - infinite text in the first interval results in a new label: Escalation Interval 1, ending at 30 seconds (from the time the call entered the queue), which indicates this interval is the first and ends after 30 seconds. Typing 45 in the field to the right of the Last Interval - infinite text for the second interval results in a new label: Escalation Interval 2, ending at 45 seconds (from the time the call entered the queue), which indicates the escalation interval begins after the first interval concludes, and ends 15 seconds after the first escalation concludes (total duration for the caller in queue is 45 seconds). Leaving the field at Last Interval - infinite -1 indicates the interval occurs at the end of the sequence and does not end until the caller hangs up.
At least one escalation interval must be defined. If the last escalation interval has a finite end time (that is, not -1, which designates an infinite end time), upon reaching the limit, the call will leave the queue with a No Matching Agents result code.
Skill-Based Routing: Common Approaches
If you decide to use skill-based routing, there are four possible scenarios you may want to consider:
•Generic Skill-Based Routing - Using skill groups to route calls by agent skill level and/or a service type.
•Group-Based Routing - Skill groups are created using agent group names as skills to enable you to route calls to the desired agent group.
•Priority-Based Routing - Using skill groups to represent customer type (or account type).
•Specific Agent-Based Routing - Routing to a specific agent.
Generic Skill-Based Routing
You can use skill groups to route calls by agent skill level and/or a service type (in this case, the skill in the skill group you create would be a service - refer to the Services section for more information about services).
If you create a services skill group (such as the Service Type skill group in the table below), skills in that skill group must have the same names as the services created on the Services page (in the Management Portal, click Agents/Skills/Services > Services) so the skill group will double as a call’s Service folder designator for statistics, allowing you to report on calls routed by skill.
•Skill groups with skills must be created first.
Example:
Skill Group | Skills |
Language | English, Spanish |
Product | Microwave, Refrigerator |
Service Type | Sales, Support |
•Agents must be assigned skill values 0 to 100.
•A voice application must be modified to select skills from skill groups. This is usually done by having Request Skill blocks on each of the Menu block branches, then accessing the Route to Agent block.
•In the Route to Agent block, routing rules must be specified by either selecting the routing rule you created on the Routing Rules page (in the Management Portal, click Agents/Skills/Services > Routing Rules) or by creating routing rules within the block. The importance level of the skills in the routing rule may diminish with each escalation interval. For example, you may create a rule with three intervals:
•In the first interval, the system would look for the best possible agent match within the first 15 seconds, with agent skills assigned the highest level of importance.
•Within the next 45 seconds, the second interval would be configured to find an agent with a less stringent skills match (maybe sacrificing product knowledge in favor of adequate language skills).
•After the caller has waited 60 seconds (the total time of the first two intervals), the third interval would specify time in queue as the highest priority and the system would search for any available agent.
Group-Based Routing
For group-based routing, a skill group can be created, with agent group names as skills. For example, if you have created agent groups called Support Group and Sales Group, then create a skill group called Agent Groups containing the skills Support Group and Sales Group. Then set the skills for all support agents at: Support Group = 100 and Sales Group = 0, and for all sales agents at: Support Group = 0 and Sales Group = 100.
In the routing rules, the skill group Agent Groups must be used with the threshold set to 1. This enables you to limit the agents considered for a call to a specific group. To enhance this scheme, varying skill values could be used from 2 to 100 to denote how good a particular agent is within that group.
Priority-Based Routing
Using priority-based routing causes some calls to jump ahead of other calls in the queue. One way to achieve this is by creating a skill group using priority levels as skills.
For example, first you can create a skill group called Customer Level containing skills Gold, Silver, and Bronze. Agents are then assigned values of skills in order of importance; for example, Bronze = 30, Silver = 60, Gold = 90. Then, in the routing rules, put the skill group Customer Level above Customer Time in Queue by giving it a higher importance value. This will reorder all calls by priority first and secondarily by time in queue. To enhance this scheme, skills values can vary from agent to agent, so comparisons can easily be made within the context of the varying customer levels. For example, you may set skill levels per customer type = Bronze 1-30, Silver 31-60, Gold 61-90. If John is good at handling Bronze-level callers and Peter is good with Gold-level callers, then John’s Bronze skill will be set to a value greater than Peter’s Bronze skill and John’s Gold skill value will be set lower than Peter’s Gold skill.
Specific Agent-Based Routing
Occasionally, you may have a need to route calls to a specific agent (for instance to a specific account owner or to the supervisor handling escalation of difficult calls), rather than to a group of agents with varying skill levels. To achieve this, in the voice application, the interaction property AssignedAgentID must be set to that agent’s login name before sending a call into queue (this can be done using the Set Interaction Property block, followed by a Route to Agent block to enable the system to enact a conditional exit, should the agent be unavailable). In this case, all routing rules are ignored and the call waits for that specific agent.
In the voice application, you may want to create a contingency in the event the specific agent is not available to take the call. To achieve this, use the Custom JavaScript Code block to remove the AssignedAgentID property from consideration: objAppCtx.Config.Item("Interaction").Attributes.Delete("AssignedAgentID"; Follow this block with another Route to Agent block containing the routing rule needed to get the call to an appropriate agent. Or, you can just send the call to the agent’s voice mail using the Connect Call block.
Create and Configure Routing Rules
The following procedure contains examples for routing rule configuration. The Application Builder Demonstration 2 also contains an example of configuring a routing rule (within the Route to Agent block); refer to the online help topic "Voice Application Design: Application Builder Demonstrations" to view the tutorial.
To Create and Configure a Routing Rule:
1.In the Management Portal, click Agents/Skills/Services > Routing Rules. On the Routing Rules page, type the name of the routing rule in the empty field at the bottom of the table. There are no naming restrictions.
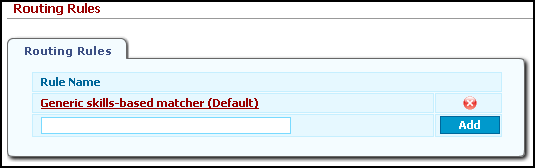
2.Click the Add button. The screen refreshes and the routing rule appears in the table.
3.To configure the routing rule, click the link in the Rule Name column. The Routing Rules propertiespage opens.
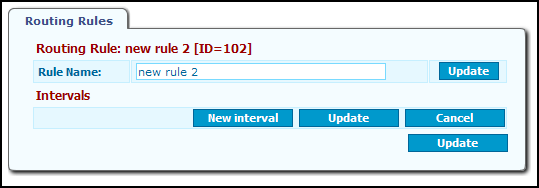
4.In the Rule Name field, you can replace the existing name with a new name for the routing rule, if needed. The new text you enter is red. Click the Update button next to the field - the text turns black.
If you change the routing rule name after the rule has been created and included in a voice application, the name change does not change the name of the routing rule in the voice applications that use the rule. Therefore, if you change the name of a routing rule, modify all voice applications using that routing rule to reflect the name change.
5.Click the New interval button. A default set of criteria for the interval displays: Customer Time in Queue, Agent Idle Time, and Priority.
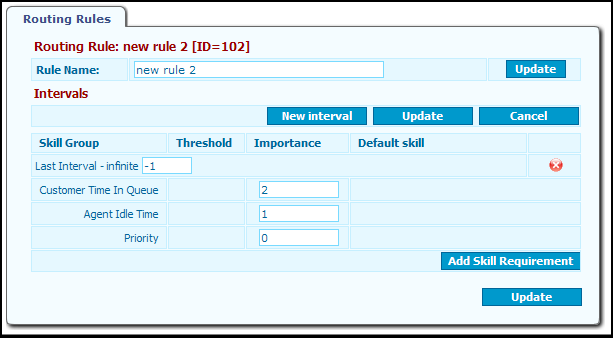
6.Change the Importance value for the Customer Time in Queue, Agent Idle Time, and Priority to establish the desired importance (the criterion with the highest Importance value will be at the top of the list after the Update button is clicked). For example, if, for this interval, Agent Idle Time is most important, give it the highest importance rating.
7.Click the Update button (either the one just above the interval or the one at the bottom of the page).
8.To add a skill requirement to the interval, click the Add Skill Requirement button. The New skill requirement dialog box opens.
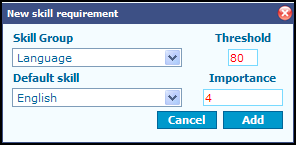
9.Select a Skill Group.
10.Select a Default Skill.
11.In the Threshold text box, type a skill value the system will search for when matching an agent to a call. For example, if you type 80, the matcher will look for an agent with a skill level of 80 or above for the specified skill.
The Threshold value is the minimum skill level an agent must have to be considered for call distribution. In order to receive the call, the agent’s skill value for this skill must equal or exceed all thresholds specified for the interval.
12.In the Importance text box, type a value.
13.Click Add. The skill requirement values are now part of the criteria for this interval. The criteria for the interval are listed in the order of importance, the highest at the top of the list.
14.Repeat steps 5 through 13 to create additional intervals for this routing rule, if needed.
If you create multiple intervals for the routing rule, you will need to use the interval field at the top of each interval to establish the time frame for the progression of intervals.
Example: The first interval created specifies skills as the most important criteria and have a time frame ending at 30 seconds; during that 30 seconds the system will route the call to the first available agent with a skills match. After 30 seconds, the second interval, which specifies agent idle time as the criteria of highest importance and has a time frame ending at 50 seconds, will activate; during that 20 second interval, the system will route the call to the agent who has been idle the longest. After 50 seconds, you may simply want the call answered, so the third interval would have time in queue as the highest importance rating; the system will route the call to the next available agent regardless of skills or idle time. If it is also the last interval of the rule, the interval field would remain at the default: Last Interval - infinite = -1.
15.Once all intervals for the rule have been created and the interval time frames specified, click the Update button at the bottom of the page, then click the Commit Changes button. This configuration takes effect immediately.
Delete Routing Rules
Deleting a routing rule prevents you from using the routing rule in future voice applications; however, the deletion does not remove the routing rule from the voice applications that currently use it.
1.On the Routing Rules page (in the Management Portal, click Agents/Skills/Services > Routing Rules), click the red x icon next to the routing rule you want to delete. A confirmation dialog box opens.
2.Click OK. The screen refreshes and the routing rule is deleted.
3.Click the Commit Changes button to apply the change.
Services
A service is a label you create to categorize interactions for statistical, routing, and monitoring purposes. For example, you might have a customer call for purchase inquiries or to offer feedback. If you create a service for each of these categories, you can track how many purchase inquiries you receive, or view a list of calls waiting in a queue to offer feedback.
IPCM determines whether or not to affix a service label to an interaction while the interaction is in the voice application. The voice application uses the Set Service block to associate the interaction with a service, according to criteria you establish. For example, you can design a voice application that sets the service if the interaction originates from a telephone number with a certain prefix, or if the caller inputs a certain code.
Queued Calls Limit Option
Use the Queued calls limit field on the Services page to set the maximum number of calls IPCM allows in the queue for a particular service at one time. For example, if you set the value in the Queued calls limit column for Customer Service to 85, the maximum number of calls that can be in the queue for Customer Service is 85.
The Service Queue Limit Exceeded conditional exit in the Route to Agent block in Application builder determines where IPCM routes a call intended for a queue that has reached its call limit. Refer to the online help topic "Voice Application Design: Building Block Definitions: Route to Agent Block" for more information.
Create Services
To Create a Service:
1.On the Services page (in the Management Portal, click Agents/Skills/Services > Services), type a name for the service in the empty field at the bottom of the page.
Once you create a service, you cannot change the service name.
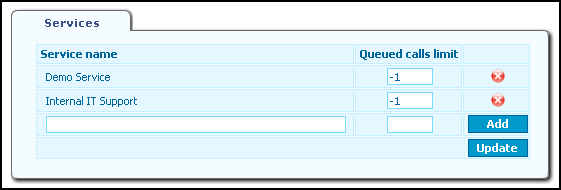
2.In the Queued calls limit field, enter the maximum number of calls IPCM will allow in the queue for this service. If you do not want the system to limit the number of possible calls in the queue, enter -1 or leave the field blank.
3.Click the Add button. The service is added to the table.
4.Click the Update and Commit Changes buttons to apply the change.
Delete Services
Deleting a service makes the service unavailable for use in future queue monitor configurations and voice application designs; however, deleting a service does not remove the service from existing configurations and designs.
To Delete a Service:
1.Click the red x icon at the end of the row. A confirmation dialog box opens.
2.Click OK. The screen refreshes and the service is removed from the list.
3.Click the Update and Commit Changes buttons to apply the change.
Queues
A queue is a list of calls with one or more properties in common. Some examples of queues include:
•A list of all calls IPCM routes to a specific agent.
•A list of all calls for a specific service.
•A list of all calls that are part of a particular integration.
You can also base queues on logical categories that mirror your routing rules and skill sets. For example, if you base your routing rules on languages and technical skills, you might have the following queues:
•English
•Spanish
•Hardware
•Software
Queues can have one or more subqueues, which are queues within a queue. Subqueues let users further classify calls within a queue; for instance, by department, product, geographical area, etc.
The Call Center server has queue position protection, which prevents a call from losing its place in a queue. For example, if a call waits in a queue for 45 seconds and the server tries to deliver the call to an agent but fails for some reason (in this example, the agent does not pick up the phone within 30 seconds), the server returns the call to the queue without resetting the call’s Time In Queue call property to 0. Instead, the server increments the Time In Queue property from 45 seconds.
Queue position protection primarily affects routing rules and estimated wait time calculations.
The Agent Dashboard Queue tab displays queues and the data for calls within each queue. The type of call data the Agent Dashboard displays depends on the queue configuration. For example, one queue might display the ANI (Automatic Number Identification) and DNIS (Dialed Number Identification Service) of calls while another queue displays the ServiceType and TimeInQueue properties of calls.
For information on the Agent Dashboard Queue tab, refer to the Agent Dashboard User’s Guide.
The Filters tab on the Queue Monitor Settings page (Management Portal > System Configuration > Contact Center Server > Queue Monitor Settings) lets you manage queues:
•Create and delete queues.
•Configure which calls and call data are displayed in a queue.
•Configure the text and background colors the Agent Dashboard displays on the Queue tab for specific conditions.
•Configure the sounds the Agent Dashboard plays for specific conditions.
Create and Delete Queues
The Queue Monitor Settings page lists the names of existing queues. Subqueues appear as indented links beneath parent queues.
Depending on options selected during installation, Ivanti Voice comes with as many as five default queues:
•My Personal Queue - Displays data about all calls assigned to the agent logged into the Agent Dashboard.
•All Queued Interactions - Displays data about all calls waiting in all queues.
•ISM Demo Queue - Displays data about calls that are part of the ISM configuration demo voice application included with Ivanti Voice.
•ITSM Demo Queue - Displays data about calls that are part of the Information Technology Service Management (ITSM) configuration demo voice application included with Ivanti Voice.
•GoldMine Demo Queue - Displays data about calls that are part of the GoldMine configuration demo voice application included with Ivanti Voice.
Ivanti Voice does not have default subqueues.
You can modify or delete predefined queues, and create new queues according to your business needs.
To Create a Queue:
1.On the Filters tab of the Queue Monitor Settings page (in the Management Portal, click System Configuration > Contact Center Server > Queue Monitor Settings), type a name for the queue in the Filter Name field. The queue name has no restrictions.
2.In the Parent drop-down list:
•If you are creating a subqueue, select the queue you want designate as the parent queue.
•If you are not creating a subqueue, select Top.
3.Click the Add button.
4.Click the Commit Changes button to save your changes.
To Delete a Queue:
1.Select the radio button next to the queue you want to delete.
2.Click the Remove button. A confirmation dialog box opens.
3.Click OK. The screen refreshes and the queue is deleted.
4.Click the Commit Changes button to apply the change.
Deleting a parent queue also deletes its subqueues.
Queue Configuration
Each queue has its own Queue properties page containing configuration settings. To open the Queue properties page, click the name of the queue in the list on the Queue Monitor Settings page.
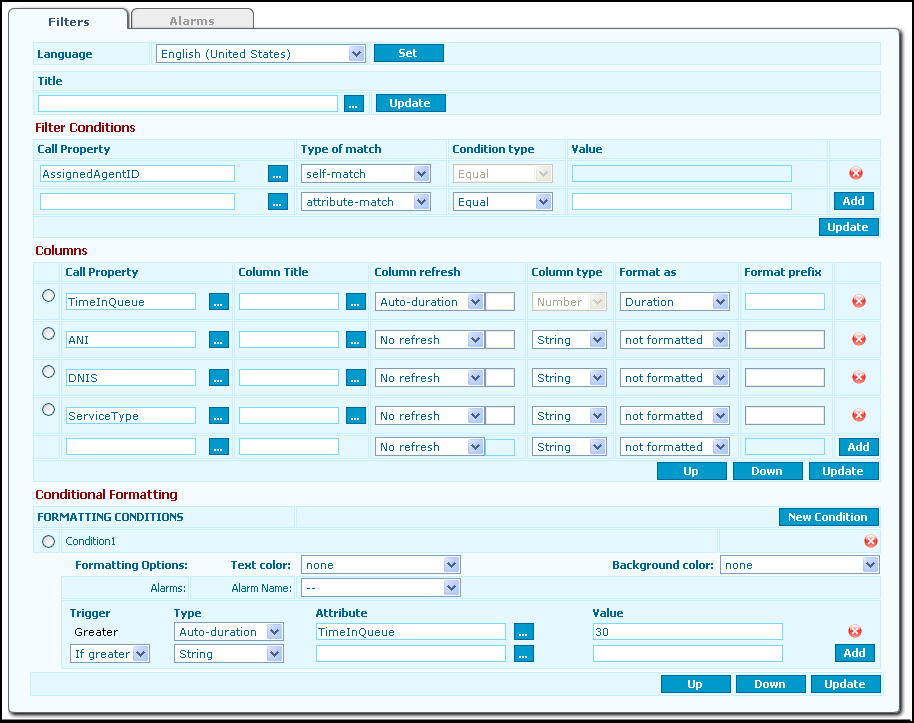
There are five components of queue configuration:
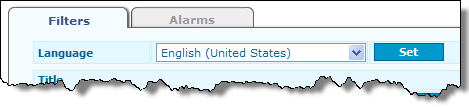
•Language - If you have Agent Dashboards running on a non-English version of Windows and want to localize the Queue pages, use the Language field to select the language. You may define the queue Title and Column Titles for every language configured in Ivanti Voice.
The Neutral setting is used when an Agent Dashboard user is running a Windows version in a language you have not chosen to support in Ivanti Voice. With the language field set to Neutral, specify the queue Title and Column Titles to be displayed in such a case.
•Title - The text in the Title field is the name of the queue that will display in the Agent Dashboard. There are no naming restrictions. For convenience, the browse button opens a Localization dialog box which displays the queue name for all languages configured in Ivanti Voice.
•Filter Conditions - Use the Filter Conditions table to specify the requirements a call must meet for Ivanti Voice to put the call in the queue. Each row of the Filter Conditions table represents one requirement. The call must meet all the requirements in the Filter Conditions table for Ivanti Voice to put the call in the queue.
•Columns - Use the Columns table to configure which call data the Agent Dashboard displays in the columns of the Queue tab (when the user selects the queue), and how the Agent Dashboard formats the data. Each row of the Columns table configures one column on the Queue tab.
The Agent Dashboard Queue tab displays the columns you configure in the order they appear in the Columns table (i.e., the columns in the Agent Dashboard display in order from left to right).
•Conditional Formatting - The conditional formatting of the queue specifies the fonts and colors the Agent Dashboard Queue tab uses when displaying calls in the queue, as well as the sound the Agent Dashboard plays when a call arrives in the queue. For example, you can configure the Queue tab to use red text with a yellow background when displaying calls waiting in the queue for more than 30 seconds. You can also configure the Agent Dashboard to play an alarm for this condition.
Use the Conditional Formatting table to configure the conditional formatting of the queue. The table displays conditions as rows with adjacent radio buttons. Within the row are parameters that control the formatting and alarms the condition uses, as well as the criteria the call must meet for Ivanti Voice to apply the formatting and alarms.
To Configure a Queue:
1.On the Queue Monitor Settings page (in the Management Portal, click System Configuration > Contact Center Server > Queue Monitor Settings), click the queue name. The queue properties page opens (on the Filters tab).
2.In the Language field, select the language for which you want to specify the queue Title and Column Titles. Click the Set button.
3.In the Title field, type the queue name that will display in the Agent Dashboard. Click the Update button next to the Title field.
For convenience, the browse button opens a Localization dialog box which displays the queue Title for all languages configured in Ivanti Voice.
4.Configure the Filter Conditions settings:

In the Property field, specify the call property(s) a call must have in order for Ivanti Voice to place the call in this queue. You can either type the name of the call property in the Property field, or click the browse button next to the Property field to select the call property from the Properties dialog box.
In the Type of match field drop-down list, select one of the following:
•attribute-match - Ivanti Voice checks each call for the call property you specified in the Property field. If the call has that property, Ivanti Voice checks the value of that property. If the value of the call property matches the value you specify in the Value field (refer to step 4c), IPCM classifies the call as meeting the requirement.
•self-match - Ivanti Voice checks each call for the call property you specified in the Property field. If the call has that property, Ivanti Voice classifies the call as meeting the requirement. Ivanti Voice does not check the value of the call property for self-match requirements.
•If you selected the attribute-match option, you need to set a Condition type and Value:
•Example: If you enter the ANI call property in the Property field, the attribute-match option in the Type of match field, and a value of 415-222-1212 in the Value field, Ivanti Voice places all calls from phone number 415-222-1212 in this queue. If you enter the ANI call property in the Property field and the self-match option in the Type of match field, Ivanti Voice places all calls with the ANI call property in this queue, but does not check the value of the call property.
•If you select Equal in the Condition type drop-down list, in the Value field enter the value the property must have in order for Ivanti Voice to place the call in this queue.
•If you select Not Equal in the Condition type drop-down list, in the Value field enter the value the property must not have in order for Ivanti Voice to place the call in this queue.
The Value fields activate only if you select the Attribute-match option in the Type of Match field.
•Click the Add button at the end of the row. Ivanti Voice adds the row to the Filter Conditions table. When all filter conditions have been added, click the Update button for the Filter Conditions section. To delete a filter condition, click the red x icon at the end of the row.
5.Configure the Columns settings. Each row in the Columns table represents a column that will display in the Agent Dashboard.
For the queue to operate correctly, you must configure a column for each call property you are using in the Filter Conditions section.
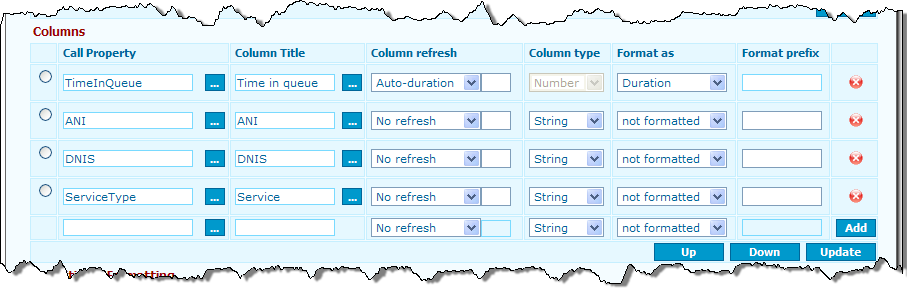
6.Configure the following settings for each Column:
In the Property field, enter the call property containing the data you want Ivanti Voice to display in this column on the Queue tab. Either type the name of the call property in the Property field, or click the browse button to the right of the field to select the call property from the Properties dialog box.
In the Column Title field, type the heading you want the Agent Dashboard to display at the top of the column on the Queue tab. If you do not specify a column title, the Property name will be used. The Column Title is localizable and should be defined for every language you want to support.
For convenience, the browse button to the right of the field opens a Localization dialog box which displays the queue Column Title for all languages configured in Ivanti Voice.
In the Column Refresh field, select the rate at which you want the Agent Dashboard to refresh the data in the column:
•No refresh - Select this option for columns containing data that does not need to be refreshed.
•Auto-duration - The column data refreshes approximately once every second.
•New timer - The column data refreshes at a rate you specify. If you select this option, in field next to the Column Refresh drop-down list, enter the number of seconds you want Ivanti Voice to wait between refreshing the data.
•3 sec - The column data refreshes every three seconds.
The Auto-duration setting uses a clock within the client application; the New timer and 3 sec settings use clocks within the Ivanti Voice server. To avoid network congestion, Ivanti recommends using the Auto-duration setting whenever possible.
In the Column Type field, select the type of values the column displays. Select String if the values are in alphanumeric format, or Number if the values are in a numeric format.
In the Format as field, indicate the format in which you want Ivanti Voice to render the data in the Queue tab:
•Not formatted - Ivanti Voice does not format the data.
•Number - Ivanti Voice formats the data as an integer.
•HEX - Ivanti Voice formats the data in hexadecimal format.
•Duration - Ivanti Voice formats the data as a duration.
In the Format Prefix field, specify data (such as an area code) for Ivanti Voice to prefix to the value.
This field is inactive if you select the Not formatted option in the Format as field.
Click the Add button at the end of the row. IPCM adds the row to the Columns table.
To change the order in which the columns appear in the Queue tab, select the radio button next to the column you want to move, then click the Up or Down button to position the column in the order you want it to appear on the Agent Dashboard Queue tab.
When all filter conditions have been added and are in the desired order, click the Update button for the Columns section.
To delete a column, click the red x icon at the end of the row.
7.Configure the Conditional Formatting settings:

To configure the formatting the Queue tab uses for this condition, select the desired Text color and Background color.
To configure the alarm the Agent Dashboard sounds when it receives a call that meets the condition, select the alarm in the Alarm Name drop-down list (refer to the Alarms section for information on populating the Alarm Name drop-down list).
Click the Update button for the Conditional Formatting section before continuing with the next step.
To set the conditions the call must meet for the Agent Dashboard to use the formatting and alarm functionality, use the following fields to create logical expressions within each condition:
Example: For example, to configure the Agent Dashboard to apply the conditional formatting to a call waiting in the queue for more than 30 seconds, configure: Trigger = Greater, Type = Auto-duration, Attribute = TimeInQueue, Value = 30.
•Trigger - The operator used to compare the values of the call attribute with the value in the Attribute field. Select one of the following: If greater, If less, or If equal.
•Type - The type of values the logical expressions uses:
•String for alphanumeric values
•Integer for numeric values
•Auto-duration for auto-duration values
•Attribute - Type an attribute to use in the logical expression or click the browse button to the right of the field to select an attribute from the Properties dialog box.
•Value - Specify the value of the attribute in the logical expression.
Click the Add button to add a new logical expression to the table.
Click the red x next to the logical expression name if you need to delete it.
To add another condition to the table, click the New Condition button and repeat steps a through d.
To change the order of the conditions, select the radio button next to the condition you want to move, then click the Up or Down button to position the condition in the desired order. The order of the conditions establishes the condition priority. Only the first satisfied condition formats the way the interaction appears in the queue, and triggers an audible alarm if configured to do so. The higher you move a condition in the table, the greater priority the condition has over the other conditions.
When all Conditional Formatting settings have been configured, click Update.
To delete a condition, click the red x in the row containing the condition name.
8.Click the Commit Changes button to apply all settings configured for this queue.
Alarms
You can customize the sound the Agent Dashboard plays when a call in the queue meets the conditional formatting you configure.
To Add a Custom Alarm:
1.Use a third-party audio editor to create a .wav file that contains the alarm.
2.On the server computer, copy the .wav file(s) into the Ivanti\IP Communications Management\Data\Alarms directory.
3.On the Management Portal Queue Monitor Settings page, click the Alarms tab. The Alarms page opens, displaying a table listing the current custom alarms.
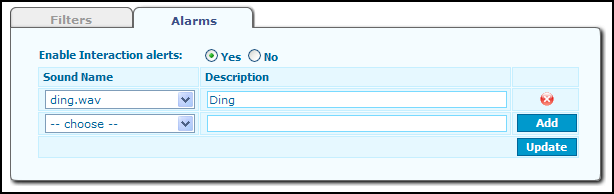
4.To enable alarms, click the Yes radio button.
5.In the Sound Name field, you will see a list of .wav files you placed in the Ivanti\IP Communications Management\Data\Alarms directory. Select a file name from the list.
6.In the Description field, type a description of the sound (optional).
7.Click Add, then click Update and Commit Changes.
The alarms you add on the Alarms page appear as options in the Alarm Name drop-down list in the Conditional Formatting section of the Queue properties page for a queue.
The Agent Dashboard has a default alarm that plays if the alarm you specify in the Alarm Name drop-down list is missing (for example, it may have been deleted accidentally).
Was this article useful?
Copyright © 2019, Ivanti. All rights reserved.