Ivanti Voice/GMEE Configuration
This topic describes the Ivanti Voice/GMEE configuration process for both GMEE. For GMEE product-specific information, refer to the documentation accompanying the GMEE product. Administrators must have system administrator-level knowledge of GMEE and Ivanti Voice products.
Install GMEE before installing Ivanti Voice. The GMEE installer overwrites Ivanti Voice data, resulting in irrevocable data loss.
The Ivanti Voice/GMEE configuration uses GMEE database tables:
-
CONTACT1: Primary contact information including:
- Account Number (ACCOUNTNO)
- Record ID (RECID)
- Name (CONTACT)
- Phone numbers (PHONE1, PHONE2, PHONE3)
- Fax number (FAX)
-
CONTACT2: Additional contact information including:
- Fields for user defined keys (USERDEF01,...,USERDEF10)
- The last the day of customer contact (LASTCONTON)
- The next planned action (NEXTACTION)
- The date the next action is planned (ACTIONON)
-
CONTHIST: Records of historical data including:
- User ID (USERID)
- Result code (RESULTCODE)
- Activity type(ACTVCODE)
- Units of forecasted sale (UNITS)
- ID of the linked account (LINKACCT)
- Additional contact data fields
-
CONTSUPP: Records of additional contact information such as referrals and profiles.
- Record type (RECTYPE)
- Referenced contact (CONTSUPREF)
- Fields for referenced contact data such as address, phone number, etc.
Server and Client Installations
The Ivanti Voice/GMEE configuration consists of server and client installation. The server configuration enables a Voice application to:
- Question callers.
- Search and update the GMEE database (including call history records) using caller input.
- Configure a screen pop to display to the Agent that receives the call.
The client configuration lets the Ivanti Voice Agent Dashboard communicate with GMEE to perform a variety of tasks including:
- Display screen pops for inbound calls.
- Transfer the current Contact Info Window screen pop to another Agent Dashboard when the agent clicks the Send Screen button.
- Update the GMEE database with input from the agent.
Ivanti Voice/GMEE Configuration
The following procedures describe two installation options:
- Same Computer Installation: Servers, Clients - The Ivanti Voice and GMEE servers can be installed on one computer with the clients installed a separate computer.
- Separate Computer Installation: Server/Client, Server/Client - The Ivanti Voice server/GMEE client can be installed on one computer with the GMEE server/Ivanti Voice client installed on a separate computer.
Then you can create a Taskbar in GMEE containing buttons that control Ivanti Voice Agent Dashboard functionality.
Same Computer Installation: Servers, Clients
In this configuration, the Ivanti Voice and GMEE servers are installed together on one computer, and the Ivanti Voice and GMEE clients are installed on a separate computer.
Install GMEE before installing Ivanti Voice. The GMEE installer overwrites Ivanti Voice data, resulting in irrevocable data loss.
To Install Ivanti Voice and GMEE:
- Install GMEE.
- Close the GMEE application.
- Install Ivanti Voice; see Installing Ivanti Voice Server.
- Restart the computer.
- Configure Ivanti Voice to connect with the GMEE database:
- Open Management Portal > System Configuration > Contact Center Server > Integrations. The Integrations page opens.
- Click the GMEE tab.
- Select the Enable check box. Click the Update button.
At this point, do not click the Commit Changes button or you will see errors in the Log, since the GMEE connection has not yet been configured.
- In the Name field, enter the name of the connection to your GMEE database.
- In the Description field, enter a description of the database connection, if desired.
- Click the Add button.
- Click the name of the connection, which now appears as a link. The connection settings appear.
- Configure the connection settings:
- System Folder - Type the location of the GMEE installation folder.
- GMEE Folder and Common Folder - Type the alias for accessing the database. For example, to access SQL Server, an alias of GMEE might be configured. The string to access this would be MSSQL: GMEE: dbo: (where GMEE is the database name).
- GM User Name - Type the GMEE user name.
- GM Password - Type the GMEE password.
- SQL User Name - Type the GMEE database user name.
- SQL Password - Type the GMEE database password.
- Click the Commit Changes button.
Separate Computer Installation: Server/Client, Server/Client
In this configuration, the GMEE server and the Ivanti Voice client are installed on one computer, and the Ivanti Voice server and the GMEE client are installed on a separate computer. Both computers must be members of the same Windows domain.
To Install Ivanti Voice and GMEE:
- Install GMEE server.
- Install the Ivanti Voice client on the same computer as the GMEE server; refer to Installing Ivanti Voice Client.
- Configure network sharing for the GMEE server system directory (<install_dir>/GMEE/GMEE) on the GMEE server host computer, making sure you grant full sharing rights and NTFS permissions to the computer account on which you plan to install the Ivanti Voice server:
- On the GMEE server host computer, right-click the <install_dir>/GMEE/GMEE folder and select Properties. The GMEE Properties dialog box opens.
- Click the Sharing tab, then select the Share this folder option.
- Click the Permissions button. The Permissions for GMEE dialog box opens.
- Click the Add button. The Select Users, Computers, or Groups dialog box opens.
- Click the Object Types button. The Object Types dialog box opens.
- Select the Computers check box, then click OK to return to the Select Users, Computers, or Groups dialog box.
- In the Enter the object names to select field, type the name of the computer on which you plan to install the Ivanti Voice server, then click the Check Names button. The appropriate name of the Ivanti Voice server target host computer displays.
- Click OK to return to the Permissions for GMEE dialog box.
- Click the Apply button, then click OK to return to the GMEE Properties dialog box.
- Click the Security tab, then click the Add button. The Select Users, Computers, or Groups dialog box opens.
- Click the Object Types button. The Object Types dialog box opens.
- Select the Computers check box, then click OK to return to the Select Users, Computers, or Groups dialog box.
- In the Enter the object names to select field, type the name of the computer on which you plan to install the Ivanti Voice server, then click the Check Names button. The appropriate name of the Ivanti Voice server target host computer displays.
- Click OK to return to the Security tab.
- Click Apply, then click OK.
- Repeat steps 3 through 17 for the Ivanti Voice client.
- Install Ivanti Voice server on a different computer.
- On Ivanti Voice server computer, map the shared GMEE directory as the network drive by creating a script to map the drive on system startup.
- Start the Microsoft Management Console: select Start > Run. The Run dialog box opens. Type mmc in the Open field, then click OK.
- In the Microsoft Management Console, press Ctrl+M or click File > Add/Remove Snap-in.
- Click the Add button.
- Select the Group Policy Object Editor snap-in and click the Add button.
- Click Finish in the next dialog box.
- Click Close, then click OK.
- Create a new text file map.bat in the C:\Windows\System32\GroupPolicy\Machine\Scripts\Startup folder.
GroupPolicy is often a hidden folder, so enable viewing of hidden folders in Windows Explorer (Tools > Folder Options > View tab). If the Scripts and Startup folders are missing, create them before proceeding.
- Use Notepad to edit the map.bat file, adding two lines:
net use q: /deletenet use q: \\GM_host_machine\share \ (e.g.: net use q:\\ipcc-nlb2\GMEE)The letter q is a placeholder for any unused drive letter you choose to use.
- Expand the tree in the left pane, then select Scripts (Startup/Shutdown).
- Double-click the Startup script in the right pane.
- Click Add, then click Browse.
- Double-click the map.bat file created earlier.
- Click Apply, then OK. Close the Management Console without saving the console settings.
- Reboot the Ivanti Voice server computer, and then verify the drive is mapped.
The drive may appear as a disconnected network drive in the My Computer folder.
- Install the GMEE client on the same computer on which the Ivanti Voice server was installed.
- In the installation wizard, when the GMEE Shared Directory dialog box opens, specify the path to the GMEE server location: \\GMEE_Host_Machine\GMEE.
- Click Next, then continue installing the GMEE client.
Create Agent Dashboard Taskbar in GMEE PE
GMEE users can create a Taskbar containing buttons that control Ivanti Voice Agent Dashboard functionality such as indicating Go Ready or Not Ready, answering calls, hanging up calls, etc.
Open the Agent Dashboard and verify the default connector is specified (VPCC.GenericConnector.1) in the Dashboard Options dialog box. Refer to Ivanti Voice Configuration with other Ivanti Products for details.
To Create an Agent Dashboard Taskbar:
- On the GMEE Taskbar, click Customize.
- Right-click the Taskbar and select Add New Group.
- Name the group Agent, then click OK.
- Set the properties for each of the Agent Dashboard functions:
- Go Ready
- Right-click the Agent group and select Add New Item. The Taskbar Group Item Selection dialog box opens.
- In the Item Type field, select External Application.
- In the Caption field, type Go Ready.
- In the Application field, type (or browse to) C:\Windows\System32\wscript.exe.
- When you browse to the wscript.exe file, it automatically populates the Start Directory field with the setting C:\Windows\System32. You must change this path to: C:\Program Files\Ivanti\IP Communications Management\scripts\HEATVoice.
- In the Command Line field, type set-ready-dashboard.js.
- In the Icon File field, type or browse to C:\Program Files\Ivanti\IP Communications Management\scripts\HEATVoice\Ready.ico (the icon was installed with Ivanti Voice).
- Click OK.
- Go Not Ready
- Right-click the Agent group and select Add New Item. The Taskbar Group Item Selection dialog box opens.
- In the Item Type field, select External Application.
- In the Caption field, type Go Not Ready.
- In the Application field, type (or browse to) C:\Windows\System32\wscript.exe.
- When you browse to the wscript.exe file, it automatically populates the Start Directory field with the setting C:\Windows\System32. You must change this path to: C:\Program Files\Ivanti\IP Communications Management\scripts\HEATVoice.
- In the Command Line field, type set-not-ready-dashboard.js.
- In the Icon File field, type or browse to C:\Program Files\Ivanti\IP Communications Management\scripts\HEATVoice\NotReady.ico (the icon was installed with Ivanti Voice).
- Click OK.
- Answer
- Right-click the Agent group and select Add New Item. The Taskbar Group Item Selection dialog box opens.
- In the Item Type field, select External Application.
- In the Caption field, type Answer.
- In the Application field, type (or browse to) C:\Windows\System32\wscript.exe.
- When you browse to the wscript.exe file, it automatically populates the Start Directory field with the setting C:\Windows\System32. You must change this path to: C:\Program Files\Ivanti\IP Communications Management\scripts\HEATVoice.
- In the Command Line field, type answer-dashboard.js.
- In the Icon File field, type or browse to C:\Program Files\Ivanti\IP Communications Management\scripts\HEATVoice\answer.ico (the icon was installed with Ivanti Voice).
- Click OK.
- Hang Up
- Right-click the Agent group and select Add New Item. The Taskbar Group Item Selection dialog box opens.
- In the Item Type field, select External Application.
- In the Caption field, type Hang Up.
- In the Application field, type (or browse to) C:\Windows\System32\wscript.exe.
- When you browse to the wscript.exe file, it automatically populates the Start Directory field with the setting C:\Windows\System32. You must change this path to: C:\Program Files\Ivanti\IP Communications Management\scripts\HEATVoice.
- In the Command Line field, type hangup-dashboard.js.
- In the Icon File field, type or browse to C:\Program Files\Ivanti\IP Communications Management\scripts\HEATVoice\hangup.ico (the icon was installed with Ivanti Voice).
- Click OK.
- Start Sales Scripts
- Right-click the Agent group and select Add New Item. The Taskbar Group Item Selection dialog box opens.
- In the Item Type field, select Main Menu Action.
- In the tree, open Go To > Sales Tools, then click OK. The Sales Scripts icon is automatically selected.
- Go Ready
Voice Applications
The Ivanti Voice Application Builder contains blocks specifically designed for creating Voice applications for the Ivanti Voice/GMEE configuration using the GMEE database:
- GMEE Auto-Complete Activity Block: Configures actions and corresponding notes to post to the Contact Record and History tab.
- GMEE Auto-Schedule Activity Block: Configures the application to post actions and corresponding notes to the contact record Pending Activity tab as scheduled.
- GMEE Search Block: Searches the GMEE database for contact records, typically using a contact phone or account number as a search key. The result of search is stored as the record ID value. Call properties can define the values of the search keys, and store the values of fields returned.
- GMEE Screen Pop Block: Governs the GMEE Screen Pop action when a call is routed to an agent.
- GMEE Update Block - Updates fields in the GMEE database.
For information about copying, then editing the GMEEDemo Voice application or creating a new application, refer to Building Block Definitions.
Ivanti recommends that you do not directly edit the sample applications.
GMEEDemo Sample Voice Application
The GoldmineDemo Voice application demonstrates how to identify a contact using the contact’s default phone number (PHONE1 field) and account number.
To Use the GoldmineDemo Voice Application:
- The GMEE Screen Pop block is configured to open a new contact window (the Incoming call action value is set to Open). The Open Search Center option is selected for callers Ivanti Voice does not identify as contacts.
- The GMEE Search block searches for the ANI. If the ANI is not found in the database, the Voice application prompts the caller to enter a default phone number, and the GMEE Search block searches the database for the number entered.
- If the search is successful, the Agent who receives the call sees the screen pop configured in step 1.
- When the call is complete, the Voice application updates the GMEE history database using the GMEE Auto-Complete Activity block.
Ivanti Voice/GMEE Call Scenario
The client and Agent Dashboard configurations enable the following call scenario:
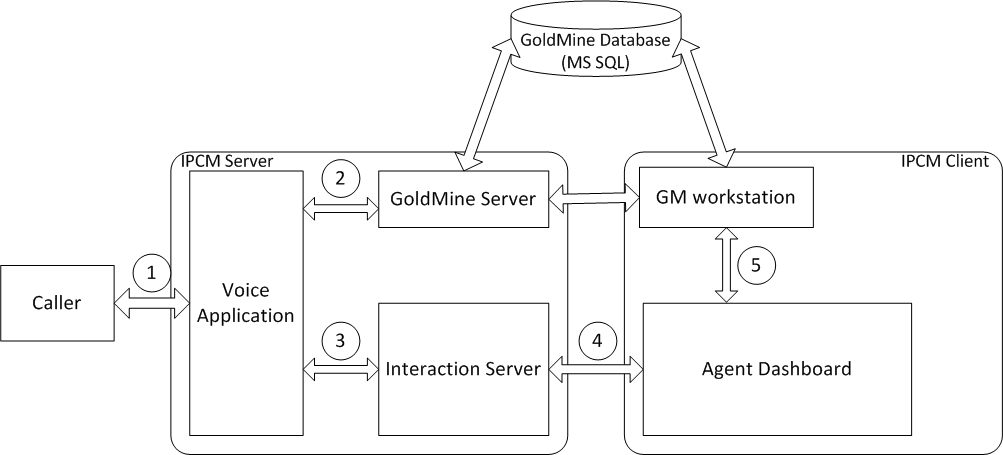
- Ivanti Voice connects a caller to the GMEE Voice application. The Voice application collects caller identification information either automatically using the ANI, or by prompting the caller to input identifying data such as a phone number, account number, or other types of data the GMEE database stores in the CONTACT1, CONTACT2, and CONTSUPP tables.
- The Voice application accesses the GMEE application and queries the GMEE database for the caller’s record using the identification information. The GMEE application returns the caller’s record to the Voice application.
- The Voice application attaches the record to the interaction, prepares a screen pop using data in the record, and places the interaction in a queue that contains GMEE calls (if you are using the GMEEDemo application, this queue is the GMEE Demo Queue).
- When Ivanti Voice routes the interaction to an agent, the connector on the agent’s workstation requests data from the GMEE database to populate the screen pop.
You can also configure the Voice application to let the agent try to find the contact information manually using the GMEE Search Center; however, even if the search is successful, the Agent Dashboard does not update the GMEE database history fields automatically.
- After the interaction is complete, the voice application updates the GMEE database using the GMEE Auto-Complete Activity block.