DEX scores
For ITAM Cloud environments integrated with the Ivanti Neurons Platform, this topic explains how to add a Ivanti Neurons Digital Experience (DEX) score to your hardware asset records. By default, Asset Administrator and Asset Manager user roles can view the DEX score in the Hardware Assets workspace and click it to access more details in the Neurons user interface.
If you're also using Ivanti Neurons for ITSM, you can set up an Incidents workspace > DEX tab that will display the DEX score of any asset linked to an incident.
With the expansion of remote work and an ever more complex technology set, it's more important than ever to measure and manage the digital employee experience.
A DEX score is calculated based on a curated set of indicators, hybrid machine learning, and statistical models. The score ranges between 0 and 100, with higher scores indicating better experiences.
The data DEX uses comes from Ivanti Neurons connectors and agents. The DEX score is calculated each time a device returns an inventory scan with an indicator value that has changed. The measured indicators are divided into these areas:
•Device Insights
•Security Insights
•Application Insights
•Service Insights
To view the details behind an asset's DEX score, click the score in the Hardware Assets workspace or Incidents workspace. This action will open the Ivanti Neurons user console, where you can view the details. To understand more about this score, see Device details > DEX Score in the Neurons Platform help.
For more information on DEX and how it works, see this Ivanti blog post: Measuring Digital Experience with Artificial Intelligence.
Getting started
Whether you're a new or existing customer, it's assumed that your ITAM Cloud environment is currently integrated with the Neurons Platform.
For new customers using ITAM 2022.4 or higher, the asset DEX score data is already configured. You need to complete just two of the following procedures:
•To map the DEX data to be imported from Neurons Platform.
•To turn on a feature flag to display the DEX data.
For customers upgrading to ITAM 2022.4 or higher (and using ITSM as well), complete all of the following procedures. For ITAM-only users, skip the "To configure a DEX child tab to display in the Incidents workspace" procedure.
1.Log in to ITAM as an Asset Administrator.
2.Open the Asset Data Mapping workspace.
3.In the Business Object Name column, double-click CI#.
4.Click the Field Mappings tab.
5.Click New Asset Data Mapping Field.
6.Add the mappings shown below for Field Name, XML Property, and Data Source, clicking Save after each one. Leave Default Value empty for each mapping.
7.Click Save to save the entire configuration.
8.Click ![]() to open the Configuration Console.
to open the Configuration Console.
9.In the left navigation pane, expand Extend > Integration Tools > Data Import Connections.
10.Scroll down the list and click Ivanti Neurons Connector – Device.
11.On the Connection Setting page, click Next.
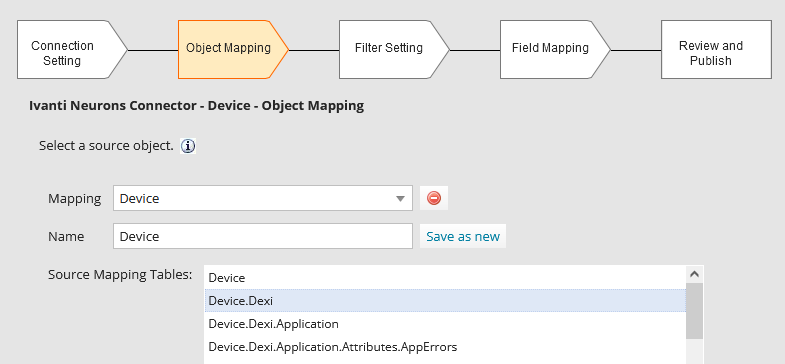
12.On the Object Mapping page, next to Source Mapping Tables select Device.Dexi, then click Next. Click Next again.
13.On the Field Mapping page, define the mappings as shown below. You may need to wait a few minutes for the mappings created above to display on this page.
14.Click Next, then Next again.
15.On the Review and Publish page, click Publish.
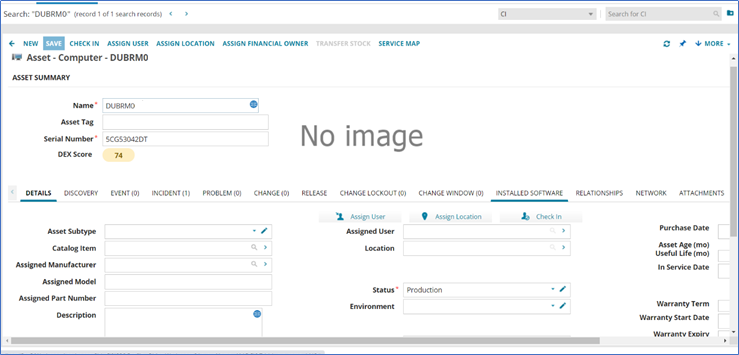
Once it's added, the DEX Score field will display on the Asset Summary page for an asset record.
1.Log in to ITAM as an Asset Administrator.
2.Click the ![]() icon in the menu bar at the top of any workspace. The Configuration Console displays in a new browser tab.
icon in the menu bar at the top of any workspace. The Configuration Console displays in a new browser tab.
3.In the left navigation pane, expand Build > Business Objects.
4.In the Find text box, search for CI and click to open the CI Business Object.
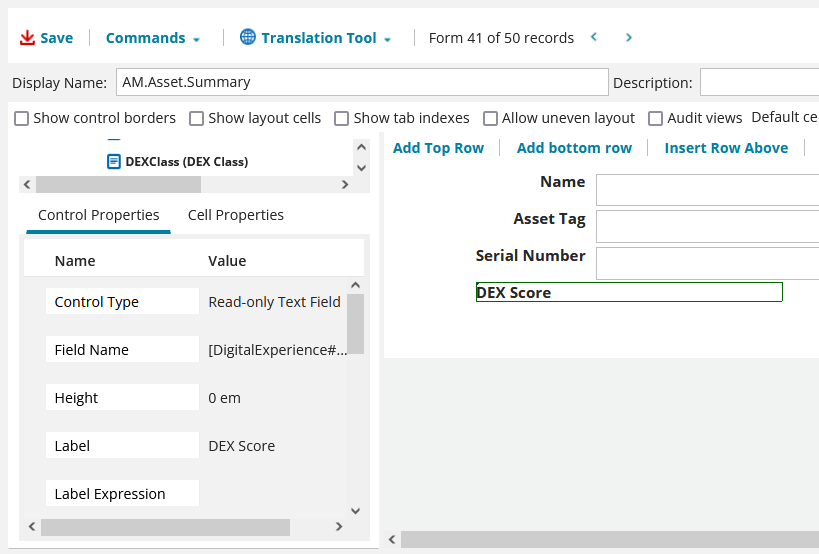
5.Click Forms at the top of the page, then scroll down the Forms list and click AM.Asset.Summary.
6.Expand CI > Relationships > DigitalExperience > Fields, then drag and drop the DEX Score into the middle pane. This will create the DEX Score field.
7.Highlight the DEX Score you just dragged and dropped and configure the Control Properties as shown below:
•Control Type: Read-only Text Field
•Field Name: [DigitalExperience#.CIContainsDigitalExperience]DEXScore
•Height: 0 em
•Label: Dex Score
•Label Pos: On the left
•Label Style Rule: DexScoreivanti_RightAlign
•Style: Default
•Style Rule: Add the following and click Save:
$(if ToLowerCase([DigitalExperience#.CIContainsDigitalExperience]DEXClass) == "red" then "DexScoreivanti_RedBackgroundLabel" else if ToLowerCase([DigitalExperience#.CIContainsDigitalExperience]DEXClass) == "green" then "DexScoreivanti_GreenBackgroundLabel" else if ToLowerCase([DigitalExperience#.CIContainsDigitalExperience]DEXClass) == "yellow" then "DexScoreivanti_YellowBackgroundLabel" else "Default")
•Tab Index: 0
•Visible Expression: Add the following and click Save:
$([DigitalExperience#.CIContainsDigitalExperience]DEXScore != null &&[DigitalExperience#.CIContainsDigitalExperience]DEXScore != "" && GetGlobal("Show Asset DEX Score"))
•Width: 4 em
•Wrapping: Overflow
8.Once complete, click Save (upper left corner) to save the entire configuration.
The result should look like this on the Asset Summary page for an asset record:
1.Log in to ITAM as an Asset Administrator.
2.Click the ![]() icon in the menu bar at the top of any workspace. The Configuration Console displays in a new browser tab.
icon in the menu bar at the top of any workspace. The Configuration Console displays in a new browser tab.
3.In the left navigation pane, expand Build > Business Objects.
4.In the Find text box, search for CI and click to open the CI Business Object.
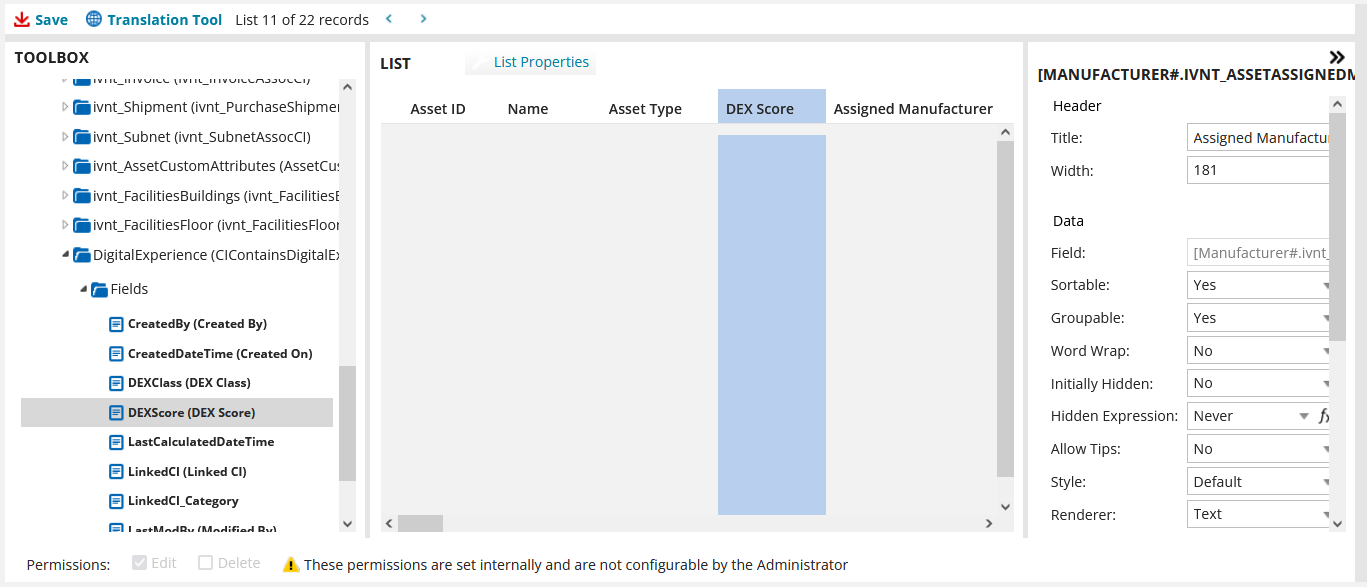
5.Click Lists at the top of the page, then scroll down the Lists list and click AM.Asset.Default.
6.In the Toolbox, expand CI > Relationships > DigitalExperience > Fields, then drag and drop the DEX Score into the middle pane. This will create the DEX Score column. The column position here will be the same position in the Hardware Assets workspace list view. You can reposition the column if needed.
7.Highlight the DEX Score you just dragged and dropped and configure the properties in the right pane as described below:
•For Hidden Expression, add the following in the Edit Expression dialog, then click Save:
$(!GetGlobal("Show Asset DEX Score"))
•For Style, select Expression from the drop-down list, add the following in the Edit Expression dialog, then click Save:
$(if ToLowerCase([DigitalExperience#.CIContainsDigitalExperience]DEXClass) == "red" then "DexScoreivanti_RedBackgroundLabel" else if ToLowerCase([DigitalExperience#.CIContainsDigitalExperience]DEXClass) == "green" then "DexScoreivanti_GreenBackgroundLabel" else if ToLowerCase([DigitalExperience#.CIContainsDigitalExperience]DEXClass) == "yellow" then "DexScoreivanti_YellowBackgroundLabel" else "Default")
8.Once complete, click Save (upper left corner) to save the entire configuration.
This procedure is only necessary for environments where ITSM is also used.
1.Log in to ITSM as an Administrator.
2.Click the ![]() icon in the menu bar at the top of any workspace. The Configuration Console displays in a new browser tab.
icon in the menu bar at the top of any workspace. The Configuration Console displays in a new browser tab.
3.In the left navigation pane, expand Build > Business Objects.
4.Click Incident.
5.Click Layouts at the top of the page, then scroll down the Layouts list and click IncidentLayout.ServiceDesk.
6.In the Views in this layout area, click formView to open the Form View Editor.
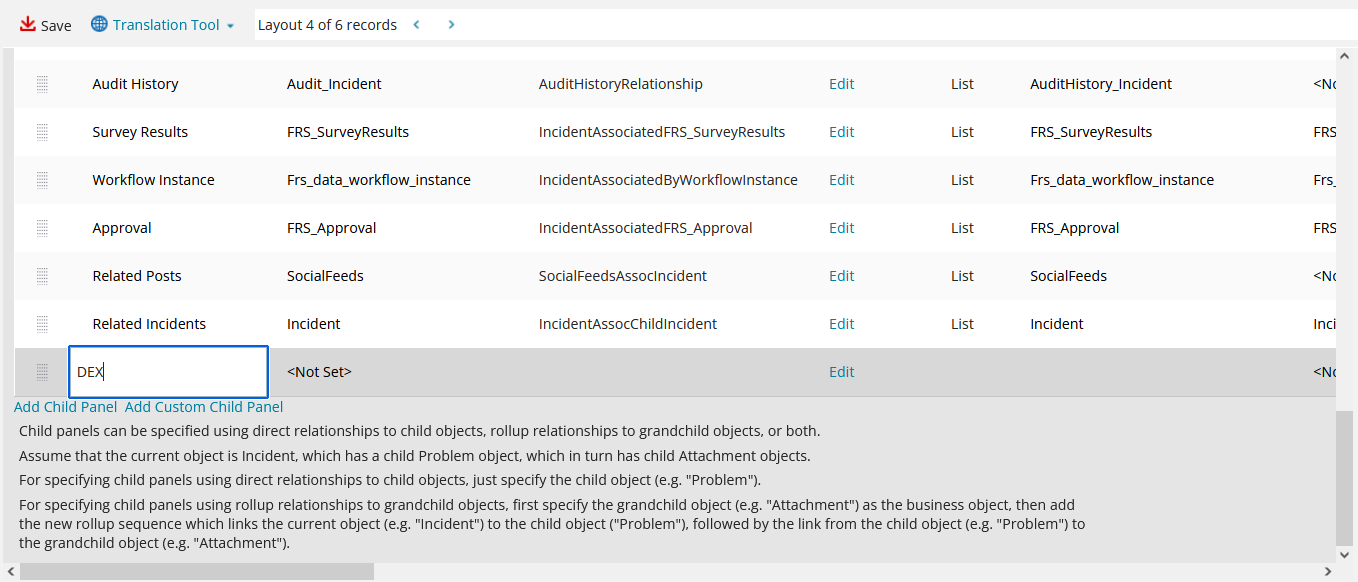
7. Scroll down to the bottom of the page and click Add Child Panel.
8.Add the following new child panel settings under the various columns:
•Display Name: Type DEX
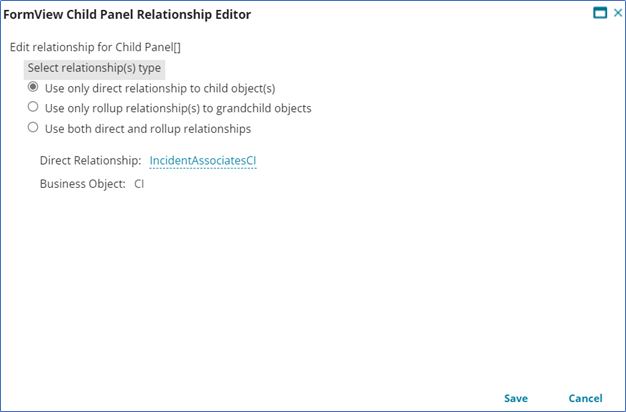
•Object: Set to the following options and click Save:
•Display: Set to List
•List: Set to Digital Experience
•Hidden Expression: Set to the following and click Save:
$(!GetGlobal("Show Asset DEX Score"))
•Initially Visible: Set to False.
9.Once complete, click Save (upper left corner) to save the entire configuration.
This flag will enable the mapped DEX data to display in the Hardware Assets workspace (and Incidents workspace if ITSM is also used).
1.Log in to ITAM as an Asset Administrator.
2.Click the ![]() icon in the menu bar at the top of any workspace. The Configuration Console displays in a new browser tab.
icon in the menu bar at the top of any workspace. The Configuration Console displays in a new browser tab.
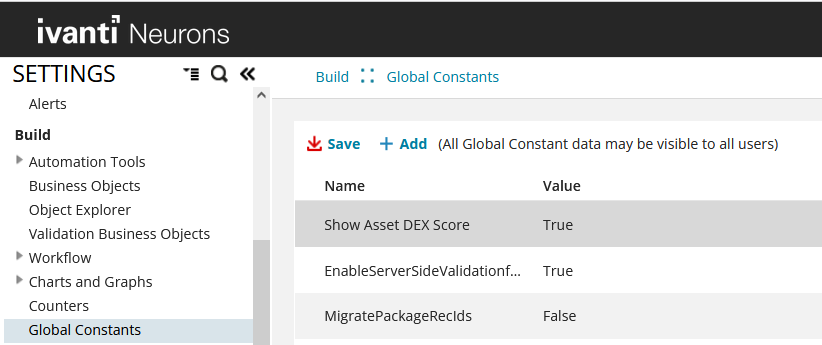
3.In the left navigation pane, expand Build > Global Constants.
4.Find Show Asset DEX Score in the list and set the value to True.
5.Click Save.

