Integrating with Ivanti Neurons for Discovery (for ITAM On-Premises only)
This topic describes how to integrate your local implementation of ITAM On-Premises with Ivanti Neurons for Discovery (accessed via the Ivanti Neurons Platform). Integration enables you to transfer data from Neurons for Discovery, such as device and invoice records, into your ITAM database. The transfer of data goes one way, meaning you can't transfer updated records back into Neurons for Discovery.
At this time, Installed software information for device records is transferable from Neurons for Discovery, but Licensable software information is not.
Getting started
Before getting started with the integration, make sure:
•You're running ITAM On-Premises 2022.3 or higher. For details on setting up ITAM On-Premises, see Setup.
For existing ITSM customers, upgrade to ITAM by applying the latest ITAM content package (available from the Ivanti Marketplace).
•You're licensed to access the Neurons Platform.
•You have an Neurons for Discovery tenant set up with data you want to transfer.
Next, follow the sections below, in the order listed, to complete the integration.
Updating the UNO Landscape configuration
This is a one-time update required to integrate with Neurons for Discovery. If you need assistance or details about the Neurons for Discovery tenant settings, contact Ivanti customer support.
Before you can update the UNO Landscape, you first need to obtain URL and tenant ID values from the Neurons Platform. Obtain these values by following the procedure below.
1.Log in to the Neurons Platform as Administrator using Chrome (or any other supported browser).
2.Click the browser's  menu and open More tools > Developer tools.
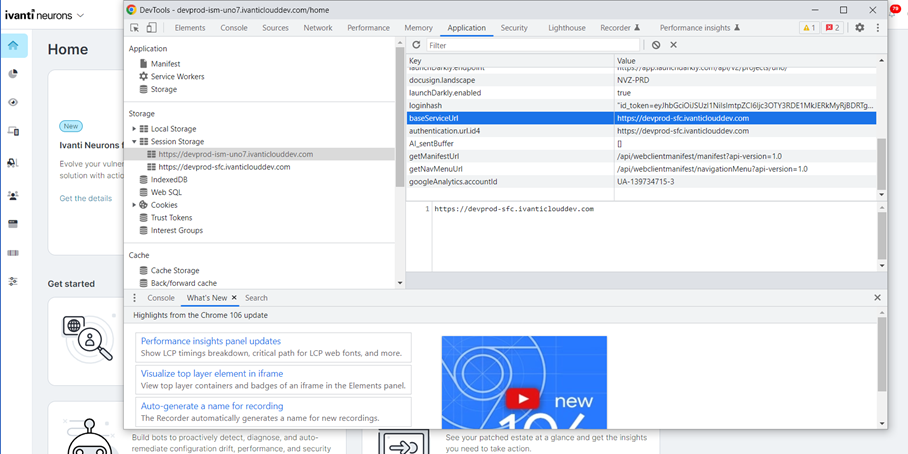
3.Under Application > Session Storage, copy the baseServiceURl value. This is the APIBaseURI value needed in step 3 of the next procedure.
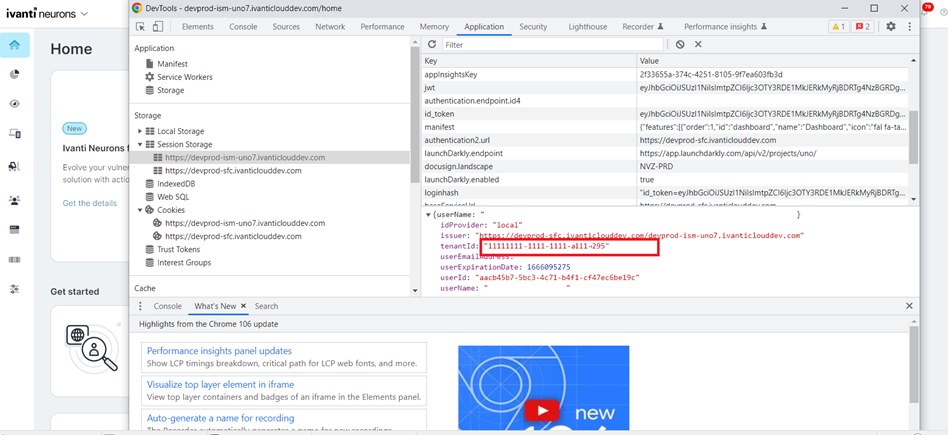
4.Under Application > Session Storage, copy the tenantId value (in the userName section). This is the UNOTenantRecId value needed in step 5 of the next procedure.
1.Log in to the ITAM tenant CentralConfig application as Administrator. If you need assistance accessing this application, contact Ivanti customer support.
If your ITAM installation doesn't currently display the Administrator user role, log in as Asset Administrator, then add the role via the Configuration Console > Roles and Permissions menu. For details, see Setting up Roles in the Configuring Ivanti Neurons for ITSM help.
2.Open the UNO Landscape workspace.
3.Click New UNO Landscape, then enter the following values:
•Name: Any identifiable name, such as "Neurons-OnPrem."
•APIBaseURI: This is the Neurons Service fabric URL (without an http/s prefix) identified in the procedure above.
•Asset Import API URI: This should be the same value as the APIBaseURI, also without an http/s prefix.
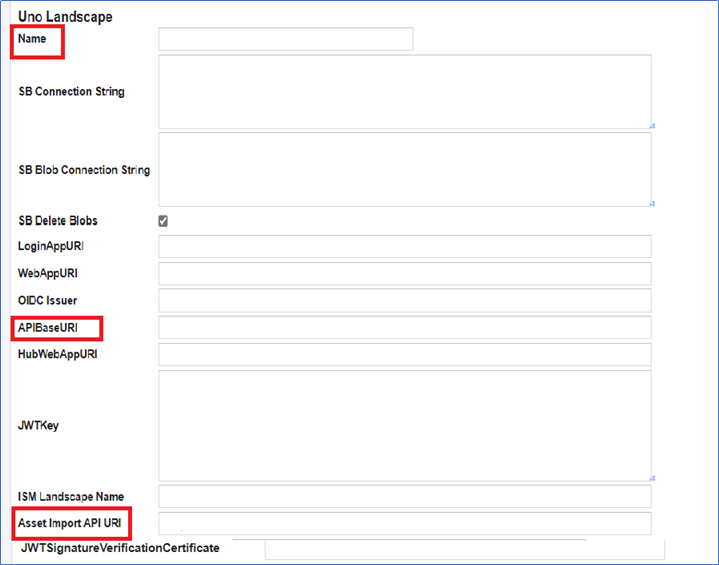
4.Click Save.
5.Open the Tenants workspace.
6.From the list, select the ITAM tenant where the data import from Neurons Platform is to occur, then enter the following values:
•UNO Landscape: From the drop-down list, select the name created above in step 3.
•UNOTenantRecId: This is the Neurons Platform tenant ID identified in the procedure above.
• UNOTenantURL: This is the Neurons Platform tenant URL.
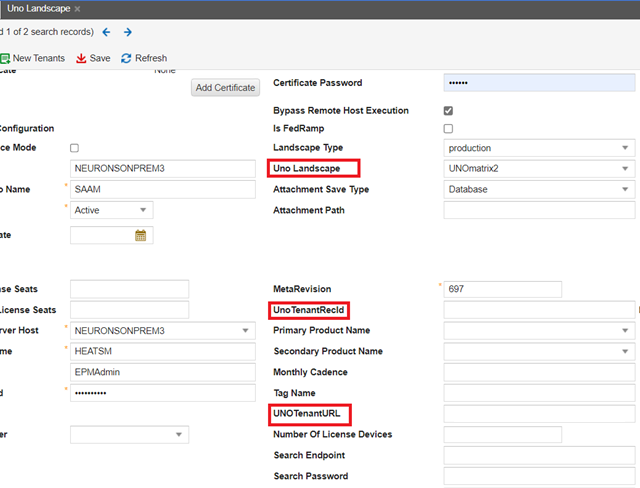
7.Click Save.
8.Click the Reset Tenant Cache button (top right of page) to ensure that the updates will take effect immediately.
Setting up the app and client registrations
Complete these procedures to enable the tenants for Neurons for Discovery and ITAM to communicate with each other.
1.Log in to the Neurons Platform as Administrator.
2.In the left navigation pane, click Admin > App Registrations.
3.Click New Registration.
4.From the New app registration drop-down, select Ivanti Neurons for ITSM and ITAM, then click Continue.
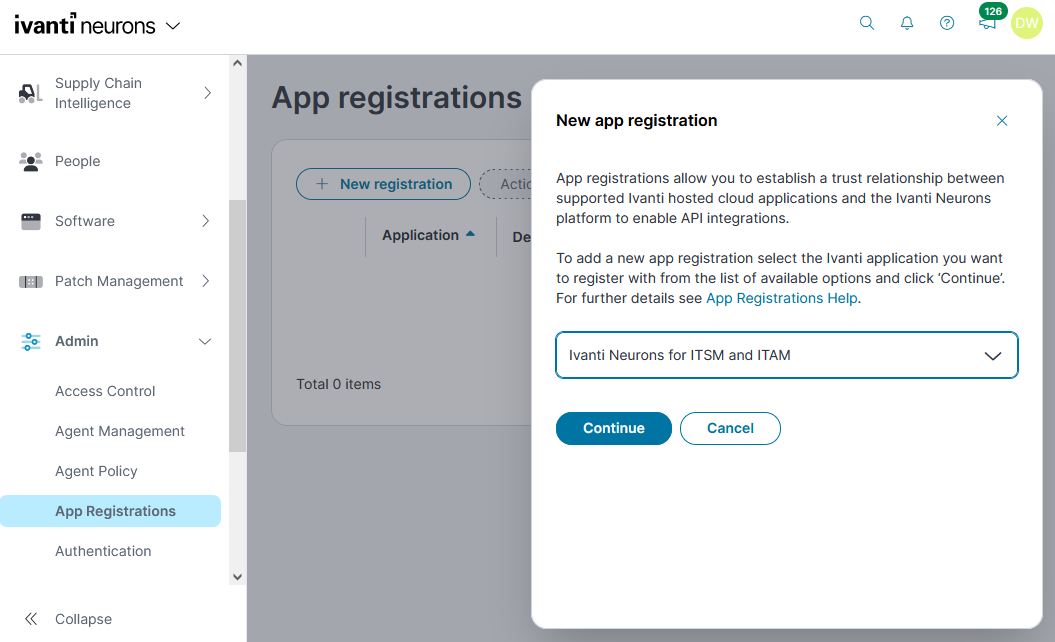
5.Add a meaningful description, such as "ITAM on-premises," then click Register.
6.Copy both the Neurons Auth URL and Client ID. (You'll need these for the next procedure when you set up client registration in the ITAM user console).
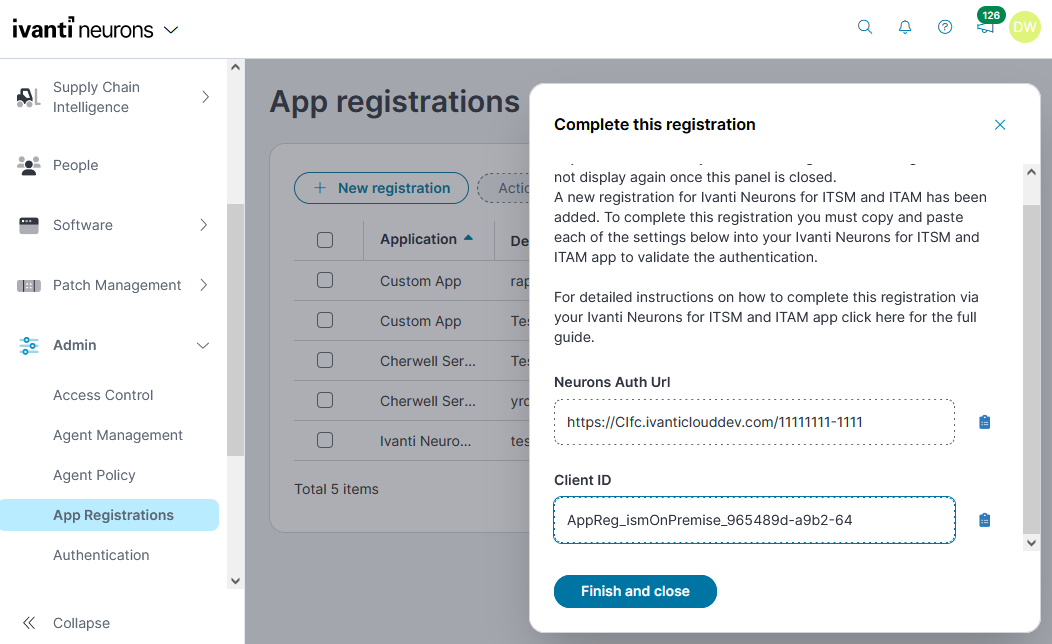
7.Click Finish and close.
1.Log in to ITAM as Administrator.
2.Open the Client Registration workspace and click New Client Registration at the top.
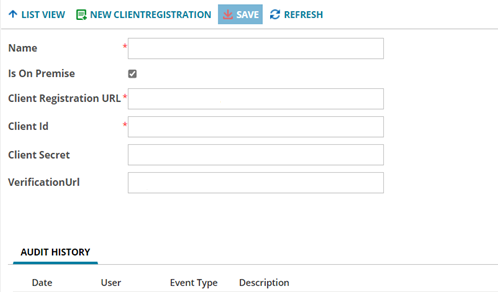
3.Add the following details from Ivanti Neurons:
•Name: Any identifiable name, such as "Neurons."
•Is On Premise: This option is selected by default—leave as is.
•Client Registration URL: The Neurons Auth URL copied from the procedure above.
•Client ID: The Client ID copied from the procedure above.
•Client Secret isn't needed here and VerificationUrl will auto-fill in step 9 below.
4.Click Save.
5.In the upper right corner, click Register Device to register your ITAM tenant with Neurons.
6.A pop-up message displays, telling you to enter the URL into a web browser to finalize the registration. Copy this URL and click OK.
7.Open a browser and paste in the URL. (Log in as Administrator if prompted.) The following screen displays:
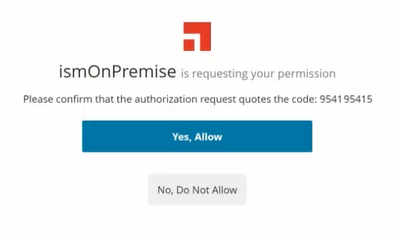
8.Click Yes, Allow. "Success" will display if verification was successful.
9.In the Client Registration workspace, click Get Token (upper right corner). The VerificationUrl field should update.
10.Click Save.
Important: You cannot access data discovered from Neurons for Discovery from more than one ITAM tenant at a time because of way app registration works—this is by design to prevent unauthorized access. The prior ITAM tenant ceases receiving data from Neurons for Discovery if the same Neurons for Discovery tenant is configured to communicate with another ITAM tenant.
Enabling the ability to transfer data into ITAM
Next, enable the ability to transfer data from Neurons for Discovery. Invoice transfers require an additional procedure to update a Web.config file.
1.Log in to ITAM as Asset Administrator.
2.Click the  icon in the menu bar at the top of any workspace. The Configuration Console displays in a new browser tab.
3.In the left navigation pane, expand Build > Global Constants.
4.Scroll down the list to EnableNeuronsSyncByAPI and set the value to True.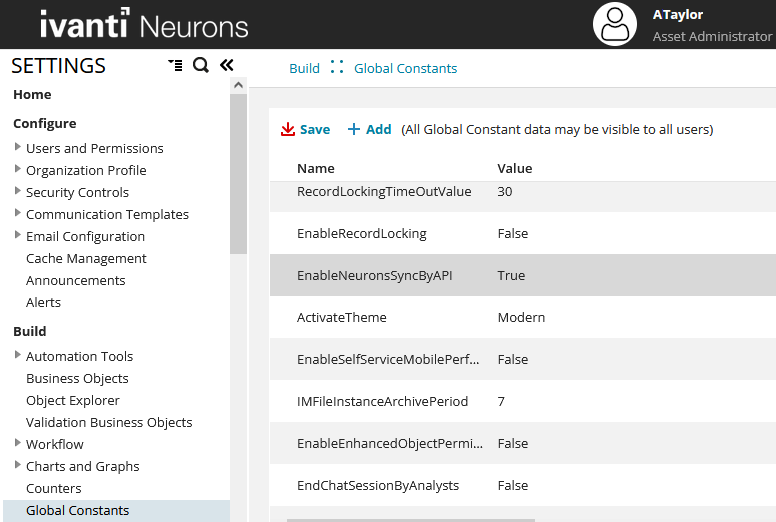
5.Click Save. An Information dialog will display; click OK.
6.Expand Configure > Cache Management. 
7.Click Remove all cache items, then click Yes.
8.Click Reset cached validation lists only, then click OK.
Important: By clearing the cache and then resetting it, you can speed up the process for enabling the connection between the tenants. The data transfer may not work immediately if this step isn't performed.
Complete two final procedures:
From the ITAM user console, open the Asset Processor Configuration workspace and enable the configurations as shown below:

On the ITAM tenant, open the IntegrationServiceHost.exe.config file (located by default at C:\Program Files\HEATSoftware\HEAT) and do the following:
• Update the IsOnpremise flag by setting it to true. The flag is case sensitive and should be in lowercase.
•Restart IIS and the Integration service.
1.On the ITAM tenant, open the Web.config file in the installation folder (located by default at C:\Program Files\HEATSoftware\HEAT\IMServer\IMServices\AssetProcessor).
2.Copy the data displayed below this section:
<CentralConfigApiKeyconfigProtectionProvider="DataProtectionConfigurationProvider">
For example:
<EncryptedData>
<CipherData>
<CipherValue>AQAAAN....AAAEAACAAAADQ6</CipherValue>
</CipherData>
</EncryptedData>
</CentralConfigApiKey>
3.Paste the copied data into the Web.config file in the IvantiCloudDataProcessor folder (located by default at C:\Program Files\HEATSoftware\HEAT\IMServer\IMServices\IvantiCloudDataProcessor).
4.Confirm <section name="CentralConfigApiKey" type="System.Configuration.NameValueSectionHandler"/> is available in the IvantiCloudDataProcessor Web.config file.
5.Restart IIS.
Configuring the Neurons connector settings
Finally, configure the Neurons Device and/or Invoice connector settings for importing the data into ITAM. Settings include data filters, field mappings, and the import schedule. This is a one-time configuration that is saved until you manually change it again.
1.Log in to ITAM as Asset Administrator.
2.Click the icon in the menu bar at the top of any workspace. The Configuration Console displays in a new browser tab.
3.In the left navigation pane, expand Extend > Integration Tools > Data Import Connections.
4.Scroll down the list to Ivanti Neurons Connector – Device or Ivanti Neurons Connector - Invoice. Ensure the connector is ON and set to Run Now. Depending on the type of records you want to import (device or invoice), click the corresponding link to open and edit the connector.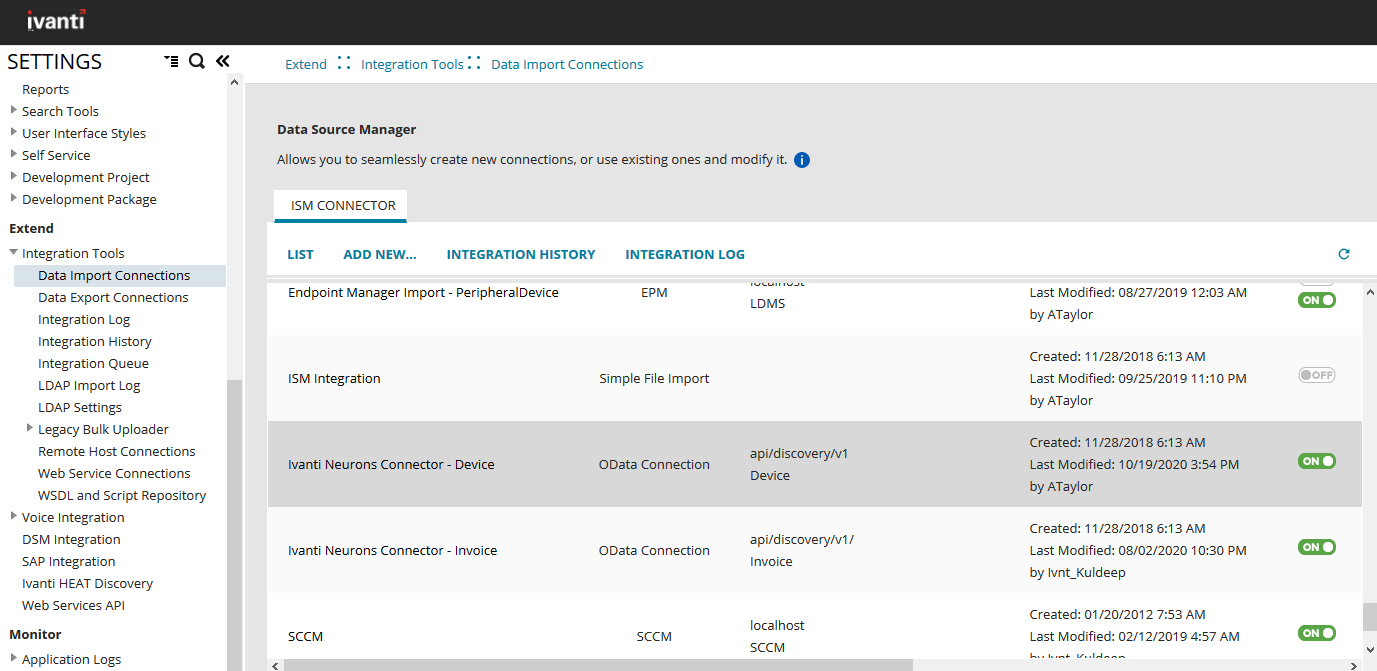
5.Connection Setting page: We recommend leaving the defaults as they are, although you can change as needed. Click Test Connection near the bottom of the page to verify that the connection settings work. It's important to test each connector that you're using. If the test connection fails, it's most likely a configuration issue and the data will not transfer into the ITAM database. Contact Ivanti customer support for assistance.
6.If the test connection is successful, click Next.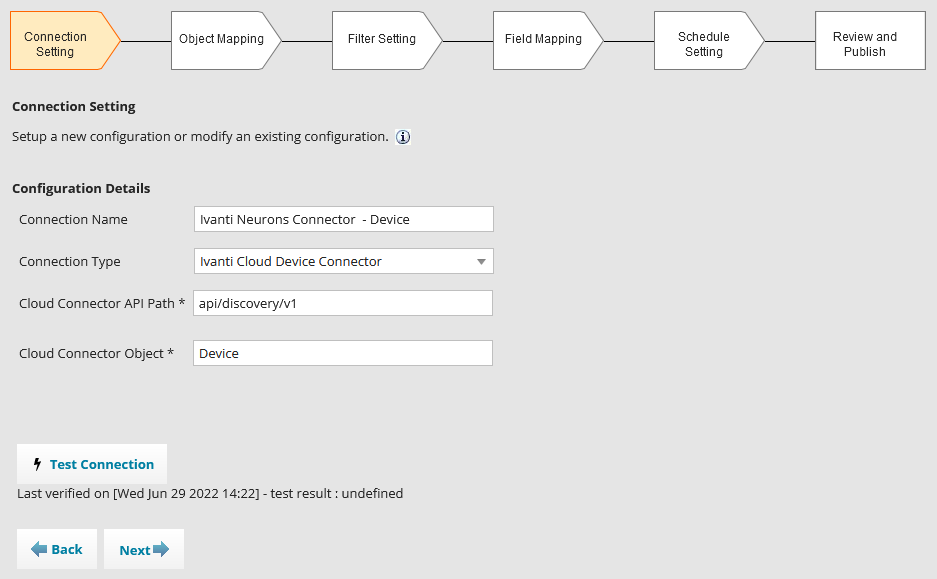
7.Object Mapping page: We recommend leaving the defaults as they are, although you can change as needed. Source mapping tables is a list of populated tables based on settings defined on the previous page. Batch size is the number of records processed at a time for any given job. Max size is the number of records retrieved each time the connector queries the source database. Root table is the primary table containing the master data that defines all devices in your organization. Unique key uniquely identifies all devices in your organization. Change-Time column is not currently in use.
8.Click Next.
9.Filter Setting page: Click Create Filter to define optional filter conditions for the records you want to import. Based on the filters defined, only those devices or invoices will be imported from the source database. For example, you can choose to import an asset type of Laptop by creating the filter value Laptop as shown below.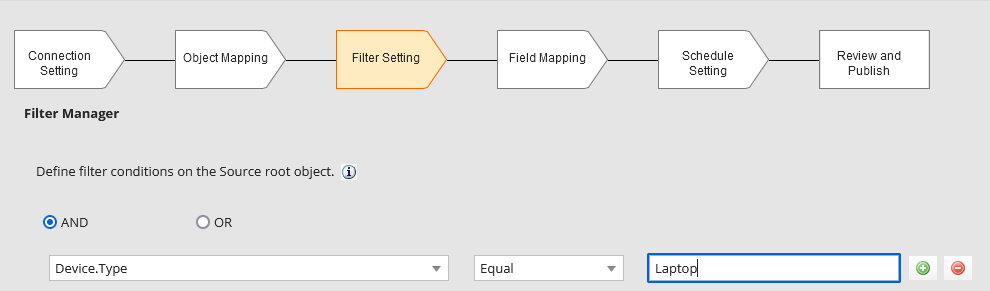
•In the left drop-down, select a field from the source database.
•In the middle drop-down, select an operator. In most cases, you’ll want to select Equal.
•In the field to the right, enter your filter condition. You can only add one filter per row.
•Use the AND/OR conditions as necessary and click the  icon to add more filters to the list. To remove a filter, click the
  icon.
icon.
10.When finished, click Next.
11.Field Mapping page: Define how fields in the source database are mapped to fields in the target ITAM database. The left column displays source field names, the middle column displays transformation functions, and the right column displays target field names. It's assumed that the Source mapping names are known or identified in advance. For an overview of available functions, see Connector transformation functions (PDF). For guidance about target field mappings, see Connector field mappings (PDF).
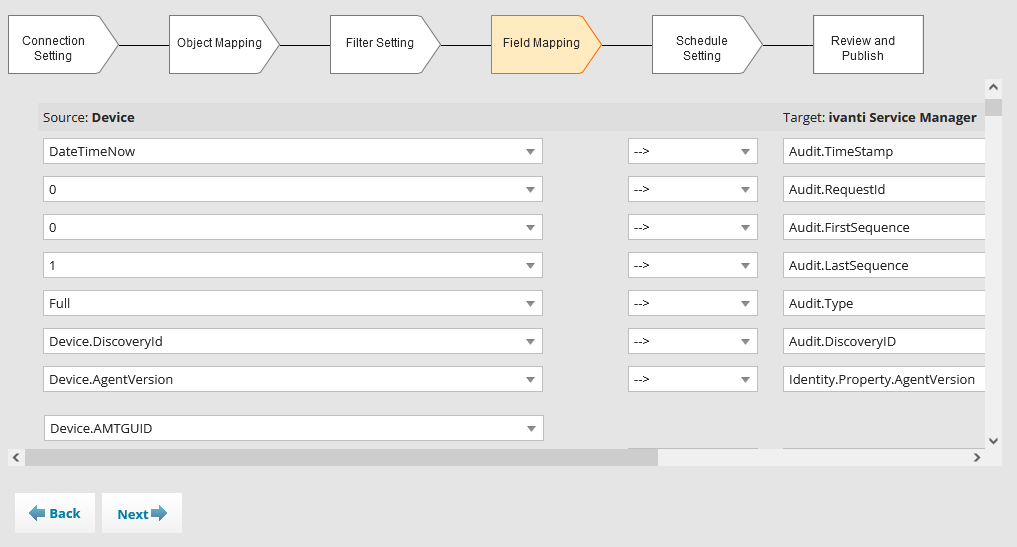
12.When finished, click Next.
13.Schedule Setting page: Schedule when the connector will sync with the Neurons Platform to import data into ITAM. Available options are located in the Schedule List. You can select more than one schedule using the Ctrl button on your keyboard.
14.Click Next.
15.Review & Publish page: Click Preview to ensure that the mappings look as expected. Click Back to make any changes. When you’re satisfied with the results, click one of these options:
• Publish to save your settings and run the connector at the schedule(s) you set.
•Publish & Run Now to save your settings and run the connector immediately. With this option, you can monitor the data transfer in real-time. See the next section for details.
•Publish & Test Run to conduct a test run of the connector but not save the records to the target ITAM database. 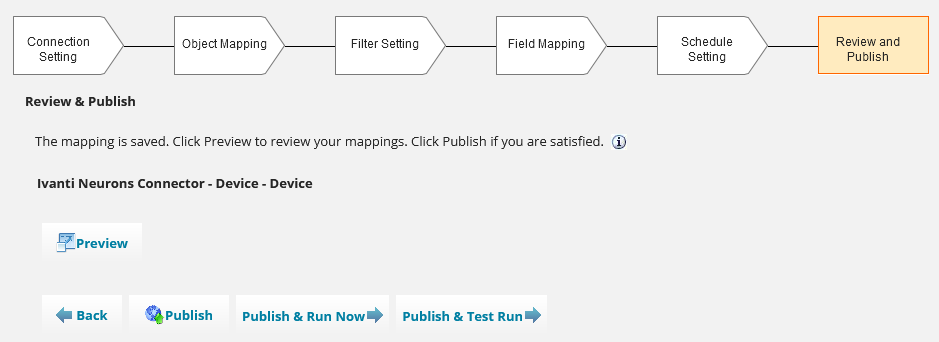
Confirming the data is importing correctly
After integration is complete, you can view details about an import job as it's occurring. From the ITAM user console:
•Open the Integration Queue workspace to monitor the job progress, which may take a while. Refresh the page as often as needed. You’ll see the status of the import job go from Queued to Running to Completed. The job will disappear from this workspace when completed.
•Open the Message Queue Journal workspace to view incoming messages related to the transferred data. Click Decompress Message (top right of page) to view details about specific, discovered records. By default, this option is disabled. To enable it, see the Troubleshooting section below.
•Open the Integration Log workspace to view any errors associated with the import job. If a job was successful, Stats display under LogType. When errors are encountered, Stats and ErrorStats display. Double-click ErrorStats to view a summary of the errors.
Imported data will display in the correct workspace for the record type—devices display in Hardware Assets and invoices display in the Invoices workspace. You may need to refresh those workspaces before the data displays.
At this time, Installed software information for device records is transferable from Neurons for Discovery, but Licensable software information is not.
Troubleshooting
The Integration Log workspace may display an error during token renewal for the ITAM tenant. You can ignore this error or use the following workaround to prevent it from happening.
1.Log in to ITAM as Asset Administrator.
2.Click the icon in the menu bar at the top of any workspace. The Configuration Console displays in a new browser tab.
3.In the left navigation pane, expand Extend > Integration tools > Web Service Connections.
4.Scroll down the list to Renew JWT for Neurons and click the Edit  icon.
icon.
5.Click Next to open the Integration Script page.
6.Update the Scripts section with the following text:
console.log("Start : Token Refresh");
RefreshOnPremToken('RefreshTokenfromNeurons');
console.log("End : Token Refresh");
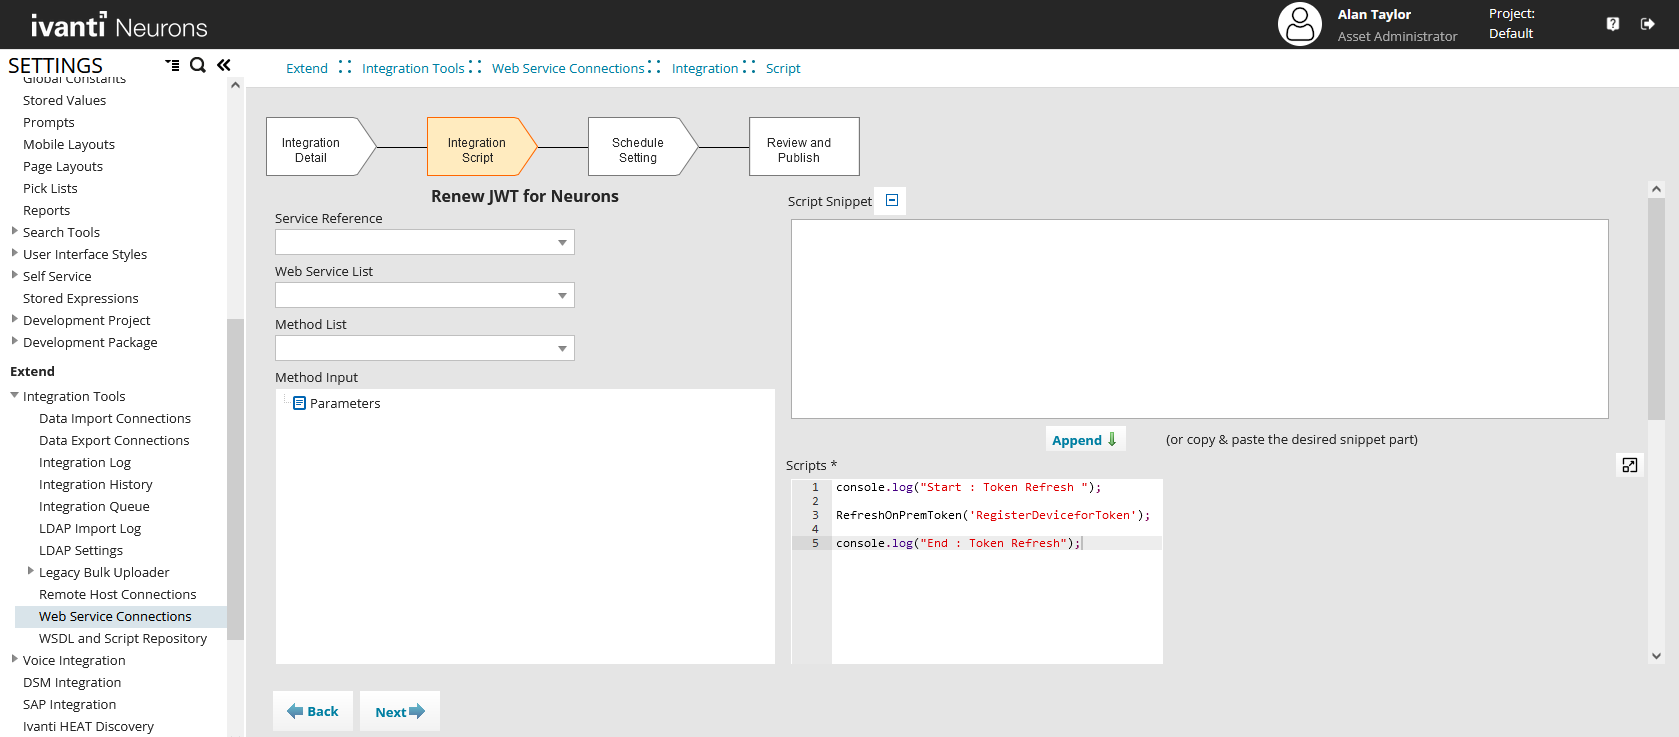
7.Click Next until you reach the Review and Publish page.
8.Click Publish and Run now.
The following tips address issues you may encounter when viewing the Message Queue Journal workspace during a data transfer.
Before updating the Web.config file in this procedure, make sure you make a backup of the original.
1.On the ITAM tenant, go to C:\Program Files\HEATSoftware\HEAT\IMServer\IMServices\IvantiCloudDataProcessor.
2.Open the Web.config file.
3.Under the <client> section, do the following:
•Ensure there's only one element with an attribute binding of NetTcpBinding_IMessageQueueService. If there are multiple elements, remove all except one.
•Ensure the address attribute of that element is this address: net.tcp://localhost:7200/
For example:
<endpoint address="net.tcp://localhost:7200/" binding="netTcpBinding" bindingConfiguration="NetTcpBinding_IMessageQueueService" contract="MessageQueueService.IMessageQueueService" name="NetTcpBinding_IMessageQueueService" />
You can use the host name/server name instead of localhost. Update the port number to 7200 if any other port is configured.
4.Save the file.
Enable this option to view details about specific records as they're being processed during a data transfer.
1.Log in to ITAM as Asset Administrator.
2.Click the icon in the menu bar at the top of any workspace. The Configuration Console displays in a new browser tab.
3.In the left navigation pane, expand Build > Automation Tools > Quick Actions to open the Quick Actions workspace.
4.Scroll down the list and click Frs_MessageQueueJournal.
5.Click the Quick Actions tab.
6.In the left side panel, click Decompress Message.
7.Click Edit to open the Edit Expression window.
8.Add the Device type in the Disable in UI when expression field as shown below:
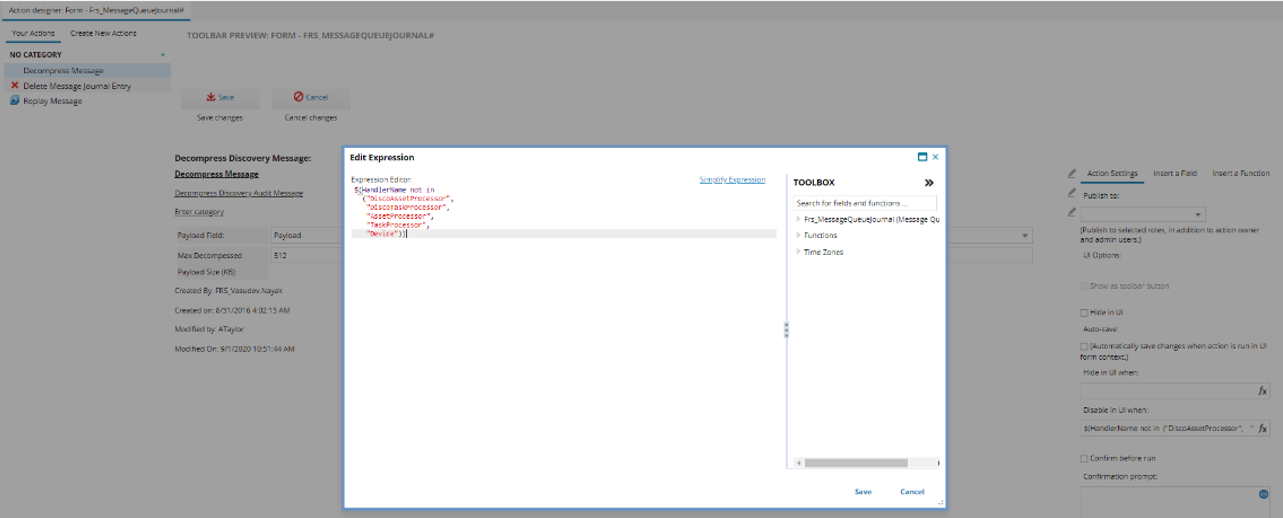
9.Click Save.