Product Catalog
The Product Catalog workspace lists standard items that users can request. The Procurement Manager role typically manages this workspace, although the Asset Administrator and Asset Manager roles can access this workspace.
Users can request items that are not in the Product Catalog, however, this process is typically longer and involves additional steps. Items in the Product Catalog have agreed costs from selected, approved vendors. If an item needs to be purchased because it is not in stock, much of the procurement process can be bypassed.
Catalog items include standard hardware, software, consumables, or bundles of these items.
Hardware - Physical devices, such as computers, servers, or peripherals. Users must return hardware when the warranty period ends or upon separation from the organization.
Software - Applications installed on devices to perform specific tasks. Renew licenses upon expiration, or reclaim them when no longer needed or when the user leaves the organization.
Consumables - Items that are used and not usually returned, such as printer ink, paper, or accessories like a mouse.
Bundle - A bundle is a grouping of items currently available in the Product Catalog list view. Bundles help streamline the request process when certain items are commonly purchased together. The pricing of a bundle is the sum of all items within it.
Currently, a bundle can include only one instance of each catalog item. For example, you cannot create a bundle that contains two of the same monitor.
When you create a catalog item, you are not creating a record for an actual asset, but rather defining an item that can be requested:
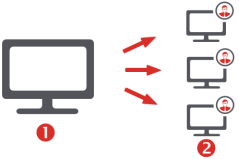
1 – Product Catalog item - the template for requested assets
2 – Asset record - created after the item is requested
The Product Catalog workspace displays a list of price list items in your database. You can use the saved searches drop-down to view different lists, such as all products, products in stock, and products out of stock.
After creating the catalog items, the next step is to design the Product Catalog forms that will enable users to select those items online. For details, see the section below.
 To create a new catalog item
1.Open the Product Catalog workspace.
2.Click the New dropdown to select the item type you want to create (bundle, consumable, hardware, or software).
3.Enter summary information at the top of page, such as
•Status
• Requestor
• Item Name
• Expiry Date (after which time the item will no longer be available in the catalog),
•Support Team
•Support Lead (the team member responsible for adding item added to the catalog).
4.Enter pricing details:
• Est External Cost (price paid by the organization)
• Est Internal Price (price charged internally, including additional costs such as maintenance)
5.Complete the associated tabs as required (tabs vary depending on the item type)
•Catalog item tabs
•Bundle Items – For bundles only. Add existing catalog items to the bundle by linking them here.
•Item Details – This information is used to create a corresponding asset record when procurement is completed for a user's order. Fields vary by item type and may include: Manufacturer, Model, and Asset Type, and a check box that indicates if the item is a standard catalog Item.
•The Manufacturer and Model fields are used to reconcile the catalog item with existing assets in the database.
When the catalog item becomes obsolete, complete the Replacement Model field to indicate the item that is to be used in its place.
To automate the reordering process for catalog items, the Asset Administrator can turn on a global constant to display two fields that are disabled by default - Reorder level Qty and Reorder Quantity. For details, see the "To enable automatic reorders" procedure below.
Click Browse beneath Catalog Image to associate an image with the catalog item. This image will also display in the Hardware Assets workspace > asset record page for all assets with this item set as the Catalog Item on the Details tab, and in the Purchase Line Item workspace for a purchase order associated with this item. We recommend that you use images that are either .PNG or .JPG and no larger than 150 x 150 pixels.
When you update the Description field or a value under the Item Details tab, this change is also made to all asset records associated with the catalog item.
•Assets – Maintain the list of assets that are associated with this catalog item by linking them here. You can also see the Status of the assets associated with the catalog item, which helps you to identify which assets are suitable to fulfill an asset request.
•Stock Levels – Shows the locations where this catalog item may be currently in stock.
•Active Orders – Lists the purchase orders associated with the catalog item that are not at one of the statuses of Cancelled, Rejected, or Completed.
•Organizational Units – Link to relevant organizational units that you want to associate with this catalog item.
•Approved Vendors – Shows details about the vendors that have been approved as suppliers for the catalog item:
•Click Add Approved Vendor to add vendors that have been approved for this catalog item and, if appropriate, enter the associated Vendor's SKU for the item from that vendor. Enter the Retail Price and any Discount you have negotiated. The product can then automatically calculate the Price that you are charged.
•Click Assign Recommended Vendor to select one of the vendors as the preferred supplier.
•Suggested Alternatives – Link to alternative items already in the Product Catalog that are appropriate substitutes if this item is unavailable when fulfilling a request.
•Journal – Add emails or notes to the catalog item.
•Attachments – Attach a document to the record, or add a URL link to a relevant website. URLs must include the https:// prefix.
•Audit History – Automatically tracks changes made to key attributes of this record.
6.After entering the required data, click Save or Submit for Approval. Saving the item changes its status to Created, which is an interim status allowing you to change the item details if necessary. Submitting the item changes the status to Approved for adding to the Product Catalog, or if an approval process is in place, submitting starts that process and changes the status to Under Review.
To enable automatic reorders
The Asset Administrator can enable automatic reordering by turning on a global constant that displays the following fields:
•Reorder level Qty
•Reorder Quantity
When a reorder level is set, a purchase order is automatically triggered when stock reaches or falls below the threshold. The order appears under the Active Orders tab. Enter a Reorder Quantity for the number of items to be automatically reordered each time the Reorder level Qty threshold is met.
Even if the reorder threshold is met, users can continue to request this item if the quantities specified are currently available in inventory (as viewable from the Stock Management workspace > Storage Space Summary tab). If requested quantities exceed the number of available items, an email is sent to the customer stating that their request is on hold. The request status changes to Waiting for 3rd Party until the restock purchase order is completed. At that point, asset fulfillment can continue.
The Asset Administrator and Storage Manager user roles can edit these fields; for other roles, these fields are read-only.
1.Click the  icon in the menu bar at the top of the page. The Configuration Console displays in a new browser tab.
2.In the left navigation pane, expand Build > Global Constants. Look for Show Reorder level and Reorder Quantity in the list.
3.Double-click in the Value column and type True, then click Save.
4.Close the Configuration Console and refresh the Product Catalog workspace.
To turn this global constant off again, enter a value of False and click Save.
To set up an approval process
By default, when you submit a new catalog item, its status changes to Approved. However, the Asset Administrator can configure an approval process to ensure that the catalog item becomes approved only after the majority of the Product Catalog Item Approvers contact group has approved the item.
1.Click the  icon in the menu bar at the top of the page. The Configuration Console displays in a new browser tab.
2.In the left navigation pane, expand Build > Global Constants. Look for ivnt_ProductCatalogThreshold in the list.
3.Double-click in the Value column and set the number to something other than 0, then click Save.
4.Under Configure in the left navigation, click Users and Permissions > Groups.
5.Double-click the group called Product Catalog Item Approvers.
6.On the Member tab, click Link and select the users you want on the approvers list. Click Select.
7.Click Save and close the Configuration Console. Refresh the Product Catalog workspace.
Now when you click Submit for Approval when creating a new catalog item, the status changes to Under Review and approval requests are sent out to the appropriate people.
When over 50% of the group has approved the item, the approval is completed and the status changes to Approved. If a majority rejects the request, the status changes to Rejected. The status can also change to Canceled, Timed Out, or No Approvers Found depending on the outcome. For each change of status, the Audit History is updated as part of the request record.
For more information, see Employees, departments, teams, and contact groups.
To discontinue catalog items
If a catalog item can no longer be purchased, you can set its Status to No Longer Purchasable. The item remains in the catalog, but can no longer be purchased. You can use the Item Details tab > Replacement Model field to direct users to the catalog item that you want to use as a replacement.
Alternatively, set the Status to Expired to remove the item from the Product Catalog completely.
Designing the Product Catalog forms
Use the Request Offerings workspace to design the Product Catalog forms, which comprise the user interface that enables users to request assets from the online Product Catalog. The Procurement Manager user role has access to this workspace, as do the Asset Administrator and Asset Manager roles.
You should design the forms after adding items to the Product Catalog workspace. Once the forms are created, relevant manager user roles can assign assets to employees from the Asset Requests workspace, or employees can place requests for themselves from the Self-Service Portal. For details, see Asset requests.
If your database is integrated with Ivanti Neurons for ITSM, you'll see request offerings in this workspace for both products.
To design the Product Catalog form
1.Open the Request Offerings workspace.
2.In the left pane, click General Services.
A list displays showing the available form templates that you can modify for your specific needs. Some of the templates are for ITSM, but the ones that mention the Product Catalog are specific to ITAM—these include bundles, computers, consumables, general assets, infrastructure, mobile devices, and peripheral devices.
3.Click the request offering you want to modify for the Product Catalog, or click New > Request Offering (top of page) to create a new form. The form template designer opens with four tabs for completing the form:
•Define the request offering
•Design a request form
•Plan a request fulfillment
•Publish the action access
For details about creating and editing request offerings, see the ITSM help topic About Request Offerings, as well as related information in the table of contents (located under that topic in the left pane).
4.Click Save & Exit.