This is not the latest version of Identity Director documentation.View available documentation.
Configure Identity Consumers
On the Identity Consumer page, you can configure Consumers that use the Identity Broker for authentication.
A new installation of Identity Broker has at least three Consumers already registered by default.
- The Identity Broker Manager is the Management Portal.
- The others (Identity Admin and Identity Manager) are for troubleshooting purposes.
If Identity Broker was installed on a server that also contains the Identity Director Management Portal and/or Web Portal, Consumers for theses portal will also have been created.
Configuring additional Identity Consumers takes two steps:
- On the Identity Consumer page of the Identity Broker Management Portal, click Add.
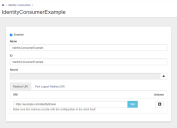
- On the New Consumer page that opens, specify the following fields:
- Name: Specify a friendly name for the Consumer. This name does not have to be unique and will only be displayed in the Identity Broker Management Portal.
- ID: Specify a unique identifier for the Consumer. The ID cannot contain spaces or special characters.
In the Management Portal of the Ivanti product that will use Identity Broker authentication, this value must be entered at Client ID. - Secret: the password or private key used to authenticate the Consumer. After clicking the lock icon or saving the new Consumer, data in this field can no longer be viewed. Unlocking the field will erase the data and a new password or private key must be entered.
In the Management Portal of the Ivanti product that will use Identity Broker authentication, this value must be entered at Client Secret. - Redirect URI: Specify the URI of the portal that will be using Identity Broker authentication.
It contains the hostname, as well as the IIS Virtual Directory Site name. As the URI is case sensitive, you can verify the actual spelling of the hostname by typing hostname in Command Prompt, and the Site name in the Internet Information Services (IIS) Manager.
Keep in mind that the URI must always end with a slash (/).
Example: https://server.mycompany.com/IdentityDirector/
In the Management Portal of the Ivanti product that will use Identity Broker authentication, this value must be entered at Redirect URI (Ivanti Automation and Ivanti Identity Director) or Application URL (Workspace Control).For the Identity Director Web Portal, more than one set of Redirect URI / Post Logout Redirect URI (see below) can be configured.
See the Identity Director Help for more information.This URI is used in step 11 of the Authentication sequence.
- Post Logout Redirect URI: This field will be pre-filled with the value you entered at Redirect URI.
Users are redirected to this page after they use the Sign out option in a portal that uses Identity Broker authentication.

Make sure at least one Identity Provider is configured before you enable Identity Broker authentication on a portal.
If a portal is configured to use Identity Broker authentication and no Identity Provider is available, users will not be able to access the portal. See Configure Identity Providers.
To configure Identity Broker authentication on an Identity Consumer (i.e. a portal for Ivanti Automation, Identity Director or Workspace Control), use the connection settings you specified for the Consumer for that portal.
Using Identity Broker authentication is optional for these portals.
The authentication settings are in the following locations:
- in the Identity DirectorManagement Portal, at Setup > Datastore, in the Authentication type section.
- in the AutomationManagement Portal, at Setup > Environment, in the Authentication type section.
- in the Workspace ControlManagement Portal, at Datastore Setup, in the Authentication type section.
In the Authentication type section, select the option Identity Broker and fill out the following fields:
- Identity Broker URL: Specify the Identity Broker Address and add the exact path /identitybroker/ids/.
Note that this path uses all lowercase letters and ends with a slash (/).
Example: https://server.mycompany.com/identitybroker/ids/
The Identity Broker Address is the address you specified in the Configure Other Settings step during installation.This URL is used in step 2 and 3 of the Authentication sequence.
- Application URL / Redirect URI: Specify the exact URL / URI of the portal.
Note that the path after the hostname is case-sensitive and ends with a slash (/).
Example: https://portals.mycompany.com/IdentityDirector/
This value must match exactly the value at Redirect URI of the Consumer for this portal, that you configured in the Identity Broker.This URI / URL is used in step 10 and 11 of the Authentication sequence.
- Client ID: Copy the ID of the Consumer for this portal, that you configured in the Identity Broker.
Example: AutomationPortal - Client Secret: Copy the Secret of the Consumer for this portal, that you configured in the Identity Broker.
See the Identity Director Help for information on how to configure Identity Broker authentication for the Identity Director Web Portal.