This is not the latest version of Identity Director documentation.View available documentation.
Install the Identity Broker
You can install the Identity Broker using the installer for Identity Director. If you perform the installation on a server that also hosts the Identity Director Management Portal and/or Web Portal, the installer will pre-configure the settings for Identity Broker Authentication for these components.
After installation, if you want to use Identity Broker Authentication for the Identity Director portals, you only have to enable it.
If you extract the Identity Broker installation file from the Identity Director Installer, that installation file will not pre-configure any settings.
Before installing the Identity Broker, make sure to create an empty database in SQL, using either a SQL or Windows account with DB_owner rights.
This also covers the scenario where you install these portals in the same run as installing the Identity Broker.
Use the installer for Identity Director to install the Identity Broker.
- After starting the Identity Director installer, choose Select and install components and click Next.
- At Features, select Identity Broker and any other component you want to install or update on this server.
- Click Next followed by Install.
If you have selected other components, these will be installed first.
For information on those installations, please refer to Getting Started with Identity Director.
Once the Identity Broker installation starts:
- Accept the License Agreement and click Next.
- Specify an installation folder. By default, Identity Broker will be installed in C:\Program Files\RES\Identity Broker\. Click Next.
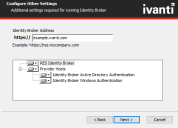
- In the Configure Other Settings step, specify the Identity Broker Address. This will be the public address of the website running the Identity Broker that your users will access.
Specify an address that:- can be reached by machines that access the Identity Consumers (Identity Director portals)
- is covered by a certificate used in IIS Site Bindings for the RES site on this server.
This can be the same address you used to Configure IIS Binding for Identity Director.
Optionally, in this step, you can specify the Authentication Provider Hosts you want to install alongside the Identity Broker:
- Identity BrokerActive Directory Authentication
- Identity Broker Windows Authentication

You can install one, both or neither, depending on your needs.
- Start the installation.
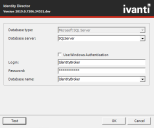
- In the Configure Database Connection step, provide the connection details for an existing database on a Microsoft SQL server. This can be an existing Identity Broker database or a new, empty database.
- Database Server: specify the server name, IP address (<IP address>,<port>) or named instance (<server name>\<instance name>).
- Specify if you want to Use Windows Authentication for the database connection, instead of SQL authentication.
- Login/Password: specify the SQL login and password for the database.
- Database name: specify the database name.
- Use the Test button to make sure the provided information is correct and a connection to the database can be established.
- Click OK to continue and Finish the installation.
If you will be installing an Identity Director portal in the same run as installing the Identity Broker, please see scenario 1 (above)
Use either the installer for Identity Director or the installation file you extracted from it, to install the Identity Broker. Follow the Setup Wizard and provide the requested information.
- Accept the License Agreement and click Next.
- Specify an installation folder. By default, Identity Broker will be installed in C:\Program Files\RES\Identity Broker\. Click Next.
- In the Configure IIS Binding step:
- Specify the Hostname or Fully Qualified Domain Name (FQDN) and Port for the Identity Broker.
Example: server.mycompany.com
Machines that access the Identity Consumers (Identity Director portals) must be able to resolve the hostname or FQDN you entered at Hostname. - Select an installed certificate for the SSL binding of the website. You can select from a list that is populated with computer certificates from the Personal Certificate Store. The certificate must cover the hostname or FQDN of the server on which you install RES Identity Broker.
For testing purposes, you can use the option
For more information: What types of Microsoft IIS Server Certificates can be used with RES web-portal productsWith a properly configured certificate, no security warnings appear when you visit the Identity Broker website. However, some web browsers will always display security warnings when you use a self-signed certificate.
If the RES site already exists in IIS, the Configure IIS Binding step is skipped: the binding configuration is already in place.
- Specify the Hostname or Fully Qualified Domain Name (FQDN) and Port for the Identity Broker.
- In the Configure Other Settings step, specify the Identity Broker Address. This will be the public address of the website running the Identity Broker that your users will access.
Example: https://server.mycompany.com
The field is pre-filled based on what you entered at Hostname in the Configure IIS Binding step.
If that step was skipped by the installer, specify an address that:- can be reached by machines that access the Identity Consumers (Identity Director portals)
- is covered by the certificate you specified for the RES site.
Optionally, in this step, you can specify the Authentication Provider Hosts you want to install alongside the Identity Broker:
- Identity BrokerActive Directory Authentication (selected by default)
- Identity Broker Windows Authentication
- Start the installation.
- In the Configure Database Connection step, provide the connection details for an existing database on a Microsoft SQL server. This can be an existing Identity Broker database or a new, empty database.
- Database Server: specify the server name, IP address (<IP address>,<port>) or named instance (<server name>\<instance name>).
- Specify if you want to Use Windows Authentication for the database connection, instead of SQL authentication.
- Username/Password: specify the SQL login and password for the database.
- Database name: specify the database name.
If selected during the installation procedure, the Active Directory Authentication Provider and/or the Windows Authentication Provider will start installing automatically.
After installation has finished
The installation will have created:
- the RES site in IIS (if it did not exist).
The Identity Broker is listed as the web application RES > identitybroker:
- a URL shortcut to the Identity Broker Management Portal on the desktop.

The URL points to the sub-directory identitybroker/mgmt/ui of the Identity Broker Address you configured.Example: https://server.mycompany.com/identitybroker/mgmt/ui
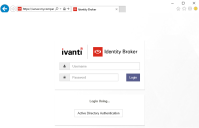
The shortcut opens the login page of the Identity Broker Management Portal.
By default, the local administrator account (admin, with the password unsecured) is enabled. Use this account only for initial setup.
See Manage access to the Management Portal.
The Login Using section, which is available if you chose to install one or more Authentication Providers in the Configure Other Settings step, cannot be used for initial setup.
