Creating or Editing a Patch Scan Template

To work with a patch scan template, do one of the following:

  • To create a new scan template, click New > Windows Patch > Patch Scan Template.
  • To edit an existing scan template, in the Patch Scan Templates list in the navigation pane, click the patch scan template name.

This will display the Patch Scan Template dialog.

TIP: To speed the template creation process, copy an existing template that is similar to the one you want to create. The contents of the copied template will be populated in the new Patch Scan Template dialog and you can simply modify the appropriate items. You copy an existing template by right-clicking the template name in the Patch Scan Templates list and then selecting Copy.

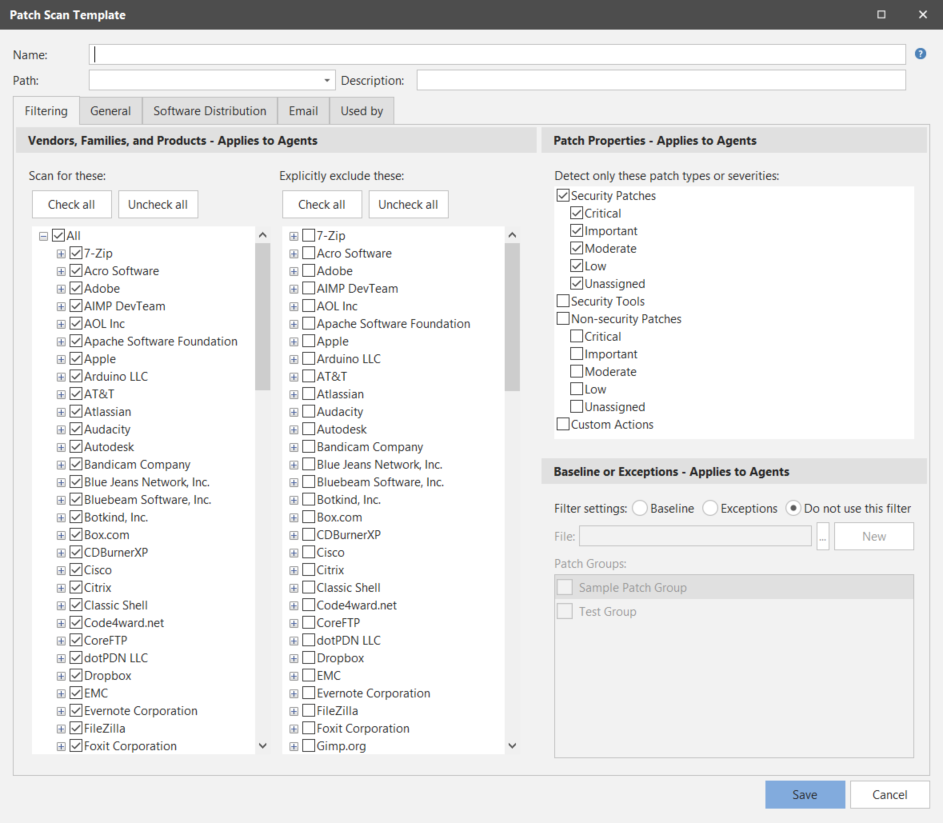
The Patch Scan Template dialog contains several tabs that collectively define the characteristics of a particular scan template.

Field

Description

Name

The name that you wish to assign to this scan template.

Path

This box is used to specify the folder path that this template will reside in within the Patch Scan Templates list in navigation pane. If you do not specify a path, the template will reside at the root level of the My Patch Scan Templates list. For more details, see Organizing Patch Scan Templates.

Description

A description of the template.

Filtering tab

There are three different filters available on this tab.

  • Vendors, Families, and Products filter: Scan for or exclude patches for the specified vendors, product families, and product versions. The items are presented in a hierarchical list. If you enable a check box at one level, all check boxes at lower levels are also enabled. If the same item is checked in both the Scan for and Explicitly exclude lists, the item will be excluded.
  • TIP: If you want to exclude a small number of items, the recommendation is to include all items in the Scan for list and then use the Explicitly exclude list to exclude the desired items. This works because items in the Explicitly exclude list override items in the Scan for list. Another option is to use just the Scan for list and clear the check boxes of the items you want to exclude, but this is often more time consuming and prone to error.

  • Patch Properties filter: Specify the types of patches and the vendor severity level of those patches that should be included in the scan. The options are:
    • Security Patches: Security bulletin related patches. You can choose to scan for one or more specific severity levels.
      • Critical: Vulnerabilities that can be exploited by an unauthenticated remote attacker or vulnerabilities that break guest/host operating system isolation. The exploitation results in the compromise of confidentiality, integrity, availability user data, or processing resources without user interaction. Exploitation could be leveraged to propagate an Internet worm or execute arbitrary code between virtual machines and the host.
      • Important: Vulnerabilities whose exploitation results in the compromise of confidentiality, integrity, or availability of user data and processing resources. Such flaws could allow local users to gain privileges, allow authenticated remote users to execute arbitrary code, or allow local or remote users to easily cause a denial of service.
      • Moderate: Flaws where the ability to exploit is mitigated to a significant degree by configuration or difficulty of exploitation, but in certain deployment scenarios could still lead to some compromise of the confidentiality, integrity, or availability of user data and processing resources. These are the types of vulnerabilities that could have had a critical impact or important impact but are less easily exploited based on a technical evaluation of the flaw, or affect unlikely configurations.
      • Low: All other issues that have a security impact. Vulnerabilities where exploitation is believed to be extremely difficult, or where successful exploitation would have minimal impact.
      • Unassigned: Security patches that have not been assigned a severity level.
    • Security Tools: Updates for security tools such as Windows Defender and Windows Malicious Software Removal Tool. Also includes certificate updates and hotfixes for known security risks that are not yet fully supported by a security bulletin.
    • Non-security Patches: Vendor patches that fix known software problems that are not security issues. You can choose to scan for one or more specific vendor severity levels. See Security Patches for a description of the available severity levels.
    • Custom Actions: Enables you to perform custom actions even if you are already fully patched. It does this by scanning for a specific QNumber and patch (QSK2745, MSST-001) that will always be found. This null patch can be remediated but no patch will be deployed. The process uses the temporary file Nullpatch.exe.
  • Baseline or Exceptions filter: Use this filter to define either a baseline set of patches that should be included or a set of patches that should be excluded.
    • Baseline: Specify a patch list and/or one or more patch groups that collectively represent a baseline set of patches. The baseline is often determined by your corporate security policy and is considered the minimum set of patches that should be installed on your machines. The baseline is considered dynamic because, even though you only define it once on the template, you can continually update the patch list as new patches are made available. For an example of how you might use a baseline filter, see Implementing an Unattended Console Configuration.
    • The Vendors, Families, and Products filter and the Patch Properties filter are unavailable when Baseline is selected. The Software distribution check box on the Software Distribution tab will also be ignored.

    • Exceptions: Specify a patch list and/or one or more patch groups that contain patches that you always want to be excluded. The Vendors, Families, and Products filter and the Patch Properties filter will be applied first, and then the patches defined here will be excluded.
    • Be careful when using the Exceptions filter. If you exclude a patch that replaces another patch, the program will now scan for the replaced patch. This is done on purpose to avoid any unintentional vulnerabilities. If the intended consequence of excluding a patch is to not automatically deploy it or the related patches, then all the patches in the chain of replaced patches must also be excluded.

    • Do not use this filter: Disables this filter.
    • File: Specify a text file that contains the list of patches you want to use as your baseline or that you want to exclude. To create a text file, click New. The text file must contain just the QNumbers associated with each patch, one entry per line. For an example text file, see Implementing an Unattended Console Configuration.
    • Patch group(s): Specify one or more patch groups that contain the patches you want to use as your baseline or that you want to exclude.

General tab

  • Scan For: During the scanning process, you can choose to scan for just missing patches or for both missing and installed patches. When scanning for both missing and installed patches, you can include effectively installed patches in the results. These are patches that replace other patches. See Effectively Installed Patches and Determining Patch Replacements for more information.
  • The following option applies only to the console, not to agents that may also be using this template.

  • Global Thread Pool Override: Specify if you want to override the Global thread pool setting on the Tools > Options > Scan dialog. You should only do this if you want to temporarily perform some bandwidth testing with your patch scans. The value you specify in the Restrict scan to maximum number of threads box defines the maximum number of machines that can be simultaneously scanned during one patch scan. The value specified is the actual limit; it is not multiplied by the number of logical CPUs on the console machine as is done on the Tools > Options > Scan dialog. You should clear the box when you have finished your testing.

Software Distribution tab

This tab enables you to specify if you want to scan for free third-party products that can be deployed by Security Controls. If you enable the Software distribution check box, the available third-party products will be included in the Patch Missing list of the scan results. Use the vertical scroll bar to view the complete list of third-party products supported by Security Controls.

If you enable the Software distribution check box, a confirmation dialog will be displayed. This is to ensure that you are enabling the check box on purpose and not inadvertently scanning for and deploying third-party applications.

The products that will be displayed are those that are available for the operating system being used on the scanned machine. If you want to include or exclude reporting on a particular product, specify that product in the Vendors, Families, and Products filter on the Filtering tab.

Email tab

This tab applies only to agentless scans initiated from the console; it does not apply to agents that may also be using this template.

This tab enables you to specify which reports should be automatically sent and to whom the reports should get sent. The specified reports will be sent when a scan using this template is completed.

There are many different reports that can get sent. To understand what a particular report contains, click on the report in the list and view its description immediately below the list.

To specify which reports should be automatically sent and to whom they should be sent:

New templates must be saved before you can perform these steps.

  1. Select a report in the Reports list.
  2. In the Report Recipients list, select the groups and/or individuals you want to email the report to.
  3. Repeat Step 1 and Step 2 for each report you want to be automatically sent.
  4. When finished, click Save.

Used by tab

This tab shows you the Favorites and agent policies that are currently using this scan template. This is important to know if you are considering modifying the template, as it tells you what other areas of the program are affected.