Organizing Patch Scan Templates
If you create many patch scan templates, you should consider organizing the templates into logical folders. Doing so will enable you to quickly locate and manage your templates. You can create as many folders and sub-folders as needed within the My Patch Scan Templates list in the navigation pane. For example, you might choose to organize your patch scan templates based on the type of machines that will be scanned, by location, by the vendors and products that will be scanned, etc.
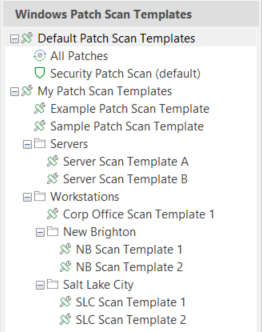
Sample Organizational Scheme
To create a new folder:
In the Patch Scan Template dialog, type a folder path into the Path box. You can specify as many folder levels as needed by using a backslash (\) to separate the levels in the name. The folder will be created when you save the template. If you do not specify a path, the template will be contained at the root level of the My Patch Scan Templates list.
Folder path examples:
- \Servers
- \Workstations
- \Workstations\Location A
- \Workstations\Location B
To assign a template to a different folder, do one of the following:
A patch scan template can only belong to one folder.
- In the Patch Scan Template dialog, type a new folder path into the Path box
- In the navigation pane, click and drag the template to a different folder
- Right-click the template and select Edit path.
To assign a folder and its contents to a different folder:
- Click and drag the folder to another existing folder.
The folder you move becomes a sub-folder.
To delete a folder, do one of the following:
- Change or remove the folder name in the Path box of all patch scan templates contained in that folder
- Click and drag the templates to a different folder
- Delete all templates contained in the folder path
The folder will be automatically deleted when the last template is removed from the folder.