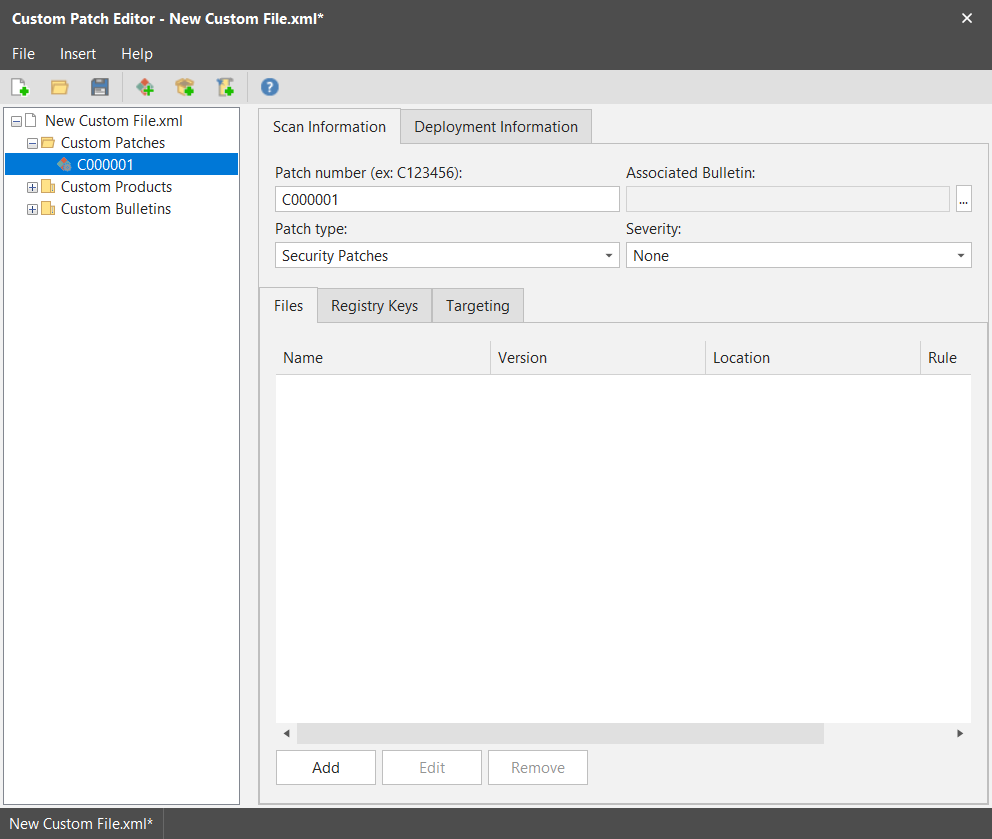
Scan Information Tab

When creating a custom patch, two major tabs are used in the right-hand pane. This topic describes the options and sub-tabs contained on the Scan Information tab.

This tab contains two sub-tabs that enable you to specify criteria for determining whether or not a patch is installed. You must use your own discretion in determining whether to specify detection criteria on the Files tab, the Registry Keys tab, or both. If your requirements are that a specific file version and a specific registry key value must both be detected in order to declare that the patch is installed, then by all means do it. The recommendation, however, is to keep things as simple as possible. If detecting an old file version is criteria enough to determine that a patch is required, you probably don't need to also specify registry key information (and vice versa).

If you do not specify registry key information, patches that were not installed by Security Controls will be reported as Effectively Installed. In order for Security Controls to display a patch as Effectively Installed you must use a scan template that scans for both missing and installed patches. See Creating a New Patch Scan Template for more information.

Field

Description

Patch Number

An identifying number for this patch. You can follow whatever numbering convention you want when defining the patch number. The only rule is that the number must be no more than 10 alphanumeric characters. Although it is not mandatory for the number to be unique, in almost all cases it makes sense to make it unique. Only in extremely rare cases is it advisable to assign the same patch number to two or more patches.

The patch number specified here will be the number shown within the Security Controls interface when referring to the patch. It is also the identifier used by such things as patch groups when specifying which patches belong to a certain group. As a point of reference, the patch number is akin to the knowledge base number (or QNumber) used to identify patches in the Microsoft world.

By default the first patch in the custom XML file is C000001. This number is automatically incremented for each new patch.

Associated Bulletin

You must associate each patch with an existing bulletin. The bulletin can be one that you created or one that was issued by another vendor. To see the list of all available bulletins, click the Browse button (). In the dialog that appears, select the desired bulletin and then click OK.

Patch Type

Specify the types of patch you are creating.

  • Security Patches: Security bulletin related patches. This is the default setting.
  • Non-security Patches: The set of patches supported by Microsoft Software Update Services (driver updates not supported).
  • Security Tools: Patches for the malware tool provided by Microsoft.
  • Software Distribution: Free third-party applications that can be deployed by Security Controls.
  • Custom Actions: Enables you to perform custom actions even if you are already fully patched. It does this by scanning for a specific QNumber and patch (QSK2745, MSST-001) that will always be found. This null patch can be remediated but no patch will be deployed. The process uses the temporary file Nullpatch.exe.

Severity

Assign one of the following four severity levels based on the perceived threat of the vulnerability related to the patch.
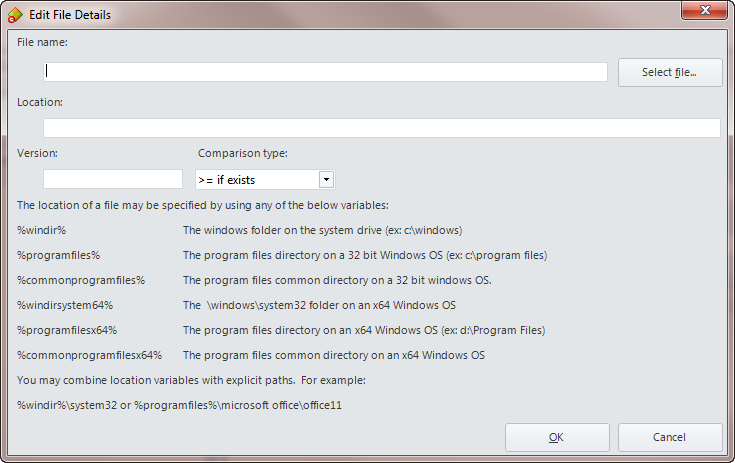
  • Critical: The problem or issue associated with the patch is deemed critical in nature.
  • Important: The problem or issue associated with the patch is deemed important to fix.
  • Moderate: The problem or issue associated with the patch is of moderate severity.
  • Low: While the problem or issue is real, the security risk or capability is deemed to be low.

Files tab

One of the ways to determine if a patch should be installed is to check the version number of the affected file on the machines being scanned. The Files tab is used to specify the file version information.

If you also specify criteria on the Registry Keys tab, the tests on that tab must also be satisfied in order for the patch to be installed.

  • Add: To add a new file definition, click this button.
  • Remove: To remove an existing file definition, click this button.
  • Edit: To edit an existing file definition, click this button.

After clicking Add or Edit, the Edit File Details dialog is displayed.
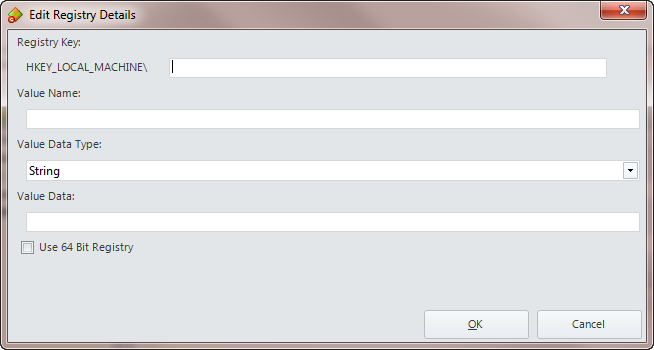
  • Filename: The name of the portable executable format file affected by the patch. For most instances the file will therefore be either an .exe or a .dll file. The file must contain version information for this check to be correct.
  • Select File: Use this button to browse the local computer or network for the file affected by the patch. When you use this button to find the file, the program will use information about the file you select to also populate the Location and Version boxes. For this reason you will typically use this button when defining the Filename box.
  • Location: Specify the location of the affected .exe or .dll file. You must provide the full directory path when specifying the location. If this box was automatically populated by the Select File button, you may need to edit the path if the location represents the position of the file on the local machine and is not representative of where it will be located on all other machines.
  • Version: Specify the version number of the affected .exe or .dll file.
  • Comparison Type: This specifies the test criteria you want to use when determining if a scanned machine needs this patch. The two available options have very similar names so be careful when making your selection.
    • If the file exists, its file version must be equal to or greater than the specified version: The only way to fail this test is if the file exists on the scanned machined but its version number is less than the number specified in the Version box. If the file does not exist on the scanned machine then the patch does not apply.
    • The file must exist and its file version must be equal to or greater than the specified version: There are two ways to fail this test. (1) If the file does not exist on the scanned machine then the test fails and the patch is required. (2) If the file does exist but its version number is less than the number specified in the Version box then the test fails and the patch is required.
  • File Location Parameters: Shows the parameters that can be used when specifying a file location. Rather than specifying one hard coded location that may not apply to every machine in your organization, you can use parameters to specify variable locations. For example, if you want to specify the Windows folder but the folder may be located at C:\Windows, D:\Windows, or C:\WinNT on the different machines in your organization, you can accommodate all options by using the %windir% parameter. You can use a parameter within a location path and you can use multiple parameters within a path.

Registry Keys tab

Another way to determine if a patch should be installed is to check for the data defined on certain registry keys on the machines being scanned. The Registry Keys tab is used to specify the registry information. If the scanned machine satisfies the criteria specified here then the patch will be applied.

If you also specify criteria on the Files tab, the tests on that tab must also be satisfied in order for the patch to be installed.

  • Add: To add new registry key information, click this button.
  • Remove: To remove existing registry key information, click this button.
  • Edit: To edit existing registry key information, click this button.

After clicking Add or Edit, the Edit Registry Details dialog is displayed.

To get the most current registry information we recommend using the Microsoft Registry Editor (regedit), a tool for viewing settings in your system registry. You can copy the required information from this tool to the appropriate fields in the Edit Registry Details dialog.

  • Registry Key: You can only specify keys that are relative to the HKEY_LOCAL_MACHINE hive. The easiest and most accurate way to populate this box is to display the desired key from within the Microsoft Registry Editor, copy the key name and then paste the name into this box. The HKEY_LOCAL_MACHINE portion of the name will likely be repeated so you'll need to remove that portion of the name from the box.
  • Value Name: The name of the specific registry key.
  • Value Data Type:
    • String: Specifies that the data must be a string.
    • DWord: Specifies that the data must be a number.
  • Value Data: The expected value of the registry key. You can find this value by locating the key within the Microsoft Registry Editor and then looking in the Data column.
  • Use 64 Bit Registry: Enable this check box if the registry key is in the 64-bit part of the registry of a 64-bit architecture.

Targeting tab

This tab enables you to specify which products apply to this patch. By default all available operating systems will be evaluated. You can greatly speed the evaluation process if you can narrow the list of products. Targeting the patch to a limited number of products can be a real time saver during the scan process as it eliminates the scanning of unnecessary products.

Said Another Way: If you do not specify any products in the Selected Products list, the patch will be associated with all available operating systems. The program will scan for the patch regardless of what is installed on the target machines. This can be useful if you want to perform a mass distribution of the patch, but it can also be quite time consuming. If you specify one or more products in the Selected Products list, the patch will be associated with only those products and not with any unspecified operating systems.

TIP: After importing a new custom XML file, you can use Patch View to verify the custom patch is associated with the correct product(s).

To narrow the list of products:

  1. Enable the Target the patch to the selected operating systems and applications check box.
  2. In the Available Products list, select the desired product and move it to the Selected Products list.
    The Available Products list contains all products currently defined in the XML patch data file plus any new custom products you may have defined using the Custom Patch File Editor.
  3. Repeat Step 2 for each product that applies to this patch.

When complete, save and then validate the XML file (see Saving and Validating Your Changes).