How to Schedule a Report
The Schedule Report dialog enables you to automatically generate a report at some time in the future. The report can be automatically generated once or on a recurring basis. The report content will be based on the last known status of the machines (as determined by the latest scan).
The generated reports can be found here: C:\ProgramData\Ivanti\Security Controls\Console\TempReports. In addition, the reports can also be sent as an email attachment to one or more recipients.
How to Access the Scheduling Dialog
To schedule a report select Tools > Schedule report. The Schedule Report dialog is displayed.
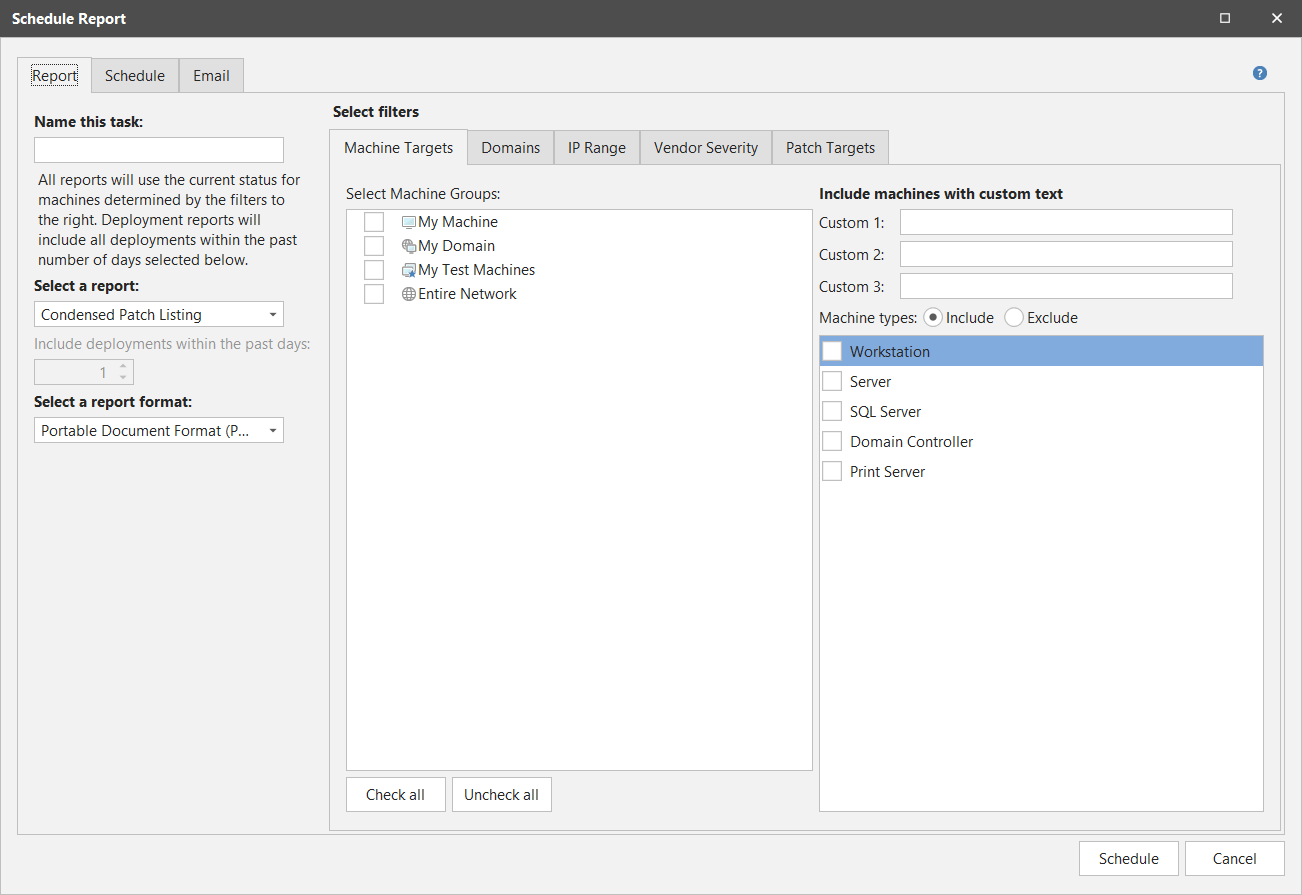
Report Tab
This tab enables you to specify which report you want to generate and what file format to use when saving the report. This tab also provides several powerful filtering options that enable you to specify the exact information you want to include in the report. The filtering options that are available will vary depending on the report you choose. If you do not specify any filtering options, the report will contain information on all of the machines detected in the latest scan.
|
Field |
Description |
|---|---|
|
Name this task |
The name that you wish to assign to the task that will generate the scheduled report. |
|
Select a report |
Select the report that you want to generate. The filters that are available in the right pane will change depending on which report you select. |
|
Select a report format |
The report will be generated in the format you choose. |
|
Machine Targets tab |
Use this tab to specify which machines you want to include in the report. You can specify filtering criteria in any or all of the available areas.
Example: If you select Entire Network in the Select Machine Groups area and Server in the Machine types area, only the server machines in your network will be included in the report. Example: If you select Entire Network, specify St. Paul in the Custom 2 box, and Server in the Machine types area, only the server machines located in the city of St. Paul will be included in the report. |
|
Domains tab |
Select the domains that you want to include or exclude from the report. Only those domains that have been detected by previous scans are available for selection. |
|
IP Range tab |
Specify the starting and ending IP addresses of the target machines you want to include or exclude from the report. |
|
Vendor Severity tab |
Specify the vendor severity level(s) of the patches that you want to include or exclude from the report. The vendor severity is assigned to each patch by Ivanti based on the perceived threat of the vulnerability related to the patch. |
|
Patch Targets tab |
Select the patch groups that you want to include or exclude. Only those patch groups that you have previously defined are available for selection. In addition, you can specify the patch status(es) that you want to include or exclude. The patch status is the current status of a patch on a target machine. You can specify a patch status without specifying a patch group (and vice versa). |
Schedule Tab
Use this tab to specify when you want the report to be generated. The report must be scheduled at least five minutes in the future.
|
Field |
Description |
|---|---|
|
Once |
If you only want to generate the report once at some date and time in the future, choose this option. Click in the box to select the date that you want to generate the report. The time will automatically default to the current time. Click in the box to manually change the time to the desired value. |
|
Recurring |
If you want to generate the report on a recurring basis, choose this option. Use the day and time boxes to specify when the report should be generated. The Add delay (days) box (available if you generate a report on a monthly basis) allows you to delay the generation of the report by up to 31 days. For example, you might use this to schedule a monthly report that is always generated four days after Patch Tuesday. You do this by specifying The Second Tuesday and then using the Add delay (days) option to delay the operation by four days. |
Email Tab
Use this tab to specify who will receive the report as an attachment in an email message.
You must configure the SMTP server in order to send an email message. See Email Operations for details on configuring the server.
|
Field |
Description |
|---|---|
|
Email subject |
Specify what should appear in the subject line of the email message. |
|
Select recipients |
Select the groups and/or individuals you want to receive the report. You can define new groups or contacts if needed. |
Scheduling the Report
Once you have made your selections, click Schedule to schedule the report. You can view the scheduled report task by selecting Manage > Scheduled Console Tasks and then selecting the Reports tab.
If scheduled credentials are not currently assigned the Scheduled Console Scans/Operations Credential dialog is displayed. You must assign a shared credential to perform a schedule action. You can use the Set scheduler credential button on the Scheduled Console Tasks dialog to view and modify which credential is being used as the scheduler credential.