Manually Installing Security Controls Agent
You must manually install Security Controls Agent on machines that are guarded by a firewall. You do this by copying the agent installation files to the desired target machines and then running the Security Controls Agent installation wizard on each machine.
Show Me!
A video tutorial is available on this topic. To access the video, click the following link:
Requirements
- The target machines must be able to communicate with the console.
- You must configure at least one Security Controls Agent policy before manually installing an agent. See Preparing to Use Agents for details.
- You must specify how the agent will authenticate itself to the console during the registration process. See Agent Options for details.
- The Security Controls issuing certificate must be in each target machine's certificate store to ensure a secure connection to the console.
- Installing an agent on a distribution server is a special case that requires the server machine's SYSTEM account to have read access to the distribution server folder. See Configuring System Account Permissions for details.
There are two different methods you can use for manually installing agents.
Option 1: PowerShell Script Installation Method
Go to the Agents Options tab to learn how to use a PowerShell script that will copy the issuing certificate to the target machine's certificate store and install the agent on the target machine.
Option 2: Manual Installation Method
If you prefer not to use the provided PowerShell script, you must manually copy the issuing certificate to the target machine's certificate store and then run the agent installation wizard.
Copy the Console Certificate to the Target Machine
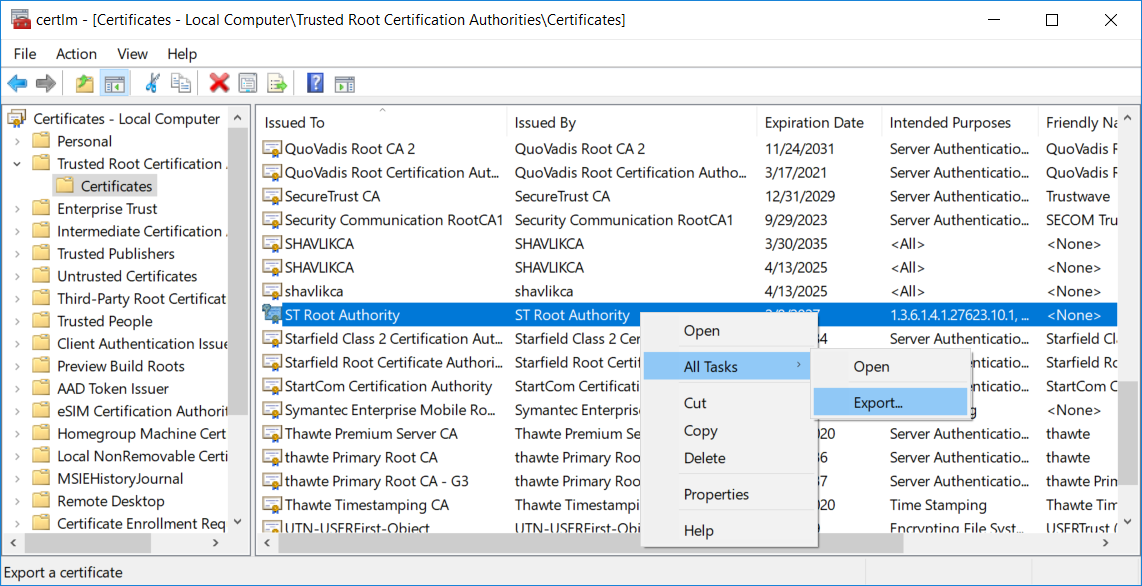
- Export the ST Root Authority certificate from the Trusted Root Authority store on the console machine.
- Import the certificate to the Trusted Root Authority on the remote machine.
Install the Agent Using the Installation Wizard
- On the Security Controls console, locate the STPlatformUpdater.exe file.
The file is located in the C:\ProgramData\Ivanti\Security Controls\Console\DataFiles directory. - Copy the .exe file to the desired target machines.
You can distribute this file using Active Directory, or you can simply copy it to a physical media such as a CD or flash drive and manually distribute it to the desired machines. - Log on to the target machine using an administrator account.
- Double-click the file named STPlatformUpdater.exe.
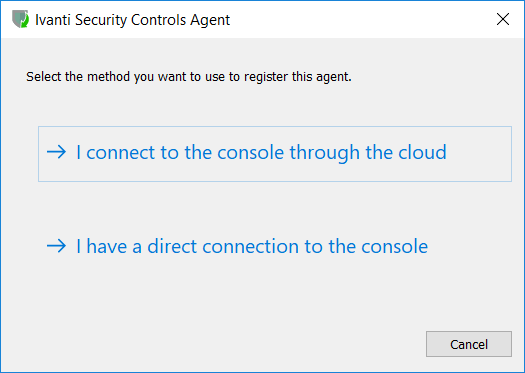
The agent is installed. When the installation is complete the Agent Registration dialog is displayed. - Click I have a direct connection to the console.
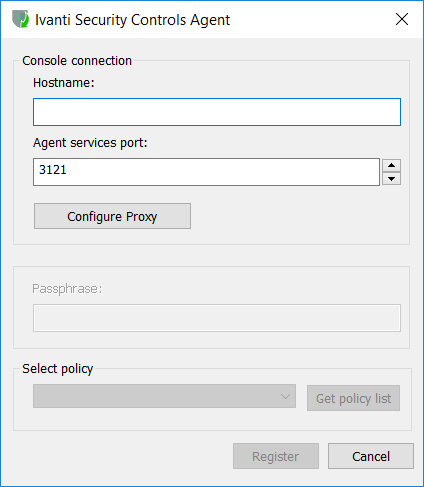
- Provide the required information.
- Hostname: Type either the hostname or the IP address of the Security Controls console. Examples: Myconsole or 192.168.1.100.
- Agent services port: Specify the port number used for forwarding information to the console. 3121 is the default port number.
- Configure Proxy: Click this button to specify the proxy settings the agent will use during the registration process. See Configuring Proxy Server Settings for details.
- Passphrase: Type the passphrase that is specified on the Tools > Options > Agents dialog.
- Select policy: Click Get policy list to connect to the console and populate the Select policy box with the list of all available agent policies. Select the policy you want assigned to this agent.
- On the Agent Registration dialog click Register.
- On the Agent Setup Wizard dialog, click Finish.
When distributing this file you may choose to create an installation script that automatically passes all necessary information to the installation wizard.
The I connect to the console through the cloud button is used if you are installing the agent via the cloud.
The following dialog is displayed.
If an IP address is used, the IP address must be added to the Console Alias list.
The agent installation routine will:
- Install the necessary .exe and other supporting files in the C:\Program Files\LANDESK\Shavlik Protect Agent directory
- Install the certificates needed to communicate securely with the console
- Acquire an agent license
- Retrieve the assigned policy, the engine components and the data files and store them.
The files are stored in the C:\ProgramData\LANDESK\Shavlik Protect\Agent directory.
When the download is complete the agent will be started automatically. You can check the status of the agent using the Security Controls Agent client program, available by selecting
- Using the Security Controls console, select Tools > Options > Agents and verify that you have enabled the passphrase option and specified a passphrase.
- On the console machine, export the ISeC issuing certificate to a DER file.
- On the console machine, locate the appropriate ISecAgent TAR file.
The TAR files are located in the C:\ProgramData\Ivanti\Security Controls\Console\DataFiles directory. Be sure to locate the file that is associated with the operating system used on your Linux machines. For example, if you have RedHat 7.x machines you will want the file named ISecAgent-Rhel7.tar. - Copy the TAR file to the same folder as the exported certificate file from Step 2.
- Distribute the certificate file and the TAR file to the desired target machines.
You can do this using whatever mechanism works best for your organization. You might use a secure file transfer tool such as WinSCP, or you can simply copy the files to a physical media such as a flash drive and manually distribute them to the desired machines. - On a Linux machine, launch a terminal and change to the path that contains the certificate file and the TAR file.
- Extract the contents of the TAR file.
- Display the list of extracted files.
- Use the install.sh file to install the agent and register it with the console.
<consolename>is the name of your console machine. The name you specify must match an entry in the console alias list.- 3121 is the default port number but it can be configured by editing the C:\Program Files\Ivanti\Security Controls\STEnvironment.config file.
<passphrase>is the passphrase you specified on the Tools > Options > Agents tab.<exported_root_cert.cer>is the name of the exported root certificate file.<agent_policy_name>is the name of the agent policy you want to assign to the agent.
If you have replaced the default Security Controls certificate with your own authority certificate, export that certificate rather than the ISeC issuing certificate. The authority certificate that you generated will likely be contained in the Intermediate Certification store.
Using Microsoft Management Console (MMC), go to the Certificates - Local Computer > Trusted Root Certification Authorities > Certificates folder. Right-click the certificate named ST Root Authority and then select All Tasks > Export.
Follow the steps in the Certificate Export Wizard. When prompted, specify that you do not want to export the private key. Save the file to your console machine in DER Encoded Binary X.509 format using an easy-to-remember file name (e.g. ISECCert.cer).
For example:
# tar -xf ISecAgent-Rhel7.tar
# ls
The install.sh file should be listed.
# ./install.sh --host <consolename> --port 3121 --passphrase <passphrase> --issuer-certificate <exported_root_cert.cer> --selected-policy <agent_policy_name>
where:
If the process is successful you will see the message Agent is fully registered. Repeat Steps 6 - 9 for each Linux machine.
You can use the stagentctl command-line utility to manage an agent. For details, see Using an Agent on a Target Machine.


