Adding servers to the core synchronization list (2019 and newer)
In Ivanti Endpoint Manager 2019.1, Ivanti increased core synchronization security. Core synchronization now uses certificate-based HTTPS/TLS encrypted communication between synchronized core servers.
You must provide account credentials on the source core that the core synchronization service will use. Core synchronization won't work until you do this. For more information, see Change synchronization settings.
Core synchronization uses the target core's certificate that is bound in IIS to port 443. The default certificate selected there is the LANDESK Secure Token Server. You can also select a self-signed certificate if necessary.
The core server initiating a core synchronization checks that the target core's certificate is in the local certificate store and that it has been validated. If the certificate isn't in the local store or if there are validation errors, the source core won't sync with the target core until you allow the certificate.
When you first sync with an untrusted core sync target, you see a dialog box similar to the following:
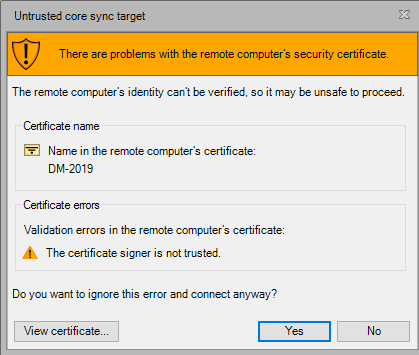
If you click No in this dialog box, core synchronization won't work to that core. Check the trust status in Core synchronization > Core servers. The Trusted column indicates the trust status.
If the certificate on a trusted core changes, the core synchronization service will log an error and disable future syncs. The certificate that was previously in the local certificate store is also removed. To reactivate synchronization to a core that is no longer trusted, right-click it in the list and click Trust target core and follow the prompts.
The core synchronization log is stored here on the core server:
- C:\Program Files\LANDesk\ManagementSuite\log\CoreSyncService.exe.log
To add a core server to the synchronization list
- Click Tools > Administration > Core synchronization.
- Right-click the Core servers tree item and click Add target core.
- Enter the Core name. This needs to be the core's fully-qualified domain name.
- Select Synchronize to this core to enable core synchronization when you exit the dialog box. You can select or clear this option later on to selectively enable or disable synchronization to that core.
- Enter a Description.
- If the source core server uses client certificate-based security, make sure you follow the steps described in the dialog box and copy encryption keys from the source core to the target core.
- Click OK.
- If this is the first time setting up synchronization with the target core or there are certificate issues, you'll see the Untrusted core sync target dialog box. Verify that the information there is accurate and acceptable, and if so click Yes to connect anyway.
IMPORTANT: Rollup core servers use the scheduler service credentials to authenticate for synchronization. On rollup cores, these scheduler service credentials must be a member of a group with console administrator privileges on the source core servers. If the credentials don't have these privileges, you'll see task handler errors in the source core server's synchronization log. For information on how to change the scheduler service credentials, see About the Change login dialog box.
To disable the trust relationship with a core server
- If you no longer want to trust a core, right-click it and click Remove trust relationship. You can trust it again later by right-clicking it and clicking Trust target core.