Creating an instance
The Configuration Center enables you to create multiple instances of Ivanti Service Desk or Asset Manager, which you can then configure and manage separately using Configuration Center.
For most installations you will need only one instance. However, if you want to host multiple Service Desk or Asset Manager systems on the same server, using the same installed software, you can create additional instances.
There are two ways of creating an instance:
- Standard Instance – creates an instance complete with an application pool and a complete set of applications and services
- Custom Instance – creates an empty instance, into which you can create your required application pools, applications and services
If you choose to create a Standard Instance, you can use the Configuration Center to delete any applications or services that you do not need, and to change their names if required.
To create a Standard Instance:
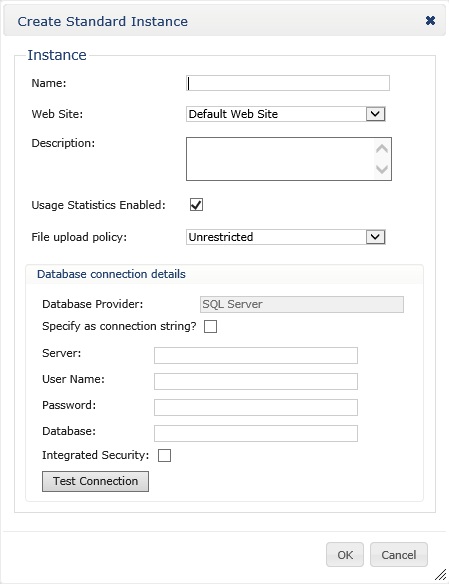
- On the Current Instances page, click Create Standard Instance.
The Create Standard Instance dialog appears. - Type a Name and Description for the Instance.
The Name will be used as a prefix for all of the initial names for the created application pools, applications and services. You can edit these names later if required. - Select the Web Site you want to use with this instance.
For most implementations, selecting Default Web Site is appropriate. However, if you want to use multiple web sites, or use a different web site, you can do so. For more information, see Managing Web Sites.
The Usage Statistics Enabled check box enables you to choose whether or not to provide feature-usage information to help Ivanti to determine which features are well used and which are rarely used. This information helps us to understand our customer base better and helps to inform our roadmap, sustainment, and new feature planning. Usage Statistics receives usage queries from a central Ivanti source, and then passes the results of these defined Service Desk and Asset Manager usage profile queries to a central, cloud-based Ivanti database. All usage statistic data is encrypted, no customer operational or transactional data is recorded, and there is no performance or operational impact. We encourage you to leave the Usage Statistics feature enabled on your live system to help us to focus on the functional areas that are important to you. We recommend disabling Usage Statistics on your test systems. You can see the output of your Usage Statistics by using the diagnostic logging category Usage Statistics on the Service Desk Framework application.
- In the File upload policy list, select Whitelist if you want to restrict the types of file that you want to allow users to attach to processes, or Unrestricted if you don't.
If you select Whitelist, then in the Whitelisted File Types field, type the file extensions that you want to allow users to upload. Use a comma to separate the different file extensions.
Setting the File upload policy to Whitelist can help you to prevent potentially harmful files, such as executables, from being uploaded. You can create separate and different whitelists for each instance of Service Desk or Asset Manager that you are running on your web server.
If you set the File upload policy list to Whitelist, but leave the Whitelisted File Types field empty, users will be prevented from uploading ANY files.
If you set the File upload policy list to Unrestricted, users will allowed to upload all file types.
- Complete the fields in the Database connection details group box.
Use the Test Connection button to confirm that you have entered your database connection details correctly.
- Click OK.
The instance is created and appears on the Current Instances page. This may take a few moments. - To view the details of the instance, click its entry on the Current Instances page.
The page for the instance appears, detailing the Application Pools, Applications, and Services that have also been created for the standard instance.
The status of the previous operation is displayed at the top of the instance page, along with links that enable you to view and delete the log file for the instance. The log file is always in English, and is intended to help Ivanti support engineers.
To return to the list of instances, click Home at the top of the page.
To create a Custom Instance:
- On the Current Instances page, click Create Custom Instance.
The Create Custom Instance dialog appears.
- Type a Name and Description for the Instance, then click OK.
The instance is created and appears on the Current Instances page. - Select the Web Site you want to use with this instance.

For most implementations, selecting Default Web Site is appropriate. However, if you want to use multiple web sites, or use a different web site, you can do so. For more information, see Managing Web Sites.
- To view the details of the instance, click its entry on the Current Instances page.
The page for the instance appears. For a Custom Instance, the instance page just shows its creation details and provides links to create an Application Pool or to connect to an existing Service Desk Framework.
The ability to link an empty Custom Instance to an existing Service Desk Framework enables you to set up an Application Services server that uses the existing Framework application on the Service Desk Web Server. For more information about setting up an Application Services server, see Setting up the Application Services Server.
You can delete instances that you no longer require.
To delete an instance:
- On the Current Instances list, hold the mouse pointer over the instance that you no longer need.
The instance is highlighted and a Delete link appears. - Click Delete, then confirm that you want to delete the instance and all of its application pools, applications, and services.
The instance is deleted and the Current Instances list updates.
The Delete ALL link at the top of the Current Instances list enables you to delete all of the instances at once.