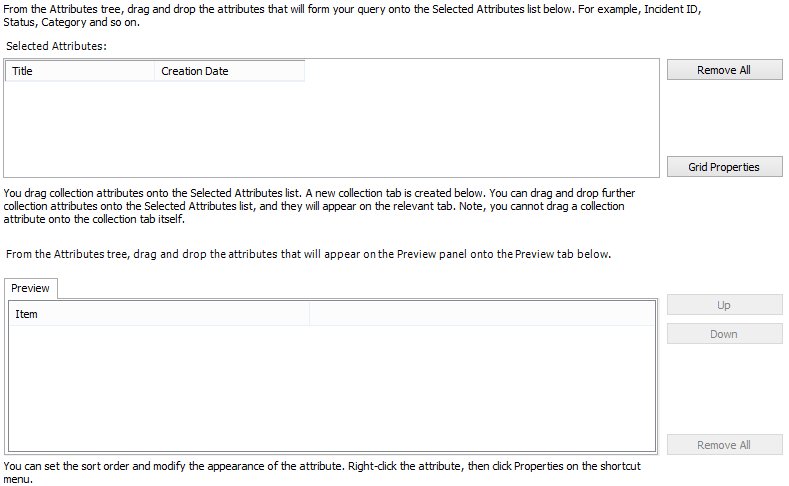
Configuring the List panel
You can configure the appearance of the data that appears in the List panel. You make the required changes on the Attribute Properties dialog.
For each attribute you can:
- Change the Column heading – This is the text that appears as the column title.
- Indicate whether it is a Color attribute, and whether it is the Text or Background color.
- Show column or hide it – This is particularly useful if the attribute is a color attribute, as you do not need to show the color column, as the color is reflected in either the text or the background color of the list.
- Remove leading zeros – This removes leading zeros from attributes such as the Incident ID.
- Truncate to a specific number of characters – This limits the amount of data that appears in the preview panel. For example, you may want to limit Call Description to 256 characters.
- Configure the Justification of the data – This justifies the data either to the Left, Center or Right of the preview panel.
- Use this column to sort data – This forms part of the query itself, and orders the results as required, either in ascending or descending order.
- Define the Width of header text of the columns, or set the column size to that of the longest data item. Alternatively, you could use the width from designer (you can modify this by moving the drag bar between the attributes on the Selected Attributes list).
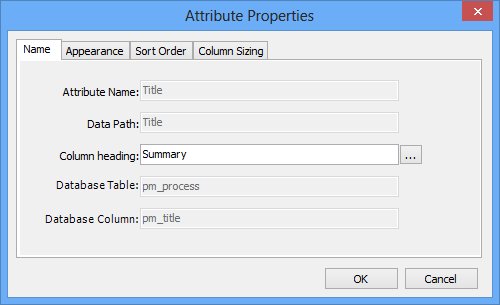
The following procedure tells you how to modify attributes using the Attribute Properties dialog. You can also modify attributes from the Query tree, by right-clicking the attribute, and selecting the relevant options.
To configure the List panel:
- In the Selected Attributes list, right-click the relevant attribute, then click Properties.
The Attribute Properties dialog appears.
- Make the required changes, then click OK.
If you want to check the appearance of the data that will appear in the List panel, click Test Query. A set of data from your database appears on the Attributes & Preview page. To end the test and return to the Query and Report Designer, click End Test.
- Click Finish.
The Save Query dialog appears. - Click Yes to save the changes you have made.