Configuring Mail to include CC recipients in replies and notifications
To be able to include CC recipients in the replies and notifications that you get from Service Desk or Asset Manager, there are a number of steps that you have to follow. These are summarized below, and documented in full later in this document:
- Configure your top-level processes (Incidents, Problems, Changes and Calls) to include CC recipients.
- Create a window for CC Recipients so that you can add them to your process at a later stage.
- Add an Optional Action Instance to your process so that a user can add a CC recipient.
- In Mail, specify that you want replies and notifications sent to CC recipients.
In the following procedures we will use Incident as the top-level business object as the example. You can repeat these for your Problems, Changes and Calls.
To configure the top-level business object for CC recipients:
- Start the Object Designer component, and open the required business object, for example, Incident.
- In the Properties grid, alongside the Behaviors property, click
 .
.
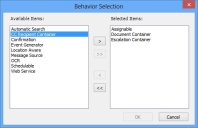
The Behavior Selection dialog appears.
- In the Available Items list, select CC Recipient Container, then click
 .
.
You can also double-click it to add it to the Selected Items list.
- Click OK.
- Click
 .
.
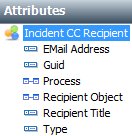
A new business object is created, with the suffix of CC Recipient, for example, Incident CC Recipient, and a number of attributes have automatically been added.
- With the top-level object selected, for example, Incident, on the Actions list, click Modify Business Object.
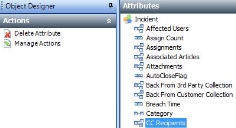
- On the Attributes tree, select the CC Recipients collection, then on the Actions list, click Manage Actions.

The Manage Actions dialog appears. - If required, select the Propagate to children? check box (this is not mandatory), and again, if required, specify a Description, then click OK.
You can add this action to the required process so that users can add further CC recipients if required. - Click
 .
.
The next step is to create a window so that users can add further CC Recipients if required.
For detailed information about designing windows, see the Designer Guide.
Creating a window for CC Recipients
To create a window for CC Recipients:
- Start the Window Manager component, and on the Business Objects tree, expand the required module.
- Select the Incident CC Recipient business object, then on the Actions list, click New Window.
A new window is created. We recommend that you rename your window. - On the Actions list, click Rename Window.
The Rename Window dialog appears. - In the Title box, name the window as required, then click OK.
- On the Attributes tree, you must add RecipientTitle to the window (as this is a mandatory attribute), and rename it as required using the Properties grid.
- Add Email Address to the window.
You don’t necessarily need to add any further attributes to the window, but you can if required. - Click
 .
.
Modifying the required process
The next step is to add an optional action instance to the required process so that further CC Recipients can be added if required.
To modify the required process:
- In the Process Designer component, open the required process.
- Select the required Status, then expand the Properties grid (
 ).
). - Alongside the Optional Action Instances property, click
 .
.
The Optional Action Instances dialog appears.
- In the Available Action Instances list, select Add CC Recipient, then click
 .
.
The Action is added to the Selected Action Instances list. - Click OK.
- Repeat as required for other statuses throughout the process, then click
 to save the changes that you have made.
For detailed instructions about creating and modifying processes, see the Designer Guide.
- On the Actions list, click Activate Process.
The final step in the configuration is within the Mail component.
Configuring Mail to include CC Recipients:
To configure Mail to include CC Recipients:
- Start the Mail component.
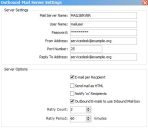
- On the E-mail Setup tree, double-click Outbound Mail Server Settings.

- Select the Notify ‘cc’ Recipients check box, then click
 .
.
Now all of the CC Recipients will be notified at the same time as the originator of the e-mail when a response is made from Ivanti Mail logging a process, and when a reminder or assignment has Notify Originator selected.