Creating escalation actions
You can define what happens when an escalation has been breached. You do this by specifying escalation actions. These actions can be specified to occur as a period (hours/minutes) before or after the due time.
There are four types of escalation action. They are:
- Reassign – Reassigns the object to a predefined analyst, group or role.
- Change priority – Changes the priority to a given value.
- Change color – Changes the color of the process within the Workload List.
- Notification – Sends a notification message to one or more analysts, groups, roles or e-mail address.
Depending upon the type of escalation action you have chosen, you need to specify different information.
To create a set of escalation actions:
- In the Administration component, on the Service Level Management tree, open the required Response Level.
- Select the relevant Escalation, then on the Actions list, click Modify Escalation.
The Escalation dialog box appears. - At the bottom of the Escalation Actions group box, click New.
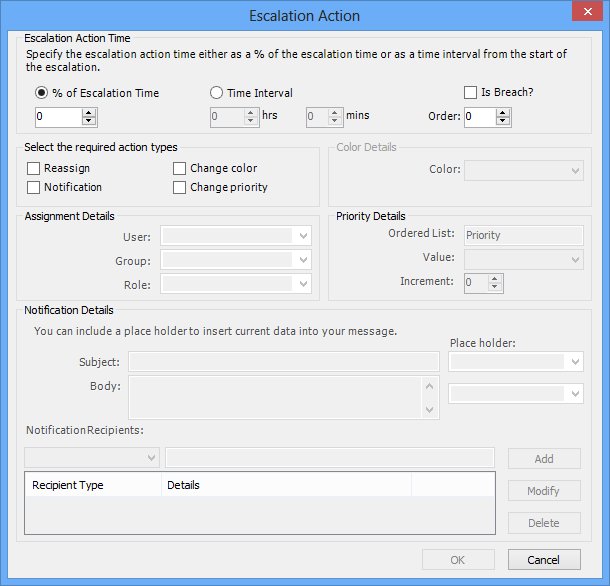
The Escalation Action dialog appears.
- Select either the % time of Escalation Time or the Time Interval option button.
- If required, set the Order.
The standard process objects (for example, Request, Problem, and Change) have an attribute called Order. If you set the Order, the order on the processes will be updated to this value. - If required, select the Is Breach? check box to indicate that this escalation has breached if it reaches this stage.
All objects that can have escalations associated with them have an attribute called Breach Time added to them that stores the object's breach time as a date/time field. This value is maintained by the system, taking into account Stop/Start Clock actions, changes in response level, and so on. You can use this attribute in queries and reports.
- In the Select the required action types group box, select the check boxes for the action types that you want to create for this escalation.
Notice that as you select a check box a different area of the dialog box becomes available. If you select all of the check boxes, then all of the items in the dialog box are available for you to complete.
The available options are different according to which Action Type you have selected.
Reassign – This enables the Assignment Details group box. You need to specify the relevant analyst and/or group and/or role to whom you want to assign the object that has the escalation.
Change Color – This enables the Color Details group box. You need to specify the relevant color. This color will be reflected in the Workload list. To select the color, click the Color list, and select the required color from the Color dialog box. Click OK.
Notification – This enables the Notification Details check box. You need to specify the subject and details that you want to appear in the notification message. You then need to select to whom you want to send this notification message. You can include current data in your notification text. In the Subject or Body box, position the cursor where you want to insert the data, then in the Place holder list, select the relevant item.
You are not limited to the items listed in the Place holder list. You can add any place holder as long as it is written in the correct format. For example, you could add {Process/RaiseUser/_Comment}.
You can limit the number of characters returned in the place holder by specifying the required number of characters after a colon within the place holder. For example, {Process/RaiseUser/_Comment:20} returns the first 20 characters of the Comment attribute on the RaiseUser object.
Change Priority – This enables the Priority Details group box. You need to specify the relevant priority. This is the priority that the object that has the escalation will change to.
- Click OK to save the information you have specified, then click OK on the Escalation dialog box.
To modify an escalation action, select it in the Escalation Actions list, then click Modify. Make the required changes, then click OK.
To delete an escalation action, select it in the Escalation Actions list, then click Delete.
If the Response Level is being used, you are asked if you want to cancel any outstanding escalation points associated with the escalation action. If you click Yes, any outstanding escalation points associated with the escalation action you are deleting are canceled and will not breach. If you click No, any outstanding escalation points associated with the escalation action will still breach as appropriate. In both cases, the escalation action will be removed from the escalation and will not be applied to future Incidents.