Adding recipients to appointments as part of process
The Appointment object includes User, Group, and Role attributes, which you can add to the Appointment window. You can then use this window to add these recipients to an Appointment as part of a process for a schedulable object so that they receive an appointment that they can add to their external calendars. You can populate these fields automatically using value types, calculations, or placeholders to populate the user, group, or role fields as part of a process design. The example below describes how to create a Task on an Incident that automatically creates appointments for a user, group, or role.
To create an appointment task:
- In Object Designer, open the Incident Management\Task Incident object.
- In the Properties grid, alongside Behaviors, click
 .
.
The Behavior Selection dialog appears. - Add the Schedulable behavior, then save the changes.
A Task Incident Appointment object is created and an Appointments collection is added to Task Incident. - In Window Manager, create a window for Task Incident Appointment, including the Title, Start Datetime, End Datetime, and the User, Group, and Role relationships.
- In the Actions list, click Make available in Web Access.
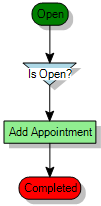
- In Process Designer, create a new Task Incident process called Appointment:

The Is Open? decision in this Task process is always true, and so the process always proceeds. It is required because you cannot have an automatic action directly after a status.
- Double-click the Add Appointment automatic action.
The Task Incident Appointment window that you designed earlier appears. - Complete the Task Incident Appointment window as required, using specific values, Value Types, or Calculations, then click OK.
- Save and activate the Appointment process.
- Add an Add Task action as required to the Incident process you want to use.
- Select this Add Task action in the process design window, then display the Process Designer Properties grid.
- Alongside Default Process, select the Appointment task process that you created above, and change the Title to Add Appointment.
- Save and activate the process.
When you use the Add Appointment task at runtime, appointments will be created automatically.