The Calendar gadget
The Calendar gadget enables you to see the availability of scheduled items such as services or analysts.
For more information about calendars and schedule management, see Schedule Management.
You cannot display Calendar gadgets on dashboards in console or Workspaces.
To add a Calendar gadget to a Web Access dashboard:
- From the Choose Gadget dialog, add a Calendar gadget.
The Create Calendar Gadget dialog appears.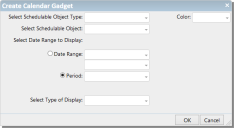
- Complete the dialog as follows:
Select Schedulable Object Type – lists all of the objects that have the Schedulable behavior set in Object Designer (see Designing schedule management). Select the business object type that you want to add to the calendar. For example, Workstation.
Select Schedulable Object – lists the instances of the object you have chosen. Select the object instances that you want to display on the calendar, or select the All... option to add all instances of the selected type (for example, All Workstation). The selected items are added below the control, enabling you to select additional instances. To remove selected instances, hold the mouse over the value you no longer require, then click next to the value.
Color – specifies the background color used for the object's appointments on the calendar. This helps you to differentiate between appointments for different objects on the same calendar.
Select Date Range to Display – select either the Date Range or Period that you want to display on the calendar.
Select Type of Display – choose from Day, Week, Month, or Timeline. - Click OK.
The calendar is added to the dashboard.

If you have the appropriate privileges, you can drag appointments that appear on a Calendar gadget to move them to a different time. This automatically sends invitation updates to any recipients associated with the appointment.
To change the configuration of a Calendar gadget, click  in the gadget's title bar, then click Configure.