Creating new dashboards
Before you can add any gadgets, you first need to create an empty dashboard.
To create a dashboard:
- In Web Desk, right-click the shortcut bar, then click Add dashboard shortcut.
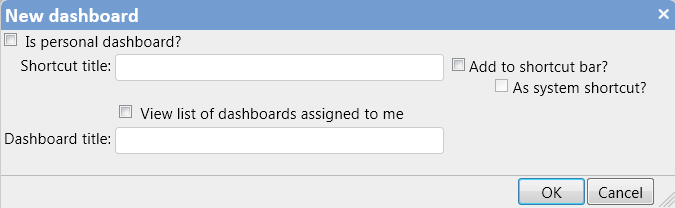
The New dashboard dialog appears.
- Type the Shortcut title that you want to appear on the shortcut bar.
- Select the Add to shortcut bar? check box to add a link to the dashboard, and the As system shortcut? check box if you want the shortcut to be available to everyone.
- In the Dashboard title box, type the title that you want to appear at the top of the dashboard, then click OK.
A blank dashboard appears.
You can edit the title of a dashboard by clicking  on the dashboard title bar, then clicking Modify Title.
If you have set up a multilingual system, you can add translations for the dashboard title by clicking on the dashboard title bar, then clicking Localize title.
If you are logged in to Web Desk using a culture that is not the base culture, you can create and modify only personal dashboards.
For more information about configuring a multilingual system, see Designing a multilingual system.
You can make dashboards that you have created using the Dashboard Designer in the Console available to Web Access (see Using Console dashboards in Web Access). If you have done this, select the View list of dashboards assigned to me check box, then select the required dashboard from the Dashboard list.