Filtering the results list
You can reduce the number of records displayed in your query results list by filtering the results based on the values of selected attributes. For example, you could add a filter so that only incidents at a certain status, or logged in a certain date range, are displayed.
If you run a query that has prompted criteria defined in Query Designer, those prompts automatically appear as filter boxes across the top of the query results page.
To add a filter:
- In the title bar for the query, click
 , then click Insert filter.
The Add attribute dialog appears. - Select the attribute that you want to filter by, then click OK.
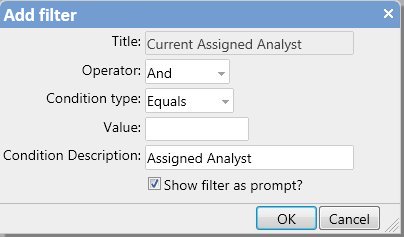
The Add Filter dialog appears.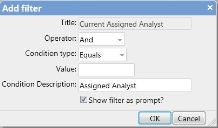
Alternatively, right-click the column heading for the attribute that you want to filter on, then click Add filter on this attribute.
- In the Operator list, select And or Or.
- In the Condition Type list, select the required condition.
The conditions available depend on the attribute's data type.
- If you want to specify the filter value as part of the query, type it in the Value box. Alternatively, if you want the attribute you are filtering by to be added as a prompt box above the column headers in the query results, select the Show filter as prompt? check box.
If you select the Show filter as prompt? check box AND type into the Value box, the Value is used as the initial value for the prompt.
- In the Condition Description box, type the text that you want to use above the column headers for the attribute you are filtering by.
If you do not set a value, the attribute name is used. - Click OK.
The query results list is filtered using the condition that you specified.
If you have multiple filter prompts displayed above the column headers, you can reorder them by dragging them. You can right-click a prompt to Remove it or Modify the Condition type and Value.
You can add further filters to a query by right-clicking the filter panel at the top of a query list, then clicking Insert Filter before, Insert Filter after, Insert Sub-filter before, or Insert Sub-filter after. The sub-filter options enable you to design queries that use nested filters.
You can design queries that include complex filter criteria that can take up a lot of room at the top of the results list. To provide more space for the query results list, you can minimize the filter panel at the top of a query by clicking  in the filter panel. The filter panel then minimizes, to display a summary of the filter conditions. Click
  to redisplay the full filter panel if you want to change the filter criteria.
If you have set up a multilingual system, you can add translations for query filters by right-clicking the required filter, then clicking Localize Query Filter. For more information about configuring a multilingual system, see Designing a multilingual system.
You can also hide the filter panel completely by selecting Hide filters on the query menu ().
You can drag the individual filter criteria within the filter panel to change the logic of the filter criteria.
Selecting values for the Is One Of and Is Not One Of conditions is done in the same way. The procedure below describes using the In condition.
To use the Is One Of condition in a query filter:
- Add the filter attribute to the query in the usual way.
- On the Modify filter dialog, in the Condition type list, select Is One Of.
- In the Value box, type the value that you want to include in the filter, then press ENTER.
The value appears below the Value box. - Add the other values you want to include in the filter as in the previous step.

- When you have set the required values, click OK.
The filter is added to the query.
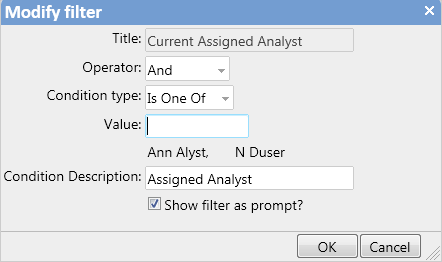
To remove one of the values from the Is One Of condition (either on the Modify filter dialog, or when the filter has been added), hold the mouse over the value you no longer require, then click  next to the value.