Automatic searching in Self Service
You can configure Self Service so that when end-users visit the Self Service web page, they are provided with a box where they type a description of their issue. Self Service then logs this as an incident, and simultaneously searches the knowledge base for any known answers. The end-user can then review the knowledge articles that are returned. The system silently records which articles the end-user opened along with the incident. When the end-user clicks Continue, they are asked if the search answered their question. You can then design your process to take the incident to a different status depending on how the end-user answers this question.
If you set up automatic searching, each article that is viewed by the end-user is added to a new Search Matches collection on the Incident object, and a new Search Status attribute is added to the Incident object. This Search Status attribute is set to 1 if the end-user replies that the search was not useful, 2 if the end-user replies that the search was useful, and 0 if they do not respond. You can then use this data for reporting purposes, and for your process design.
There are three steps to setting up automatic searching in Self Service:
- Add the Automatic Search behavior to the required process object in Object Designer, and then set the Is AutoSearch? flag on the attributes that you want to use in the search.
This makes a Complete Search action available for the object in Process Designer, and creates the Search Matches collection and Search Status attribute on the Incident object. - Use Process Designer to use the new action.
This action is intended for use only with Self Service, so it is worth extending your process design to include a mechanism to bypass the action for analysts.
For example, you could use templates to set the value of a check box. When you then publish the process shortcut to Self Service, you specify the template that sets the check box value that directs the process through the Complete Search action. For analysts, you would use a template that sets the check box value to bypass the Complete Search action. - Use Process Designer to handle the Search Status response given by the end-user.
For example, if they respond that the search was useful (Search Status equals 2), go to the Resolved status, otherwise go to the In Progress status.
To add the Automatic Search behavior:
- In the Ivanti Console, start the Object Designer component.
- From the Business Objects tree, open the top-level process object that you want to enable auto-searching for.
For example, Incident Management\Incident. - In the Properties grid, alongside Behaviors, click
 .
.
The Behavior Selection dialog appears. - In the Available Items list, click Automatic Search, then click
 .
.
Automatic Search moves to the Selected Items list. - Click OK.
- In the Attributes tree, select the attributes that you want to use in the search, and set their Is AutoSearch? property to True.
- Click
 .
.
The changes are saved, and the Complete Search action is available for the object in Process Designer.
To add the Complete Search action to a process:
- In Process Designer, open the required process.
- From the Toolbox, drag on an Action Instance or Automatic Action Instance.
The Select Action dialog appears. - In the list, select Complete Search, then click OK.
The action is added to the process.
You have now configured your system to search the knowledge base while logging an incident. The next stage is to design the process to behave differently depending on whether the end-user found the knowledge search useful or not. The procedure below describes how to resolve the incident if the search is useful, or move the incident to an In Progress status if it wasn't.
To resolve the incident if the search is useful:
- In Process Designer, open the required process.
- From the Toolbox, drag on a Decision.
The Select Condition dialog appears. - Click New.
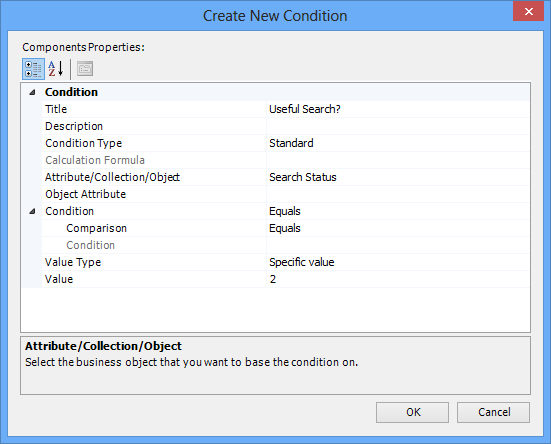
The Create New Condition dialog appears. - In the Title box, type Useful Search?
- In the Attribute/Collection/Object list, select Search Status.
- Expand the Condition property, then in the Comparison list, select Equals.
- In Value Type list, select Specific value, and in the Value box, type 2.

- Click OK.
The Decision is added to the process diagram. - Drag from the icon for the Complete Search action to the icon for the Useful Search? decision that you have just added.
Remember that when you create the links from a decision, the first link is the Yes link. The condition for the decision we have just created is true if the search was useful (Search Status Equals 2), so the first link needs to be to the Resolved status.
- Drag from the icon for the Useful Search? decision to the icon for the Resolved status.
A link with the word Yes on it appears. - Drag from the icon for the Useful Search? decision to the icon for the In Progress status.
A link with the word No on it appears. - Click .
You can add the Search Matches collection to your Incident window, so that analysts can see which knowledge articles have been viewed by the end-user when they view the incident.