Setting up Desktop Integration with Endpoint Manager
Setting up your client workstations
To use Ivanti Endpoint Manager, you must first install the Ivanti Endpoint Manager console. You need irccntr.exe and isscntr.exe to launch the Endpoint Manager component. Your analysts must have permission to use Ivanti remote control functions.
Create an Ivanti Endpoint Manager connection
You first need to create an LDMS connection.
This is different from creating a connection using Data Connections, which you may have created to import information from an external data source.
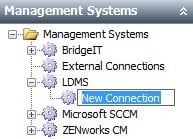
To create a new connection:
- In Console, start Desktop Manager.
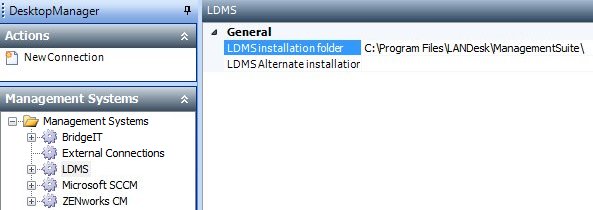
- On the Management Systems tree, double-click the LDMS node.
The Properties grid appears.
- Ensure that the path name to the required folder is correct.
- With LDMS selected on the Management Systems tree, on the Actions list, click New Connection.
- Type a name for the new connection.
- On the Connection String property grid, complete the following information:
Provider – The provider that enables access to the information in your desktop management system. For example, SQLOLEDB.
Server (Data Source) – The name of the server on which Ivanti Endpoint Manager (LDMS) is set up and configured. Typically, Endpoint Manager installs to a database instance called ldmsdata; if Endpoint Manager is installed on a specific database instance, you need to include this in the form server\dbinstance. For example, LDServer\ldmsdata.
Database – The name of the database that is used by Endpoint Manager.
User ID – The User ID for the database that is used by Endpoint Manager.
Password – The Password for the database that is used by Endpoint Manager. Click  , then enter and confirm the password. Click OK.
Is Ivanti on an Oracle Database? – Select False.
You don’t usually need to include a value for the Core Server Name property.
- On the Ivanti MBSDK Service Details property grid, complete the following information to enable the software distribution functions of Endpoint Manager from Service Desk and Asset Manager:
Ivanti MBSDK Service URL – The URL for the Ivanti MBSDK service. For example, https://servername/MBSDKService/MsgSDK.asmx.
User Name – The user name used to access the MBSDK web service.
Domain – The domain name of the web service user.
Password – The password used to access the MBSDK web service.
Server Date/Time Format – the date/time format on the Endpoint Manager server.
- By default the Debug property is set to False, but if you are having difficulties during set up, select True to enable you to see the Endpoint Manager commands before they are executed.
- Click
 .
.
Specifying the unique identifier for your remote objects
Before you can use your desktop management functions, you must first set up how Desktop Manager identifies the specific remote object that you want to manage on the connection that you have set up. You do this by selecting the business object from which you will use Desktop Integration, then specifying the attribute that contains the unique identifier for the remote objects that you want to manage. This unique identifier is used to search for a match on your Endpoint Manager system. If a match is made, you can then connect to that remote object.
For example, you can specify that a Desktop Integration connection can occur on your Configuration Management | Configuration Item | PC object. When you use the Desktop Integration menu on the PC window, Desktop Manager searches your Endpoint Manager system according to the attribute that you specified on the PC business object. For example, in the case of Endpoint Manager, this is the attribute that contains the Computer ID. When the corresponding Computer ID is found on your Endpoint Manager system, then Desktop Manager enables you to use Endpoint Manager functions (such as remote control) on that specific PC instance.
To specify the unique identifier for your remote objects:
- On the Management Systems tree, select the connection you have created, then on the Actions list, click New Business Object.
The Select Business Object dialog appears.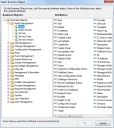
- On the Business Objects tree, select the business object that you want to manage using Desktop Management.

You will use the desktop management shortcut menu from the window that you have created for this business object.
- On the Attributes tree, select the Ivanti computer ID attribute which contains the unique identifier for the remote objects on the connection that you have created.
- Click OK.
- Click .
- Repeat if required for other business objects. For example, PC, Laptop, Server and Workstation.