Adding dashboards
This section describes how to add a new or existing dashboard to your system.
To create a new dashboard:
1.Click New Dashboard under Dashboards in the Reporting section of the menu bar.
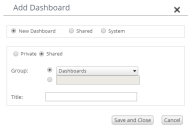
The Add Dashboard dialog appears.
2.Select New Dashboard at the top of the dialog.
3.Select Private if the dashboard is for just yourself, or Shared to make it available to others.
4.In Group, either select an existing group to place the new dashboard into, or select the option button next to the box below and type a title for a new group.
5.Type a Title for the new dashboard, then click Save and Close.
The Dashboard page appears for the new dashboard so that you can configure it, and it is added to the menu bar.
For more information, see Viewing and configuring dashboards.
You can also add existing dashboards to your Dashboards menu. There are two types of dashboard you can add:
•Shared – dashboards created by colleagues as a shared dashboard (see above).
•System – dashboards created by Ivanti that are provided with License Optimizer.
To add an existing dashboard:
1.Click Add Dashboard under Dashboards in the Reporting section of the menu bar.
The Add Dashboard dialog appears.
2.Select Shared or System at the top of the dialog as required.
The dialog updates to show just a Dashboard drop-down list.
3.Select the required dashboard from the Dashboard drop-down list, then click Save and Close.
The selected Dashboard page appears.
Editing or deleting dashboards
You can edit or delete dashboards that you have added, but first you need to extend the dashboard menu.
To edit or delete a dashboard:
1.On the gears menu alongside the Account details section at the top right of the page, select Extend Dashboard Menu Options.
The License Optimizer page refreshes.
2.Expand the Reporting > Dashboards section of the menu bar.
Icons are now available alongside dashboard items that you have added.
3.Click:![]() to display the Edit Dashboard dialog to change the Group or Title of the dashboard
to display the Edit Dashboard dialog to change the Group or Title of the dashboard![]() to delete the selected dashboard
to delete the selected dashboard