User groups and folder security
A user group is a collection of one or more Xtraction users with a common need for access to the same Xtraction resources. Groups enable the administrator to define who has permission to access the folders where dashboards, documents, and filters are stored. A user group can be associated with multiple dashboard or document folders.
A user can be a member of multiple groups.
1. At the bottom of the page, click the Administration > User Administration link.
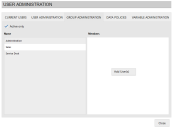
2.Click the Group Administration tab to display the groups list. At the top, you have the option to limit the display to Active only groups.
3.To add a group, right-click in the group area and select Add.
4.In the Group dialog, enter a name for the group. Select if the group should be Active or not. If you clear this option, the group will be created but will not be viewable if the Active only option on the previous dialog is selected. Click OK.
5.To add members to this group, select it in the group list, then right-click in the Members list and select Add user(s).
6.Scroll through the list to add users, and use your Ctrl key to select more than one at a time.
7.Click Close when finished.
Folders
You can use folders to organize content and restrict access to certain groups or users.
It's helpful to create an initial set of public folders for users with the roles of designer and enterprise designer so that they can organize dashboards in a structured way. One approach is to have top-level folders for each organizational unit, with sub-folders for different types of dashboards—for example Daily, Weekly, Monthly, and Annual.
Folder permissions define user and group access to dashboards, documents, and filters that are stored in those folders.
1.Open one of the designer tools, for example Dashboard Designer.
2.In the top menu bar, click Tools > Folders to open the Folders dialog.
3.In the folders list, right-click My Folders, Shared Folders, or User Folders and click Add folder to open the Folder dialog.
4.Enter a name and select an owner.
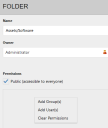
5. Options available under Permissions depend on a user's rights. Administrators can select between public and restricted access. Most users may only select to release their own folders to the public:
•Select Public (accessible to everyone) to make the folder freely accessible. Note that it's not possible to make a sub-folder of a restricted folder public. The sub-folder will only be available to the same users who have access to the parent folder.
•To restrict access, right-click in the Permissions area and assemble a list of groups or users that have permissions to access the folder. 
6.Click OK when finished.
For details about displaying the folders of inactive users, see User accounts.