User accounts
If the Auto Create Users option was enabled during installation, an account is automatically created the first time an authenticated user logs into Xtraction. However, you may want to manually set up user accounts ahead of time so that user roles are already assigned. The user settings you can edit include roles, access rights, group participation, variables, and passwords.
If your company has purchased an Enterprise Server license, you have the option of setting up an unlimited number of accounts to have view-only access to private and public dashboards and documents. These end users, known as "viewers," are not assigned a user role and do not consume an Xtraction analyst license when viewing content. Once a user has an assigned role, each Xtraction session that they open in a browser will use an analyst license.
Before setting up user accounts, you need to create the user groups, data policies, and variables that will be associated with the accounts:
•User groups: Create groups to control access to saved content within folders. For details, see User groups and folder security.
•Data policies: Define policies to impose restrictions on user access to data. For details, see Data policies.
•Variables: Create variables to filter dashboards and documents at the user-account level. For details, see Variables.
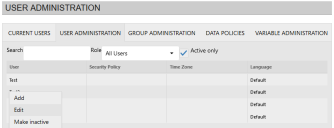
Once a user account is created, you can't delete it, nor can you change a user's username from within Xtraction. You can, however, right-click a name and select Make inactive to temporarily suppress a user's access rights.
All user accounts have an Xtraction session timeout period that was set up during installation. If you ever need to adjust the timeout period, do so from the Xtraction Settings utility > Features tab. The utility is located by default at C:\Program Files (x86)\Xtraction Software\Xtraction\Tools.
1.At bottom of the page, click the Administration > User Administration link.
2.Click the User Administration tab to display the user list.
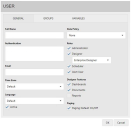
3.To create a new user, right-click anywhere in the list and select Add. The User dialog displays three tabs that you need to fill in for each user account.
•Full Name: The display name of the user.
•Authentication: Contains the details of the current user's credentials. To add a new credential, right-click and select one of these authentication types:
•Add Windows Authentication: Only a username is required. Windows authentication is managed by the external system itself, so Xtraction doesn’t need any more details. Note that the username should be in the format Domain\Username.
•Add Local: User credentials used to log into Xtraction locally. Provide a username (not case sensitive) and password (case sensitive). Note that with Local authentication, users can change their own Xtraction credentials by clicking the Profile > Change Password link at the bottom of the page.
•Email: This field is not currently used by Xtraction.
•Time Zone: The time zone used when displaying date/time fields that are based on Greenwich Mean Time (GMT). Data is displayed in the context of the time zone set for each user. If the user is traveling to a different location or needs to access data in the context of that location, this setting provides the basis for adjustments. If set to Default, the time zone is determined by the global Default Time Zone value (set in the dialog accessed via the Administration > Settings link).
•Language: Select a language or use Default, which is based on your Xtraction server installation locale.
•Active: Select or clear this option to manage the user's access to Xtraction. When cleared, the user can't log into Xtraction. If a user is active, that person is counted as a registered user in the Xtraction database.
•Data Policy: You can assign one data policy per user account. Data policies help restrict the data that a user can view. If None is selected, the user will have unrestricted access to all available data, which isn't recommended. You must first define the data policies before they display here. For details, see Data policies.
•Roles: Select one or more roles for the user. If assigning a designer role, you must select a specific designer type. For companies with an Enterprise Server license, you can set up users without a role to have view-only access to content. For details about user roles, see User roles.
•Designer Features: If you assign a designer role, you must also select the features that the user may access—dashboards, documents, or reports. Generally, you will not want to give most designers access to reports, because they can then write SQL statements directly against any data source they have access to.
The Exportables designer feature enables a user to create single components for export to 3rd-party applications. When selecting this feature, make sure you assign the component scheduler role as well.
•Paging: Select this option to enable paging on record lists. If enabled after the account is set up, paging is only applied once a user has logged off and on again.
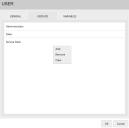
Groups control access to saved dashboards, documents, and filters within folders. The user can be a member of multiple groups. You must first create the user groups before they display here. For details, see User groups and folder security.
Right-click an entry and select from these options:
•Add: To add another group in which the user participates. You can use the Ctrl or Shift keys to select sets of groups.
•Remove: To remove a group from participation by the user.
•Clear: To remove all group participation for this user.
Variables tab
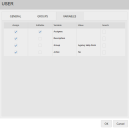
Variables control access to data in a dashboard or document by filtering the display. The administrator controls whether the user can change the value associated with a variable. You must first create the variables before they display here. For details, see Variables.
Select from these options:
•Assign: Assign a variable to this user.
•Editable: Allow the user to edit the variable value. For certain variable values, you may want to give editing permissions only to the user accounts of senior managers or executive designers.
•Search: Assign a default value to the variable. Use the Search button at the end of each row to perform a search for suitable values.
4.Click OK when finished.
If you've set up Local authentication for a user but also want to enable Windows authentication for them, you can do so from Xtraction.
1.At bottom of the page, click the Administration > User Administration link.
2.Click the User Administration tab to display the user list.
3.Select a user from the list, then right-click and select Edit. The User dialog will display.
4.In the General tab, right-click in the Authentication area and select Add Windows Authentication. Enter the user's Windows username (using the format Domain\Username), then click OK. After adding, be sure to advise users that they can use their Windows credentials to access Xtraction.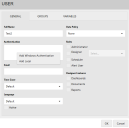
5.Click OK when finished.
Note that Windows authentication passwords are stored elsewhere, so you can't change the Windows password from within Xtraction.
Viewing, logging off, and searching for users
As administrator, you can manage the Xtraction user list with the following procedures.
1.At bottom of the page, click the Administration > User Administration link.
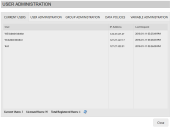
2.With the Current Users tab open, click the ![]() icon to ensure that you see the current set of users.
icon to ensure that you see the current set of users.
At the bottom of the dialog, you can see the number of licensed and registered users for your installation. Licensed users refers to the number of users that can be logged into Xtraction at one time, as defined by your installation's current license file. Total Registered users refers to the number of users defined in the Xtraction user database that are active as opposed to inactive.
When you log off a user remotely, a delay of up to one minute may occur before the current users list updates.
1.At bottom of the page, click the Administration > User Administration link.
2.With the Current Users tab open, right-click a user and select Log Off. Xtraction will automatically log off that user and display a message on their screen indicating that this was an administrator log-off.
1.At bottom of the page, click the Administration > User Administration link.
2.Click the User Administration tab to display the user list. When viewing the full list, you can tell which users are active versus inactive—active users have a green square in front of their name.
3.At the top of the dialog, you can search for specific users and by user role. You can also limit the display to Active only users.
To temporarily suppress a user’s access rights to Xtraction, right-click a name in the user list and select Make inactive.
Displaying the folders of inactive users
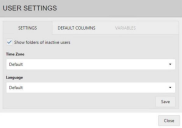
You can enable an option to display the folders of inactive users in the folder lists on the Home page and on the Dashboard Designer and Document Designer menus for Save and Tools > Folders. These folders display with the  icon.
icon.
Note that this option is always disabled on first login, is available for administrators only, and is applicable for just the current Xtraction session (it doesn't persist between sessions).
