Test to Live
Esta información solo está disponible en inglés.
The Service Desk and Asset Manager Test to Live application enables you to trial new designs in a test database, and then migrate the updates to your live system. The workflow for using the test to live application is illustrated below:
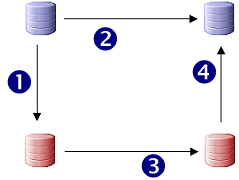
 – Live database
 – Test database
Overview of using the Test to Live application:
This section describes the procedure for using the Test to Live application. For information about best practice strategies for migrating designs from development and test systems into your live system, see Test to Live migration strategies.
- Back up your Live database and restore it to your Test system.
- The Live system continues to be used to capture and update incidents, requests, and so on, with new data being captured as usual.
DO NOT make changes in your Live system to data that is migrated by the Test to Live application, as Test to Live synchronizes this data between Test and Live, and as a result will delete or overwrite any changes made in Live. (See Configuration information that IS migrated.)
You can continue to work with incidents, requests, and so on. You can create users and CIs.
- Make the required updates to your Test system, and test them.
- Back up your Live database again, and back up your test database.
- Stop the application pool on all servers for the Live system while the Test to Live application is migrating the design changes into the Live system.
- Use the Test to Live application to migrate your design changes into the Live system.
- Manually update items that are not transferred (see Configuration information that IS NOT migrated).
Configuration information that IS migrated
During the migration of your Test system into your Live system, ALL changes to the following items are migrated:
- business objects
- windows, views, and copy rules
- templates
- processes
- system queries
- shortcuts, including publishing details
- system dashboards, including publishing details
- system preferences
- CI Exception Reporting configuration
- MI configuration
- Event Manager configuration
- data import schedules
- license information
- NEW groups and roles – groups and roles that are updated and deleted in the test database are not migrated to live
- NEW reference lists, ordered lists, and categories – reference lists, ordered lists, and categories that are updated and deleted in the test database are not migrated to live
- NEW agreements and response levels – agreements and response levels that are updated and deleted in the test database are not migrated to live
- other parts of your database schema that are not deliberately excluded, such as stored procedures
Configuration information that IS NOT migrated
The following rules are also applied when you migrate your Test system into your Live system:
- attachment data (tps_attachment_data)
- UPDATED or DELETED groups and roles (and their associated privileges) – only new groups and roles that have been added to the test database are migrated to live
- UPDATED or DELETED reference lists, ordered lists, and categories – only new items that have been added to the test database are migrated to live
- UPDATED or DELETED agreements and response levels – only new agreements and response levels that have been added to the test database are migrated to live
In addition, you can choose to migrate changes to the following items:
- connections created in the Data Connections component
- connections created in the Desktop Manager component
- settings in the Mail component
These changes are optional so that you can configure these components to connect to Test systems, and then choose not to migrate these changes to your Live system. If, however, you have created a new data connection that you want to use in your Live system, you can choose to migrate it.
If you choose to migrate one of these sets of optional changes, then ALL updates for that component are migrated into the Live system.
Migrating users
It is best practice to avoid referencing specific users in your database design: we recommend that you refer to groups or roles in your designs, and add the required users to these groups or roles. However, if you refer to specific users in your updated design (for example, in process assignments or in query criteria), Test to Live identifies these users and provides you with two options. You can:
- add the new users to your Live database
- update the references in your updated design to refer to an existing user in your Live database
Migrating mail boxes
If you restore a backup of your live database to test, the best way of handling the Outbound Mail Settings and Inbound Mail Settings for the mail boxes in your test system is to update the existing live settings to work with your test mail system. Then, when you synchronize test to live, you can select the Retain Differences option for the mail box so that the changes you made to these settings in Test are not synchronized to Live.
If you delete the mail box definitions in Test and create new test mail box definitions, Test to Live considers these as changes that need to by synchronized. This means that the mail box definitions in your Live system will be deleted and replaced by the mail box definitions in your Test system. The Retain Differences option would not be valid in this instance.
Migrating reference data
For technical reasons, migration of the following types of reference data is different from other migrations in Test to Live:
- groups, roles, and privileges
- reference lists, ordered lists, and categories
- agreements and response levels
For these items, NEW instances are migrated from test to live, but updates and deletions are not migrated.
The best practice is not to add new instances of these items in live. However, there may be times when this is impractical. If you do need to add new instances of these items to your live system, DO NOT also add them to your test system, because Test to Live will try and fail to create duplicate entries in live.
Also, as updates and deletions to these items in test are not migrated, you will need to track these types of change in your test system and then manually make those changes in your live system.
If a new privilege for a role is added, this is migrated. If a privilege is changed from Read to Create or Update, this is NOT migrated.
Using Test to Live
To create a test database from your live database:
- Back up your live Service Desk or Asset Manager database.
- Restore this backup as your test database.
- Use the Ivanti Configuration Center to create a new instance for the Test database.
- Make and test the required changes in your Test database.
To migrate changes from your test database to your live database:
- From the LANDesk\LANDesk Service Desk program group, start Test To Live.
The Test To Live application starts. - In the Test Database group box, enter the connection details to your test database.
- In the Live Database group box, enter the connection details to your live database.
- Backup your live database.
Make sure you take a further backup of your live database before you migrate your test changes into your live system.
- Select the DB is backed up? check box, then click Connect.
Test to Live loads the test and live databases and determines the changes that have been made. If any changes to Desktop Manager connections, Data Connection connections, or Mail settings are discovered, they appear in the Pre-Sync Validation box. - In the top list in the Pre-Sync Validation group, select Import into Live or Retain Differences as appropriate for each optional difference that is found.
- If any users are referenced in the changes in your Test database, they appear in the lower list. For each user, select Import into Live or Replace With User and select the appropriate user.
You can either migrate the referenced users into your Live database, or you can update the references to an existing user in your Live database. - When you are happy with the settings you have selected, take down the Live system, then click Start Sync.
The changes in your Test database are synchronized into your Live database.
A log file is created in C:\Users\username\AppData\Local\LANDesk\TestToLive.
Test to Live migration strategies
The previous section described how to migrate changes from a test system directly into a live system. In this section, you learn about the best practice method for migrating your design changes into your live system.
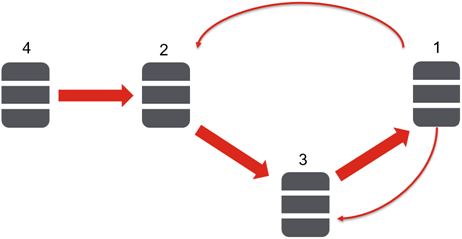
1 – Production. The live system.
2 – UAT. The User Acceptance Testing system where your users test the changes that you have made before they go live.
3 – Pre-production. Created from your Production system just before you migrate your changes through to Production to enable you to test for any issues before migrating to Production.
4 – Development (optional). If you have the resources, a separate Development system enables you to separate your development work from your user acceptance testing.
The procedure described below provides a mechanism that enables you to identify and fix any issues in the migration from test before you migrate to your live production system.
- Create a UAT system using a backup of your Production system. (Optionally, also create a Development system.)
- Make your design changes either in Development or UAT.
- If you are using a Development system, use Test to Live to migrate your changes to UAT.
- When your user acceptance testing is successfully completed, and just before the down-time for your Production system, create a Pre-production system from a new backup of your Production system.
- Use Test to Live to migrate your changes from UAT to Pre-production and resolve any issues you find.
- Stop your Production system and use Test to Live to migrate your changes from UAT to Production.
- Take a new backup of your Production system and use this to update all of your UAT and Development systems ready for the next round of updates.