Setting up Apple Device Enrollment with Ivanti EPMM
Setting up Apple Device Enrollment with Ivanti EPMM involves the following main steps:
- Editing Ivanti EPMM roles for Apple Device Enrollment
- Linking Ivanti EPMM to Apple Device Enrollment
- Assigning devices to the Apple Device Enrollment account
- Creating an Apple Device Enrollment Profile
- Assigning Apple Device Enrollment devices to an enrollment profile en masse
- Checking for Apple Device Enrollment account updates
- Setting up Apple Device Enrollment with Ivanti EPMM
Before you begin
Sign up for Apple Business Manager. Apple's deprecated deployment accounts will continue to be supported by Ivanti EPMM as long as Apple continues support.
For more information, see the Apple documentation for setting up an Apple Device Enrollment account.
When using the hold feature while registering a device with Apple Device Enrollment, it is possible for the device to get stuck in the hold screen if its Internet connectivity drops, causing the Apple MDM server to be unable to reconnect to the device. Make sure you have a stable Internet connection before registering a Apple School Manager device using the hold feature.
Editing Ivanti EPMM roles for Apple Device Enrollment
Before you can set up and manage Apple Device Enrollment in Ivanti EPMM, you must be sure your user name has the correct permissions for these actions. By default, user names with the administrator role will have the correct permissions.
Procedure
- In the Admin Portal, select Admin > Admins.
- Select the administrators whose permissions you want to edit.
- Select Actions > Edit Roles.
- In the Edit Roles window, select the following:
Item
Description
Admin Space
Select the space over which this administrator has administrative control. For example, select Global to allow the administrator to use the permissions selected here throughout Ivanti EPMM.
Manage custom attributes
Select to allow the administrator to create custom attributes for use with Apple Device Enrollment.
Manage device enrollment (iOS only)
Select to enable Apple Device Enrollment.
You can use Apple Device Enrollment to manage macOS and tvOS devices.
- Click Save.
Linking Ivanti EPMM to Apple Device Enrollment
Linking your Ivanti EPMM server to the Apple School Manager portal allows you to use Ivanti EPMM as the designated MDM server for your Apple School Manager devices. You can then use Ivanti EPMM to manage and secure your enrolled devices.
This process involves:
- downloading a public key from Ivanti EPMM and uploading it to the Apple School Manager
- downloading the Apple School Manager server token file and uploading it to Ivanti EPMM
After you upload it to the Apple School Manager, the public key certificate encrypts the authentication server token file for secure transfer to Ivanti EPMM.
If you have multiple Apple School Manager accounts for the same instance of Ivanti EPMM, you can use the same certificate you download from Ivanti EPMM for all your Apple School Manager accounts.
The following procedure is applicable for only Apple School Manager. If you try to create a MDM server using Apple Business Manager, you will not be able to connect it to Apple School Manager.
Procedure
- In Ivanti EPMM, go to Devices & Users > Apple Device Enrollment.
- Click Add+. The Add Account dialog box opens.
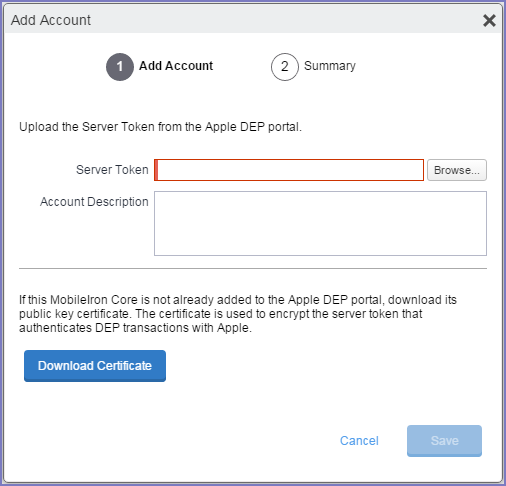
- In the Add Account window, click Download Certificate. A .CRT file is downloaded to the file system.
- Go to your Apple School Manager portal and sign in using a dedicated Apple ID.
- Navigate to the Manage Servers page and add an MDM server using the certificate (.CRT file) downloaded in the previous steps.
- Download the server token (.P7M file) from the Apple School Manager. The file will download to your default download location.
- Go back to Ivanti EPMM and in the Add Account window, click Browse next to the ServerToken field.
- Select the server token (.P7M file) you downloaded from the Apple School Manager portal.
- Click Open.
- Click Save.
- Go back to the Apple School Manager portal.
- Click Done.
- In Ivanti EPMM, click Check for Updates. Ivanti EPMM retrieves the new devices.
Assigning devices to the Apple Device Enrollment account
After linking your Apple School Manager account to Ivanti EPMM, you must add devices to your Apple Device Enrollment account. Devices added to Apple Device Enrollment are assigned to Ivanti EPMM, as this is the MDM server you linked to in Linking Ivanti EPMM to Apple Device Enrollment.
Procedure
- Go to the Apple School Manager portal and sign in using a dedicated Apple ID.
- Navigate to the Manage Devices page and select the method by which you want to add devices, and take action accordingly.
Choose Devices By...
Description
Serial Number
Enter one or more comma-separated serial numbers for the devices you want to assign.
Order Number
Choose an order
•Click the Order Number radio button.
•Select a specific order number from the Choose an order drop-down list.
A list of devices purchased with that order number is displayed.
Upload CSV File
•Click the Upload CSV File radio button.
•Click the Choose File link to select a CSV file listing devices by serial number.
- Select Assign to Server.
- From the Choose MDM Server drop-down list, select your instance of Ivanti EPMM.
- Click OK. The devices are assigned.
Creating an Apple Device Enrollment profile for Apple School Manager
There are many options for creating a profile for Apple School Manager. The list can be found here: Creating an Apple Device Enrollment Profile.
Mark this location if you will be returning to this page, or open the above link in a new window.
Example Device Enrollment Profiles for Apple School Manager
- Teacher Profile - create a single profile that meets your teacher requirements.
- Student Profile (1:1) - Create a single profile that meets your student requirements for student 1:1 devices (not multi-user).
- Shared iPad Profile (Multi-User)
-
Create a new Add Enrollment Profile and ensure that it has the following settings selected:
- Enable Supervision
- Require MDM Enrollment
- Enable Shared iPad (multi-user) for Apple Education
-
Click Save. The Shared iPad profile displays in the Device Enrollment page. The profile is marked as "Multi--user" and from this point forward, any devices that get this enrollment profile will automatically be set for multi-user.

Next steps
- For Apple Business Manager, continue to Assigning Apple Device Enrollment devices to an enrollment profile en masse.
- For Apple School Manager, continue to Adding your enrolled devices to your MDM server.
Assigning Apple Device Enrollment devices to an enrollment profile en masse
After linking Ivanti EPMM to a Apple Device Enrollment account, the devices assigned to this account are displayed in the Ivanti EPMM Admin Portal. The Apple Device Enrollment devices are organized so that clicking the number in the Devices column for an account shows the devices assigned to that account. To manage your devices in Apple Device Enrollment, it can help to assign multiple devices to an enrollment profile. You can do that by:
- selecting the devices and adding them
- creating a CSV file containing the relevant devices and uploading the file to Ivanti EPMM
You can also assign custom attributes to the devices using a CSV file. This happens when you assign these devices to an enrollment profile.
If you have already created an enrollment profile and assigned it as the default for all Apple Device Enrollment devices associated with your Apple School Manager account, then your devices have already been assigned an enrollment profile, and you can skip this step. Continue on to Checking for Apple Device Enrollment account updates.
Note the following:
- The CSV file can contain up to 5,000 devices.
- Assigning devices and profiles with a CSV file containing UTF-8 characters may cause errors due to invalid encoding.
- When adding a custom attribute to a CSV file, the column header must match the name of the custom attribute exactly. For multi-users in shared device carts, be sure the CSV file you upload has a new column for the custom attribute created when you enabled Apple Education and connected to the MDM server. Each of these devices must be pre-assigned to a device cart.
- The value of a custom attribute must match the data type of the custom attribute. For example, a boolean type custom attribute can only have a boolean value. For Apple Education Managed Apple ID and Apple Education Device Cart attributes, string is the only valid data type.
Procedure
- Go to Apple School Manager and sign in using your Apple ID.
- Select Device Enrollment Program in the sidebar.
- Select Manage Servers, then click the name of the server.
- In the Server Details window, click Download Serial Numbers to download a comma-separated value (CSV) file that contains the serial numbers of all assigned devices.
- After you download the CSV file, click OK.
- Open the CSV file in an editor.
- Remove the column next to the serial numbers. This column may be called MODEL.
- Optionally, you can assign a custom attribute to the devices listed in the CSV file by editing the CSV file. The custom attribute is assigned to devices when the devices are assigned to the enrollment profile.
- Add a column to the file and name it.
- The name of the column is the name of the custom attribute.
- Enter a value for the custom attribute in each device row.
- Optionally, add more custom attributes and values.
- Save your changes.
- In Ivanti EPMM, select Devices & Users > Apple Device Enrollment.
- Find the Apple School Manager account you want to use, and click the number in the Enrollment Profiles cell. Ivanti EPMM displays the available enrollment profiles.
- Select the device enrollment profile you want to use.
- Select Actions > Assign Devices to Profile.The Assign Devices to Profile dialog box opens.
- Click Upload, and browse for the CSV file you downloaded from the Apple School Manager Portal.
- Click Assign.
Checking for Apple Device Enrollment account updates
As devices are added to the Apple Device Enrollment account on the Apple School Manager portal, and not on Ivanti EPMM, it is recommended to occasionally check for Device Enrollment account updates in Ivanti EPMM. Ivanti EPMM will synchronize with the Apple School Manager portal, and any devices that have been added or removed will be reflected in the Ivanti EPMM Admin Portal. If an enrollment profile has been configured as the default for the Apple Device Enrollment account, the default enrollment profile will be applied to all newly assigned Apple School Manager devices.
Procedure
- In Admin Portal, go to Devices & Users > Apple Device Enrollment.
- Click Check for Updates.
Verifying the Apple Device Enrollment status of a device
Two values in the Device Details tab indicate the status of a device:
- Apple School Manager Device
- A value of true indicates the device was purchased from Apple as a Apple School Manager device. The device itself may or may not be enrolled via Apple School Manager.
- A value of false indicates the device is either not a Apple School Manager device, or the device was a Apple School Manager device that was later removed from the Apple School Manager portal.
- Apple Device Enrolled
- A value of true indicates the device is enrolled in the Apple School Manager. Alternatively, the device is enrolled in the Apple School Manager and registered with Ivanti EPMM, but the device has been removed from the Apple School Manager portal.
- A value of false indicates the device is not currently enrolled via Apple School Manager.
If a Apple School Manager device is not enrolled in Apple Device Enrollment, you can retire and wipe the device so as to re-purpose the device for another user.
Procedure
- In the Admin Portal, select Devices & Users > Devices.
- Find the device whose enrollment details you want to examine, and click the carat (^) next to it.
- Click the Device Details tab.
- Examine the values for DEP Device and DEP Enrolled.