Configuring device and server authentication
You specify the device and server authentication in the Sentry configuration under Services > Sentry in the Admin Portal. Click Add New > Standalone Sentry or click the Edit icon for an existing Sentry.
•Device authentication is configured in the Device Authentication Configuration section.
•Server authentication is configured:
| - | in the ActiveSync Configuration section for the ActiveSync server. |
| - | in the App Tunneling Configuration section for each AppTunnel service. |
If you do device authentication with Identity certificates, you can specify different server authentication types for the ActiveSync configuration and for each AppTunnel service. For example, you can specify Pass Through for the ActiveSync server and Kerberos Constrained Delegation (KCD) for the servers listed for an AppTunnel service.
For identity certificates, you can upload a local CA or an external CA. See the “Managing Certificates and Configuring Certificate Authorities” chapter in the Ivanti EPMM Device Management Guide for information on how to create a local CA, generate a certificate signing request (CSR), and configure Certificate and Certificate Enrollment settings.
Before you begin
•Obtain the certificates required for your implementation.
Procedure
| 1. | In the Admin Portal, select Services > Sentry. |
| 2. | Click the Edit icon the Standalone Sentry entry. |
Figure 1. Device authentication

| 3. | In the Device Authentication Configuration section, select an option appropriate for your implementation. |
| 4. | Depending on the option you selected, follow the instructions in one of the following section to complete the configuration: |
| - | Pass Through |
See Configuring authentication using Pass Through for next steps.
| - | Group Certificate |
See Configuring authentication using a group certificate for next steps.
| - | Identity Certificate |
See Configuring authentication using an identity certificate and Pass Through for next steps.
OR
See Configuring authentication using an identity certificate and Kerberos constrained delegation for next steps.
Configuring authentication using Pass Through
With the pass through option, Ivanti Standalone Sentry passes through the user name and password or NTLM authentication provided by the device.
Procedure
| 1. | In the Ivanti Standalone Sentry configuration on Ivanti EPMM, for Device Authentication, select Pass Through. |
Pass Through is only option available for server authentication for the ActiveSync server.
| 2. | Click Save to save your configuration. |
See also, Device authentication configuration on Ivanti Standalone Sentry
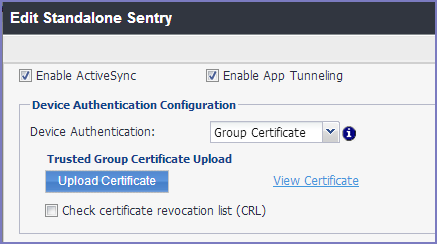
Configuring authentication using a group certificate
If you select Group Certificate for device authentication, additional configuration fields display in the Device Authentication Configuration section.
For device authentication with group certificate, Pass Through is the only option available for server authentication.
Figure 2. Authentication using group certificate
Procedure
| 1. | In the Device Authentication Configuration section |
| 2. | For Device Authentication, select Group Certificate. |
| 3. | Click Upload Certificate. |
| 4. | Select the certificate (usually a .cer file) you trust. |
| 5. | Click Upload. |
The certificate is uploaded at this time, but does not persist until you click Save.
| 6. | If you want to validate the certificates presented by the device against the Certificate Revocation List (CRL) published by the CA, then select Check Certificate Revocation List (CRL). |
| - | CRL check should be enabled only if the certificate chain presented by the device or the Trusted-Front-End to Standalone Sentry contains information to download CRL over HTTP. |
| - | Only HTTP- and HTTPS-based CRLs are supported. Some CAs create LDAP-based CRLs by default that will not work with Sentry. |
| - | For CRL validation to work, Sentry requires network connectivity to the CRL Distribution Point (CDP), usually the CA that issued the certificate, through an HTTP or HTTPS port. |
| 7. | If you are configuring the Standalone Sentry for ActiveSync, in the ActiveSync Server Configuration section, Server Authentication defaults to Pass Through. |
If you are configuring Standalone Sentry for AppTunnel, in the App Tunneling Configuration section, select Pass Through for Server Auth for the AppTunnel Service.
| 8. | Click Save. |
Ivanti Standalone Sentry restarts.
Next steps
Create a Certificates setting to generate the identity certificate for the device. Go to Configuring a Certificates Enrollment setting.
Configuring a Certificates Enrollment setting
You will reference the certificate enrollment setting in the Exchange configuration if you are configuring ActiveSync email. If you are configuring AppTunnel, you will reference the certificate enrollment setting in the AppConnect app configuration, the Docs@Work configuration, or the Web@Work configuration, depending on the app for which you are configuring an AppTunnel service. The certificate is pushed to the device along with the configuration in which the certificate is referenced. You do not need to apply the certificate setting to a label.
Procedure
| 1. | In the Admin Portal, go to Policies & Configs > Configurations. |
| 2. | Click Add New > Certificate Enrollment > Single File Identity. |
| 3. | Enter the requested information and upload the certificate. |
This is the same certificate you uploaded for device authentication to the Ivanti Standalone Sentry. You will upload the certificate and the key (a .p12 file).
| 4. | Click Save. |
For more information about the Single File Identity setting, see the Ivanti EPMM Device Management Guide.
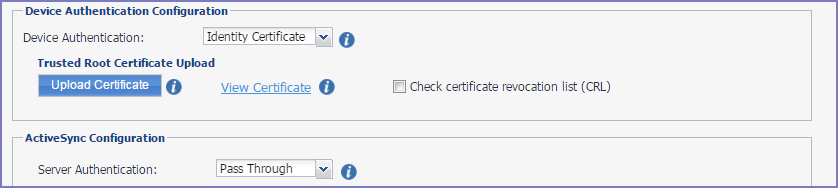
Configuring authentication using an identity certificate and Pass Through
This section describes the configuration when you choose Identity Certificate to authenticate the device to Standalone Sentry and Pass Through for how Sentry authenticates the device to the ActiveSync server or a backend resource.
If you select Identity Certificate for device authentication, additional configuration fields display in the Device Authentication Configuration section.
Figure 3. Device authentication with identity certificate
Procedure
| 1. | In the Device Authentication Configuration section, click Upload Certificate. |
| 2. | Select the Root certificate (this may be a root certificate chain) that you received from the CA you trust. The CA may be a Root Authority or an Intermediate Authority. |
| 3. | Click Upload. |
The certificate is uploaded at this time, but does not persist until you click Save.
| 4. | If you want to validate the certificates presented by the device against the Certificate Revocation List (CRL) published by the CA, then select Check Certificate Revocation List (CRL). |
| - | CRL check should be enabled only if the certificate chain presented by the device or the Trusted-Front-End to Ivanti Standalone Sentry contains information to download CRL over HTTP. |
| - | Only HTTP- and HTTPS-based CRLs are supported. Some CAs create LDAP-based CRLs by default that will not work with Sentry. |
| - | For CRL validation to work, Sentry requires network connectivity to the CRL Distribution Point (CDP), usually the CA that issued the certificate, through an HTTP or HTTPS port. |
| 5. | If you are configuring Standalone Sentry for ActiveSync, in the ActiveSync Server Configuration section, Server Authentication defaults to Pass Through. |
If you are configuring Standalone Sentry for AppTunnel, in the App Tunneling Configuration section, select Pass Through for Server Auth for the AppTunnel Service.
| 6. | Click Save. |
Standalone Sentry restarts.
Next steps
Create a Certificates Enrollment setting to generate the identity certificate for the device. Go to Configuring a Certificates Enrollment setting.
Configuring a Certificates Enrollment setting
You will reference the certificates enrollment setting in the Exchange configuration if you are configuring ActiveSync email. If you are configuring AppTunnel, you will reference the certificate enrollment setting in the AppConnect app configuration, the Docs@Work configuration, or the Web@Work configuration, depending on the app for which you are configuring an AppTunnel service. The certificate is pushed to the device along with the configuration in which the certificate is referenced. Do not apply the certificate setting to a label.
Procedure
| 1. | In the Admin Portal, go to Policies & Configs > Configurations. |
| 2. | Click Add New > Certificates Enrollment. |
| 3. | Select and configure the appropriate certificate enrollment setting. |
The identity certificate generated must be trusted by the certificate chain in the certificate you uploaded to the Ivanti Standalone Sentry for device authentication.
| 4. | Click Save. |
Next steps
For more information about Certificate Enrollment settings, see the Ivanti EPMM Device Management Guidefor your device operating system. For Android enterprise, see the Ivanti EPMM Device Management Guidefor Android.
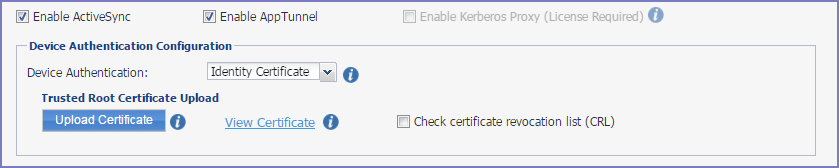
Configuring authentication using an identity certificate and Kerberos constrained delegation
This section describes the configuration when you choose Identity Certificate to authenticate the device to Standalone Sentry and Kerberos for how Sentry authenticates the device to the ActiveSync server or backend resource.
•For ActiveSync, Sentry supports Kerberos authentication only with Microsoft Exchange Servers.
•If you are configuring tunneling to a DFS server, in the Kerberos distribution center, map the SPN of the CIFS service domain to one of its domain controllers. See Configuring Kerberos authentication for DFS.
•Kerberos initialization in Standalone Sentry occurs only during tomcat start up. Ivanti Standalone Sentry obtains the ticket-granting ticket (TGT) during Kerberos initialization. If the initialization fails during tomcat start up, Ivanti Standalone Sentry automatically continues to retry until a service ticket from the KDC is received. The retry interval starts at one minute and maxes out at one-hour intervals. Failed initialization attempts are reported with a WARN level log in Standalone Sentry System Manager in Monitoring. To manually initialize Kerberos, use the debug command, debug sentry kerberos init. The command has no impact if Kerberos initialization has already been completed. For more information on the debug command, see Command Line Interface.
If you select Identity Certificate for device authentication, additional configuration fields display in the Device Authentication Configuration section.
Figure 4. Device authentication configuration
Before you begin
Set up your environment. See Authentication Using Kerberos Constrained Delegation on the Support site.
Procedure
| 1. | In the Device Authentication Configuration section: |
Click Upload Certificate.
Select the Root certificate (this may be a root certificate chain) that you received from the CA you trust. The CA may be a Root Authority or an Intermediate Authority.
Click Upload.
The certificate is uploaded at this time, but does not persist until you click Save.
If you want to validate the certificates presented by the device against the Certificate Revocation List (CRL) published by the CA, then select Check Certificate Revocation List (CRL).
| - | CRL check should be enabled only if the certificate chain presented by the device or the Trusted-Front-End to Standalone Sentry contains information to download CRL over HTTP. |
| - | Only HTTP- and HTTPS-based CRLs are supported. Some CAs create LDAP-based CRLs by default that will not work with Sentry. |
| - | For CRL validation to work, Sentry requires network connectivity to the CRL Distribution Point (CDP), usually the CA that issued the certificate, through an HTTP or HTTPS port. |
| 2. | In the ActiveSync Configuration section, if you are configuring Kerberos for ActiveSync: |
For Server Authentication, select Kerberos.
Configure the ActiveSync Server SPNs:
| - | If you used the fully-qualified domain name of the ActiveSync server as the basis for the Service Principal Name of the server in the ActiveSync Server(s) field above, then select Derive SPN From FQDN Of ActiveSync Server. |
| - | If you configured the IP address or alternate DNS name of the ActiveSync server in the ActiveSync Server(s) field, then deselect Derive SPN From FQDN Of ActiveSync Server. |
Enter the SPNs for each of your ActiveSync servers, separated by semicolons, in the field that appears when this option is selected. Typically, SPNs are in the form: http/<FQDN>.
Example: http/CAS.ironmobile.com.
The SPN is case-sensitive. The name of the CAS node that uses KCD must exactly match the name of the node.
| 3. | In the App Tunneling Configuration section, if you are configuring Kerberos for AppTunnel, for an AppTunnel Service configure the following: |
For Server Auth, select Kerberos.
In the Server SPN List field, enter the Service Principal Name (SPN) for each server listed in the Server List.
| - | Each SPN must be separated by semicolons. Example: sharepoint1.company.com;sharepoint2.company.com. |
| - | The Server SPN List applies only when the Service Name is not <ANY> and the Server Auth is Kerberos. |
| - | If each server in the Server List has the same name as its SPN, you can leave the Server SPN List empty. However, if you include a Server SPN List, the number of SPNs listed must equal the number of servers listed in the Server List. The first server in the Server List corresponds to the first SPN in the Server SPN List, the second server in the Server List corresponds to the second server in the Server SPN List, and so on. |
If Service Name is <ANY> and Server Auth is Kerberos, the Standalone Sentry assumes that the SPN is the same as the server name received from the device.
| 4. | When you select for Identity Certificate for Device Authentication, the Certificate Field Mapping section appears. Use this section to specify the certificate fields that Ivanti Standalone Sentry can use to derive users’ UPN and Realm for Kerberos authentication. You can specify multiple certificate fields. |
Figure 5. Certificate field mapping

Click + to add an entry.
The order of the rows specifies priority. Sentry checks the first row and if the required information is not available, it will check the next row. Use the up and down arrow keys to reorder the rows.
For Certificate Field Content, select User UPN or User DN.
|
Certificate Field Content |
Certificate Field |
|
User UPN |
Select the certificate field from which Standalone Sentry will derive the user’s UPN |
|
User DN |
Select the certificate field from which Standalone Sentry will derive the user’s realm. This field is required in a cross-realm Kerberos environment. |
For Certificate Field, select the field from which Ivanti Standalone Sentry will derive the User UPN or User DN.
For WP8.1 devices, for User UPN, select either DNS Name or RFC 822 Name, and for User DN select Certificate Subject.
| 5. | Complete the Kerberos Authentication Configuration section. |
The configuration depends on whether you use a keytab file or not.
| 6. | Click Save. |
Standalone Sentry restarts.
•For completing the Kerberos Authentication Configuration section, see Configuring Kerberos authentication using a Kerberos-generated keytab file and Configuring Kerberos authentication without a keytab file.
•For details on configuring AppTunnel for AppConnect apps, see the AppConnect and AppTunnel Guide.
•See also, Key Distribution Center (KDC) discovery through DNS.
•If you are setting up tunneling to DFS servers and authenticating using Kerberos, see Configuring Kerberos authentication for DFS.
•For information about Kerberos setup, see the Authentication Using Kerberos Constrained Delegation tech note.
Configuring Kerberos authentication using a Kerberos-generated keytab file
Procedure
| 1. | In the Kerberos Authentication Configuration, select Use Keytab File. |
| 2. | Click Upload File. |
| 3. | Select the keytab file. |
| 4. | Click Upload. |
The keytab file provides the required Kerberos authentication information. For information about generating a keytab, see Authentication Using Kerberos Constrained Delegation on the Support site.
| 5. | Optionally, configure one or more Key Distribution Center. |
The Key Distribution Center is the network service that supplies session tickets and temporary session keys. This is generally the Active Directory domain controller host name. Enter either the IP address or the FQDN of the AD.
You can enter multiple KDCs. Separate each KDC with a semicolon.
For example: KDCdomainname1.com;KDCdomainname2.com.
If you do not configure a KDC, the system auto-detects the KDC.
| 6. | Click Save. |
Standalone Sentry restarts.
Configuring Kerberos authentication without a keytab file
Procedure
| 1. | In the Kerberos Authentication Configuration section complete the Kerberos configuration fields. Use the following guidelines: |
| - | Realm The Kerberos administrative domain. The realm is usually the company domain name, in all uppercase characters. |
| - | Sentry Service Principal The service principal for the Sentry service account, preceded by HTTP/. For example, if the user name of the service account is sentry1_eas_kcd, the service principal would be HTTP/sentry1_eas_kcd. |
| - | Password Password for the Sentry service account. |
| 2. | Optionally, configure one or more Key Distribution Center. |
The Key Distribution Center is the network service that supplies session tickets and temporary session keys. This is generally the Active Directory domain controller host name.
If you do not configure a KDC, the system auto-detects the KDC.
| 3. | Click Save. |
Standalone Sentry restarts.