Configuring Ivanti Standalone Sentry for ActiveSync
Before you begin
You must have installed Ivanti Standalone Sentry. For information about installing Ivanti Standalone Sentry, see the Ivanti Standalone Sentry Installation Guide.
Procedure
| 1. | In the Ivanti EPMM Admin Portal, go to Services > Sentry. |
| 2. | Select Add New > Ivanti Standalone Sentry or click the Edit icon for an existing Ivanti Standalone Sentry entry. |
| 3. | Complete the fields in the form for configuring ActiveSync. |
| 4. | Click Save. |
| 5. | Create an Exchange setting that points to the Ivanti Standalone Sentry. |
•See the following section to complete the fields in the Standalone Sentry form for configuring ActiveSync:
| - | Ivanti Standalone Sentry connectivity settings |
| - | Enable ActiveSync |
| - | Configure device authentication |
| - | Configure ActiveSync |
| - | Configured settings for managing multiple servers |
| - | Advanced settings |
•See Configuring Exchange settings for Ivanti Standalone Sentry for ActiveSync to create an exchange setting.
•See Multiple ActiveSync domains if Standalone Sentry will support multiple ActiveSync domains.
Ivanti Standalone Sentry connectivity settings
Enter the connectivity settings as described in the following table:
|
Item |
Description |
|
Sentry Host / IP |
Enter the host name or IP address of the server on which Ivanti Standalone Sentry is installed. |
|
Sentry Port |
Enter the port that Ivanti EPMM will use to access Ivanti Standalone Sentry. The default is 9090. |
Enable ActiveSync
In the Ivanti Standalone Sentry form, select Enable ActiveSync. The ActiveSync Configuration section displays.
Configure device authentication
The Device Authentication setting, in the Ivanti Standalone Sentry form, determines how users attempting to connect to the ActiveSync server or backend resource authenticate with Ivanti Standalone Sentry.
See Device and Server Authentication for information on selecting and configuring a method of device authentication.
See Multiple trusted root certificates for device authentication for information on uploading multiple trusted root certificates for device authentication.
Configure ActiveSync
Figure 1. ActiveSyc fields
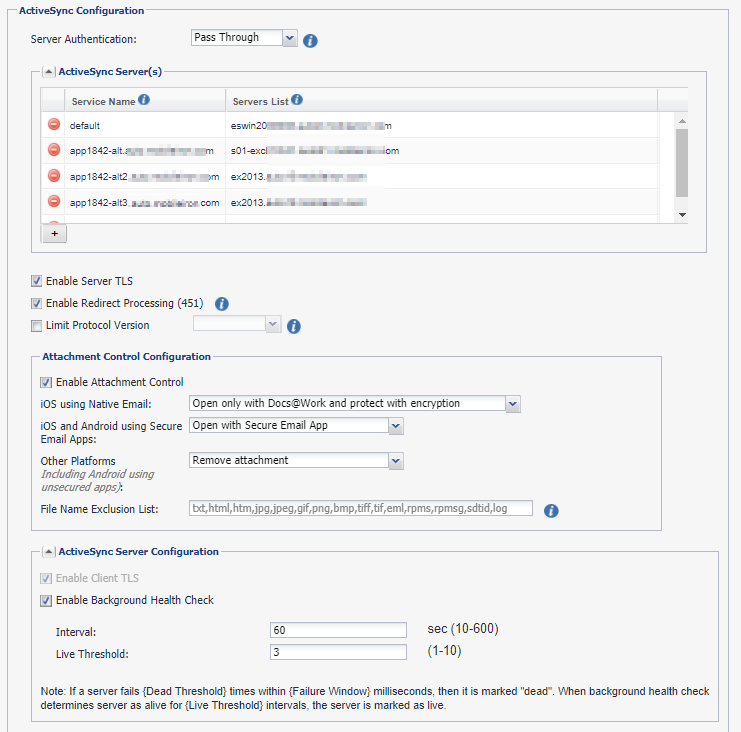
Use the guidelines in the following table to configure ActiveSync.
|
ActiveSync Configuration This section of the form displays only if you choose Enable ActiveSync. |
|
|
Server Authentication |
Select how Sentry authenticates the user to the ActiveSync server. Select Pass Through or Kerberos. The Kerberos option is only available if you selected Identity Certificate for Device Authentication. If you select Kerberos, the Kerberos Authentication Configuration section displays. See Configuring authentication using an identity certificate and Kerberos constrained delegation for information on configuring Kerberos for server authentication. |
|
ActiveSync Server(s) |
|
|
ActiveSync Service |
The first entry is always default and cannot be edited. You can add multiple ActiveSync services. You configure multiple ActiveSync services if your enterprise has multiple Exchange ActiveSync (EAS) domains, and you want to use the same Standalone Sentry as the gatekeeper to the ActiveSync domains. For more information on configuring multiple EAS domains on the same Standalone Sentry, see Multiple ActiveSync domains. If you are configuring multiple ActiveSync services, enter the hostname for the Standalone Sentry. The hostname you enter here should match the hostname in the DNS entry that resolves to the Standalone Sentry IP address. The service name cannot contain the following characters: /;?*<>|” or space. Ivanti Standalone Sentry matches the Host header value (Server Name in the Exchange setting) to the ActiveSync Service Name configured in the Ivanti Standalone Sentry settings to determine which ActiveSync server to forward the traffic. If Standalone Sentry does not find a match, ActiveSync traffic is forwarded to the ActiveSync server configured in the default service. |
|
Servers List |
Enter the ActiveSync server hostnames or IP addresses with port, separated by semicolons (;). The port is optional. The ActiveSync servers in this list provide failover support for each other. Sentry does scheduling and background health check on the servers listed here. The maximum number of characters accepted is 4000 characters. For Microsoft Office 365, enter outlook.office365.com. For Gmail, enter m.google.com. |
|
Enable Server TLS |
Specify whether the ActiveSync servers require SSL (i.e., port 443). If you are using Google Apps via Standalone Sentry, you must check Enable Server TLS. |
|
Enable Redirect Processing (451) |
To disable redirect processing, clear the check box. If Enable Redirect Processing (451) is disabled, the Standalone Sentry does not handle redirection, and passes the redirect URL to the device. See also 451 redirect processing. |
|
Limit Protocol Version |
Check this option to choose the ActiveSync protocol version that the device and Microsoft Exchange use to communicate with the Ivanti Standalone Sentry. If the device is already registered, you have to push the exchange profile to the device to force the device to use the new protocol. Alternately, device users can go to iOS device Settings > Mail > Accounts, select the enterprise mail account, and toggle to disable and re-enable the mail account. |
|
Attachment Control Configuration Specify whether to enable email attachment control, and then specify the type of email attachment control. For more information, see Email attachment control with Ivanti Standalone Sentry. |
|
|
ActiveSync Server Configuration |
|
|
Enable Client TLS |
Specify whether the client must use TLS. Though the field label reads “TLS”, the intended requirement is SSL. |
|
Enable Background Health Check |
The default setting is enabled. Clear the check box to disable the ActiveSync server health check. If enabled, when the ActiveSync server fails for the number of times configured in the Dead Threshold setting and within the number configured in the Failure Window, then the ActiveSync server status shows Unreachable. When the background health check determines that the server is live for the number configured for Live Threshold, the ActiveSync server status shows Reachable. |
|
Interval |
Specify the time interval, in seconds, that Sentry performs a background health check. The valid range is 10 through 600. The default is 60. |
|
Live Threshold |
Specify the number of times the ActiveSync server background health check is successful before the server is marked as live. The valid range is 1 through 10. The default is 3. |
Configured settings for managing multiple servers
The Global Server Configuration section in the Ivanti Standalone Sentry entry provides additional flexibility in managing multiple servers. These could be multiple ActiveSync servers or multiple enterprise resources.
|
Global Server Configuration |
|
|
|
|
|
Scheduling |
Specify Priority or Round Robin scheduling if multiple servers are specified. Priority means that the first available server in the specified list will be used, with the first server in the list having highest priority. So if the first server in the list is never unavailable, then the other servers will never be used. Round Robin means that each server in the list will be used in turn. |
|
Dead Threshold |
Specify the number of times that a server connection can fail before the server will be marked “dead”. The valid range is 1 through 1000. |
|
Failure Window |
Specify the time interval in milliseconds during which the specified number of server connection failures must occur in order for the server to be marked “dead”. The valid range is 1 though 86400000 milliseconds (24 hours). |
|
Dead Time |
Specify the amount of time in milliseconds that the server should be marked “dead” after the specified number of connection failures. The valid range is 1 through 172800000 milliseconds (48 hours). |

Advanced settings
The Advanced Configuration section in the Ivanti Standalone Sentry entry provides additional flexibility to configure Ivanti Standalone Sentry session timeouts. You may want to configure the session timeouts to manage server resources.
Do not make changes to the settings unless specifically instructed in the documentation or by Professional Services.
|
Advanced Configuration |
|
|
|
|
|
Socket read/write timeout |
Specify the time in milliseconds, Sentry should check for the socket read/write time out from either the device or the server. Enter a valid integer. The default setting is 10000, and the minimum is 1. |
|
Server connection timeout |
Specify the time in milliseconds after which Sentry will time out when connecting to the server. Enter a valid integer. The default setting is 10000, and the minimum is 1. |
|
Server response timeout |
Specify the time in milliseconds after which Sentry will time out when waiting for an HTTP response from the server. Enter a valid integer. The default setting is 60000, and the minimum is 1. |
|
Device request timeout |
Specify the time in milliseconds after which Sentry will time out when waiting for an HTTP request from the device on a new or existing connection. Enter a valid integer. The default setting is 10000, and the minimum is 1. |

Configuring Exchange settings for Ivanti Standalone Sentry for ActiveSync
The exchange settings points to the Ivanti Standalone Sentry.
Procedure
| 1. | In the Ivanti EPMM Admin Portal, go to Policies & Configs > Configurations > Exchange. |
| 2. | For Server address, enter one of the following: |
| - | When using Integrated Sentry, set the server address to the Microsoft Exchange Server’s address. |
| - | When using Ivanti Standalone Sentry, set the server address to the Ivanti Standalone Sentry’s address. |
If you added multiple ActiveSync services, enter the DNS hostname for the Ivanti Standalone Sentry.
| - | When using Ivanti Standalone Sentry with Lotus Domino server 8.5.3.1 Upgrade Pack 1, set the server address to <Standalone Sentry’s fully qualified domain name>/traveler. |
| - | When using Ivanti Standalone Sentry with a Lotus Domino server earlier than 8.5.3.1 Upgrade Pack 1, set the server address to <Standalone Sentry’s fully qualified domain name>/servlet/traveler. |
| - | If you are using load balancers, contact Professional Services. |
| 3. | Enter the ActiveSync User Name. |
| 4. | Enter the ActiveSync User Email. |
| 5. | Enter the ActiveSync User Password. |
| 6. | If Ivanti Standalone Sentry is using Identity or Group certificate for device authentication, select the Certificate Enrollment entry to generate the identity certificate for the device. |
| 7. | Click Save. |
| 8. | Apply the setting to a label that includes the devices you want to allow access to your enterprise ActiveSync server. |
| • | See “Exchange settings” in the Ivanti EPMM Device Management Guide to complete the fields in the form. |
•See Re-pushing Exchange settings to understand the impact of re-pushing an Exchange setting.