Office 365 settings
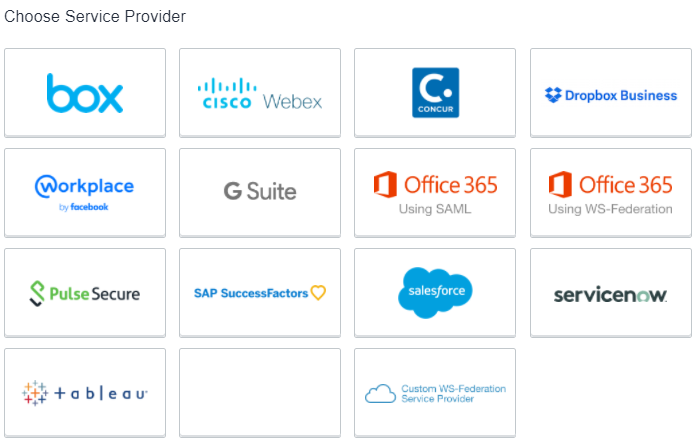
Office 365 is configured using either WS-Federation or SAML federation authentication protocols. Select one of the following service provider options in the Choose Service Provider page to configure Office 365 settings:
- Office 365 Using SAML
- Office 365 Using WS-Federation
Figure 1. Choose service provider
The following describes the settings specific to Office 365 as the service provider:
- Office 365 settings using SAML authentication
- Office 365 settings using WS-Federation authentication
- PowerShell commands for Office 365
- Backup and restore Office 365 federation settings
- Multi-domain issuer
- Active Logon Policy for Office 365
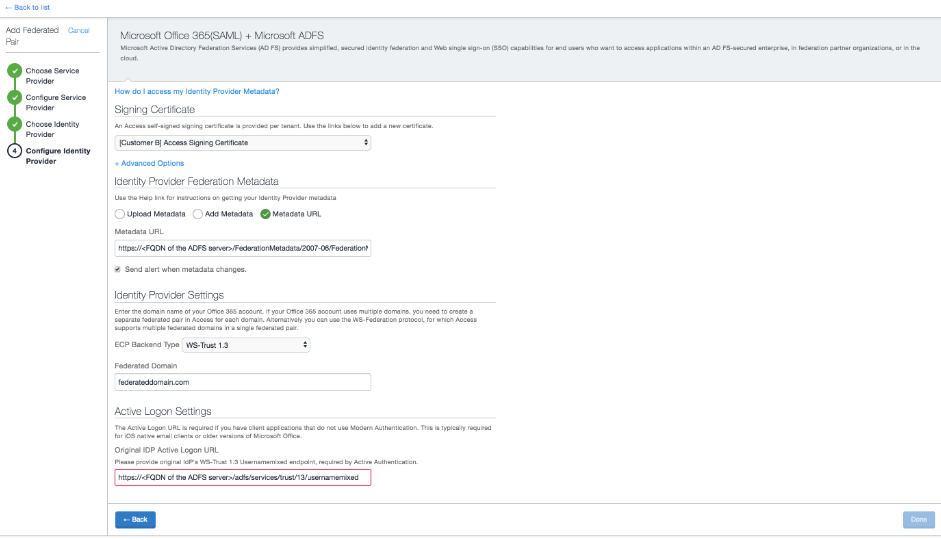
Office 365 settings using SAML authentication
The following describes the additional Office 365 settings available for configuration if your service provider is Office 365 Using SAML. These settings are available in the IdP configuration page:
- ECP Backend Type: Select from the drop-down list. Specifies the ECP backend type to connect to the IdP.
- Federated Domain: Enter the value for Office 365.
Example: mycompany.com. - Active Logon Settings: Enter the Active Logon URL in the text box for Original IDP Active Logon URL. The Active Logon URL varies depending on the ECP backend type and the IdP. If your IdP is Microsoft ADFS, the Original IDP Active Logon URL text box is pre-populated with the Active Logon URL. Update the URL with the correct ADFS domain.
- Example for ADFS using ECP WS-Trust 1.3:
https://<FQDN of the ADFS server>/adfs/services/trust/13/usernamemixed. - Example for ADFS using WS-Trust2005:
https://<FQDN of the ADFS server>/adfs/services/trust/2005/usernamemixed
- Example for ADFS using ECP WS-Trust 1.3:
Figure 2. IdP settings for Office 365 as the service provider using SAML
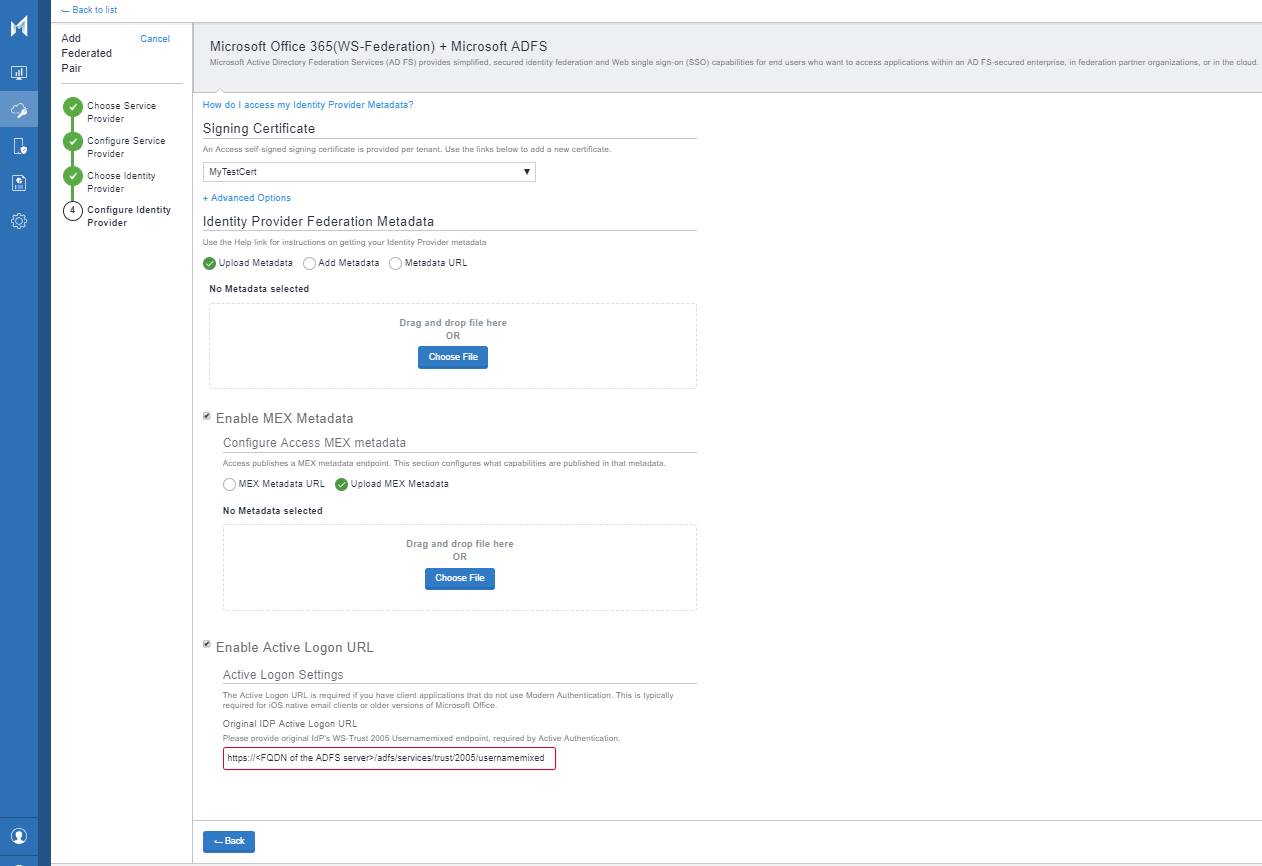
Office 365 settings using WS-Federation authentication
The following describes the additional Office 365 settings available for configuration if your service provider is Office 365 Using WS-Federation.
The option to enable multiple federated domains is available in the Office 365 service provider configuration page.
- Support Multiple Domains: Select the check box to enable multiple federated domains to use the same federated pair in Ivanti Access.
The options to configure MEX metadata and the Active Logon URL are available in the IdP configuration page.
MEX metadata and Active Logon URL expose SOAP Web Service endpoints and define how other endpoints interact with the SOAP Web Service endpoints. Ivanti Access publishes MEX metadata based on the MEX metadata configuration provided by the original IdP. Access only exposes the endpoints that are supported and configured in the MEX metadata of the original IdP. Only WS-Trust 1.3 and WS-Trust 2005 protocols for usernamemixed are supported. Configuring MEX metadata allows for support for applications such as Microsoft Dynamics 365 and Microsoft SQL Server. In addition, Windows Transport endpoint is supported with Ivanti Access + Standalone Sentry deployments only.
For more information about enabling Windows Transport endpoints see Azure Hybrid Domain-Join with Ivanti Access.
Select one of the following methods to provide the MEX metadata configuration from the original IdP:
- Enable Mex Metadata: Select the check box to provide metadata configuration from the original IdP. Choose one of the following:
- MEX metadata URL: Enter the URL for the MEX metadata for the original IdP.
Example for ADFS MEX Metadata URL : https://<FQDN of the ADFS server>/adfs/services/trust/mex
Note: Federation metadata import through URL might fail if the server does not present certificate chain issued by trusted certificate authorities. For the MEX metadata URL, the corresponding server must present full certificate chain issued by trusted certificate authority. - Upload MEX metadata: Upload the MEX metadata file from the original IdP.
Deselect the check box to disable MEX metadata.
- MEX metadata URL: Enter the URL for the MEX metadata for the original IdP.
- Enable Active Logon URL: Select the check box to enable Active Logon URL. Enter the Active Authentication URL for the original IdP. You enable Active Logon URL to handle Active Auth traffic. This is required for applications, such as some email applications, that support only active authentication. Ivanti Access exposes only WS-Trust 2005 usernamemixed endpoints.
If your IdP is Microsoft ADFS, the Original IDP Active Logon URL text box is pre-populated with the Active Logon URL. Update the URL with the correct ADFS domain.
Example:
https://<FQDN of the ADFS server>/adfs/services/trust/2005/usernamemixed
Deselect the check box to disable Active Logon URL.
Native iOS clients, Android email clients, and Email+ use active authentication.
See also Active Logon Policy for Office 365.
Figure 3. Office 365 settings using WS-Federation authentication
Authentication with Microsoft PowerShell commands
Ivanti Access supports the use of Microsoft PowerShell commands, such as Connect-MsolService and Connect-SPOService, to get authorization tokens to authenticate endpoints with Azure ID. This support allows administrators to set up authentication for service provider (SP) accounts that belong to a federated domain.
- PowerShell commands, such as Connect-MsolService and Connect-SPOService, are ActiveAuth transactions. Therefore, ensure that an Active Logon Policy is applied. Otherwise, the ActiveAuth traffic is bypassed and no rules are evaluated.
-
Ensure that the latest version of MSOnline PowerShell module is installed when running PowerShell scripts from Ivanti Access pair for setting up Office 365. If older version of this module are used, it prompts a login with Basic Auth which will be deprecated by Microsoft in October.
For Ivanti Access + Standalone Sentry deployments, the feature is not enabled by default. The feature is enabled using command line interface (CLI) commands in Standalone Sentry. The commands are available in Standalone Sentry 9.6.0 through the latest version as supported by Ivanti.
Do not enable the feature on a Standalone Sentry that is configured for ActiveSync. The feature is not supported on a Standalone Sentry that is configured for ActiveSync.
To enable the feature in Ivanti Access + Standalone Sentry deployments, enter the following command in Standalone Sentry command line interface (CLI) in CONFIG mode:
config# debug sentry ignore-line-breaks true
To disable the feature in Ivanti Access + Standalone Sentry deployments, enter the following command in Standalone Sentry command line interface (CLI) in CONFIG mode:
config# debug sentry ignore-line-breaks false
Restart the Standalone Sentry service for the configuration changes to take effect. To restart Standalone Sentry service, enter the following command in EXEC PRIVELEGE mode:
sentry# service tomcat restart
The 'service tomcat restart' may impact traffic.
Would you like to proceed? {yes|[no]} : yes
To view whether the feature is enabled or not in Standalone Sentry, enter the following show command in EXEC PRIVELEGE mode:
sentry# show sentry ignore-line-breaks
org.apache.xml.security.ignoreLineBreaks: false
- False indicates that the feature is disabled.
- True indicates that hte feature is enabled.
PowerShell commands for Office 365
The commands to federate Azure AD with Ivanti Access are provided as a PowerShell batch script, which can be downloaded from the Ivanti Access administrative portal. After you create a federated pair with Office 365 in Access, the link to download the PowerShell batch script becomes available in the federated pair listing in Profile > Federated pairs.
Ensure that the latest version of MSOnline PowerShell module is installed when running PowerShell scripts from Ivanti Access pair for setting up Office 365. If older version of this module is used, it prompts a login with Basic Auth which will be deprecated by Microsoft in October.
To use the PowerShell commands, download the PowerShell script and run the script in PowerShell with the following command:
script_name.ps1 -domain mydomain.com
In the above command:
- script_name is the name of the downloaded PowerShell script.
- mydomain.com is the Microsoft Azure AD domain.
Ensure that you have PowerShell Administrator permissions.
Figure 4. Download PowerShell commands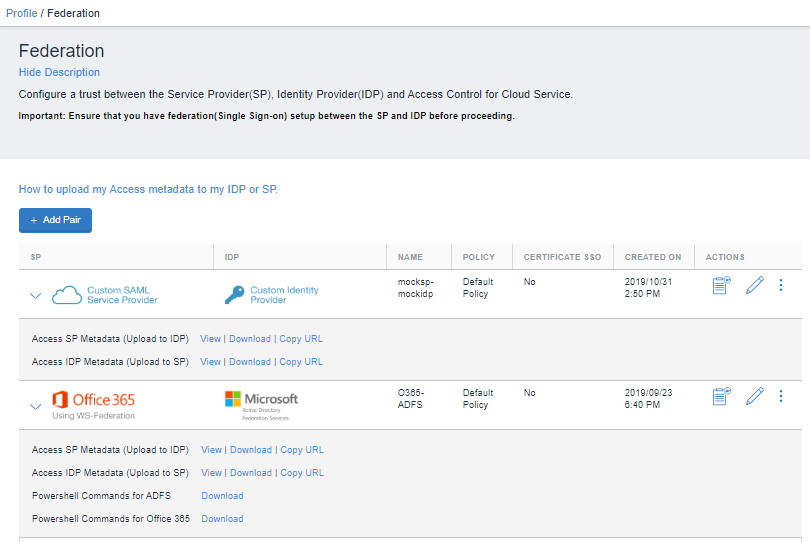
Backup and restore Office 365 federation settings
To backup and restore the Office 365 federation settings, see Back up and restore Office 365 settings.
Multi-domain issuer
If you are federating using the WS-Federation protocol, you can use the same federated pair for multiple AD domains suffixes that federate with the same Office 365 tenant.
In cases where multi-domain issuer is enabled, Ivanti Access composes the multi-domain issuer from the domain in the UPN. If the UPN domain is the sub domain, the issuer will not match with the root domain issuer in Azure AD. Configure the attribute AzureDomain in the ADFS, if you have a domain forest (multiple ADs joined in the forest). In such cases, the issuer URI suffix is derived from the value of the attribute name AzureDomain in the assertion from the original IdP.
For ADFS 3.0, to add the AzureDomain attribute, add the following claim rules to the relying party trust:
- Query DistinGuishedName from AD
- Parse DistinGuishedName to compose root domain
- Issue root domain and AzureDomain attribute
c:[Type == "http://schemas.microsoft.com/ws/2008/06/identity/claims/windowsaccountname", Issuer == "AD AUTHORITY"]
=> add(store = "Active Directory", types = ("http://somedomain.com/phase1"), query = ";DistinGuishedName;{0}", param = c.Value);
c:[Type == "http://somedomain.com/phase1"]
=> add(Type = "http://somedomain.com/phase2", Value = RegExReplace(c.Value, "^(?:.*?)DC=(?<domain1>[^'DC']*),DC=(?<domain0>[^'DC']*)$", "${domain1}.${domain0}"));
c:[Type == "http://somedomain.com/phase2"]
=> issue(Type = "http://schemas.xmlsoap.org/claims/AzureDomain", Value = c.Value);
For ADFS 4.0, to add the AzureDomain attribute, add the following claim rules to the relying party trust:
- Query DistinguishedName from AD
- Parse DistinguishedName to compose root domain
- Issue root domain and AzureDomain attribute
c:[Type == "http://schemas.microsoft.com/ws/2008/06/identity/claims/windowsaccountname"]
=> add(store = "Active Directory", types = ("http://somedomain.com/phase1"), query = ";distinguishedName;{0}", param = c.Value);
c:[Type == "http://somedomain.com/phase1"]
=> add(Type = "http://somedomain.com/phase2", Value = RegExReplace(c.Value, "^(?:.*?)DC=(?<domain1>[^'DC']*),DC=(?<domain0>[^'DC']*)$", "${domain1}.${domain0}"));
c:[Type == "http://somedomain.com/phase2"]
=> issue(Type = "http://schemas.xmlsoap.org/claims/AzureDomain", Value = c.Value);