User Settings
This section contains the following topics:
- Editing the default setting
- Adding a custom setting
- Deleting a custom setting
- Configuring the settings for new device registrations
- Configuring the device limit per user
- Configuring the device wipe limit
- Configuring the Self Service Portal authentication
- Setting the password complexity
- Defining the terms of service
- Configuring the User Invite reminder emails
- Configuring User Registration Confirmation emails
- Configuring User Work Schedule setting
- Configuring Admin Portal authentication setting
User settings define device registration options. There are several types:
- Device Registration Setting: Sets authentication by password, PIN, or both; Apple Enrollment type, and device ownership.
- Previously, if you setup SAML auth/IdP, SAML authentication is used for both device registration and portal authentication. From release 79.1 onwards, a toggle button is provisioned to choose different authentication methods for Admin Portal access and Device Registration. The bypass toggle is applicable only for device registration.
This functionality is not supported for PIN Only type of authentication.
- Device Limit Setting: Sets the number of devices a user can register.
- Wipe Limit Setting: Sets the limit for the maximum number of devices that can be wiped at a time.
- Self Service Portal Authentication Setting: Set the password authentication type for the self-service portal.
- Password Complexity Setting: Set password complexity and policy parameters for local accounts used for device registration, and access to Admin Portal and Self Service portals.
- Terms of Service Setting: Sets the terms of service displayed to the user for each device registration.
- User Invite Reminder Setting: Sets the dates and frequency to send User Invite reminder emails.
- User Registration Confirmation Setting: Controls the ability to send the User Registration Confirmation email. See Configuring and using registration confirmation emailsfor an overview of the solution and Configuring User Registration Confirmation emails below for specific user settings instructions.
- User Work Schedule Setting: Controls the ability to configure a user work schedule that blocks all communication from Sentry to managed devices during the prescribed non-working hours. Useful for locales with Right-to-Disconnect laws.
- Admin Portal Auth Setting: Controls whether Ivanti Neurons for MDM prompts the admin for password only, or password and PIN.
You can edit the default settings for the All Users group or add custom settings and assign them to other user groups.
Editing the default setting
Click the Edit link for the setting that has the lock icon. You cannot delete a default setting.
Adding a custom setting
Click the Add setting for specific user groups link.
Deleting a custom setting
Click the X icon.
Configuring the settings for new device registrations
You can configure minimum OS version, authentication type, and device ownership for new device registrations. The device enrollment URL generated in earlier versions of Ivanti Neurons for MDM will cease to work with the current version. The administrator will need to regenerate the device enrollment URL for device registration.
Procedure
- Log in to Ivanti Neurons for MDM.
- Go to Users > User Settings.
- Under Device Registration Settings click +Add setting for specific user groups.
- Edit the default Device Registration Authentication Type setting or add a new one.
- Enter a name in the Name field.
- (Optional) Enter a description of the setting.
- In the OS Settings section, define the minimum OS version for iOS, macOS
- For Android:
- Enable Minimum Security Patch option (Android only) and specify the period by selecting the duration type from the following drop-down list options:
- days(s)
- month(s)
- year(s)
- Enable Manufacturer Allowlist/Blockedlist option and select any of the following options:
- Create a Allowlist- To only allow devices from these manufacturers to be registered.
- Create a Blockedlist- To prevent devices from these manufacturers to be registered.
- Click Add manufacturer.
- Type the name of the manufacturer in the Manufacturer name field.
- Click Save. The added manufacturer name is displayed in the table.
The manufacturer name is case sensitive. To edit or delete an added manufacturer name, click the Edit or Delete option for the manufacturer.
- In the Apple Enrollment section, select the Apple Enrollment Type:
- Device Enrollment
- User Enrollment- By default, User Enrollment is applicable for iOS and iPadOS devices.
- (Optional) Include macOS Device (macOS 10.15+) - Select this option to make User Enrollment applicable for macOS devices as well.
- In the Registration Invitation Method (iOS and Android Only) section, Enable MAM only registration.
This option should be enabled for MAM-Only device registrations and when enabled, the users are redirected to Public App Store to download AppStation client app.
- In the Device Registration Authentication Type section, select one of the following registration type options from the Select Registration Type drop-down. If you use Device Enrollment, make sure that your Device Enrollment configuration matches your choice.
- Password Only
- PIN Only When you select this option, the Bypass IdP Device Registration Authentication toggle button is locked.
- Password and PIN
- For PINs, specify the following. During the device registration, a user can click Resend PIN if required.
- PIN lifetime: How long the PIN remains valid (1-30 days).
- PIN length: The number of characters (4-12).
- Allow user to request a new PIN: (when forgotten or expired).
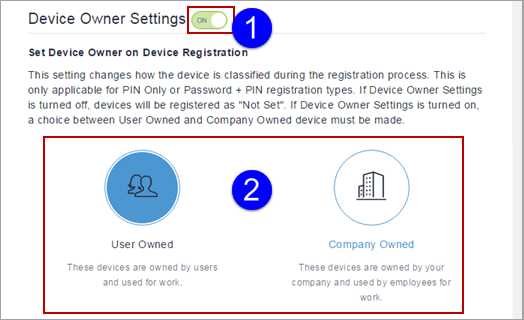
- Optionally, turn on Device Owner Settings, and then click User Owned or Company Owned. This setting changes how the device is classified during the registration process.
- If Device Owner Settings is turned ON and if the administrator has marked the device as User Owned, the user will be presented with the option to mark the device as User Owned or Company Owned during device enrollment and also from the self-service portal. For User Enrollment Enrolled devices, the default Device Owner Settings will be "User Owned" irrespective of the choice made by an administrator.
- For Supervised devices, device owner setting will be "Company Owned."
- Click +Add for at least one user group to which you want to distribute the setting.
- ( On-demand feature for iOS and macOS devices only) Optionally, turn on the Device Allowlist option to allow device registration based on Allowlisted serial numbers.
- Click Next. The User Setting Distribution page opens.
- Select the user group distribution.
- Click Done.
- Send an invite to the users. For more information, see Inviting Users.
Select the Enable Minimum Version toggle button and select an OS version from the drop-down list.
Enable Minimum Version setting is not applicable for DEP device registrations.
To add a manufacturer:
Users may still receive a PIN to complete account activation.
This setting affects both normal registration and Device Enrollment registration.
Note the following points:
If a user device is registered using PIN only option, the user receives a registration confirmation email with a PIN for authentication.
- A PIN is sent to the user's email ID.
- The user enters the PIN on the device registration page.
- If the PIN is correct, the user is directed to complete the registration process.
For users configured with SAML-based Identity Provider (IdP),Ivanti Neurons for MDMsupports PIN-based authentication while registering the device. The Device Registration Authentication Type should be PIN or PIN and Password. The PIN and Password feature acts as two-factor authentication for additional security. In this case, when such a user tries to register a device:
- A PIN is sent to the user's email ID.
- The user enters the PIN on the device registration page.
- If the PIN is correct, the user is redirected to the IdP's login page, where the user enters the IdP user name and password.
- If the IdP credentials are correct, the user is redirected to the device to complete the registration process.
Configuring the device limit per user
Procedure
- Edit the default Device Limit setting or add a new one.
- Edit or assign a name to identify the setting.
- Type an optional description of the setting.
- Select a limit from the drop-down.
- Click +Add for at least one user group to which you want to distribute the setting.
- Click Save.
Configuring the device wipe limit
Procedure
- Edit the default Device Wipe Limit setting.
- Turn on the Enable wipe limit for all users (including default roles) option.
- In the Maximum number of devices a user can wipe at a time field, type the maximum number of devices that can be wiped at a time. The default value is 1. You can set a maximum value of 200 as the device wipe limit.
- Click Done.
Configuring the Self Service Portal authentication
Procedure
- Edit the default Self Service Portal Authentication setting or add a new one by clicking + Add setting for specific user groups.
- Edit or assign a name to identify the setting.
- Type an optional description of the setting.
- Select a Self Service Portal Authentication Type from the drop-down. It can be one of the following options:
- Password
- Certificate
- Click Next.
- Select one or more user groups for which this configuration will be distributed.
- Click Done.
Setting the password complexity
You can set password complexity and policy parameters for local accounts used for device registration, and access to Admin Portal and Self Service portals.
The password length, characteristics, and policies set below define the security of a password.
This also defines the difficulty associated with a user selecting a valid password. If you use Local Account for your end users and would like secure passwords for access to the Admin Portal, consider using a PIN for device registration to ensure that password complexity does not interfere with device registration. Use the "Device Registration Authentication" Type setting to select the authentication mode for device registration under User Settings > Device Registration Setting.
Procedure
- Edit the default Password Complexity settings.
- Define the following password complexity settings:
Setting
What To Do
Minimum Password Length Move the slider to specify the minimum length of a password to prevent the user from creating short and insecure passwords.
Number ranges between 8 to 32.
Required characteristics Specify the number of password characters that should be met when you select a password. The minimum number of characteristics that should be met is 3 (4 for Federal customers). Required Special Characters (symbols) Specify the number of non-alphanumeric characters a password should contain. Required UpperCase Characters Specify the number of uppercase alphabetical characters a password should contain. Required LowerCase Characters Specify the number of lowercase alphabetical characters a password should contain. Required Numeric Characters Specify the number of numeric characters a password should contain. Password validations Allowed Numeric Sequence Select the number of repeating number in a sequence.
Example: 123.
Allowed Repeated Characters Select the number of repeating alphabatical characters.
Example: bbc.
- Set the following password policies setting to customize behavior.
Setting
What To Do
Retained Password History Move the slider to select the number of new passwords that must be associated with a user account before an old password can be used.
Number ranges between 3 to 36.
Password Expiration Period Move the slider to select the password expiration duration in days.
Number ranges between 30 to 365 days.
Inactivity Timeout Move the slider to specify the time a user maybe inactive before an Admin Portal or a Self Service portal session time.
Number ranges between 5 to 60(minutes).
Failed Logins Threshold Move the slider to select the number of failed login attempts before the 5 minute account lockout takes effect.
Number ranges between 2 to 5.
When the failed attempts are within the threshold limit, a message is displayed to the user on the lockout and to attempt login later.
When the failed attempts exceed the threshold limit, a message is displayed to the user on the lockout and to attempt login after a specified time(in minutes).
- Click Done. If you have changed the Password Complexity default setting, older password of existing local account remains unchanged. On expiry, the user will be prompted to renew the password. For administrators, attempting to login to the Admin Portal, can contact Help Desk who can provide guidance for resetting password.
In a device registration, the recommended approach is to use PIN-only registration mode.
Defining the terms of service
Procedure
- Create a new Terms of Service setting.
- Assign a name to identify the setting.
- Type an optional description of the setting.
- Select the Prompt the user... option.
- Type a title and text to display.
- Click +Add for at least one user group to which you want to distribute the setting.
- Click Save.
Once accepted, the terms of service cannot be deleted. However, you can turn off the prompts for new registration by clearing the Prompt the user... option.
Configuring the User Invite reminder emails
Administrators can drive device enrollments by using this setting to send User Invite reminder emails.
Procedure
- Edit an existing User Invite Reminder Setting or add a new one.
- Edit or assign a name to identify the setting.
- Type an optional description of the setting.
- Ensure the User Invite Reminders option is turned on.
- In the Define Start and End Dates region, choose when you want to start and stop sending email reminders.
The maximum number of emails that can be sent is 30. To reset this limit, the admin should re-send the invite.
- In the Define Frequency region, choose how frequently you want to send email reminders.
- Click Next.
- Select a distribution for this configuration.
- Click Done.
Configuring User Registration Confirmation emails
Administrators can send emails to new users who have completed registration.
Procedure
- Edit an existing User Registration Confirmation Setting or add a new one.
- Edit or assign a name to identify the setting.
- Type an optional description of the setting.
- Ensure the Send a confirmation email upon successful User registration option is turned on.
- Click Next.
- Select a distribution for this configuration.
- Click Done.
Configuring User Work Schedule setting
Administrators can configure a user work schedule for users that blocks all communication from Sentry to managed devices during the prescribed non-working hours. This is useful for users in locales with Right-to-Disconnect laws.
Procedure
- Select Users.
- Select User Settings.
- In the section, User Work Schedule Setting, select +Add setting for specific user groups.
- Provide a name for the setting.
- Turn on the setting.
- Select the time zone.
- Configure the hours during which Ivanti Neurons for MDM blocks the Exchange ActiveSync protocol, AppConnect-Enabled apps, and managed apps.
- Click Next.
- Configure the distribution, and then click Done.
Changes applied may take up to 1 hour and 15 minutes to take effect on the device.
Configuring Admin Portal authentication setting
Administrators can set the authentication type to authenticate user login. This setting controls whether the users will be prompted for password only or password and PIN.
Procedure
- Edit an existing Admin Portal Auth Setting or add a new one.
- Edit or assign a name to identify the setting.
- Type an optional description of the setting.
- In the Admin Portal Authentication Type, select any of the following options:
Option
Description
Password Select this option to authenticate the login using password only.
Users may still receive a PIN to complete account activation.
Password and PIN Select this option to authenticate the login using password and PIN.
When you select this option the following additional fields are displayed:
- PIN lifetime: Select the minute duration of the lifetime of the PIN from the drop-down list. The minutes should be within the range of 1 to 15.
- PIN length: Select the length of the characters of the PIN from the dropdown list. The range of the PIN length should be between 4 to 12.
This option is applicable only for local accounts and not for LDAP Admin accounts.
Allow user to request a new PIN Select this option to allow users to request a new PIN. - Click Next.
- Select a distribution for this configuration.
- Click Done.
For users configured with SAML-based Identity Provider (IdP),Ivanti Neurons for MDMsupports PIN-based authentication to the administration portal. The Admin Portal Authentication Type should be PIN and Password. This feature acts as two-factor authentication for additional security. In this case, when such a user tries to log into the portal:
- A PIN is sent to the user's email ID.
- The user enters the PIN on the administration portal login page.
- If the PIN is correct, the user is redirected to the IdP's login page, where the user enters the IdP user name and password.
- If the IdP credentials are correct, the user is redirected to the administrator portal.
When logging into the administrator portal, a user can click Forgot Password to reset their password. In the next screen, the user can enter a new password and the PIN (prompted based on the preceding user authentication mode settings) sent to the user's email address. Click Resend PIN if required. The user must wait fifteen minutes between Forgot Password requests.
When this configuration is distributed to devices, consecutive unsuccessful log in attempt (default value: 5 attempts) by the user using password or PIN will result in account lockout and a message will be displayed to the user on the lockout.