Terminal Services
About Terminal Services
Use the Terminal Services feature to enable a terminal emulation session on a Windows terminal server, Citrix NFuse server, or Citrix Metaframe server. You can also use this feature to deliver the terminal services through the system, eliminating the need to use another Web server to host the clients.
The system supports several mechanisms for intermediating traffic between a Citrix server and client, including the Terminal Services, JSAM, PSAM, VPN Tunneling, and hosted Java applets features.
Terminal Services User Experience
From an end-user perspective, accessing secured terminal services resources through the system is simple. When you enable the Terminal Services feature for a user role, the end user simply needs to do the following tasks:
1.Specify the resource that the user wants to access-The user can specify the resource he wants to access by clicking a link or entering the resource in the system browse bar. Or, if you enable auto-launch for a bookmark, the system automatically launches the resource for the user when he signs into the device.
2.Enter credentials for the resource-When the user accesses a resource, the system prompts him to enter his username and password (if required by the resource). Or if you enable SSO, the system automatically sends this information to the resource without prompting the user. Once the resource verifies the credentials, the system launches the resource.
Users can access terminal services resources using the following methods:
•Session bookmarks-A session bookmark defines various information, including the server to which the user can connect, the terminal session's window parameters, and the username and password that the system sends to the Windows terminal server or Metaframe server. You can create any number of session bookmarks for a role, enabling the user to access multiple servers using different session bookmarks for each. (Users can simultaneously open multiple sessions to the same terminal server or to different servers.)
•URLs from other web sites-In most cases, users access session bookmarks directly from the end-user console. If you do not want to require users to sign into the end-user console to find and access terminal services links, you can create URLs on other web sites that point to session bookmarks that you have already created. Or, you can create URLs that include all of the parameters that you want to pass to the Terminal Services program, such as the host, ports, and terminal window parameters.
If you create links on external servers to terminal services bookmarks on the system and you are using multiple customized sign-in URLs, some restrictions occur.
•Connect Secure browse bar-In addition to enabling users to link to terminal services links through bookmarks and URLs, you can also enable them to access these resources through the system browse bar on Windows systems. Users can access Citrix Metaframe or Nfuse servers by entering ica://hostname in the browse box. Or, users can access Microsoft terminal services or remote desktop sessions by entering rdp://hostname in the browse box.
•Server address-By entering a terminal server IP address or hostname, users can launch a remote desktop connection to any accessible server.
Task Summary: Configuring the Terminal Services Feature
To configure the Terminal Services feature:
1.Create resource profiles that enable access to Windows terminal servers or Citrix servers, include session bookmarks that link to those servers, and assign the session bookmarks to user roles using settings in the Users > Resource Profiles > Terminal Services page of the admin console.
We recommend that you use resource profiles to configure terminal services (as described here). However, if you do not want to use resource profiles, you can configure the Terminal Services feature using role and resource policy settings in the following pages of the admin console instead:
•Create resource policies that enable access to Windows terminal servers and Citrix servers using settings in the Users > Resource Policies > Terminal Services > Access page of the admin console.
•Determine which user roles may access the Windows terminal servers and Citrix servers that you want to intermediate, and then enable Terminal Services access for those roles through the Users > User Roles > Select_Role > General > Overview page of the admin console.
•Create session bookmarks to your Windows terminal servers and Citrix servers using settings in the Users > User Roles > Select_Role > Terminal Services > Sessions page of the admin console.
2.(Optional.) Modify general role and resource options after configuring terminal services using resource profiles or roles and resource policies. Use the following pages of the admin console:
•(Optional.) Enable users to define their own terminal services sessions, specify the local devices to which users can connect, and set display and performance options using settings in the Users > User Roles > Select_Role > Terminal Services > Options page of the admin console. If you choose to enable users to define their own terminal services sessions, you must also create corresponding resource policies or resource profiles that enable access the specified resources, as explained in earlier in this topic.
•(Optional.) Create links to a terminal services session that users can access from an external web site.
•(Optional.) Enable the system to match IP addresses to hostnames using settings in the Users > Resource Policies> Terminal Services > Options page of the admin console.
3.(Citrix only) Specify where the system should obtain the Citrix client to upload to the users' systems through settings in the Users > User Roles > Select_Role > Terminal Services > Options page of the admin console.
Additionally, if you specify that the system should obtain a Citrix client from an external web site, you must:
•Create a Web access resource policy that enables access to the web site where the Citrix client resides through settings in the Users > Resource Policies > Web > Access > Web ACL page of the admin console.
•Create a Web caching resource policy through settings in the Users > Resource Policies > Web > Caching page of the admin console so the user's browser can deliver the Citrix client. (Note that you must select the Unchanged (do not add/modify caching headers) option.)
Terminal Services Execution
When a user tries to access a terminal services resource, the system completes the following steps to initiate and intermediate the terminal services session:
1.The system checks for a Java client.
To enable a terminal services session, the user either needs an RDP client on his system (to access a Windows terminal server) or an ICA client (to access a Citrix Metaframe server or server farm). These clients come in both Windows and Java versions and enable the user to run an application on the server while only transmitting keyboard, mouse, and display information over the network.
The system enables you to upload a Java version of the RDP or ICA client through a terminal services resource profile (but not role). If you have uploaded a client to the system and specified that the system always use it to run your users' terminal sessions, the system launches the specified Java client.
2.(Citrix only.) If necessary, the system checks for a Windows client.
If you have not uploaded a Java client, the system checks for a Windows version of the ICA client. If it cannot find a Windows ICA client, it installs the version you specified in the Users > User Roles > Role >Terminal Services > Options page of the admin console.
3.The system checks for the terminal services proxy.
To intermediate a Windows or Citrix session, the user either needs a Ivanti Terminal Services proxy on his system or Ivanti Citrix Services Client proxy. The system checks for the appropriate proxy on the user's computer, and if it cannot find it, installs a new one. Depending on the user's rights, the system either uses an ActiveX component or Java component to install the proxy.
4.The proxy tries to invoke the Windows client.
Once the system has confirmed that a proxy is installed on the user's computer, the proxy attempts to invoke the Windows RDP or ICA client. If successful, the client initiates the user's terminal services session and the proxy intermediates the session traffic.
5.The proxy tries to invoke the Java client.
If a Winitiates the user's terminal services session and the proxy intermediates the session traffic.
For informatdows client is not present on the user's machine (for instance, because it was deleted or because the user does not have the proper privileges to install it), but you have uploaded one to the system through the terminal services resource profile, the system uses the uploaded Java applet to launch the session.
As part of the installation, the system asks the user if he wants to always use the Java client or only for this session. The system then stores the user's preference as a persistent cookie. Once the Java client is installed, the client inion about the specific files installed by the system when you enable the Terminal Services feature, as well as the rights required to install and run the associated clients, see the Client-side Changes Guide on the Support Center.
Configuring Citrix to Support ICA Load Balancing
The Service Terminal Services feature supports connecting to Citrix server farms in which published applications are preconfigured (as described later in this topic). The system does not support load balancing configurations in which Nfuse servers dynamically retrieve a list of Citrix published applications within a server farm.
Citrix Load Balancing Overview
The system supports the following Citrix load balancing scenario:
1.The Citrix administrator makes a published application available to multiple Citrix servers in a farm by generating a custom ICA file. The generated ICA file contains a parameter called HTTPBrowserAddress that points to the IP address and port number of the master browser (that is, the server that performs the load balancing).
2.When the ICA client attempts to launch a published application on the user's computer, it uses the HTTPBrowserAddress parameter to connect to the master browser.
3.The master browser pings servers in the farm to determine their respective loads and returns the IP address of the least busy server to the ICA client.
4.The ICA client uses the IP address returned by the master browser to connect to the appropriate terminal server.
Configuring Citrix Load Balancing
For the system to work properly with a Citrix farm, you must configure the Citrix farm and Connect Secure as described in the following steps. Note that these instructions are based on using a Citrix Metaframe Presentation Server 3.0.
1.On the Citrix server, enable a server (or multiple servers) in your farm as a master browser:
•Right-click a server in the Metaframe Farm and select Properties.
•Select Metaframe Settings.
•Enter the TCP/IP port for the Citrix XML service.
2.On the Citrix server, publish the applications that are hosted on MetaFrame XP servers in the farm:
•Right-click the Applications link and select Publish applications.
•Specify which desktop or application to publish.
•Follow the prompts in the wizard.
•Specify the list of servers that host the application you are publishing and click Finish.
3.The specified published application appears in the server farm.
4.On the Citrix server, generate a corresponding Citrix ICA file for the published application:
•Select the application you published in Step 2 and select Create ICA file.
•Follow the prompts in the wizard.
•On the TCP/IP + HTTP Server page, enter the name of the HTTP browser server and the port number. (The port should match the Citrix XML Service port that you set up in Step 1).
•Save the ICA file.
•On Connect Secure, upload the ICA file using settings in either of the following admin console pages:
•Users > User Roles > Role > Terminal Services > Sessions
•Users > Resource Profiles > Profile
•On Connect Secure, create a resource policy for the HTTP browser server and port entered in Step 3.
•On Connect Secure, test the configuration by launching the bookmark as an end user.
One of the Citrix servers in the farm performs the load balancing, not Connect Secure. If the ICA client is already installed on the user's desktop then administrator rights are not required.
For more information about the rights required to use the Terminal Services feature, see Ivanti Connect Secure Client-Side Changes Installation Reference.
If the XML response from the master browser contains the hostname, it will not work through Connect Secure. To ensure that the response is in dot-port format (an IP address), clear the Enable XML service DNS address resolution check box during the browser server configuration. This option controls whether the destination Citrix server is represented as a hostname or as an IP address.
About Terminal Services Resource Profiles
Terminal Services resource profile configuration instructions vary depending on whether you want to configure access to a Windows terminal server (which requires an RDP client) or Citrix terminal server (which requires an ICA client). Furthermore, if you choose to configure access to a Citrix server using a custom ICA file, you include many of your configuration settings in the ICA file itself and therefore do not need to configure them through the system. If you configure access to a Citrix server using the default ICA file on the system, however, you must configure additional settings.
You may want to create multiple bookmarks for the same terminal services resource in order to provide easy access to multiple applications. For instance, the server defined in your resource profile may provide access to multiple applications (such as Siebel and Outlook). To easily provide access to each of these applications, you can create resource profile bookmarks to each. Or, you may want to use multiple bookmarks to configure single sign-on to one application, but not another.
When configuring session bookmarks, note that:
•To change the host or ports for a terminal services session bookmark created through a resource profile, you must edit the values through the resource profile's Resource tab (not its Bookmark tab).
•You can only assign session bookmarks to roles that you have already associated with the resource profile-not all of the roles defined on the system. To change the list of roles associated with the resource profile, use settings in its Roles tab.
•Session bookmarks simply control which links to display to users-not which resources the users can access. For example, if you enable access to a terminal server through a resource profile but do not create a corresponding session bookmark to that server, the user can still access the server by entering it into the Address box of the home page.
•Make sure to enter a unique set of parameters when defining a terminal services bookmark. If you create two bookmarks that contain the same set of parameters, the system deletes one of the bookmarks from the end-user view. You can still see both bookmarks, however, in the administrator console.
Configuring a Windows Terminal Services Resource Profile
This topic describes how to configure a terminal services resource profile that enables access to a Windows terminal server using an RDP client.
Users can use RDP7 features through the Ivanti Terminal Services if an RDP7 client is present. However, the true multi-monitor and bidirectional audio features of RDP7 are not supported with this release.
To create a Windows terminal services resource profile:
1.In the admin console, select Users > Resource Profiles > Terminal Services.
2.Click New Profile. Or select an existing profile from the list.
3.Select Windows Terminal Services from the Type list.
4.Enter a unique name and optionally a description for the resource profile. (This name becomes the default session bookmark's name.)
5.Specify the server and port to which this resource profile should connect in the Host field. When entering the server, you may enter a hostname or IP address.
6.Enter the port on which the terminal server listens in the Server port box. (By default, the system populates this box with port number 3389.)
7.Select the Create an access control policy allowing Terminal Service access to this server check box to enable access to the server specified in the Server Port box (enabled by default).
8.(Applies to 9.x) If you want to enable intermediation using a Java client, select Enable Java support and then specify which Java client the system should use.
Figure: Terminal Service Resource Profile (9.x)
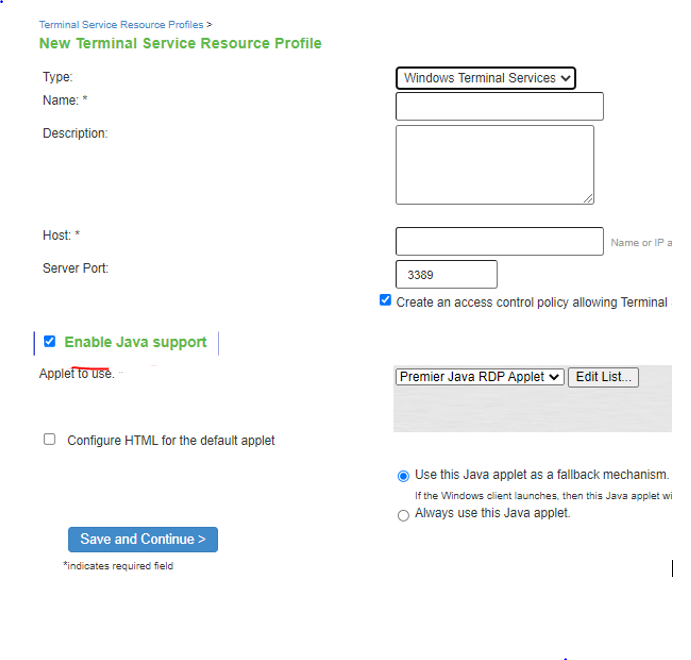
Figure: Terminal Service Resource Profile (22.x)
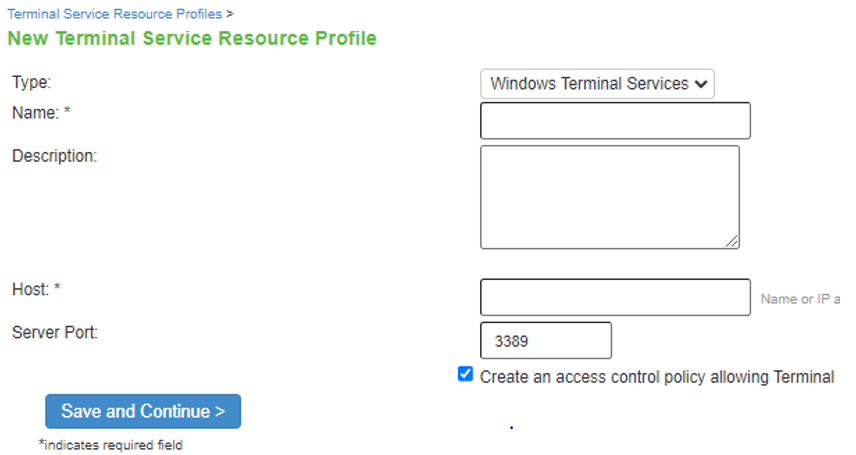
9.Click Save and Continue.
10.Select the roles to which the resource profile applies in the Roles tab and click Add.
The selected roles inherit the autopolicy and session bookmarks created by the resource profile. If it is not already enabled, the system also automatically enables the Terminal Services option in the Users > User Roles > Select_Role > General > Overview page of the admin console for all of the roles you select.
11.Click Save Changes.
12.(Optional.) Modify the default session bookmark created by the system in the Bookmarks tab and/or create new ones. By default, the system creates a session bookmark to the server defined in the Host box and displays it to all users assigned to the role specified in the Roles tab.)
Defining a Hosted Java Applet Autopolicy
This feature applies only to 9.x.
Hosted Java applet autopolicies enable you to store terminal services Java clients directly on the system without employing a separate Web server to host them. You can then associate these Java applets with the resource profile and specify that the system always use them to intermediate traffic, or that the system fall back to the applets when other terminal services clients are not available on the user's system.
Although you can use a Java applet to intermediate traffic to an SSO-enabled resource, we do not recommend it because the applet may require the user's password to be presented as plain text.
A default Premier Java RDP applet is shipped with each device and cannot be deleted. The HOB applet is available through the New Terminal Services Resource Profile window and the Users > User Roles > Users > Terminal Services > Options window. To use the Ivanti-supplied HOB applet, you must contact Ivanti Customer Care to purchase a license including the number of concurrent users you want to support.
The HOB applet is similar to any other Java applet accessed through the system or uploaded to the system. You must install a code-signing certificate to avoid seeing a warning similar to "This applet was signed by "Ivanti Connect Secure" but Java cannot verify the authenticity of the signature's certificate. Do you trust this certificate?" Install a valid Applet signing certificate (JavaSoft) in the Configuration > Certificates > Code-signing Certificates window.
The HOB applet is for RDP connections and appears only for Windows Terminal Services. It is not applicable for Citrix Terminal Services profiles. The supported HOB version is 4.1.0794.
You can purchase HOB applets directly from HOB; however, Ivanti will support them only to the extent of uploading them. If you have any problems configuring or running the applet, you must contact HOB support.
To create a hosted Java applet autopolicy:
1.Create a terminal services resource profile.
2.Select Enable Java support within the resource profile.
3.Select the Java applet that you want to associate with the resource profile from the Applet to use list. Or, if the applet that you want to use is not currently available in the list, click Edit Applet. Then:
•Click New Applet to add an applet to this list. Or, select an existing applet and click Replace (to replace an existing applet with a new applet) or Delete (to remove an applet from the system).
If you replace an existing archive, make sure that the new applet archive contains all of the necessary files for the applet to successfully launch and run. If the associated HTML for the applet refers to files that do not exist in the new archive, then the applet will not function correctly.
The system only allows you to delete applets that are not currently in use by a Web or terminal services resource profile.
If you select the Enable Java support option and have a custom ICA file that you uploaded to the system, your HTML file is auto-populated with references to your custom ICA file. No additional HTML code needs to be added.
•Enter a name to identify the applet in the Name box. (This applies to new and replaced applets only.)
•Browse to the applet that you want to upload to the system. You can upload applets (.jar or .cab files) or archives (.zip, .jar, and .tar files) that contain applets and all of the resources that the applets need. (This applies to new and replaced applets only.)
•If the file that you selected is an archive that contains the applet, select the Uncompress jar/cab file check box. (This applies to new and replaced applets only.)
•Click OK and Close Window.
When you select an applet in the Java Applets dialog box, you are loading third-party software onto the Ivanti product. By clicking OK, you are agreeing to the following terms on behalf of yourself (as purchaser of the equipment) or the organization that purchased the Ivanti product, as applicable:
By loading third party software onto the Ivanti product, you are responsible for obtaining all rights necessary for using, copying, and/or distributing such software in or with the Ivanti product. Ivanti is not responsible for any liability arising from use of such third party software and will not provide support for such software. The use of third-party software may interfere with the proper operation of the Ivanti product and/or Ivanti software, and may void any warranty for the Ivanti product and/or Ivanti software.
4.Create an HTML page definition in the HTML box that includes references to your Java applets. The maximum size of the HTML that can be specified is 25k. Then, fill in any required attributes and parameters.
If you are using HTML generated by the system, make sure to search the HTML code for "__PLEASE_SPECIFY__" and update the code as necessary.
If you select Hob-Ivanti RDP Applet from the Applet to Use menu, you must select the Configure HTML for the default applet check box in order to edit the HTML. Otherwise, the default HTML is used. By default, the proxy mode is disabled in the Hob-Ivanti RDP Applet.
To enable the proxy mode, add the following:
<parameter name="proxymode" value="http">
If your proxy requires authentication, add the following to the Hob-RDP Applet:
<parameter name="proxyuser" value="<username>">
<parameter name="proxypassword" value="<password>">
You can also add any additional HTML or JavaScript that you choose to this Web page definition. The system rewrites all of the code that you enter in this box.
Make sure to enter unique HTML in this box. If you create two bookmarks with the same HTML code, the system deletes one of the bookmarks in the end-user view. You can still see both bookmarks, however, in the administrator console.
For dynamic drive mapping to work with HOB Applet 4.1.0794, you must enable both the AUTOLDM and TWAUTOMAPDRIVE parameters. See the Premier Java Applet Configuration Options document located on the support site for more details on these two parameters.
5.Select Use this Java applet as a fallback mechanism to use this applet only when the Windows client fails to launch. Or select Always use this Java applet to use this applet regardless of whether or not the Windows client launches.
6.Click Save Changes.
Defining a Bookmark for a Windows Terminal Services Profile
When you create a terminal services resource profile, the system automatically creates a bookmark that links to the terminal server that you specified in the resource profile. The system allows you to modify this bookmark as well as create additional bookmarks to the same terminal server.
To configure resource profile bookmarks for Windows terminal services:
1.In the admin console, select Users > Resource Profiles > Terminal Services > Resource Profile Name > Bookmarks.
2.Click the appropriate link in the Bookmark column if you want to modify an existing session bookmark. Or, click New Bookmark to create an additional session bookmark.
Although it is generally easiest to create a resource profile session bookmark through the resource profile configuration page, you can choose to create one through the user roles page as well.
3.(Optional.) Change the name and description of the session bookmark. (By default, the system populates and names the session bookmark using the resource profile name.)
4.Specify how the terminal emulation window should appear to the user during a terminal session by configuring options in the Settings area of the bookmark configuration page.
5.Pass user credentials from the system to the terminal server so that users can sign onto the terminal server without having to manually enter their credentials. You can do this by configuring options in the Session area of the bookmark configuration page.
6.Allow users to access specific applications on the terminal server by configuring options in the Start Application area of the bookmark configuration page. In addition, you can use settings in this area to define auto-launch and session reliability options.
7.Allow users to access local resources such as printers and drives through the terminal session by configuring options in the Connect Devices area of the bookmark configuration page.
8.Specify how the terminal emulation window should appear to the user during a terminal session by configuring options in the Desktop Settings area.
9.Specify the roles to which you want to display the session bookmarks if you are configuring the session bookmark through the resource profile pages, under Roles:
•ALL selected roles-Displays the session bookmark to all of the roles associated with the resource profile.
•Subset of selected roles-Displays the session bookmark to a subset of the roles associated with the resource profile. Then select roles from the ALL Selected Roles list and click Add to move them to the Subset of selected roles list.
10.Click Save Changes.
Creating a Windows Terminal Services Bookmark Through the User Roles Page
It is generally easiest to create a terminal services bookmark through the resource profile configuration pages. However, you can choose to create a resource profile session bookmark through the user roles page using the following instructions:
1.In the admin console, select Users > User Roles > Select Role > Terminal Services> Sessions.
2.Click Add Session.
3.Select Terminal Services Resource Profile from the Type list. (This option displays only after you have already created a terminal services resource profile.)
4.Select an existing resource profile that connects to a Windows terminal server on the system. (The system automatically populates the Host and Server Port boxes using settings from the selected resource profile.)
5.Click OK. (If you have not already associated the selected role with the resource profile, the system automatically makes the association for you. The system also enables any access control policies for the role that are required by the resource profile.)
6.If this role is not already associated with the selected resource profile, the system displays an informational message. If you see this message, click Save Changes to add this role to the resource profile's list of roles and to update the profile's autopolicies as required. Then, repeat the previous steps to create the session bookmark.
When you create a resource profile session bookmark through the user roles page (instead of the standard resource profiles page), the system only associates the generated session bookmark with the selected role. The system does not assign the session bookmark to all of the roles associated with the selected resource profile.
7.(Optional.) Change the name and description of the session bookmark. By default, the resource profile name is used as the bookmark name.
8.Configure the bookmark's settings.
Defining Display Options for the Windows Terminal Services Session
When configuring a terminal services bookmark, you can specify how the terminal emulation window should appear to users during their terminal sessions.
To define display options and auto-launch options:
1.Create a terminal services bookmark or edit an existing bookmark.
2.Scroll to the Settings area of the bookmark configuration page.
3.Select an option from the Screen Size drop-down list if you want to change the size of the terminal services window on the user's workstation. The default window size is full screen.
If you select the Full Screen option and are connecting to a Windows terminal server, the system modifies the user's hosts file to display the correct hostname in the terminal services window. If the user does not have the proper rights to modify the hosts file, the system displays the loopback address instead.
Also note that to restore the hosts file to its original state after running the terminal services window, the user must properly close his application. Otherwise, other applications that use the hosts file (such as JSAM and Host Checker) might not run properly. The user can also restore his hosts file to its original state by rebooting his system or by renaming the backup hosts file (hosts_ive.bak).
4.Select 8-bit, 15-bit, 16-bit, 24-bit, or 32-bit color from the Color Depth list if you want to the change the color-depth of the terminal session data. The default color depth is 8-bit.
5.Click Save Changes.
Defining SSO Options for the Windows Terminal Services Session
When configuring a terminal services bookmark, you can configure the system to pass user credentials from the system to the terminal server so that the user does not have to manually enter his username and password. The system passes the specified credentials when a user clicks the session bookmark. If the credentials fail, the server prompts the user to manually enter his username and password.
To define single sign-on options:
1.Create a terminal services bookmark or edit an existing bookmark.
2.Scroll to the Authentication area of the bookmark configuration page.
3.Specify the username to pass to the terminal server. You can enter a static username or a variable. Enter the <username> variable to pass the username stored in the system's primary authentication server. Or use the following syntax to submit the username for the secondary authentication server: <username@SecondaryServerName> or <username[2]>.
4.Select Password if you want to specify a static password or select Variable Password if you want to use the password stored in the system's primary or secondary authentication server. To use the password from the primary authentication server, enter the <password> variable. Or use the following syntax to submit the password for the secondary authentication server: <Password@SecondaryServerName> or <Password[2]>.
5.Click Save Changes.
Defining Application Settings for the Windows Terminal Services Session
When configuring a terminal services bookmark, you can specify that users can only access specific applications on the terminal server.
To define applications that users can access:
1.Create a terminal services bookmark or edit an existing bookmark.
2.Scroll to the Start Application area of the bookmark configuration page.
3.Select the Launch seamless window check box to have the Windows application server manage the display of the application. This allows an application's windows to behave in the same way as an application running on a Windows application server, regardless of the user's desktop environment.
If SSO is not configured, seamless window is supported only on Remote Desktop Protocol (RDP).
The Launch seamless window check box is applicable only for servers running Windows 2008 and later.
Enter the server alias name (applicable only for servers running Windows 2008 and later) in the Alias name box.
1.Specify where the application's executable file resides on the terminal server in the Path to application box (visible only when you clear Launch seamless window). For example, you might enter the following directory for the Microsoft Word application:
C:\Program Files\Microsoft Office\Office10\WinWord.exe
2.Specify where the terminal server should place working files for the application in the Working directory box. For example, you might specify that Microsoft Word should save files to the following directory by default:
C:\Documents and Settings\username\My Documents
You can use session variables such as <username> and <password> n the Path to application and Working directory boxes. For example, when specifying an application path, you might want to include the <username> variable to personalize the location. For example: C:\Documents and Settings\<username>\My Documents.
3.Select the Auto-launch check box if you want to automatically launch this Terminal Service session bookmark when users sign into device. When you select this option, the system launches the terminal services application in a separate window after the user signs in.
4.Click Save Changes.
Defining Device Connections for the Windows Terminal Services Session
When configuring a terminal services bookmark, you can specify local resources that users can access through the terminal session.
The system does not support providing users access to local resources when intermediating traffic using Java applets. Therefore, if you select the Enable Java Applets option when creating a Windows Terminal Services resource profile, note that the Connect Devices options described below might not work.
When you enable local resources through the terminal server, each user can only access his own local resources. For instance, user 1 cannot see user 2's local directories.
To define local resources that users can access:
1.Create a terminal services bookmark or edit an existing bookmark.
2.Scroll to the Connect Devices area of the bookmark configuration page.
3.Select Connect local drives to connect the user's local drive to the terminal server, enabling the user to copy information from the terminal server to his local client directories.
4.Select Connect local printers to connect the user's local printers to the terminal server, enabling the user to print information from the terminal server to his local printer.
5.Select Connect COM Ports to connect the user's COM ports to the terminal server, allowing communication between the terminal server and the devices on his serial ports.
6.Select Allow Clipboard Sharing to allow the contents of the clipboard to be shared between the user's host computer and the terminal server. Because of limitations in RDP client earlier than version 6.0, clearing the Allow Clipboard Sharing option will automatically disable the Connect local drives, Connect local printers, and Connect COM Ports options.
7.Select Connect smart cards to allow users to use smart cards to authenticate their remote desktop sessions.
Smart cards are supported by Microsoft Remote Desktop Protocol versions 5.1 and later.
8.Select Sound Options to enable sound during the remote session. Select Bring to this computer to redirect audio to the local computer. Select Leave at remote computer to play the audio only at the server.
Sound options are supported by Microsoft Remote Desktop Protocol versions 5.1 and later.
9.Select Use Multiple Monitors to support multiple monitors connected to the client computer during the remote session.
Multiple monitors are supported by Microsoft Remote Desktop Protocol versions 8.1 and later.
10.Select the Network Level Authentication check box to enable the NLA at the bookmark level.
11.Select the Allow Smartcard with Network Level Authentication check box to enable smart cards and NLA simultaneously.
This option is applicable to non-cross-domain certificates.
12.Select the Use Remote Microphones check box to support microphones connected to the client computer during the remote session.
13.Click Save Changes.
Defining Desktop Settings for the Windows Terminal Services Session
When configuring a terminal services bookmark, you can specify how the terminal emulation window should appear to the user during a terminal session.
The options in this topic only apply to Windows Terminal Services bookmarks.
To define display settings for the users' sessions:
1.Create a terminal services bookmark or edit an existing bookmark
2.Scroll to the Display Settings area of the bookmark configuration page.
3.Select Desktop background to display a wallpaper background to users. If you do not select this option, the background is blank.
4.Select Show contents of window while dragging to show the contents of the Windows Explorer window while users move the windows on their desktops.
5.Select Menu and window animation to animate the movement of windows, menus, and lists.
6.Select Themes to allow users to set Windows themes in their terminal server windows.
7.Select Bitmap Caching to improve performance by minimizing the amount of display information that is passed over a connection.
8.Select Font Smoothing (RDP 6.0 onwards) to make text smoother and easier to read. This option only works on Windows Vista computers running RDP clients that are version 6.0 or later.
9.Select Desktop Composition (RDP 6.0 onwards) to allow desktop composition. With desktop composition, individual windows no longer draw directly to the screen. Instead, their drawing is redirected to video memory, which is then rendered into a desktop image and presented on the display.
10.Click Save Changes.
Creating a Citrix Terminal Services Resource Profile Using Default ICA Settings
This topic describes how to configure access to a Citrix Metaframe server using a default ICA configuration file.
To create a Citrix Terminal Services resource profile that uses default ICA settings:
1.In the admin console, select Users > Resource Profiles > Terminal Services.
2.Click New Profile. Or select an existing profile from the list.
3.Select Citrix using default ICA from the Type list.
4.(Existing resource profiles only) If you want to customize the default ICA file that comes with the system, click the Open link, customize the file, and upload it.
5.Enter a unique name and optionally a description for the resource profile. (This name becomes the default session bookmark's name.)
6.Specify the server and port to which this resource profile should connect in the Host box. When entering the server, you may enter a hostname or IP address.
7.Enter the port on which the terminal server listens in the Server Port field. (By default, the system populates this field with port number 1494 for Citrix.)
8.Select the Create an access control policy allowing Terminal Service access to this server check box to enable access to the server specified in the Server Port box (enabled by default).
9.Enable intermediation using a Java client by selecting Enable Java support and then specifying which Java client the system should use.
10.Click Save and Continue.
11.Select the roles to which the resource profile applies in the Roles tab and click Add.
The selected roles inherit the autopolicy and session bookmarks created by the resource profile. If it is not already enabled, the system also automatically enables the Terminal Services option in the Users > User Roles > Select_Role > General > Overview page of the admin console for all of the roles you select.
12.Click Save Changes.
13.(Optional.) Modify the default session bookmark created by the system in the Bookmarks tab and/or create new ones. (By default, the system creates a session bookmark to the server defined in the Host box and displays it to all users assigned to the role specified in the Roles tab.)
Defining a Bookmark for a Citrix Profile Using Default ICA Settings
When you create a Terminal Services resource profile, the system automatically creates a bookmark that links to the terminal server that you specified in the resource profile. The system enables you to modify this bookmark as well as create additional bookmarks to the same terminal server.
To configure resource profile bookmarks for Citrix Terminal Services using default ICA settings:
1.In the admin console, select Users > Resource Profiles > Terminal Services> Select Resource Profile > Bookmarks.
2.Click the appropriate link in the Bookmark column if you want to modify an existing session bookmark. Or, click New Bookmark to create an additional session bookmark.
Although it is generally easiest to create a resource profile session bookmark through the resource profile configuration page, you can choose to create one through the user roles page as well.
3.(Optional.) Change the name and description of the session bookmark. (By default, the system populates and names the session bookmark using the resource profile name.)
4.Specify how the terminal emulation window should appear to the user during a terminal session use configuration options in the Settings area of the bookmark configuration page.
5.Pass user credentials from the system to the terminal server so users can sign onto the terminal server without having to manually enter their credentials. You can do this by using the configuration options in the Session area of the bookmark configuration page.
6.Allow users to access specific applications on the terminal server by using configuration options in the Start Application area of the bookmark configuration page. In addition, you can use settings in this section to define auto-launch and session reliability options.
7.Allow users to access local resources such as printers and drives through the terminal session by using the configuration options in the Connect Devices section of the bookmark configuration page.
8.Specify the roles to which you want to display the session bookmark if you are configuring the session bookmark through the resource profile pages, under Roles:
•ALL selected roles-Displays the session bookmark to all of the roles associated with the resource profile.
•Subset of selected roles-Displays the session bookmark to a subset of the roles associated with the resource profile. Then select roles from the ALL selected roles list and click Add to move them to the Subset of selected roles list.
9.Click Save Changes.
Creating a Citrix Terminal Services Bookmark Through the User Roles Page
It is generally easiest to create a terminal services bookmark through the resource profile configuration pages, as explained in the previous topic. However, you can choose to create a resource profile session bookmark through the user roles page using the following instructions:
1.In the admin console, select Users > User Roles > Select_Role > Terminal Services> Sessions.
2.Click Add Session.
3.Choose Terminal Services Resource Profile from the Type list. (The system does not display this option if you have not already created a terminal services resource profile.)
4.Select an existing resource profile that connects to a Citrix server using the default ICA file. (The system automatically populates the Host and Server Port fields using settings from the selected resource profile.)
5.Click OK. (If you have not already associated the selected role with the resource profile, the system automatically makes the association for you. The system also enables any access control policies for the role that are required by the resource profile.)
6.If this role is not already associated with the selected resource profile, the system displays an informational message. If you see this message, click Save Changes to add this role to the resource profile's list of roles and to update the profile's autopolicies as required. Then, repeat the previous steps to create the session bookmark.
When you create a resource profile session bookmark through the user roles page (instead of the standard resource profiles page), the system only associates the generated session bookmark with the selected role. The system does not assign the session bookmark to all of the roles associated with the selected resource profile.
7.(Optional.) Change the name and description of the session bookmark. By default, the resource profile name is used as the session bookmark name.
8.Configure the bookmark's settings.
Defining Display Options for the Citrix Terminal Services Session
When configuring a terminal services bookmark, you can specify how the terminal emulation window should appear to users during their terminal sessions.
To define display, auto-launch, and session reliability options:
1.Create a terminal services bookmark or edit an existing bookmark.
2.Scroll to the Settings area of the bookmark configuration page.
3.Select an option from the Screen Size drop-down list if you want to change the size of the terminal services window on the user's workstation. The default window size is full screen.
4.Select 8-bit, 15-bit, 16-bit, 24-bit, or 32-bit color from the Color Depth list if you want to the change the color-depth of the terminal session data. The default color depth is 8-bit.
When configuring a Citrix session bookmark, note that the setting you choose here and the user's local desktop setting both affect the client's color-depth display. If these settings do not match, the user sees the lower of the two color-depths during his session. For example, if you select 16-bit color during configuration, but the user's local desktop is set to 8-bit, the user sees 8-bit color depth during his session.
5.Click Save Changes.
Defining SSO Options for the Citrix Terminal Services Session
When configuring a terminal services bookmark, you can configure the system to pass user credentials from the system to the terminal server so that the user does not have to manually enter his username and password. The system passes the specified credentials when a user clicks the session bookmark. If the credentials fail, the server prompts the user to manually enter his username and password.
To define single sign-on options:
1.Create a terminal services bookmark or edit an existing bookmark.
2.Scroll to the Authentication area of the bookmark configuration page.
3.Specify the username to pass to the terminal server in the Username field. You can enter a static username or a variable. Enter the <username> variable to pass the username stored in the system's primary authentication server. Or use the following syntax to submit the username for the secondary authentication server: <username@SecondaryServerName> or <username[2]>.
4.Select Password if you want to specify a static password or select Variable Password if you want to use the password stored in the system's primary or secondary authentication server. To use the password from the primary authentication server, enter the <password> variable. Or use the following syntax to submit the password for the secondary authentication server: <Password@SecondaryServerName> or <Password[2]>.
5.(Default ICA file and listed applications only.) Select Use domain credentials to pass the user's cached domain credentials to the Citrix Metaframe server (also called pass-through authentication). When you select this option, the system uses the Citrix Program Neighborhood client to intermediate the Citrix terminal session.
If you want to download the Program Neighborhood client, select Users > User Roles > Select_Role > Terminal Services > Options in the admin console and enter the URL in the Download from URL box. See the Citrix web site for the location of the latest Program Neighborhood client cab file.
When you select the Use domain credentials option, you must also enable SSO through the user's settings file (appsrv.ini). If the user has already successfully signed into the Metaframe server using cached domain credentials, this setting should already be enabled. Otherwise, you or the user must:
•Set EnableSSOnThruICAFile=On in appsrv.ini. You can locate appsrv.ini in the %HOMEPATH%\Application Data\ICAClient directory.
•Set UseLocalUserAndPassword=On in the ICA file.
6.If you have not enabled SSO through the INI file, the user is prompted to manually enter his credentials when he tries to access the Metaframe server through the system.
7.Click Save Changes.
Defining Application, Auto-Launch, and Session Rliability Settings for the Citrix Terminal Services Session
When configuring a terminal services bookmark, you can specify that users can only access specific applications on the terminal server.
To define applications that users can access:
1.Create a terminal services bookmark or edit an existing bookmark.
2.Scroll to the Start Application area of the bookmark configuration page.
3.Select the Launch seamless window check box to have the Windows application server manage the display of the application. This allows an application's windows to behave in the same way as an application running on a Windows application server, regardless of the user's desktop environment.
If SSO is not configured, seamless window is supported only on Remote Desktop Protocol (RDP) 6.0 and later.
Enter the server alias name in the Alias Name field (applicable only for servers running Windows 2008 and later).
4.Specify where the application's executable file resides on the terminal server in the Path to application box (visible only when you clear Launch seamless window). For example, you might enter the following directory for the Microsoft Word application:
C:\Program Files\Microsoft Office\Office10\WinWord.exe
5.Specify where the terminal server should place working files for the application in the Working directory field. For example, you might specify that Microsoft Word should save files to the following directory by default:
C:\Documents and Settings\<username>\My Documents
You can use system session variables such as <username> and <password> in the Path to application and Working directory boxes. For example, when specifying an application path, you might want to include the <username> variable to personalize the location. For example, C:\Documents and Settings\<username>\My Documents.
6.Select the Auto-launch check box if you want to automatically launch this terminal service session bookmark when users sign into the device. When you select this option, the system launches the terminal services application in a separate window when the user signs in.
7.Select Session Reliability and Auto-client reconnect to keep ICA sessions active and on the user's screen when network connectivity is interrupted. Users continue to see the application they are using until the network connectivity resumes or the session reliability time-out has expired (the time-out value is defined by the Citrix product). Enter the port to use in the Port to be enabled box.
8.Click Save Changes.
Defining Device Connections for the Citrix Terminal Services Session
When configuring a terminal services bookmark, you can specify local resources that users can access through the terminal session.
For the Connect Devices settings to take effect, they must also be enabled on the Metaframe server. For example, if you enable Connect Drives on the system, but disable it on the Metaframe server, then the Metaframe server will block access to local drives. Note that if you clear the Configure access to local resources check box, the settings on the Metaframe server take effect.
To define local resources that users can access:
1.Create a terminal services bookmark or edit an existing bookmark.
2.Scroll to the Connect Devices area of the bookmark configuration page.
3.Select Connect local drives to connect the user's local drive to the terminal server, enabling the user to copy information from the terminal server to his local client directories.
4.Select Connect local printers to connect the user's local printers to the terminal server, enabling the user to print information from the terminal server to his local printer.
5.Select Connect COM Ports to connect the user's COM ports to the terminal server, allowing communication between the terminal server and the devices on his serial ports.
6.When you enable local resources through the terminal server, each user can only access his own local resources. For instance, user 1 cannot see user 2's local directories.
7.Click Save Changes.
Creating a Citrix Resource Profile That Uses a Custom ICA File
Use this type of resource profile to enable a terminal session to a Citrix Metaframe server using settings that you specify in a customized ICA file. Use custom ICA files to enable terminal sessions to Citrix Metaframe servers or NFuse servers governing Citrix server farms (in other words, to load balance). You may also use custom ICA files to link to single servers, if necessary. When you select this option, the system uses the session parameters defined in the specified custom ICA file.
To enable the connection between the system and the Citrix server farm, you must use the TCP/IP+HTTP protocol for browsing and specify the Citrix Metaframe or NFuse server port and IP address. The system does not support UDP port-forwarding.
To create a Citrix resource profile that uses a custom ICA file:
1.In the admin console, select Users > Resource Profiles > Terminal Services.
2.Click New Profile. Or select an existing profile from the list.
3.Select Citrix using custom ICA file from the Type list.
4.Specify the ICA file that contains the session parameters that you want use in the Custom ICA File box. Note that you may download and customize the following ICA files from the system:
•ICA file that comes with the system-To customize this file, click the Open link, save the file to your local machine, customize the file as required, and upload it back to the system using the Browse option. If you customize this file, you must replace the following parameters in the default.ica file: <CITRIX_CLIENT_NAME>, <APPDATA> and <TARGET_SERVER>.
•ICA file that you have already associated with the resource profile-To customize this file, click the Current ICA File link, save the file to your local machine, and customize the file as required. Once you make changes, you must upload the revised version using the Browse option.
Before uploading the ICA file, you should test it to make sure it initiates the Citrix session correctly. To test, create an ICA file and access it directly. If the file displays the Citrix session correctly then it should work through the system.
If SSO is configured in the custom ICA bookmark, seamless mode is ignored and the application is launched in non-seamless mode.
When using the Java rewriting technology to tunnel Citrix JICA applets through the system, you must set the proxyType parameter in the ICA file to None (even if a client-side proxy is configured in the browser).
5.Enter a unique name and optionally a description for the resource profile. (This name becomes the default session bookmark's name.)
6.Enable access to the servers specified in the custom ICA file:
•Select the Autopolicy: Terminal Services Access Control check box.
•Specify the Metaframe servers to which you want to enable access in the Resource field.
•Choose Allow to enable access to the specified resource or Deny to block access to the specified resource from the Action list.
•Click Add.
7.Enable intermediation using a Java client by selecting Enable Java support.
If you select the Enable Java support option and have a custom ICA file that you uploaded to the system, your HTML file is auto-populated with references to your custom ICA file. No additional HTML code needs to be added.
8.Click Save and Continue.
9.Select the roles to which the resource profile applies in the Roles box and click Add.
The selected roles inherit the autopolicy and session bookmarks created by the resource profile. If it is not already enabled, the system also automatically enables the Terminal Services option in the Users > User Roles > Select_Role > General > Overview page of the admin console for all of the roles you select.
10.Click Save Changes.
11.(Optional) Modify the default session bookmark created by the system in the Bookmarks tab and/or create new ones. (By default, the system creates a session bookmark to the server defined in your custom ICA file and displays it to all users assigned to the role specified in the Roles tab.)
Defining a Bookmark for a Citrix Profile Using a Custom ICA File
When you create a terminal services resource profile, the system automatically creates a bookmark that links to the terminal server that you specified in the resource profile. You can modify this bookmark as well as create additional bookmarks to the same terminal server.
To configure resource profile bookmarks for Citrix Terminal Services using custom ICA settings:
1.In the admin console, select Users > Resource Profiles > Terminal Services> Select_Resource_Profile > Bookmarks.
Click the appropriate link in the Bookmark column if you want to modify an existing session bookmark. Or, click New Bookmark to create an additional session bookmark.
Although it is generally easiest to create a resource profile session bookmark through the resource profile configuration page, you can choose to create one through the user roles page as well.
2.(Optional.) Change the name and description of the session bookmark. (By default, the system populates and names the session bookmark using the resource profile name.)
3.Pass user credentials from the system to the terminal server so that users can sign onto the terminal server without having to manually enter their credentials. You can do this by configuring options in the Session area of the bookmark configuration page.
4.Automatically launch this terminal service session bookmark when a user signs in to the device by selecting the Auto-launch check box. When you select this option, the system launches the terminal services application in a separate window when the user signs in.
5.Under Roles, specify the roles to which you want to display the session bookmark:
•ALL selected roles-Displays the session bookmark to all of the roles associated with the resource profile.
•Subset of selected roles-Displays the session bookmark to a subset of the roles associated with the resource profile. Then select roles from the ALL selected roles list and click Add to move them to the Subset of selected roles list.
6.Click Save Changes.
Creating a Citrix Profile That Lists Published Applications
Citrix created published applications to satisfy the need for security. It is dangerous to allow any executable to be run on the server. With published applications, only applications that are allowed to be run are published.
These published applications are displayed on the system index page as terminal services bookmarks.
The Citrix Desktop Toolbar Viewer is enabled only for XenDesktop. It is not enabled for XenApp. If you require the Citrix Desktop Toolbar Viewer, use the XenDesktop configuration on Connect Secure. Do not configure a desktop as part of the Citrix Listed Applications feature.
To create a Citrix profile that lists published applications:
1.In the admin console, select Users > Resource Profiles > Terminal Services.
2.Click New Profile.
3.Select Citrix Listed Applications from the Type list.
4.Enter a unique name and optionally a description for the resource profile. This name becomes the default session bookmark's name.
5.Enter the IP address and port of the Citrix MetaFrame server where the XML service is running.
You do not need to enter the port number if you are using the default value. The default port is 80 (if SSL is selected, the default port is 443).
You can enter more than one server. If the connection fails on one server, the next server in the list is used.
6.Click the Use SSL for connecting to Citrix XML Service check box to send the password through SSL instead of cleartext.
Although cleartext is supported, we recommend you always use SSL to avoid any security issues.
7.Enter the username, password, and domain name for connecting to the Citrix Metaframe server where the XML service is running.
You can enter variable credentials such as <USERNAME> and <PASSWORD>. If you use variable credentials, the Subset of selected Applications option is disabled in the Bookmarks window.
When the user accesses the application list, their credentials are submitted to the Citrix XML service, substituting the session context variables <USERNAME> and <PASSWORD>. Only the user's specific applications (as determined by the Citrix administrator) are returned.
8.Enable access to the servers specified in the custom ICA file:
•Select the Autopolicy: Terminal Services Access Control check box.
•Specify the Metaframe servers to which you want to enable access in the Resource field.
•Choose Allow to enable access to the specified resource or Deny to block access to the specified resource from the Action list.
•Click Add.
9.Enable intermediation using a Java client by selecting Enable Java support and then specifying which Java client to use.
10.Click Save and Continue.
11.Select the roles to which the resource profile applies in the Roles tab and click Add.
The selected roles inherit the autopolicy and session bookmarks created by the resource profile. If it is not already enabled, the system also automatically enables the Terminal Services option in the Users > User Roles > Select_Role > General > Overview page of the admin console for all of the roles you select.
12.Click Save Changes.
13.(Optional.) Modify the default session bookmark created by the system in the Bookmarks box and/or create new ones.
Defining a Bookmark for a Citrix Profile Listing Applications
When you create a terminal services resource profile, the system automatically creates a bookmark that links to the terminal server that you specified in the resource profile. You can modify this bookmark as well as create additional bookmarks to the same terminal server.
To configure resource profile bookmarks for Citrix terminal services list applications:
1.In the admin console, select Users > Resource Profiles > Terminal Services> Resource_Profile > Bookmarks.
Click the appropriate link in the Bookmark column if you want to modify an existing session bookmark. Or, click New Bookmark to create an additional session bookmark.
Although it is generally easiest to create a resource profile session bookmark through the resource profile configuration page, you can choose to create one through the user roles page as well.
2.(Optional.) Change the name and description of the session bookmark. By default, the resource profile name is used as the session bookmark name.
3.Under Applications, select the applications you want available to the end user.
•ALL Applications-Allow all executables on the server to be available to the end user.
•Subset of selected applications-Select the executables from the Available list and click Add to allow only those applications to be run. The Available list is automatically populated from the Metaframe server.
This option is disabled when you enter variable credentials, such as <USERNAME> and <PASSWORD> while defining the resource profile.
4.Under Settings, specify how the terminal emulation window should appear to users during their terminal sessions.
You cannot change the IP address or XML Service running port for connecting to the XML Service or the Java client to use for intermediation.
•Select an option from the Screen Size drop-down list if you want to change the size of the terminal services window on the user's workstation.
•(Optional.) Select 8-bit, 15-bit, 16-bit, 24-bit, or 32-bit color from the Color Depth list if you want to the change the color-depth of the terminal session data.
5.Under Session, you can configure the system to pass user credentials from the system to the terminal server so that the user does not have to manually enter his username and password.
•Specify the username to pass to the terminal server in the Username box. You can enter a static username or a variable.
•Select Password if you want to specify a static password or select Variable Password if you want to use the password stored in the system's primary or secondary authentication server.
•Select Use domain credentials to pass the user's cached domain credentials to the Citrix Metaframe server (also called pass-through authentication). When you select this optionthe system uses the Citrix Program Neighborhood client to intermediate the Citrix terminal session.
If you want to download the Citrix Program Neighborhood client, select Users > User Roles > Role Name > Terminal Services > Options of the admin console and enter the following URL in the Download from URL box: http://download2.citrix.com/FILES/en/products/client/ica/client9230/wficat.cab
When you select the Use domain credentials option, you must also enable SSO through the user's settings file (appsrv.ini).
6.Under Connect Devices, specify which user devices to connect to the terminal server.
•Connect local drives-Connect the user's local drive to the terminal server, enabling the user to copy information from the terminal server to his local client directories.
•Select Connect local printers-Connect the user's local printers to the terminal server, enabling the user to print information from the terminal server to his local printer.
•Select Connect COM Ports-Connect the user's COM ports to the terminal server, allowing communication between the terminal server and the devices on his serial ports.
7.Under Roles, specify the roles to which you want to display the session bookmark:
8.Click Save Changes.
Creating Session Bookmarks to Your Terminal Server
When you enable the Terminal Services option through the admin console, you can create session bookmarks to your terminal server. A terminal services session bookmark defines information about the terminal server to which users can connect and (optionally) applications that they can use on the terminal server. The session bookmarks that you define appear on the Terminal Services panel in the end-user console for users who map to the appropriate role.
You can use two different methods to create terminal services session bookmarks:
•Create session bookmarks through existing resource profiles (recommended)-When you select this method, the system automatically populates the session bookmark with key parameters (such as the session type) using settings from the resource profile. Additionally, while you are creating the associated resource profile, the system guides you through the process of creating any required policies to enable access to the session bookmark.
•Create standard session bookmarks-With this option, you must manually enter all session bookmark parameters during configuration. Additionally, you must enable access to the Terminal Services feature and create resource policies that enable access to the servers defined in the session bookmark.
If you enable the Terminal Services option but do not give users the ability to create their own session bookmarks, make sure that you configure session bookmarks for them. Otherwise, users cannot use this feature.
You can also enable users to create their own session bookmarks on the homepage and browse to the terminal servers using the system browse bar. Or, you can create links from external sites to a terminal services bookmark.
Creating Advanced Terminal Services Session Bookmarks
The information in this topic is provided for backwards compatibility. We recommend that you configure access to Windows terminal servers and Citrix servers through resource profiles instead, because they provide a simpler, more unified configuration method. Resource profile also contain features (such as the ability to use Java RDP clients to support Macintosh and Linux users) which are not available through roles.
Make sure to enter a unique set of parameters when defining a terminal services bookmark. If you create two bookmarks that contain the same set of parameters, the system deletes one of the bookmarks from the end user view. You can still see both bookmarks in the administrator console.
To create a session bookmark for terminal sessions:
1.In the admin console, select Users > User Roles > Role > Terminal Services > Sessions.
2.Click Add Session.
3.Select Standard in the Type drop-down list.
4.Specify the type of user session you want to create from the Session Type list:
•Windows Terminal Services-Enables a terminal session to a Windows terminal server.
•Citrix using default ICA-Enables a terminal services session to a Citrix Metaframe server. When you select this option, the system uses the default Citrix session parameters.
(Existing sessions only.) You can also use the Open link to open the system's default ICA file, which you can then save to your local machine and customize as required. If you customize this file, you must replace the following parameters in the default.ica file: <CITRIX_CLIENT_NAME>, <APPDATA>, and <TARGET_SERVER>.
•Citrix using custom ICA file-Enables a terminal services session to a Citrix Metaframe or NFuse server governing a Citrix server farm. When you select this option, the system uses the session parameters defined in the specified custom ICA file, thus removing the Session Reliability, Start Application, and Connect Devices configuration items from the current page.
Because the system does not support UDP port-forwarding, you must use the TCP/IP+HTTP protocol for browsing and specify the Citrix Metaframe or NFuse server port and IP address to enable the connection between Connect Secure and the Citrix server farm.
5.Enter a name and (optionally) a description for the session bookmark.
6.In the Host field, specify the hostname or IP address of the Windows terminal server or Metaframe terminal server.
7.In the Client Port and Server Port fields, enter the ports on which the user client communicates and terminal server listens.
If you specify a client port and the Ivanti terminal services client is unable to bind to this port, then the terminal services client will fail. However, if you leave the Client Port field blank, the Ivanti terminal services, Ivanti Citrix Services Client dynamically selects an available port.
8.(Windows Terminal Services and Citrix using default ICA only) If you want to specify the screen size and color depth options for the terminal emulation window, use configuration options in the Settings section.
9.If you want to pass user credentials from the system to the terminal server, enabling users to sign onto the terminal server without having to manually enter their credentials, use configuration options in the Session section.
10.If you only want to allow users to access specific applications on the terminal server, use configuration options in the Start Application section of the bookmark configuration page. In addition, you can use settings in this section to define auto-launch and session reliability options.
11.(Windows Terminal Services and Citrix using default ICA only) If you want to allow users to access local resources such as printers and drives through the terminal session, use configuration options in the Connect Devices section of the bookmark configuration page.
12.(Windows Terminal Services only) If you want to specify how the terminal emulation window should appear to the user during a terminal session, use configuration options in the Desktop Settings section.
13.Click Save Changes or Save + New.
Defining Screen Size and Color Depth Options for the Terminal Services Session
When configuring a terminal services bookmark, you can specify how the terminal emulation window should appear to users during their terminal sessions.
The options in this section only apply to Windows Terminal Services bookmarks, Citrix using default ICA bookmarks and Citrix listed applications bookmarks.
To define display, auto-launch, and session reliability options:
1.Create a terminal services session bookmark or edit an existing session bookmark.
2.Scroll to the Settings section of the bookmark configuration page.
3.Select an option from the Screen Size drop-down list if you want to change the size of the terminal services window on the user's workstation. The default window size is full screen.
If you select the Full Screen option and are connecting to a Windows terminal server, the system modifies the user's hosts file in order to display the correct hostname in the terminal services window. If the user does not have the proper rights to modify the hosts file, the system displays the loopback address instead.
Also note that in order to restore the hosts file to its original state after running the terminal services window, the user must properly close his application. Otherwise, other applications that use the hosts file (such as JSAM and Host Checker) might not run properly. The user can also restore his hosts file to its original state by rebooting his system or by renaming the backup hosts file (hosts_ive.bak).
4.Select a value from the Color Depth list if you want to the change the color-depth of the terminal session data. The default color depth is 8-bit.
When configuring a Citrix session bookmark, note that the setting you choose here and the user's local desktop setting both affect the client's color-depth display. If these settings do not match, the user sees the lower of the two color-depths during his session. For example, if you choose 16-bit color during system configuration, but the user's local desktop is set to 8-bit, the user sees 8-bit color depth during his session.
5.Click Save Changes or Save + New.
Defining SSO Options for the Terminal Services Session
When configuring a terminal services bookmark, you can pass user credentials from the system to the terminal server so that the user does not have to manually enter his username and password. The system passes the specified credentials when a user clicks the session bookmark. If the credentials fail, the server prompts the user to manually enter his username and password.
To define single sign-on options:
1.Create a terminal services session bookmark or edit an existing session bookmark.
2.Scroll to the Authentication section of the bookmark configuration page.
3.In the Username field, specify the username to pass to the terminal server. You can enter a static username or a variable. Enter the <username> variable to pass the username stored in the system's primary authentication server. Or use the following syntax to submit the username for the secondary authentication server: <username@SecondaryServerName> or <username[2]>.
4.Select Password if you want to specify a static password or select Variable Password if you want to use the password stored in the system's primary or secondary authentication server. To use the password from the primary authentication server, enter the <password> variable. Or use the following syntax to submit the password for the secondary authentication server: <Password@SecondaryServerName> or <Password[2]>.
5.(Citrix using default ICA or listed applications) Select Use domain credentials to pass the user's cached domain credentials to the Citrix Metaframe server (also called pass-through authentication). When you select this option, the system uses the Citrix Program Neighborhood client to intermediate the Citrix terminal session.
If you want to download the Program Neighborhood client, go to the Users > User Roles > Select Role > Terminal Services > Options page of the admin console and enter the following URL in the Download from URL field: https://downloadplugins.citrix.com/Windows/CitrixReceiver.exe
When you select the Use domain credentials option, you must also enable SSO through the user's settings file (appsrv.ini). If the user has already successfully signed into the Metaframe server using cached domain credentials, this setting should already be enabled. Otherwise, you or the user must:
•Set EnableSSOnThruICAFile=On in appsrv.ini. You can locate appsrv.ini in the %HOMEPATH%\Application Data\ICAClient directory.
Set UseLocalUserAndPassword=On in the ICA file.
If you have not enabled SSO through the INI file, the user is prompted to manually enter his credentials when he tries to access the Metaframe server through the system.
6.Click Save Changes or Save + New.
Defining Application Settings for the Terminal Services Session
When configuring a terminal services bookmark, you can specify that users can only access specific applications on the terminal server. Additionally, you can define auto-launch and session reliability options for the session.
To define applications that users can access:
1.Create a terminal services session bookmark or edit an existing session bookmark.
2.Scroll to the Start Application section of the bookmark configuration page.
If you specify Citrix using custom ICA file in the Session Type configuration section, the Start Application configuration item is not available.
3.(Windows Terminal Services and Citrix using default ICA only) In the Path to application field, specify where the application's executable file resides on the terminal server. For example, you might enter the following directory for the Microsoft Word application:
C:\Program Files\Microsoft Office\Office10\WinWord.exe
4.(Windows Terminal Services and Citrix using default ICA only) In the Working directory field, specify where the terminal server should place working files for the application. For example, you might specify that Microsoft Word should save files to the following directory by default:
C:\Documents and Settings\<username>\My Documents
You can use session variables such as <username> and <password>in the Path to application and Working directory fields. For example, when specifying an application path, you might want to include the <username> variable to personalize the location. For example: C:\Documents and Settings\<username>\My Documents.
5.(Citrix using default ICA only) Select Session Reliability and Auto-client reconnect to keep ICA sessions active and on the user's screen when network connectivity is interrupted. Users continue to see the application they are using until the network connectivity resumes or the session reliability time-out has expired (the time-out value is defined by the Citrix product). Enter the port to use in Port to be enabled.
6.Select the Auto-launch check box if you want to automatically launch this Terminal Service session bookmark when users sign into the device. When you select this option, the system launches the terminal services application in a separate window when the user signs in.
7.Click Save Changes or Save + New.
Defining Device Connections for the Terminal Services Session
When configuring a terminal services bookmark, you can specify local resources that users can access through the terminal session.
The options in this section only apply to Windows Terminal Services bookmarks and Citrix using default ICA bookmarks.
The Connect Devices options that you specify at the role-level control whether end users can enable or disable access to local resources when they configure their own bookmarks. These role-level options do not control whether users can access local resources through a bookmark created by the system administrator.
To define local resources that users can access:
1.Create a terminal services session bookmark or edit an existing session bookmark.
2.Scroll to the Connect Devices section of the bookmark configuration page.
If you specify Citrix using custom ICA file in the Session Type configuration section, the Connect Devices configuration item is not available.
3.Select Connect local drives to connect the user's local drive to the terminal server, enabling the user to copy information from the terminal server to his local client directories.
4.Select Connect local printers to connect the user's local printers to the terminal server, enabling the user to print information from the terminal server to his local printer.
5.Select Connect COM Ports to connect the user's COM ports to the terminal server, allowing communication between the terminal server and the devices on his serial ports.
6.(Windows Terminal Services only) Select Allow Clipboard Sharing if you want to allow the contents of the clipboard to be shared between the user's host computer and the terminal server. Due to the limitations of the RDP client, disabling the Allow Clipboard Sharing option will automatically disable the Connect local drives, Connect local printers, and Connect COM Ports options.
When you enable local resources through the terminal server, each user can only access his own local resources. For instance, user 1 cannot see user 2's local directories.
7.(Windows Terminal Services only) Select Connect smart cards to allow users to use smart cards to authenticate their remote desktop sessions.
8.(Windows Terminal Services only) Select Sound Options to enable sound during the remote session. Choose Bring to this computer to redirect audio to the local computer. Choose Leave at remote computer to play the audio only at the server.
Smart cards and sound options are supported by Microsoft Remote Desktop Protocol versions 5.1 and later.
9.(Windows Terminal Services only) Select Use Multiple Monitors to support multiple monitors connected to the client computer during the remote session.
Multiple monitors are supported by Microsoft Remote Desktop Protocol versions 8.1 and later.
10.(Windows Terminal Services only) Select the Use Remote Microphones check box to support microphones connected to the client computer during the remote session.
11.Select the Network Level Authentication check box to enable the NLA at the bookmark level.
12.Select the Allow Smartcard with Network Level Authentication check box to enable smart cards and NLA simultaneously.
This option is applicable to non-cross-domain certificates.
13.Click Save Changes or Save + New.
Defining Desktop Settings for the Terminal Services Session
When configuring a terminal services bookmark, you can specify how the terminal emulation window should appear to the user during a terminal session.
The options in this section only apply to Windows Terminal Services bookmarks.
To define display settings for the users' sessions:
1.Create a terminal services session bookmark or edit an existing session bookmark.
2.Scroll to the Display Settings section of the bookmark configuration page.
3.Select Desktop background if you want to display a wallpaper background to users. If you do not select this option, the background is blank.
4.Select Show contents of window while dragging if you want to show the contents of the Windows Explorer window while users move the windows on their desktops.
5.Select Menu and window animation if you want to animate the movement of windows, menus, and lists.
6.Select Themes if you want to allow users to set Windows themes in their terminal server windows.
7.Select Bitmap Caching if you want to improve performance by minimizing the amount of display information that is passed over a connection.
8.Select Font Smoothing (RDP 6.0 onwards) to make text smoother and easier to read. This option only works on Windows Vista computers running RDP clients that are version 6.0 or later.
9.Select Desktop Composition (RDP 6.0 onwards) to allow desktop composition. With desktop composition, individual windows no longer draw directly to the screen. Instead, their drawing is redirected to video memory, which is then rendered into a desktop image and presented on the display.
10.Click Save Changes or Save + New.
Creating Links from an External Site to a Terminal Services Session Bookmark
When creating a link to a terminal services session bookmark from another site, you can construct either of the following types of URLs:
•URL that includes all necessary parameters-Create a URL that includes all of the parameters that you want to pass to the terminal services program, such as the host, ports, and terminal window parameters. When constructing the URL, use the following syntax:
https://<SASeriesAppliance>/dana/term/winlaunchterm.cgi?<param1>=<value1>&<param2>=<value2>
When constructing your URL, you can use the case-insensitive parameter names described in Table 92. If you want to include more than one parameter in the session bookmark, string them together using ampersand characters (&). For example:
https://YourSA.com/dana/term/winlaunchterm.cgi?host=yourtermserver.yourdomain.com&type=Windows&clientPort=1094&serverPort=3389&user=john&password=abc123&screenSize=fullscree
URL to terminal services bookmark-Create a URL that simply points to a session bookmark that you have already created on the system. When constructing the URL, use the following syntax:
https://<SASeriesAppliance>/dana/term/winlaunchterm.cgi?bmname=<bookmarkName>
Within the URL, only define the bmName parameter.
When using the system to host Terminal Services session bookmarks, you must:
•Enable the User can add sessions option in the Users > User Roles > Select Role > Terminal Services > Options page. If you do not select this option, users cannot link to the Terminal Services session bookmarks from external sites.
•Create a policy that prevents the system from rewriting the link and the page that contains the link using settings in the Users > Resource Policies > Web > Rewriting > Selective Rewriting page of the admin console.
Additionally, we recommend that you use https protocol instead of http. Otherwise, when users launch the session bookmark, they see an insecure site warning.
If you create links on external servers to Terminal Services bookmarks on the system and you are using multiple customized sign-in URLs, some restrictions occur.
The following table describes Case-Insensitive Terminal Services Session Bookmark Parameter Names:
|
Parameter Name |
Description and Possible Values |
Example |
|
host |
Required. Hostname or IP address of the Windows terminal server or Metaframe terminal server. |
https://YourSystem.com/dana/term/winlaunchterm.cgi?host=YourTermServer |
|
type |
Type of terminal server. Possible values include Windows or Citrix. |
https://YourSystem.com/dana/term/winlaunchterm.cgi?host=YourTermServer&type=Windows |
|
clientPort |
Port on which the user client communicates. |
https://YourSystem.com/dana/term/winlaunchterm.cgi?host=YourTermServer&clientPort=1094 |
|
serverPort |
Port on which the terminal server listens. Default values are 3389 for Windows and 1494 for Citrix. |
https://YourSystem.com/dana/term/winlaunchterm.cgi?host=YourTermServer&serverPort=3389 |
|
user |
Username to pass to the terminal server. You can enter a static username, such as JDoe, or a variable username such as <user> or <username> |
https://YourSystem.com/dana/term/winlaunchterm.cgi?host=YourTermServer&user=jDoe
|
|
password |
Password to pass the terminal server. |
https://YourSystem.com/dana/term/winlaunchterm.cgi?host=YourTermServer&user=jDoe&password=<password> |
|
bmname |
Specifies the session bookmark name |
https://YourSystem.com/dana/term/winlaunchterm.cgi?bmname=<bookmarkname> |
|
screenSize |
Terminal services window's size. Possible values: fullScreen 800x600 1024x768 1280x1024 |
https://YourSystem.com/dana/term/winlaunchterm.cgi?host=YourTermServer&screenSize=fullScreen
|
|
colorDepth |
Terminal services window's color depth, in bits. Possible values: 8 15 16 24 32 |
https://YourSystem.com/dana/term/winlaunchterm.cgi?host=YourTermServer&colorDepth=32 |
|
startApp |
Specifies the path of an application executable to start. |
https://YourSystem.com/dana/term/winlaunchterm.cgi?host=YourTermServer&startApp=C:\Program Files\Microsoft Office\Office10\WinWord.exe |
|
startDir |
Specifies where the terminal server should place working files for the application. |
https://YourSystem.com/dana/term/winlaunchterm.cgi?host=YourTermServer&startapp=C:\temp |
|
connectDrives |
Specifies whether the user can connect his local drive to the terminal server. Possible values: Yes No |
https://YourSystem.com/dana/term/winlaunchterm.cgi?host=YourTermServer&connectDrives=Yes |
|
connectPrinters |
Specifies whether the user can connect his local printer to the terminal server. Possible values: Yes No |
https://YourSystem.com/dana/term/winlaunchterm.cgi?host=YourTermServer&connectPrinters=Yes |
|
connectComPorts |
Specifies whether the user can connect his COM ports to the terminal server. Possible values: Yes No |
https://YourSystem.com/dana/term/winlaunchterm.cgi?host=YourTermServer&connectComPorts=Yes |
|
allowclipboard |
Specifies whether the user can share the contents of the clipboard between the user's host computer and the terminal server. Possible values: Yes No |
https://YourSystem.com/dana/term/winlaunchterm.cgi?host=YourTermServer&allowclipboard=Yes |
|
desktopbackground |
Specifies whether to display your current wallpaper setting. Possible values: Yes No |
https://YourSystem.com/dana/term/winlaunchterm.cgi?host=YourTermServer&desktopbackground=Yes |
|
showDragContents |
Specifies whether to show the contents of the Windows Explorer window while moving the window around your desktop. Possible values: Yes No |
https://YourSystem.com/dana/term/winlaunchterm.cgi?host=YourTermServer&showDragContents=Yes |
|
showMenuAnimation |
Specifies whether to animate the movement of windows, menus, and lists. Possible values: Yes No |
https://YourSystem.com/dana/term/winlaunchterm.cgi?host=YourTermServer&showMenuAnimation=Yes |
|
themes |
Specifies whether to allow users to set Windows themes in their terminal server windows. Possible values: Yes No |
https://YourSystem.com/dana/term/winlaunchterm.cgi?host=YourTermServer&themes=Yes |
|
bitmapcaching |
Specifies whether to improve performance by minimizing the amount of display information that must be passed over a connection. Possible values: Yes No |
https://YourSystem.com/dana/term/winlaunchterm.cgi?host=YourTermServer&bitmapcaching=Yes |
|
fontsmoothing |
Specifies whether to make text smoother and easier to read. This option only works on Windows Vista computers running RDP clients that are version 6.0 or later. Possible values: Yes No |
https://YourSystem.com/dana/term/winlaunchterm.cgi?host=YourTermServer&fontsmoothing=Yes |
|
desktopcomposition |
Specifies whether to enable desktop composition. Possible values: Yes No |
https://YourSystem.com/dana/term/winlaunchterm.cgi?host=YourTermServer&desktopcomposition=Yes |
|
soundoptions |
Specifies whether to enable sound. Possible values: 0-disable sound 1-bring sound to this computer 2-leave sound at remote computer |
https://YourSystem.com/dana/term/winlaunchterm.cgi?host=YourTermServer&soundOptions=1 |
|
multiMon |
Specifies whether to allow users to use all the monitors for the remote session. Possible values: Yes No |
https://YourSystem.com/dana/term/winlaunchterm.cgi?host=YourTermServer&multiMon=Yes |
Specifying General Terminal Services Options
Users can create their own terminal services session bookmarks and can configure the system to create terminal services resource policies that enable access to the servers specified in the terminal services session bookmarks.
To specify general Terminal Services options:
1.In the admin console, choose Users > User Roles > Role > Terminal Services > Options.
2.If you are enabling Citrix sessions, under Citrix client delivery method, specify where the system should obtain the ICA client to download to users' systems:
•Download from the Citrix website-The system installs the latest version of the ICA client from the Citrix web site. You can edit the URL to point to a new location if the one listed is no longer valid.
•Download from the IVE - Use the Browse button to browse to the ICA client on your local network. You can upload a CAB, MSI or EXE file. Once you upload the client, the system uses it as the default and downloads it to your users' systems when necessary. You must also specify the exact version number of the ICA client.
If you upload an MSI or EXE file, an open/save dialog box appears to download and install the client. If Java fallback is configured, you are given the option to bypass this download and use Java instead.
•Download from a URL - The system installs the ICA client of your choice from the specified web site. You must also specify the exact version number of the ICA client. If Java fallback is configured, you are given the option to bypass this download and use Java instead.
NOTE:
We recommend that you test the Citrix client that you expect the system to download with the custom ICA file that you have uploaded to the system. Perform this testing without the system to determine if the Citrix client supports the features in the custom ICA file. If the features do not work without the system, they will not work through the system either.
If you choose to download an ICA client from the Citrix web site or a URL, the system secures the download transaction by processing the URL through the Content Intermediation Engine. Therefore, you must choose a site that is accessible by the system and enabled for users within this role.
To determine if the ICA web client is already installed on a machine, check for the following entry in your Windows registry: HKEY_CLASSES_ROOT\CLSID\{238F6F83-B8B4-11CF-8771-00A024541EE3}
You can determine the version number of an ICA client by extracting the cab file (for example, wficat.cab), looking for an inf file in the archive (for example, wficat.inf), and then locating the information about each ocx in the inf file. For example, wficat.inf (in wficat.cab) might contain the following information:
[wfica.ocx]
file-win32-x86=thiscab
clsid={238F6F83-B8B4-11CF-8771-00A024541EE3}
FileVersion=8,00,24737,0
[wfica32.exe]
file-win32-x86=thiscab
FileVersion=8,00,24737,0
In this case, "8,00,23737,0" is the file version. (Note that the version includes commas instead of periods.)
3.Enable the User can add sessions option to enable users to define their own terminal session bookmarks and to enable users to access terminal servers through the system browse bar on the home page. When you enable this option, the Add Terminal Services Session button appears on the Terminal Services page the next time a user refreshes the user console.
4.Select the Deny single sign-on for sessions added by user option if you do not want the user Add Terminal Service Session page to include the Authentication section used for single sign-on. This setting is disabled by default. When enabled, it disallows SSO for all user-added terminal services sessions, even if the user had previously configured SSO authentication credentials when that was permitted. This option adds a security measure to protect against exploitation of a security breach. If SSO is allowed, an attacker who gains access to a user's home page could gain access to the terminal services added by the user.
5.Enable the Auto-allow role Terminal Services sessions option to enable the system to automatically enable access to the resources defined in the terminal session bookmark (rather than having to create resource policies). Note that this only applies to role bookmarks, not user bookmarks.
6.You may not see the Auto-allow option if you are using a new installation or if an administrator hides the option.
If you want to allow users to enable access to local devices through the bookmarks they create, select from the following options in the Allow users to enable local resources defined below section:
•Users can connect drives - Enables the user to create bookmarks that connect the local drives to the terminal server, enabling the user to copy information from the terminal server to his local client directories.
•User can connect printers - Enables the user to create bookmarks that connect his local printers to the terminal server, enabling the user to print information from the terminal server to his local printer.
•User can connect COM ports - Enables the user to create bookmarks that connects his COM ports to the terminal server, allowing communication between the terminal server and the devices on his serial ports.
•Allow Clipboard Sharing - Enables the user to create bookmarks that shares the contents of the clipboard between the user's host computer and the terminal server. Due to the limitations of the RDP client, disabling the Allow Clipboard Sharing option will automatically disable the Connect local drives, Connect local printers, and Connect COM Ports options.
When you enable local resources through the terminal server, each user can only access his own local resources. For instance, user 1 cannot see user 2's local directories.
The Connect Devices options that you specify at the role-level override any Connect Devices options that you set at the bookmark level.
•User can connect smart cards - Allows users to use smart card readers connected to their system for authenticating their remote desktop session.
•User can connect sound devices - Allows users to redirect audio from the remote desktop session to their local system.
NOTE:
•Smart cards redirecting audio are supported by Microsoft Remote Desktop Protocol versions 5.1 and later.
•If smart card option is selected, then Network Level Authentication (NLA) is not supported.
•User can connect to Multiple Monitors - Allows users to fully utilize all the monitors connected to the client computer for the remote desktop connection thereby providing extra desktop space and an almost seamless experience with the client desktop that is much improved over "Span mode".
•User can connect microphone devices - Allows users to use microphone devices connected to their system.
•User can enable/disable NLA - Allows users to enable/disable NLA at bookmark level.
Multiple monitors are supported by Microsoft Remote Desktop Protocol versions 8.1 and later.
7.In the Allow users to modify Display settings below section:
•Select Desktop background to display your current wallpaper setting. If you do not select this option, your background is blank.
•Select Show contents of window while dragging to show the contents of the Windows Explorer window while moving the window around your desktop.
•Select Menu and window animation to animate the movement of windows, menus, and lists.
•Select Themes to allow Windows themes to be set in the terminal server window.
•Select Bitmap Caching to improve performance by minimizing the amount of display information that must be passed over a connection.
•Select Font Smoothing (RDP 6.0 onwards) to make text smoother and easier to read. This option only works on Windows Vista computers running RDP clients that are version 6.0 or later.
8.Click Save Changes.
Configuring Terminal Services Resource Policies
When you enable the Terminal Services feature for a role, you need to create resource policies that specify which remote servers a user can access. You can create resource policies through the standard interface (as described in this section) or through resource profiles (recommended method).
The information in this section is provided for backwards compatibility. We recommend that you configure access to Windows terminal servers and Citrix servers through resource profiles instead, since they provide a simpler, more unified configuration method.
When writing a Terminal Services resource policy, you need to supply key information:
•Resources-A resource policy must specify one or more resources to which the policy applies. When writing a Terminal Services policy, you need to specify the terminal server to which users can connect.
•Roles-A resource policy must specify the roles to which it applies. When a user makes a request, the system determines what policies apply to the role and then evaluates those policies that correspond to the request.
•Actions-A Terminal Services resource policy either allows or denies access to a terminal server.
The system's engine that evaluates resource policies requires that the resources listed in a policy's Resources list follow a canonical format.
To write a Terminal Services resource policy:
1.In the admin console, choose Users > Resource Policies > Terminal Services > Access.
2.On the Terminal Services Policies page, click New Policy.
3.On the New Policy page, enter a name to label this policy and optionally description.
4.In the Resources section, specify the servers to which this policy applies.
5.In the Roles section, specify which roles to which this policy applies.
6.In the Action section, specify:
•Allow access-To grant access to the servers specified in the Resources list.
•Deny access-To deny access to the servers specified in the Resources list.
•Use Detailed Rules-To specify one or more detailed rules for this policy.
7.Click Save Changes.
8.On the Terminal Services Policies page, order the policies according to how you want the system to evaluate them. Keep in mind that once the system matches the resource requested by the user to a resource in a policy's (or a detailed rule's) Resource list, it performs the specified action and stops processing policies.
Related Documentation
About Terminal Services Resource Profiles
Specifying Resources for a Resource Policy
Writing a Detailed Rule for Resource Policies
Specifying the Terminal Services Resource Option
Use the Options tab to match IP addresses to hostnames specified as resources in your terminal services resource policies. When you enable this option, the system looks up IP address corresponding to each hostname specified in a Terminal Services resource policy. When a user tries to access a server by specifying an IP address rather than the hostname, the system compares the IP to its cached list of IP addresses to determine if a hostname matches an IP. If there is a match, then the system accepts the match as a policy match and applies the action specified for the resource policy.
When you enable this option, the system compiles a list of hostnames specified in the Resources field of each Terminal Services resource policy. The system then applies the option to this comprehensive list of hostnames.
This option does not apply to hostnames that include wildcards and parameters.
To specify the Terminal Services resource option:
1.In the admin console, choose Users > Resource Policies > Terminal Services > Options.
2.Select IP based matching for Hostname based policy resources.
3.Click Save Changes.
Using the Remote Desktop Launcher
End users can connect to a terminal server by:
•Entering rdp://hostname in the system browser bar
•Creating a terminal services bookmark
•Using the remote desktop launcher (RDPLauncher)
RDPLauncher uses the Terminal Services section in the end-user home page and allows the end user to enter a terminal service IP address or hostname. The default server port is 3389.
RDPLauncher provides only the screen. User experience options are not available through RDPLauncher. For example, the following options in the New Terminal Services Sessions window do not apply to terminal services launched through RDPLauncher:
•Client port
•Authentication settings
•Start application settings
•Connect Devices settings
•Display Settings
•Remote Audio
To allow end users to use RDPLauncher,
1.Select the Terminal Services option in Users > User Roles > Role Name > General > Overview.
2.Select Enable Remote Desktop Launcher in Users > User Roles > Role Name > Terminal Services > Options.
3.(optional) If your end users are on non-Windows systems, such as a Macintosh or Linux system, select Enable Java for Remote Desktop Launcher and select the applet to use.
If you select Hob-IvantiSecure RDP Applet from the Applet to Use menu, you must select the Configure HTML for the default applet check box in order to edit the HTML. Otherwise, the default HTML is used.
Screen size and color depth parameters for the RDPLauncher terminal services session are defined through Preferences > General on the end-users home page.