Deploying on Hyper-V
•Deploying a Hyper-V ISA-V through the Hyper-V Manager
•Deploying Connect Secure with Automatic Initial Configurations
•Deploying a Hyper-V ISA-V through Powershell cmdlets
Supported Platforms Systems
Ivanti Security Appliance are now supported on Microsoft's Hyper-V hypervisor in addition to VMWare platform.
This section helps you in choosing the instance types that should be deployed with Ivanti Connect Secure.
 25.1.1.0
•ISA4000-V
•ISA6000-V
•ISA8000-V
25.1.3.0
•ISA4500-V
•ISA6500-V
•ISA8500-V
For more details, see ISA VA Supported Platforms.
Limitations
•Hyper-V Deployment with secure boot is only qualified for ICS 25.1.1.0 release onwards.
•Upgrade from 22.X to 25.X as well as rollback from 25.1.1.0 to any older release is not supported.
•Only Fresh install is supported.
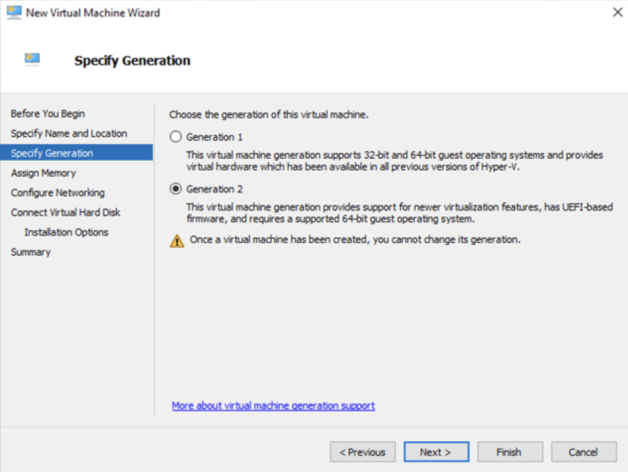
•The image supports only IDE disks and will support only the ‘Generation 2’ type of Virtual machine in Hyper-V Manager because secure-boot is only supported on Gen2 onwards.
•VM Cloning is no longer a valid scenario because for every VM we should store unique keys in TPM, hence we can’t use same TPM while cloning.
Deploying a Hyper-V ISA-V through the Hyper-V Manager
To deploy a Ivanti Security appliance through the Hyper-V Manager:
1.Copy the Hyper-V ISA-V Package to the Hyper-V Server.
2.Open Hyper-V Manager.
3.Deploy Hyper-V ISA-V.
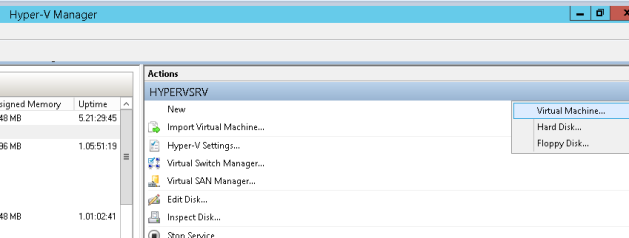
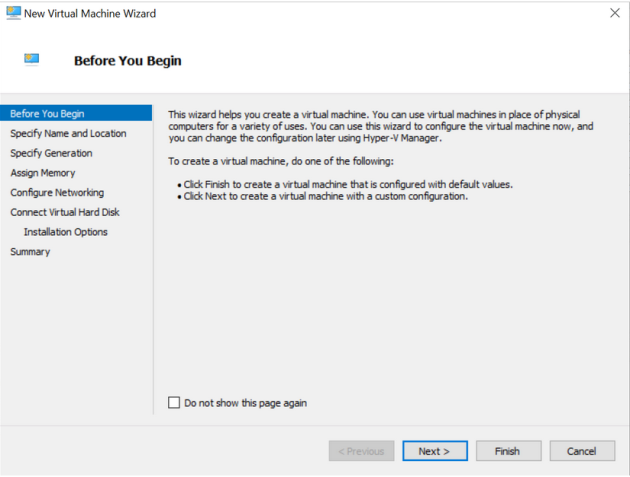
4.On the Before you Begin screen, click Next.
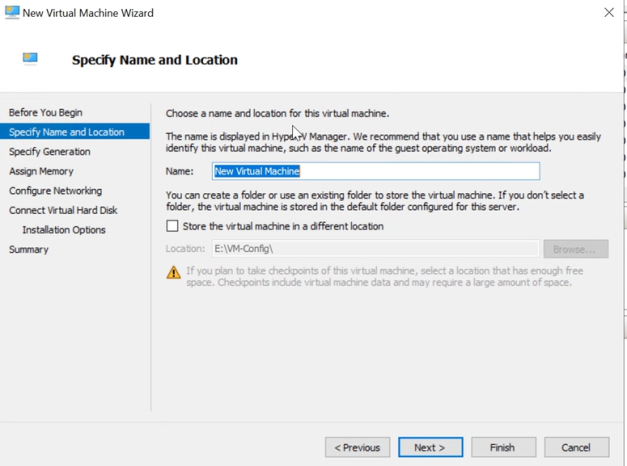
5.Enter Specify Name and Location and click Next.
6.Select Generation 2 only as Hyper-V ISA-V does not support older Generation 1, and click Next.
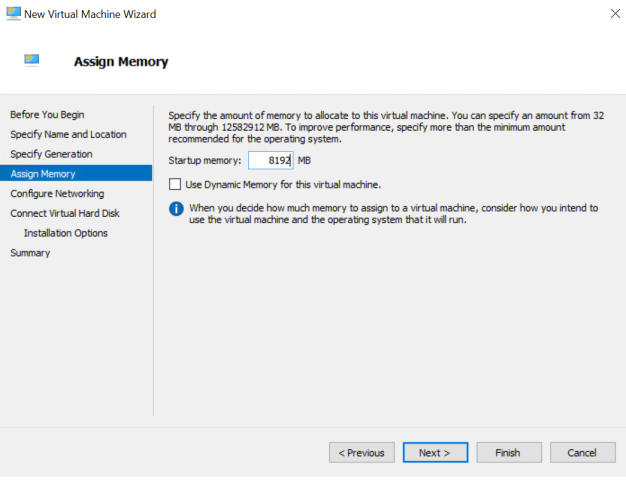
7.Now assign the appropriate memory. Enter 8192 MB for ISA-V, and click Next.
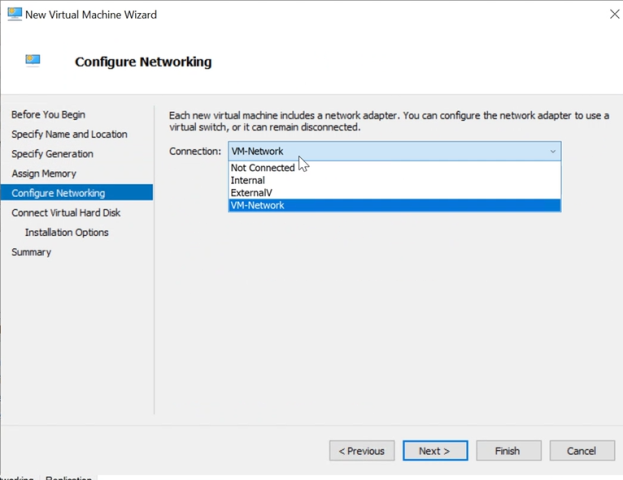
8.The Configure Networking page opens. Select a virtual switch to be used by the network adapter, and click Next.
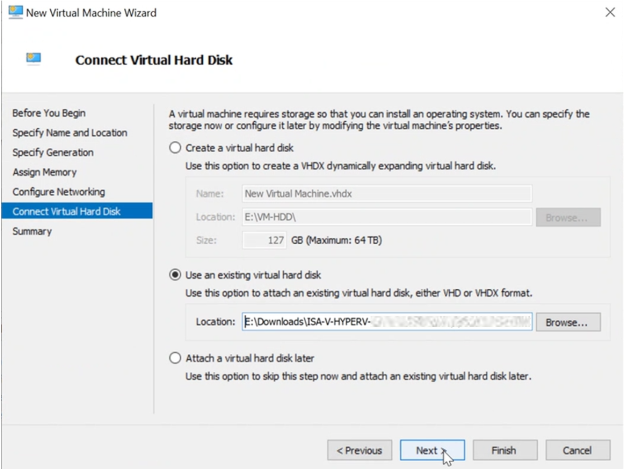
9. The Connect Virtual Hard Disk page appears. Select the Use an existing virtual hard disk button and provide the location of the Hyper-V ISA-V package.vhdx (step 1).
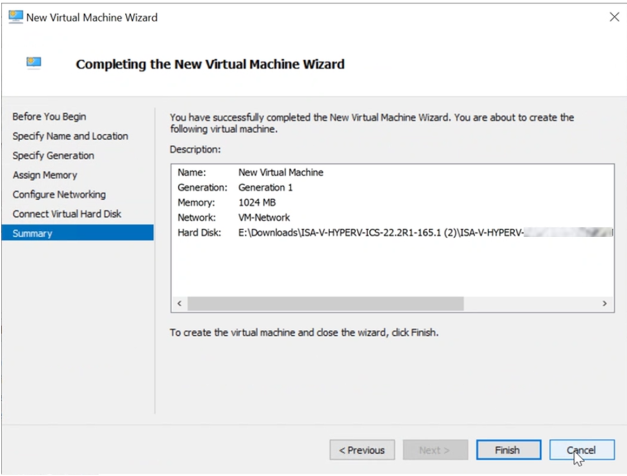
10. Click on Finish. Hyper-V Server creates an entry under Virtual Machines.
11. Now, add number on vCPUs and network adapter for External Port and Management Port.
a. Right click on the VM Name, and click on Settings.
b. Enter Number of virtual processors required.
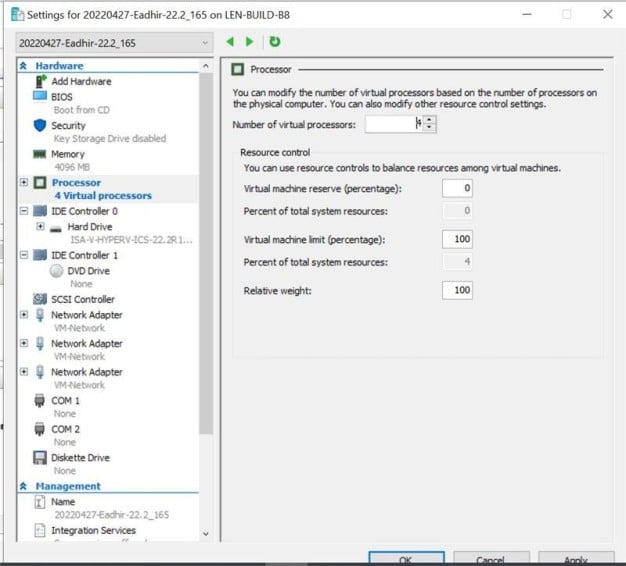
c. In the dialog box that opens, click on Add Hardware in the left pane.
d. On the right pane, select Network Adapter.
e. Click on Add.
It is important to add all the three network adapters to Hyper-V ISA-V before powering on the VM. Adding network adapters after powering-on the Hyper-V ISA-V may result in network connectivity issues. The following list indicates the order of virtual adapters:
1. Network Adapter: Internal
2. Network Adapter 2: External
3. Network Adapter 3: Management
12. Select the virtual switch for External Port, and click on Apply.
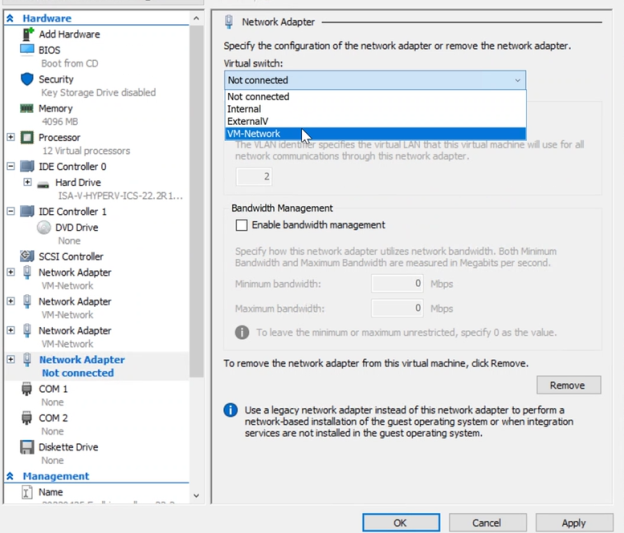
13. Now add network adapter for Management port.
a. Click on Add Hardware on the left pane. Select Network Adapter, click on Add.
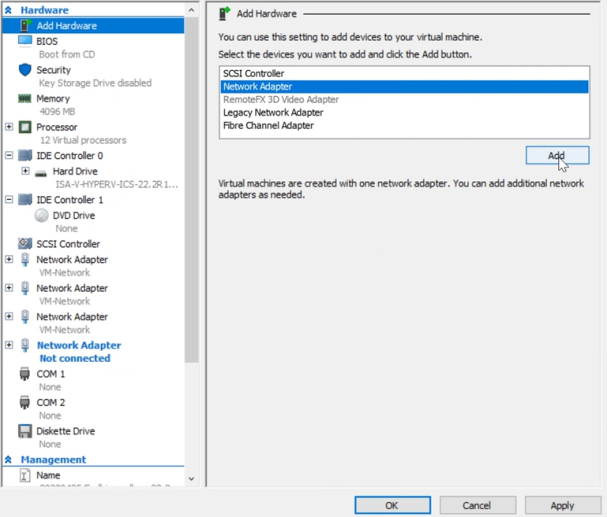
b. Select the Virtual Switch for Management Port, and click on Apply.
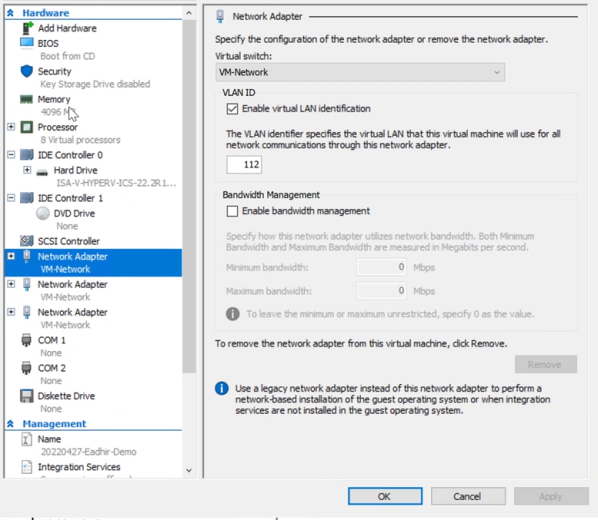
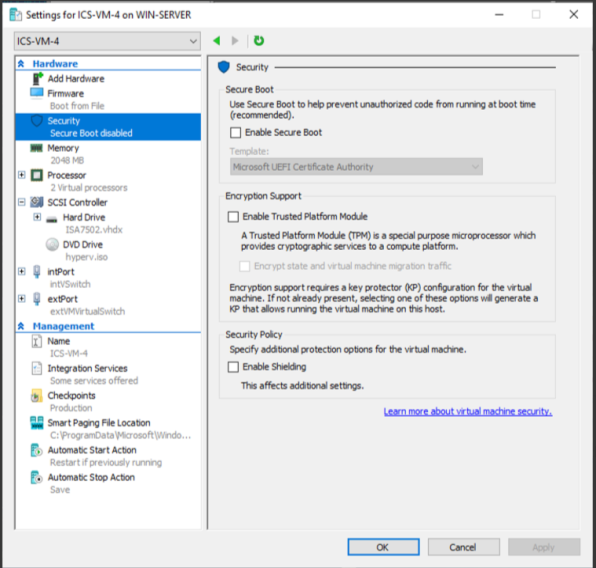
14. Before starting the virtual machine, go to Settings > Security.
a. Change the Template to Microsoft UEFI Certificate Authority.
b. Clear the Enable Secure Boot option to disable it before the first boot.
c. Clear the Enable Trusted Platform Module option to disable TPM for the first boot.
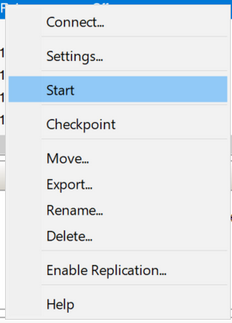
15. Select Start to power on the virtual machine.
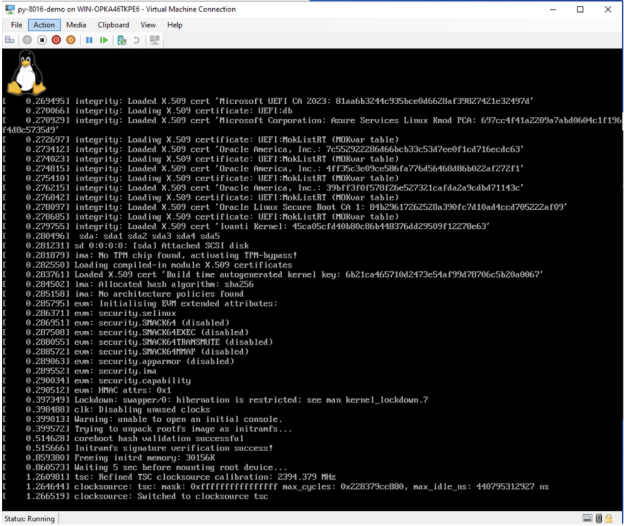
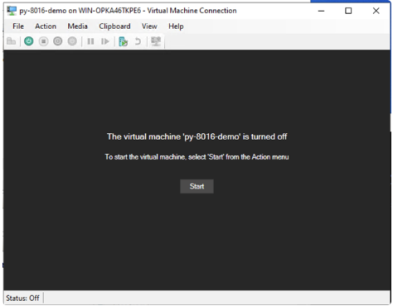
16. Virtual machine will boot, and it will automatically shut down when it detects Secure Boot is disabled. This step is very much needed, as it will install Ivanti Secure Boot certificate in this first boot. The following screenshot may or may not appear during the fast booting process and after the system is turned off.
17. Before starting the virtual machine again, go to Settings > Security.
a. Make sure the Template is Microsoft UEFI Certificate Authority.
b. Select the Enable Secure Boot option.
c. Select the Enable Trusted Platform Module option.
d. Optional step is to add a DVD drive with automatic initial configurations For details, see Deploying Connect Secure with Automatic Initial Configurations.
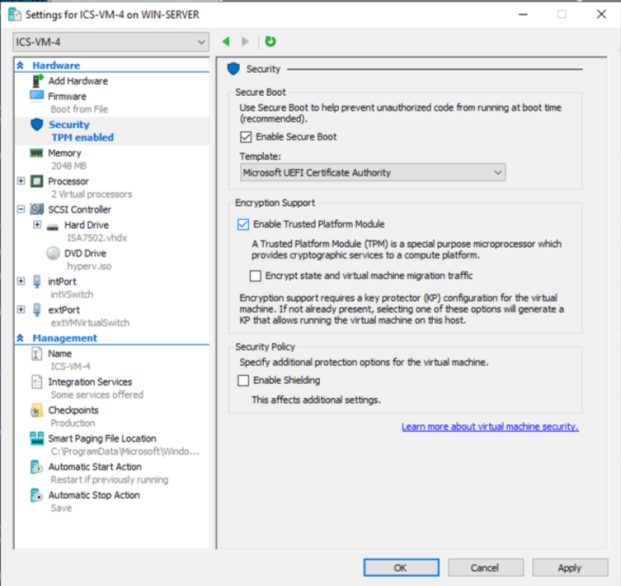
18. Select Start to power on the virtual machine.
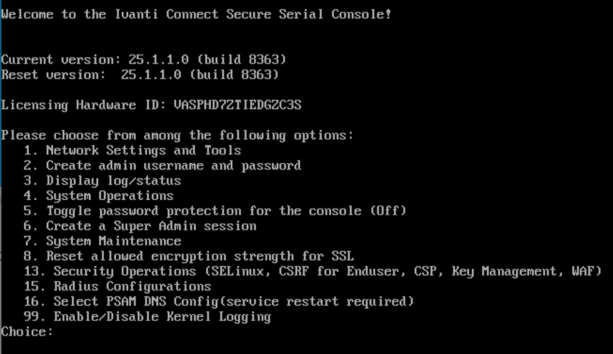
Once Deployment is successful, the deployed VM Console is shown.
Deploying Connect Secure with Automatic Initial Configurations
1.Download the Hyper-V package file and find the hyperv_template.xml file.
2.Customize the required fields like IP address/Subnet Mask/Default Gateway for internal, external, and management ports and then convert to .iso image (hyperv.iso) using the following command.
Command Sample: mkisofs -l -o hyperv.iso hyperv_template.xml.
3.Under DVD Drive, click Browse and upload the .iso file and then start the VM.
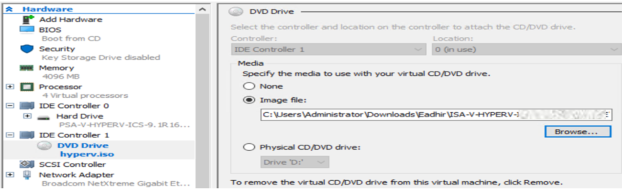
4.You can add DVD Drive when the virtual machine is switched off automatically after the first.
Note:
When deploying a Hyper-V image using a script (.ps1 file), it is essential to use the file name hyperv_template.xml with the mkisofs command. If you use any other file name, the deployment will not recognize hyperv.iso as a drive.
For example, the following commands will not work:
mkisofs -l -o hyperv.iso hyperv_template-AP.xml
mkisofs -l -o hyperv.iso hyperv_template-AP1.xml
or
with any other file name in place of hyperv_template.xml.
Always use the file name hyperv_template.xml with the mkisofs command:
mkisofs -l -o hyperv.iso hyperv_template.xml
Deploying a Hyper-V ISA-V through Powershell cmdlets
To deploy a Hyper-V ISA-V through Powershell cmdlets:
•either run the powershell commands manually from powershell script "hyperv-VMDeployVHDX.ps1".
•or call the powershell script(Method1) with proper arguments to automate all the steps and directly get a running VM with secure boot enabled.
Launch Hyper-V ISA-V in an automated fashion with secure boot enabled.
1.Copy the Hyper-V ISA-V Package and hyperv-VMDeployVHDX.ps1 to the Hyper-V Server.
2.Open PowerShell as administrator.
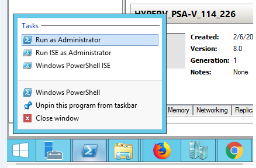
3.PowerShell script takes the following inputs:
•VMName: Name of the VM to create (mandatory)
•VHDXPath: Path to the existing VHDX file (mandatory)
•ISAVariant: ISA variant determining VM resources - "4K", "6K", or "8K" (mandatory)
•4K: 8GB RAM, 4 vCPUs
•6K: 16GB RAM, 8 vCPUs
•8K: 32GB RAM, 12 vCPUs
•IntSwitch: Name of the Hyper-V virtual switch for Internal network adapter (mandatory)
•ExtSwitch: Name of the Hyper-V virtual switch for External network adapter (mandatory)
•MgmtSwitch: Name of the Hyper-V virtual switch for Management network adapter (optional)
•ConfigISOPath: Path to an ISO file to mount as a DVD drive for auto configuration (optional)
4.Keep the VMName, VHDXPath, ISAVariant, Internal Switch name, External Switch name ready.
5.Example deployment commands:
With all three network adapters:

With Internal and External adapters only:

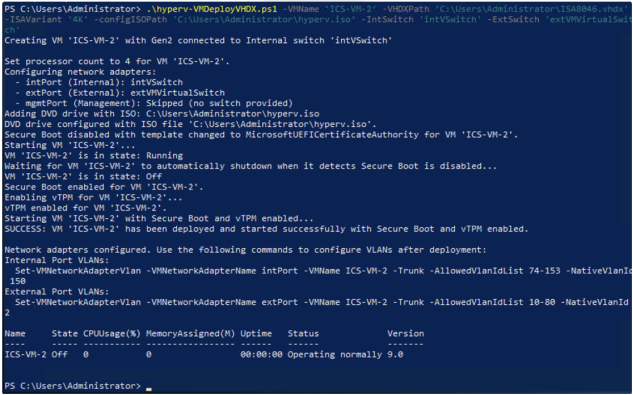
Cloning of VM on Hyper-V
Cloning is no longer supported for Generation 2 VMs because of TPM (Trusted platform modules) limitations.
Increasing the Disk Size in Hyper-V
Fresh installation 80 GB disk space is available by default. You can modify or increase the disk size only once on fresh installation or upgrade of the ICS images, but not on rollback or factory reset images.
To increase the disk space:
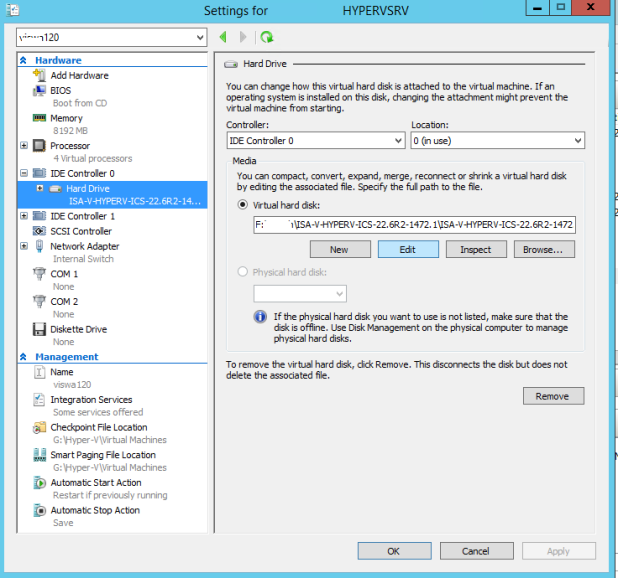
1.Click IDE Controller > Hardware, click Edit.
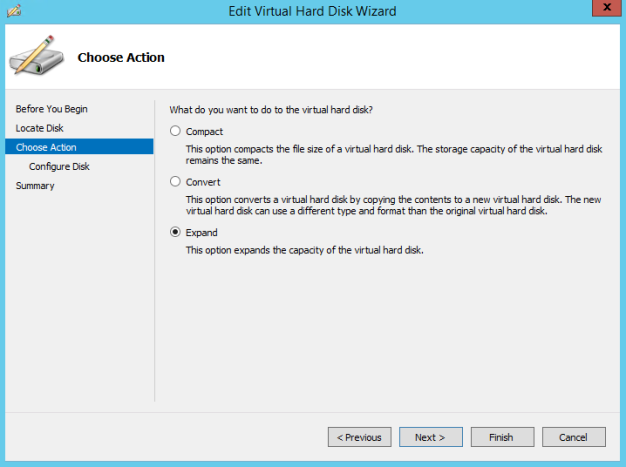
2.Select Expand and click Next>.
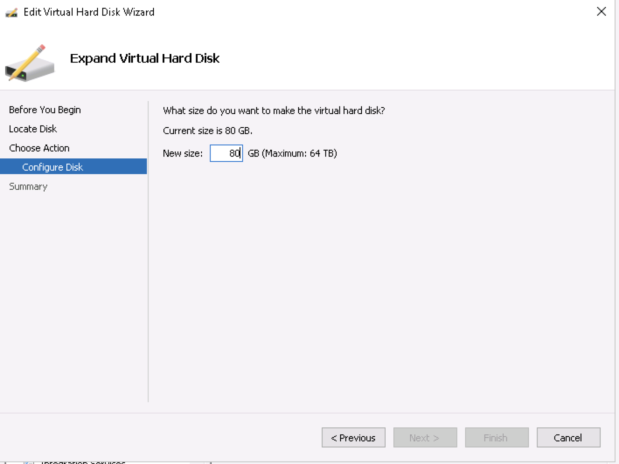
3.Change the disk size in GB and click Finish.
ICS Provisioning Parameters
Provisioning parameters are those parameters which are required during the deployment of a virtual appliance. ICS accepts the following parameters as provisioning parameters in the XML format.
|
<PropertySection> <Property oe:key="vaIPAddress" oe:value=""/> <Property oe:key="vaNetmask" oe:value=""/> <Property oe:key="vaGateway" oe:value=""/> <Property oe:key="vaDefaultVlan" oe:value=""/> <Property oe:key="vaExternalIPAddress" oe:value=""/> <Property oe:key="vaExternalNetmask" oe:value=""/> <Property oe:key="vaExternalGateway" oe:value=""/> <Property oe:key="vaExternalDefaultVlan" oe:value=""/> <Property oe:key="vaManagementIPAddress" oe:value=""/> <Property oe:key="vaManagementNetmask" oe:value=""/> <Property oe:key="vaManagementGateway" oe:value=""/> <Property oe:key="vaManagementDefaultVlan" oe:value=""/> <Property oe:key="vaPrimaryDNS" oe:value=""/> <Property oe:key="vaSecondaryDNS" oe:value=""/> <Property oe:key="vaWINSServer" oe:value="1.2.3.4"/> <Property oe:key="vaDNSDomain" oe:value="ics.company.com"/> <Property oe:key="vaAdminUsername" oe:value="admin"/> <Property oe:key="vaAdminPassword" oe:value="Password123$"/> <Property oe:key="vaCommonName" oe:value="ics-ext-port.company.com"/> <Property oe:key="vaOrganization" oe:value="Ivanti"/> <Property oe:key="vaRandomText" oe:value="randomtextrandomtextrandomtextrandomtext"/> <Property oe:key="vaAcceptLicenseAgreement" oe:value="y"/> <Property oe:key="vaEnableLicenseServer" oe:value="n"/> <Property oe:key="vaAdminEnableREST" oe:value=""/> <Property oe:key="vaAuthCodeLicense" oe:value=""/> <Property oe:key="vaConfigURL" oe:value="http://a.b.c.d/ics_config.xml"/> <Property oe:key="vaConfigServerCACertPEM" oe:value=""/> <Property oe:key="vaConfigData" oe:value=""/> <Property oe:key="vaInternalPortReconfigWithValueInVAppProperties" oe:value="1"/> <Property oe:key="vaManagementPortReconfigWithValueInVAppProperties" oe:value="1"/> <Property oe:key="vaExternalPortReconfigWithValueInVAppProperties" oe:value="1"/> </PropertySection> |
|
Parameter Name |
Type |
Description |
|---|---|---|
|
vaIPAddress |
IP address |
Internal interface IP |
|
vaNetmask |
IP address |
Internal interface subnet mask |
|
vaGateway |
IP address |
Internal interface IP gateway |
|
vaDefaultVlan |
integer |
VLAN number to assign to this interface |
|
vaExternalIPAddress |
IP address |
External interface IP |
|
vaExternalNetmask |
IP address |
External interface subnet mask |
|
vaExternalGateway |
IP address |
External interface IP gateway |
|
vaExternalDefaultVlan |
integer |
VLAN number to assign to this interface |
|
vaManagementIPAddress |
IP address |
Management interface IP |
|
vaManagementNetmask |
IP address |
Management interface subnet mask |
|
vaManagementGateway |
IP address |
Management interface IP gateway |
|
vaExternalDefaultVlan |
integer |
VLAN number to assign to this interface |
|
vaPrimaryDNS |
IP address |
Primary DNS IP |
|
vaSecondaryDNS |
IP address |
Secondary DNS IP |
|
vaWINSServer |
IP address |
Windows server IP |
|
vaDNSDomain |
string |
Windows domain name |
|
VaAdminUsername |
string |
Admin username |
|
vaAdminPassword |
string |
Admin password |
|
vaCommonName |
string |
Common name |
|
vaOrganization |
string |
Organization name |
|
vaRandomText |
string |
Random text to generate self-signed certificate |
|
vaAcceptLicenseAgreement |
character |
“y” to accept the license agreement |
|
vaEnableLicenseServer |
character |
“y” to enable it as VLS server. “n” to bring it up as a ICS node. |
|
vaAdminEnableREST |
character |
“y” to enable REST for administrator user |
|
vaAuthCodeLicense |
string |
Authentication code that needs to be obtained from Ivanti. |
|
vaConfigURL |
string URL |
Http based URL where XML based ICS configuration can be found. |
|
vaConfigServerCACertPEM |
string |
PEM format of CA certificate. |
|
vaConfigData |
string |
base64 encoded XML based ICS configuration. |
|
vaInternalPortReconfigWithValueIn VAppProperties |
integer |
The Internal port overwrite property. If set to 1, overwrites the virtual appliance’s internal port settings with the ones specified during deployment. Set this value as 1. |
|
vaManagementPortReconfigWithValueIn VAppProperties |
integer |
The Management port overwrite property. If set to 1, overwrites the management port-related parameters in the ICS with the ones defined here. Set this value as 1. |
|
vaExternalPortReconfigWithValueIn VAppProperties |
integer |
The External port overwrite property. If set to 1, overwrite the external port-related parameters in ICS/IPS with the ones defined here. Set this value as 1. |
v6 Parameters
| Parameter | Type | Description |
|---|---|---|
| vaNetworkStack | IPv4 or IPv6 address |
It indicates network address configured during deployment. v4 : IPv4 addresses are allowed to configured. v6 : IPv6 addresses are allowed to configured. Both: IPv4 and IPv6 addresses are allowed to configured. |
| vaIPv6Address | IPv6 address | Internal interface IPv6 address |
|
vaPrefix |
IPv6 address |
Internal interface IPv6 prefix length. |
|
vaIPv6Gateway |
IPv6 address |
Internal interface IPv6 gateway address. |
|
vaManagementIPv6Address |
IPv6 address |
Management interface IPv6 address |
|
vaManagementPrefix |
IPv6 address |
Management interface IPv6 prefix length. |
|
vaManagementIPv6Gateway |
IPv6 address |
Management interface IPv6 gateway address. |
|
vaExternalIPv6Address |
IPv6 address |
External interface IPv6 address |
|
vaExternalPrefix |
IPv6 address |
External interface IPv6 prefix length. |
|
vaExternalIPv6Gateway |
IPv6 address |
External interface IPv6 gateway address. |
ICS supports zero touch provisioning. This feature can detect and assign DHCP networking settings automatically at the ICS boot up. The following ICS parameters should be set to null in order to fetch the networking configuration automatically from the DHCP server.
|
vaIPAddress |
vaExternalIPAddress |
vaManagementIPAddress |
vaNetworkStack |
vaManagementIPv6Address |
vaExternalPrefix |
|
vaNetmask |
vaExternalNetmask |
vaManagementNetmask |
vaIPv6Address |
vaManagementPrefix |
vaExternalIPv6Gateway |
|
vaGateway |
vaExternalGateway |
vaManagementGateway |
vaPrefix |
vaManagementIPv6Gateway |
|
|
vaPrimaryDNS |
vaSecondaryDNS |
vaDNSDomain |
vaIPv6Gateway |
vaExternalIPv6Address |