Enterprise Onboarding
Configuring Enterprise Onboarding
Enterprise onboarding allows users to securely access enterprise network resources with almost any device. Wi-Fi, VPN and certificate profiles can be defined for enterprise resources and downloaded to a device during onboarding, depending on the device type.
The profiles can be defined on a single Ivanti Connect Secure or Ivanti Policy Secure server dedicated to onboarding or they can be defined on each server. Alternatively, the profiles can be defined on a third-party MDM server, in which case users will see a link and instructions on the onboarding page to continue onboarding using the external MDM server.
Onboarding is initiated from the browser. The supported profiles depend on the device type and whether the Ivanti Secure Access Client is installed (see the following table).
The following table lists the Device Onboarding Profile Support:
|
Device |
Supported profiles |
|
Android 4.0 or later |
Supports all profiles, but the Ivanti Secure Access Client must be installed during onboarding. |
|
iOS 6.0 or later |
Supports all profiles (Safari browser). |
|
Windows 7.0, 8.0, and 8.1 |
Supports Wi-Fi and certificate profiles (IE, Firefox, or Chrome browser). The Ivanti Secure Access Client onboarding application must be installed during onboarding. Windows 8 RT and Windows 8 Phone are not supported. |
|
MAC OS X |
Supports Wi-Fi and certificate profiles (Safari browser). |
Enterprise onboarding is enabled in the user role, and each profile can be applied to all user roles or specific roles. The SCEP server and CSR templates allow certificates to be generated dynamically for device and server authentication.
•Enabling Enterprise Onboarding at the Role Level
•Defining Certificate Profiles
•Workflow for Onboarding Android Devices
Domain Discovery Service
In the email-based authentication, once user enters email, client would parse domain and send it to a discovery server to fetch the server URL. It would then proceed with AD authentication with the server.
To set up the Auto-Discovery experience, you will need to contact Technical support through DevOps ticket. Once the needed information is provided (and validated), Technical Support will enable the Auto-Discovery experience for your Email Domain.
Enabling Enterprise Onboarding at the Role Level
To enable enterprise onboarding for a user role:
1.In the admin console, choose Users > User Roles > RoleName > General > Overview.
2.In the Enterprise Device Onboarding section, select the Enterprise Onboarding check box.
3.Click Save Changes.
4.Click the Enterprise Onboarding tab or click Options next to the Enterprise Onboarding check box to specify the following:
•Auto launch - Displays the onboarding page when the user logs in to Ivanti Connect Secure or Ivanti Policy Secure if enterprise onboarding is enabled for the user's role (the default). If this option is disabled, an onboarding link is displayed on the home page.
•Use third party MDM for onboarding - Displays a link on the onboarding or home page where the user can download profiles from an MDM server. Enter the URL for the MDM page in the text box.
•Install Ivanti Secure Access Client: Enabling this option will automatically install Ivanti Secure Access Client during onboarding from Windows OS.
5.Click Save Changes.
Defining the SCEP Server
The Simple Certificate Enrollment Protocol (SCEP) server configuration and CSR templates allows each client device to dynamically obtain certificates for authentication.
To define the SCEP server:
1.In the admin console, choose Users > Enterprise Onboarding.
2.Specify the following information:
|
Setting |
Description |
|
SCEP Server URL |
Enter the URL for a SCEP server. The following SCEP servers are supported: Microsoft AD 2008 Symantec mPKI |
|
Challenge |
Specify the password required by the SCEP server. |
|
Retries |
Specify the number of attempts to access the server when the first attempt fails. |
|
Retry Delay |
Specify the number of seconds between retry attempts. |
|
Upload Encryption Certificate |
Click Browse to upload the certificate used to encrypt SCEP requests. To upload the certificate automatically, select the Test Enrollment check box, select a CSR template, and click Test Configuration. To create a CSR template, see Defining CSR Templates |
3.Click Save Changes.
Defining CSR Templates
If the SCEP server is configured, the Certificate Signing Request (CSR) templates can be used in the VPN, Wi-Fi, and certificate profiles to allow each onboarded device to dynamically obtain certificates for authentication on all mobile devices. Up to 10 templates can be defined.
All LDAP attributes (such as <ldap.userAttrName>) and variables (such as <user>) can be used in the Subject DN, Email, and Subject Alternative Name Value fields. However, if you enter an LDAP variable with a string vector data type in the Subject Alternative Name Value field, only the first value in the string will be used.
To define CSR templates:
1.In the admin console, choose Users > Enterprise Onboarding > CSR Templates.
2.To add a template, click New CSR Template or select an existing template that you want to change, duplicate, or delete. Clicking Duplicate creates a copy of the selected template with Copy of before the template name.
3.Specify the following information:
|
Setting |
Description |
|
Name |
Specify the template name displayed in the list of CSR templates. |
|
Subject DN |
Specify the subject distinguished name. For example: CN=<USERNAME>,OU=Engineering=Ivanti All LDAP attributes (such as <ldap.userAttrName>) and variables (such as <user>) can be used. |
|
|
(Optional) Specify an email address with the <USER> variable, such as <USER>@ivanti.com. |
|
Subject Alternative Name Type |
Select an alternative name type if the CA requires an alternative subject name. The types include RFC-822 Name (an e-mail address), DNS domain name, URI, and IP address. |
|
Subject Alternative Name Value |
Specify one or more values for the selected alternative name type. Multiple values must be separated by a comma or space. If an LDAP variable is specified that has a string vector data type, only the first value in the string will be used. |
|
Key Size |
Select the key size used by the SCEP server. |
4.Click Save Changes.
- The number of keys available in the system can be viewed at Users->Enterprise OnBoarding->CSR Templates.
- The keys are generated only if:
A) The onboarding license is installed
B) A CSR template is configured for that key size- The max number of keys of each type is minimum of 10K keys and the number of onboard user license installed.
- Key generation is CPU intensive and time consuming. If bulk users are going to onboard it is recommended to make sure that the number of available keys >= the numbers of users that needs to onboard.
Defining VPN Profiles
VPN profiles provide Android and iOS devices with secure access to enterprise networks. One or more VPN profiles can be assigned to specific user roles or to all roles. Up to 10 profiles can be defined.
All LDAP attributes (such as <ldap.userAttrName>) and variables (such as <user>) can be used in the Username, Realm, and Role fields.
To define VPN profiles:
1.In the admin console, choose Users > Enterprise Onboarding > VPN Profiles.
2.To add a profile, click New Profile or select an existing profile that you want to change, duplicate, or delete. Clicking Duplicate creates a copy of the selected profile with Copy of before the profile name.
3.Specify the following profile information:
|
Setting |
Description |
|
Name |
Specify the name to be displayed in the list of VPN profiles. |
|
Description |
(Optional) Enter a description of the VPN profile. |
|
Apply to Client Types |
Select the device types the profile applies to (Android and iOS only). |
|
Server URL |
Specify the URL of the VPN server (must be a Ivanti Connect Secure or Ivanti Policy Secure device). |
|
Realm |
Specify the realm name. The realm is required only if the sign-in URL has the User picks from a list of authentication realms option enabled. |
|
Role |
Specify the user role. The user role is required if the role mapping rules for the user realm specify multiple roles and the User must select from among assigned roles option is enabled. |
|
Username |
Specify the <USER> variable for the user name. |
|
Authentication Method |
Select Password or Certificate for the user authentication method. For certificate authentication, specify the following: Use CSR Template-Select the CSR template used to obtain the certificate. To create a CSR template, see "Defining CSR Templates". Enable VPN On Demand-Select this option to allow iOS devices to establish the VPN when a specific host or domain is accessed. To specify the first host or domain: Match Domain or Host-Enter a hostname or a partial domain name. For example, if you enter example.com, a match occurs when the user accesses any domain that ends with example.com, such as www.test-example.com. On Demand Action-When a match occurs on the specified host or domain, select whether a VPN is always established, never established, or only if the DNS look-up fails (Establish If Needed). Selecting Never Establish does not prevent an existing VPN from being used. To add another domain, click the + button. To remove a domain, select the check box next to the domain and click the - button. Up to 10 domains can be defined. |
|
Roles |
Select one of the following options: Policy applies to ALL roles-To apply this profile to all users. Policy applies to SELECTED roles-To apply this profile only to users who are mapped to roles in the Selected roles list. Make sure to add roles to this list from the Available roles list. Policy applies to all roles OTHER THAN those selected below-To apply this profile to all users except for those who map to the roles in the Selected roles list. Make sure to add roles to this list from the Available roles list. |
4.Click Save Changes.
Defining Wi-Fi Profiles
Wi-Fi profiles provide Android, iOS, MAC OS X, and Windows devices with secure access to wireless networks. One or more Wi-Fi profiles can be assigned to specific user roles or to all roles. Up to 10 profiles can be defined.
All LDAP attributes (such as <ldap.userAttrName>) and variables (such as <user>) can be used in the Username and Password fields for the WPA Enterprise and WPA2 Enterprise security types.
To define Wi-Fi profiles:
1.In the admin console, choose Users > Enterprise Onboarding > WiFi Profiles.
2.To add a profile, click New Profile or select an existing profile that you want to change, duplicate, or delete. Clicking Duplicate creates a copy of the selected profile with Copy of before the profile name.
3.Specify the following profile information:
|
Setting |
Description |
|
Name |
Specify the name to be displayed in the list of Wi-Fi profiles. |
|
Description |
(Optional) Enter a description of the profile. |
|
Apply to Client Types |
Select the device types the profile applies to (Android, iOS, MAC OS X, and Windows). |
|
SSID |
Specify the server set ID of the wireless network. |
|
Non-Broadcast SSID |
Select the check box if the wireless network does not broadcast its identity. |
|
Auto Connect |
Select the check box to connect the client automatically when the network is detected (not supported by Android clients). |
|
Security Type |
Select the type of authentication used by the network, and specify the password or enterprise settings, as required: None-No authentication required. WEP-Wired Equivalent Privacy used for a non-enterprise network. Enter the network shared key in the displayed text box. WPA Personal or WPA2 Personal-Wi-Fi Protected Access used for a non-enterprise network. You can select the encryption method (AES or TKIP) and enter the network shared key in the displayed text box (applies to Windows clients only). WPA Enterprise or WPA2 Enterprise-Wi-Fi Protected Access used for an enterprise network. Select the Extensible Authentication Protocols (EAP) supported by the network's RADIUS authentication server. For Android devices, note the following: Android 4.3 or later is required For the EAP-TLS protocol, the CA certificate must be configured (along with the client certificate) on Samsung devices for authentication. An 802.1x RADIUS server certificate must be signed by a private root CA. Authentication fails if the certificate is signed by an intermediate root CA. |
|
EAP |
For the WPA Enterprise and WPA2 Enterprise security types, select the supported EAP protocols and specify the associated authentication settings: None-If none of the EAP protocols is selected (Android devices only), enter the <USER> and <PASSWORD> variables in the Username and Password fields. iOS, MAC OS X, and Windows clients require at least one of the EAP types to be selected (PEAP, EAP-TLS, or EAP-TTLS). Selecting Multiple EAP types is not supported for Android clients. |
|
PEAP |
The PEAP protocol is supported by all clients. Specify the following: Inner Authentication Method-Select the protocol used to authenticate the username and password (None or MSCHAPv2). The None option is valid only for Android devices. Username and Password-Enter the <USER> and <PASSWORD> variables. Outer Identity-Specify an alternate username to be used outside the encrypted tunnel, to conceal the user's identity in unencrypted packets. Trusted Server Name(s)-Specify the IP address or fully qualified domain name of one or more trusted RADIUS servers used by the network. Multiple servers must be separated by a semicolon. Trusted CA Certificate-For Windows clients, select the Trusted Root CA of the RADIUS server certificate, even if the device certificate is signed by an intermediate CA. The Trusted Root CA must be configured in a certificate profile before it can be selected here (see "Defining Certificate Profiles. For iOS and MAC OS X clients, if the RADIUS server certificate is signed by an intermediate CA, create a certificate profile for the intermediate CA, and then select the certificate here. The certificate profile ensures that the intermediate CA is downloaded to the client. |
|
EAP-TLS |
The EAP-TLS protocol is supported by all clients. Specify the following: Username-Enter the <USER> variable. Use CSR Template-Select the CSR template used to obtain the certificate. To create a CSR template, see Defining CSR TemplatesTrusted Server Name(s)-Specify the IP address or fully qualified domain name of one or more trusted RADIUS servers used by the network. Multiple servers must be separated by a semicolon. Trusted CA Certificate-For Windows clients, select the Trusted Root CA of the RADIUS server certificate, even if the device certificate is signed by an intermediate CA. The Trusted Root CA must be configured in a certificate profile before it can be selected here (see "Defining Certificate Profiles). On Windows 7 clients that have multiple certificates, users are prompted to select the certificate for 802.1x connections that use EAP-TLS. For iOS and MAC OS X clients, if the RADIUS server certificate is signed by an intermediate CA, create a certificate profile for the intermediate CA, and then select the certificate here. The certificate profile ensures that the intermediate CA is downloaded to the client. |
|
EAP-TTLS |
The TTLS protocol is supported by all clients. Specify the following: Inner Authentication Method-Select the protocol used to authenticate the username and password (None, PAP, or MSCHAPv2). The None option is valid only for Android devices. Username and Password-Enter the <USER> and <PASSWORD> variables. Outer Identity-Specify an alternate username to be used outside the encrypted tunnel, to conceal the user's identity in unencrypted packets. Trusted Server Name(s)-Specify the IP address or fully qualified domain name of one or more trusted RADIUS servers used by the network. Multiple servers must be separated by a semicolon. Trusted CA Certificate-For Windows clients, select the Trusted Root CA of the RADIUS server certificate, even if the device certificate is signed by an intermediate CA. The Trusted Root CA must be configured in a certificate profile before it can be selected here (see Defining Certificate Profiles. Also, if the RADIUS server certificate is signed by an intermediate CA, then the public intermediate CA must be configured in a certificate profile to ensure that the intermediate CA is downloaded to the client along with the Wi-Fi TTLS profile configuration. For iOS and MAC OS X clients, if the RADIUS server certificate is signed by an intermediate CA, create a certificate profile for the intermediate CA, and then select the certificate here. The certificate profile ensures that the intermediate CA is downloaded to the client. Profile generation does not occur when Wi-Fi profile with EAP-TTLS is selected for windows 7 client. However, this issue is not seen with windows 8.1. |
|
Roles |
Select one of the following options: Policy applies to ALL roles-To apply this profile to all users. Policy applies to SELECTED roles-To apply this profile only to users who are mapped to roles in the Selected roles list. Make sure to add roles to this list from the Available roles list. Policy applies to all roles OTHER THAN those selected below-To apply this profile to all users except for those who map to the roles in the Selected roles list. Make sure to add roles to this list from the Available roles list. |
4.Click Save Changes.
Defining Certificate Profiles
Certificate profiles specify the device certificates sent to each client device during onboarding. Up to 10 profiles can be defined.
For security reasons, certificate profiles cannot be included in the XML export or import.
To define certificate profiles:
1.In the admin console, choose Users > Enterprise Onboarding > Certificate Profiles.
2.To add a profile, click New Profile or select an existing profile that you want to change, duplicate, or delete. Clicking Duplicate creates a copy of the selected profile with Copy of before the profile name.
3.Specify the following information:
|
Setting |
Description |
|
Client Types |
Select the device types the profile applies to (Android, iOS, MAC OS X, and Windows). |
|
Import and Use Global Certificate |
Select this option to use the Ivanti Connect Secure or Ivanti Policy Secure global certificate to authenticate the client device. Click Import Certificate & Key, click Browse to locate the certificate file, and then click Import. For more information about device certificates, see Using Device Certificates. |
|
Import and Use CA Certificate |
Select this option to import any CA certificate (public Root CA, private Root CA, public intermediate CA, or private intermediate CA). These CA's can be used in Wi-Fi profiles and must be downloaded to the client devices. Click Import and Use CA Certificate, click Browse to locate the certificate, and then click Import CA Certificate. |
|
Generate per User Certificate |
Select this option to use the SCEP server and a CSR template to generate a certificate for each client. Select a CSR template from the Use Certificate Template list. To create a CSR template, see Defining CSR Templates. |
|
Roles |
Select one of the following options: Policy applies to ALL roles-To apply this profile to all users. Policy applies to SELECTED roles-To apply this profile only to users who are mapped to roles in the Selected roles list. Make sure to add roles to this list from the Available roles list. Policy applies to all roles OTHER THAN those selected below-To apply this profile to all users except for those who map to the roles in the Selected roles list. Make sure to add roles to this list from the Available roles list. |
4.Click Save Changes.
Onboarding Devices
Onboarding is initiated from the browser. When a user logs in, the onboarding option is displayed if VPN, Wi-Fi or certificate profiles are defined in the user's role. MAC OS X devices and iOS devices can be onboarded without installing the Ivanti Secure Access Client. For Android devices the browser displays a link to install the Ivanti Secure Access Client. For Windows devices, the browser displays a link to install the Onboarding application.
Note the following:
•If the device has a VPN connection to Ivanti Connect Secure, the user is warned that the connection will be closed and reestablished through the onboarding process.
•If the user onboards the device again, which may be necessary if a certificate expires or the configuration is deleted, new profiles are downloaded to the device.
•The following message IDs in the User Access Log can be used to verify the onboarding process (they include the username and device ID):
•AUT31186-Indicates the status of an onboarding attempt (failed or successful)
•AUT31152-Indicates onboarding failed because the maximum device limit of 10000 has been reached
•AUT31187-Indicates the attempt to build a configuration profile failed due to an error
•AUT31188-Indicates a configuration profile was generated successfully, and lists the names of the profiles contained in the configuration profile
The following message IDs are related to device limits:
•SYS31177-Indicates the number of devices onboarded is nearing the system limit of 10000.
•SYS31178-Indicates the number of devices onboarded has exceeded the system limit of 10000 (critical error).
•SYS31193-Information message generated by a background process that attempts to delete device records when 95% of system limit (10000) is reached. It displays the number of device records deleted, the current number of onboarded devices, and the system limit.
Workflow for Onboarding Android Devices
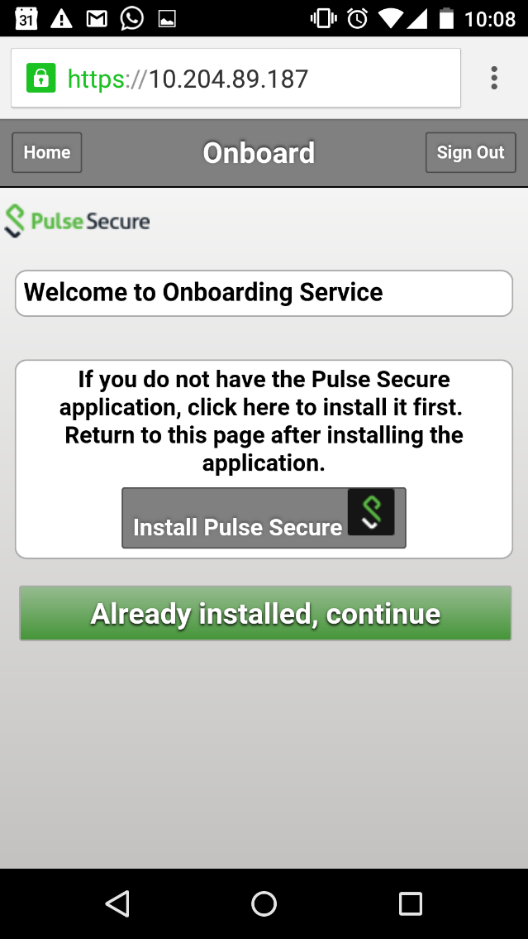
To onboard an Android device:
1.Enter the onboarding URL in the browser.
The following figure depicts the Onboarding Start Page:
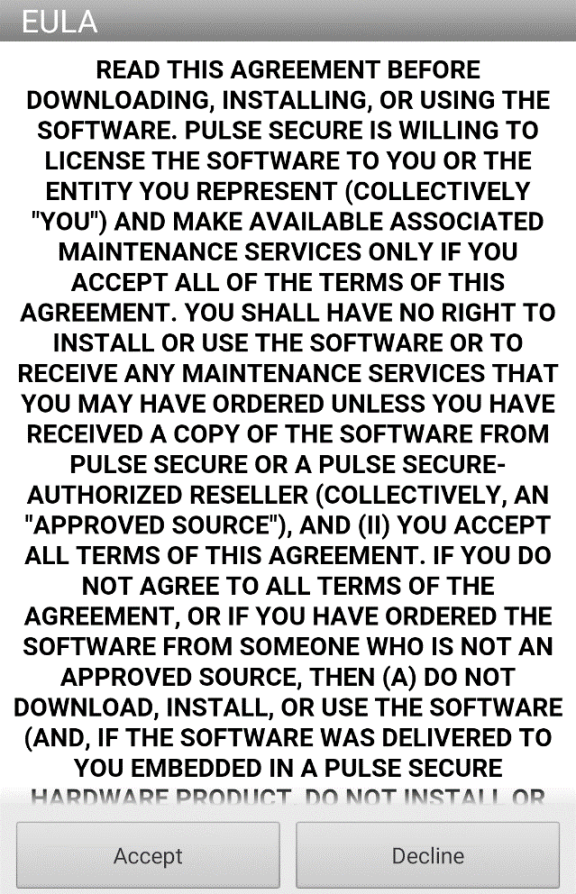
2.The first time Ivanti Secure Access Client is launched, the EULA is displayed.
The following figure depicts the End User License Agreement:
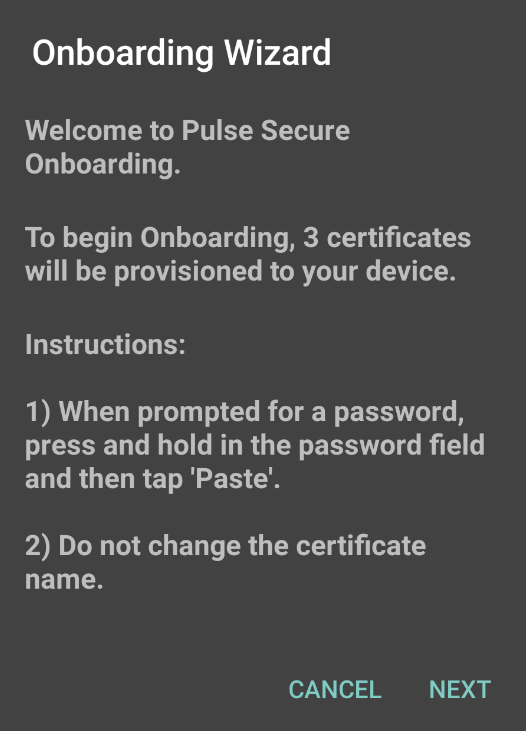
3.On the Ivanti Secure Access Client onboarding Wizard page, read the instructions carefully and tap Next.
The following figure depicts the Onboarding Wizard Start Page:
4.On the CA certificate provisioning page, tap OK.
The following figure depicts the Certificate Provisioning Page:
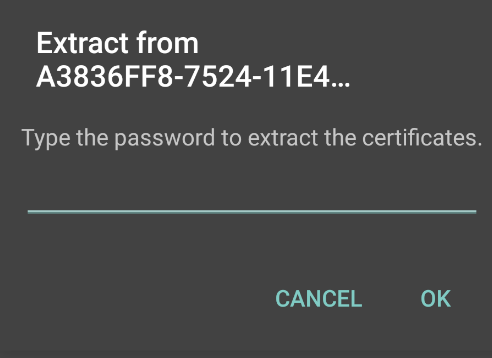
5.Paste the password from the clipboard to extract the certificates, and tap OK.
The following figure depicts the Certificate Password Page:
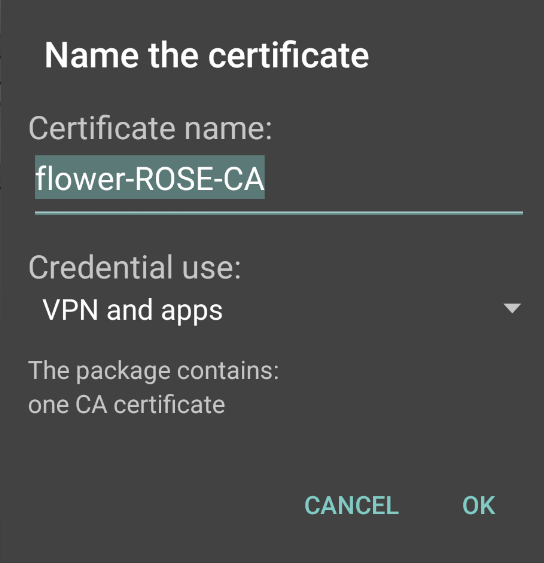
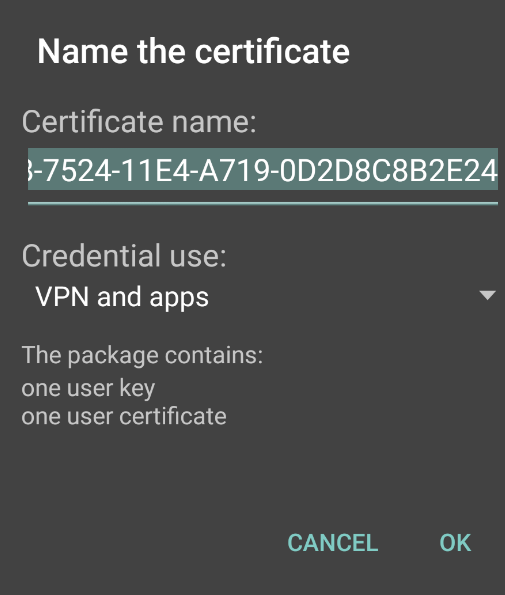
6.Tap OK to confirm the certificate name.
The following figure depicts the Certificate Name Page:
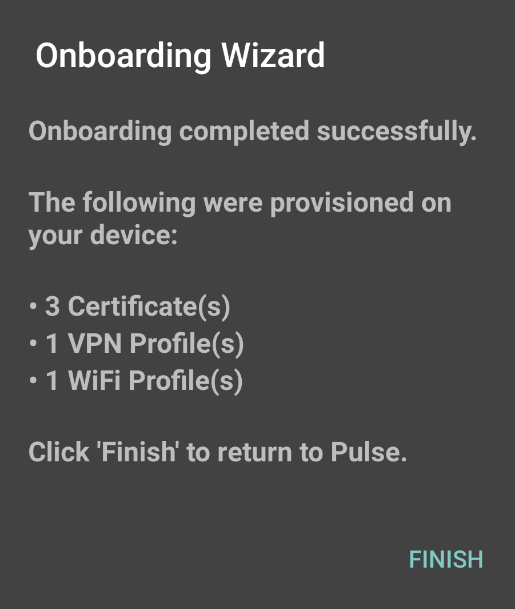
7.View the number of certificates and profiles provisioned on the client, and tap Finish.
The following figure depicts the Onboarding Wizard Summary Page:
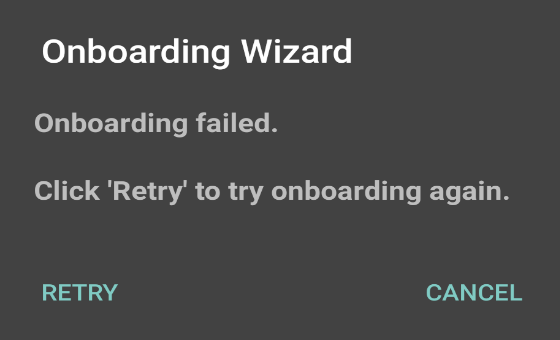
8.If onboarding fails due to an error, tap Retry. Users should contact their administrator if onboarding fails after three attempts.
The following figure depicts the Error Page:
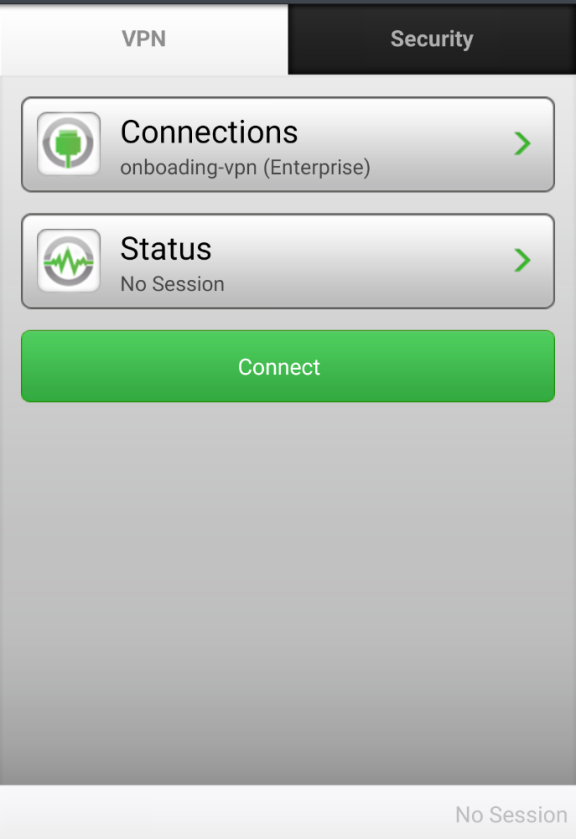
9.If onboarding is successful, tap the VPN tab to view the provisioned VPN connections.
The following figure depicts the VPN Connections Page:
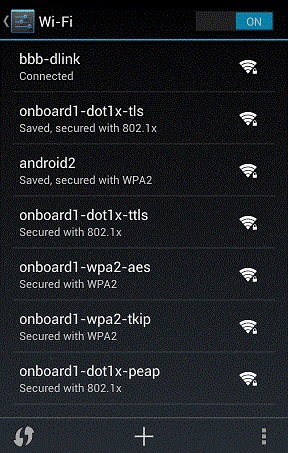
10.Tap the Wi-Fi icon to view the provisioned Wi-Fi networks. To enable a Wi-Fi connection, select the network and tap the Connect icon.
The following figure depicts the Wi-Fi Connections Page:
Managing Onboarded Devices
The Device Management page lists the following types of devices:
•Onboarded devices- Devices that have Enterprise Onboarding enabled in the user's role and have been onboarded during device registration. After a device is onboarded, it is displayed on the Device Management page until it is deleted.
The username, user roles, operating system, and registration date are shown for each device, along with the onboarded, and access status. Devices that become inactive or invalid must be deleted manually.
To view the Device Management page:
1.Select System > Status > Devices.
2.Use the controls described in Table 100 to view and manage the devices.