General Access Management
Access Management Overview
The system enables you to secure your company resources using authentication realms, user roles, and resource policies. These three levels of accessibility allow you to control access from a very broad level (controlling who may sign into the device) down to a very granular level (controlling which authenticated users may access a particular URL or file). You can specify security requirements that users must meet to sign in to the device, to gain access to features, and even to access specific URLs, files, and other server resources. The system enforces the policies, rules and restrictions, and conditions that you configure to prevent users from connecting to or downloading unauthorized resources and content.
To permit endpoints that are not directly connected to a Ivanti security device to access resources behind the firewall, you can configure a Policy Secure device to provision shared user sessions from any number of different Ivanti Connect Secure devices and Infranet Controllers. IF-MAP Federation allows users to access resources protected by any number of Ivanti firewalls (Infranet Enforcers) without requiring additional authentication.
The access management framework is available on all Ivanti Connect Secure products. The access management features, including realms, roles, resource policies, and servers, are the base of the platform on which all Ivanti Connect Secure products are built.
Policies, Rules & Restrictions, and Conditions Overview
The system enables you to secure your company resources using authentication realms, user roles, and resource policies. These three levels of accessibility allow you to control access from a very broad level (controlling who may sign into the device) down to a very granular level (controlling which authenticated users may access a particular URL or file).
Accessing Authentication Realms
Resource accessibility begins with the authentication realm. An authentication realm is a grouping of authentication resources, including:
•An authentication server - verifies that the user is who one claims to be. The system forwards credentials that a user submits on a sign-in page to an authentication server.
•An authentication policy - specifies realm security requirements that need to be met before the system submits a user's credentials to an authentication server for verification.
•A directory server - specifies an LDAP server that provides user and group information to the system that it uses to map users to one or more user roles.
•Role mapping rules - specifies the conditions a user must meet for the system to map the user to one or more user roles. These conditions are based on either user information returned by the realm's directory server or the user's username.
•You can associate one or more authentication realms with the sign-in page. When more than one realm exists for a sign-in page, a user must specify a realm before submitting one's credentials. When a user submits their credentials, the system checks the authentication policy defined for the chosen realm. The user must meet the security requirements you define for a realm's authentication policy or else the system does not forward the user's credentials to the authentication server.
•At the realm level, you can specify security requirements based on various elements such as the user's source IP address or the possession of a client-side certificate. If the user meets the requirements specified by the realm's authentication policy, the system forwards the user's credentials to the appropriate authentication server. If this server successfully authenticates the user, then the system evaluates the role mapping rules defined for the realm to determine which roles to assign to the user.
Accessing User Roles
A role is a defined entity that specifies session properties for users who are mapped to the role. These session properties include information such as session time-outs and enabled access features. A role's configuration serves as the second level of resource access control. Not only does a role specify the access mechanisms available to a user, but you can also specify restrictions with which users must comply before they are mapped to a role.
At the role level, you can specify security requirements based on elements such as the user's source IP address and possession of a client-side certificate. If the user meets the requirements specified either by a role mapping rule or a role's restrictions, then the system maps the user to the role. When a user makes a request to the backend resources available to the role, the system evaluates the corresponding access feature resource policies.
Note that you may specify security requirements for a role in two places in the role mapping rules of an authentication realm (using custom expressions) or by defining restrictions in the role definition. The system evaluates the requirements specified in both areas to make sure the user complies before it maps the user to a role.
Accessing Resource Policies
A resource policy is a set of resource names (such as URLs, hostnames, and IP address/netmask combinations) to which you grant or deny access or other resource-specific actions, such as rewriting and caching. A resource policy serves as the third level of resource access control. While a role may grant access to certain types of access features and resources (such as bookmarks and applications), whether or not a user can access a specific resource is controlled by resource policies. These policies may even specify conditions that, if met, either deny or grant user access to a server share or file. These conditions may be based on security requirements that you specify. The user must meet these security requirements or else the system does not process the user's request.
At the resource level, you can specify security requirements based elements such as the user's source IP address or possession of a client-side certificate. If the user meets the requirements specified by a resource policy's conditions, then the system either denies or grants access to the requested resource. You may enable Web access at the role level, for example, and a user mapped to the role may make a Web request. You may also configure a Web resource policy to deny requests to a particular URL or path when Host Checker finds an unacceptable file on the user's machine. In this scenario, the system checks to see if Host Checker is running and indicates that the user's machine complies with the required Host Checker policy. If the user's machine complies, meaning the unacceptable file is not found, then the system grants the user access to the requested Web resource.
Note that you can create separate resource policies, or you can create automatic resource policies (called autopolicies) during resource profile configuration (recommended).
Policies, Rules & Restrictions, and Conditions Evaluation
The following figure illustrates the access management security checks that the system performs when a user tries to access resources through the device. A detailed description of each step follows the diagram.
The following figure depicts the Security Checks Performed During a User Session:
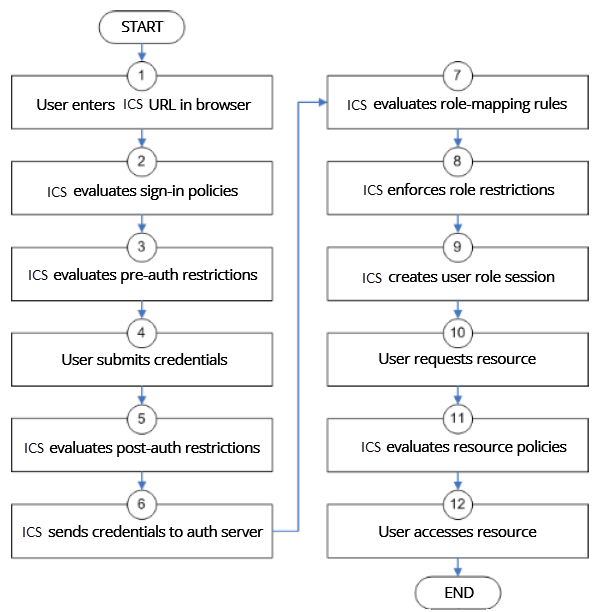
1.The user enters the URL of the device end-user console (such as http://employees.yourcompany.com/marketing) in a web browser.
2.The system evaluates its sign-in policies (starting with the administrator URLs and continuing to user URLs) until it matches the hostname entered by the user.
3.The system evaluates pre-authentication restrictions and determines if the user's system passes host checks and other requirements. If the pre-authentication checks fail, the system denies the user access. If the checks pass, the system prompts the user to enter the username and password for the realms whose preauthentication checks succeeded. (If required by the realm, the system prompts the user to enter two sets of credentials.) If more than one realm exists, the user must enter a realm or choose one from a list.
4.The system evaluates the post-authentication restrictions and determines whether the user's password conforms to specified limits and requirements. If the postauthentication checks fail, the system denies the user access. If the checks pass, the system passes the user's credentials to the realm's authentication server.
5.The system forwards the user's username and password to the authentication server, which returns success or failure. (A RADIUS returns attributes for the system to use in role mapping.) If the authentication server returns failure, the system denies the user access. If the server returns success, the system stores the user's credentials. If the realm has a separate LDAP authorization server, the system also queries the LDAP server for attribute and group information and saves the information returned by LDAP. If the realm includes a secondary authentication server, the system repeats this process with the secondary server.
6.The system evaluates the realm's role mapping rules and determines the roles for which the user is eligible. The system determines eligibility using information from the LDAP or RADIUS server or the user's username.
7.The system evaluates the restrictions of the eligible roles, enabling the user to access those roles whose restrictions the user's computer meets. Restrictions may include source IP, browser type, client-side certificate, and Host Checker.
8.The system creates a "session role," determining the user's session permissions. If you enable permissive merging, the system determines session permissions by merging all valid roles and granting the allowed resources from each valid role. If you disable merging, the system assigns the user to the first role to which he is mapped.
9.When the user requests a resource, the system checks whether the corresponding access feature is enabled for the session user role. If not, the system denies the user access. If the access feature is enabled, the evaluates resource policies.
10.The system evaluates resource profiles and policies related to the user's request, sequentially processing each until it finds the profile or policy whose resource list and designated roles match the user's request. The system denies user access to the resource if specified by the profile or policy. Otherwise, the system intermediates the user request if the profile or policy enables access.
11.The system intermediates the user request, forwarding the user's request and credentials (if necessary) to the appropriate server. Then, the system forwards the server's response to the user.
12.The user accesses the requested resource or application server. The user session ends when the user signs out or the session times out due to time limits or inactivity. The system may also force the user out if the session if you enable dynamic policy evaluation and the user fails a policy.
13.The user can perform realm, role mappings and create rules based on the Enhanced Key Usage (EKU) attribute in the certificates. This attribute can be parsed in certificates to create realm restrictions, role restrictions and role mapping based on rules that contained this attribute. Also, this is supported for custom expressions. The Enhanced Key Usage has 2 parts - The EKU Text and the EKU OID. The EKU text has information about the enhanced key usage - for example - "smart card logon", "wireless", "TLS Web Server Authentication", "E-mail Protection", "TLS Web Client Authentication" and so on. The OID is an identifier for this attribute and is a dotted number representation. The restrictions and role mappings can be done on either the text or the OID.
If you enable dynamic policy evaluation, the system performs additional checks beyond the ones mentioned here.
Dynamic Policy Evaluation
Dynamic policy evaluation allows you to automatically or manually refresh the assigned roles of users by evaluating a realm's authentication policy, role mappings, role restrictions, and resource policies. When the system performs a dynamic evaluation, it checks whether the client's status has changed. (For instance, the client's Host Checker status may have changed. Or, if the user is roaming, the computer's IP address may have changed.) If the status has changed, the system enables or denies the user access to the dependent realms, roles, or resource policies accordingly.
The system does not check for changes in user attributes from a RADIUS, or LDAP server when performing dynamic policy evaluation. Instead, the system re-evaluates rules and policies based on the original user attributes that it obtained when the user signed into the device.
Understanding Dynamic Policy Evaluation
Please note the following about Dynamic Policy Evaluation:
•Clients that use Network Communications Protocol (NCP) do not honor policy changes. This includes PSAM and WTS/CTS.
•PSAM establishes a new NCP tunnel when the protected application opens a new connection, so PSAM establishes new NCP connections frequently. This means PSAM gets the new policy frequently.
•WTS has a persistent NCP tunnel so it does not get policy changes until the user disconnects and then reconnects.
Because the system evaluates Web and Files resource policies whenever the user makes a request for a resource, dynamic policy evaluation is unnecessary for Web and Files.
If the system determines after a dynamic policy evaluation that a user no longer meets the security requirements of a policy or role, the system terminates the connection immediately with the user. The user may see the closing of a TCP or application connection, or the termination of a user session for VPN Tunneling, Secure Application Manager, Terminal. The user must take the necessary steps to meet the security requirements of the policy or role, and then sign into the system again.
The system logs information about policy evaluation and changes in roles or access in the Event log.
Understanding Standard Policy Evaluation
If you do not use dynamic policy evaluation, the system evaluates policies and roles only when the following events occur:
•When the user first tries to access the system sign-in page, the system evaluates the Host Checker policies (if any) for a realm.
•Immediately after the user's initial authentication, the system evaluates the user's realm restrictions in the authentication policy, role mapping rules, and role restrictions.
•When the user makes a request for a resource, the system evaluates resource access policies to determine if the associated role is allowed to access the resource.
•When the Host Checker status of the user's machine changes, the system evaluates the Host Checker policies (if any) for the role.
If you do not use dynamic policy evaluation and you make changes to an authentication policy, role mapping rules, role restrictions, or resource policies, the system enforces those changes only when the events described above occur.
If you use dynamic policy evaluation, the system enforces changes when the events described above occur, and it also enforces changes at the times you specify.
Enabling Dynamic Policy Evaluation
You can use dynamic policy evaluation in the following ways:
•Evaluate all signed-in users in a realm - You can automatically or manually refresh the roles of all currently signed-in users of a realm by using the General tab of the Administrators > Admin Realms > Select Realm or Users > User Realms > Select Realm page. You can trigger the system to perform a dynamic policy evaluation at the realm level based on:
•An automatic timer - You can specify a refresh interval that determines how often the system performs an automatic policy evaluation of all currently signed-in realm users, such as every 30 minutes. When using the refresh interval, you can also fine tune the system performance by specifying whether or not you want to refresh roles and resource policies as well as the authentication policy, role mapping rules, and role restrictions.
•On-demand - At any time, you can manually evaluate the authentication policy, role mapping rules, role restrictions, and resource policies of all currently signed-in realm users. This technique is especially useful if you make changes to an authentication policy, role mapping rules, role restrictions, or resource policies and you want to immediately refresh the roles of a realm's users.
•Evaluate all signed-in users in all realms - At any time, you can manually refresh the roles of all currently signed-in users in all realms by using settings in the System > Status >Active Users page.
•Evaluate individual users - You can automatically refresh the roles of individual users by enabling dynamic policy evaluation for Host Checker on the Authentication > Endpoint Security > Host Checker page. Host Checker can trigger the system to evaluate resource policies whenever a user's Host Checker status changes. (If you do not enable dynamic policy evaluation for Host Checker, the system does not evaluate resource policies, but it does evaluate the authentication policy, role mapping rules, and role restrictions whenever a user's Host Checker status changes.)
Specifying Source IP Access Restrictions
This topic describes options to enforce source IP restrictions for access to the corporate network or intranet resources.
About Source IP Restrictions
You can enforce access rules based on the source IP address of the request. You can configure rules related to sign-in, role-mapping, and resource access.
At the realm level, you can add source IP rules to the realms associated with sign-in pages. The user must sign in from a host with an IP address that is allowed by the source IP requirements for the authentication realm. If the source IP policy does not allow the host to access the realm, the system does not forward the user's credentials to the authentication server, and the user is denied access. You can set up multiple rules. For example, you can deny access to all users on a wireless network (10.64.4.100), and allow access to all other network users (0.0.0.0).
At the user role level, you can add source IP rules to the criteria that determine user role membership. If the source IP rule disqualifies a user from a role, subsequent role mapping rules are consulted.
In resource policies, you can add allow/deny rules based on source IP.
Specifying Source IP Restrictions at the Realm Level
To specify source IP restrictions:
1.Navigate to the administrator or user realm you want to configure:
•Administrators > Admin Realms > Realm
•Users > User Realms > Realm
2.Select Authentication Policy > Source IP to display the Source IP policy configuration page.
3.Choose one of the following options:
•Allow users to sign in from any IP address - Essentially, this option turns off source IP restrictions.
•Allow or deny users from the following IP addresses - Specifies source IP restrictions. If you select this option, use the policy table controls to create source IP rules.
•Allow or deny users from the following locations - Specifies source IP restrictions based on the geographical location of the user Use the table controls to create location restriction rules. Ensure UEBA package is uploaded on the ICS for this feature to work.
IP address and Location restrictions cannot be applied simultaneously.
4.Add a rule to the table:
1.Use the text boxes to specify source IP address match criteria:
•For IPv4 clients, enter IPv4 address and netmask pairs. IPv4 Address formats as per RFC-1166 are allowed.
•For IPv6 clients, enter IPv6 address and prefix length pairs.
2.Use the Allow and Deny option buttons to specify the action when a rule matches.
3.Click Add to add the rule to the table.
4.Use the selection box and arrow buttons to order the list. Move the highest priority restrictions to the top of the list. For example, to deny access to all users on a wireless network (10.64.4.100) and allow access to all other network users (0.0.0.0), move the wireless network address (10.64.4.100) to the top of the list and move the (0.0.0.0) network below the wireless network.
5.For administrator realms, select the ports where the administrator can log in (internal, external, and management). On virtual appliances that use traffic segregation, administrators can log in on the management port on the Default Network or Administrative Network (see Using the Traffic Segregation Feature. If necessary, click External Port or Management Port to enable the port.
6.Save the configuration.
Specifying Source IP Restrictions at the Role Level
To specify source IP restrictions:
1.Navigate to the administrator or user role you want to configure:
•Administrators > Admin Roles > Role
•Users > User Roles > Role
2.Select General > Restrictions > Source IP to display the Source IP policy configuration page.
3.Choose one of the following options:
•Allow users to sign in from any IP address - Essentially, this option turns off source IP restrictions.
•Allow or deny users from the following IP addresses - Specifies source IP restrictions. If you select this option, use the policy table controls to create source IP rules.
4.Add a rule to the table:
5.Use the text boxes to specify source IP address match criteria:
•For IPv4 clients, enter IPv4 address and netmask pairs. IPv4 Address formats as per RFC-1166 are allowed
•For IPv6 clients, enter IPv6 address and prefix length pairs.
6.Use the Allow and Deny option buttons to specify the action when a rule matches.
7.Click Add to add the rule to the table.
8.Use the selection box and arrow buttons to order the list. Move the highest priority restrictions to the top of the list. For example, to deny access to all users on a wireless network (10.64.4.100) and allow access to all other network users (0.0.0.0), move the wireless network address (10.64.4.100) to the top of the list and move the (0.0.0.0) network below the wireless network.
9.Save the configuration.
Specifying Source IP Restrictions in Resource Policies
A third way to use source IP restrictions is by creating custom rules in resource policies. The action for custom rules is either allow or deny. The match criteria include resources and conditions. One of the conditions you can set is source IP, so you can enforce source IP restrictions through resource policies. For example:
1.Navigate to Users > Resource Policies.
2.Select a policy. Click Web Access Policies, for example, to display its policies list.
3.Click the Initial Policy for Local Resources policy to edit it.
4.Click the Detailed Rules tab.
5.Under Conditions, expand the Prebuilt Conditions list, expand the SourceIPStr selections, select one of the example expressions, such as SourceIPStr = "192.168.10.0/24" or SourceIPStr = "2001:DB8::15", and click Insert Expression to add the string to the Conditions box.
6.Modify the IP address. In other words, replace 192.168.10.0/24 with an IPv4 address / netmask pair; replace 2001:DB8::15 with an IPv6 address. IPv4 Address formats as per RFC-1166 are allowed.
7.Specify the other match condition (resource) and specify the action (allow or deny).
8.Save the configuration.
Specifying Browser Access Restrictions
Use a browser restriction to control from which Web browsers users can access a system sign-in page or be mapped to a role. If a user tries to sign in to the device using an unsupported browser, the sign-in attempt fails. This feature also enables you to ensure that users sign in to the device from browsers that are compatible with corporate applications or are approved by corporate security policies.
You can restrict system and resource access by browser-type:
•When administrators or users try to sign in to Ivanti Connect Secure - The user must sign in from a browser whose user-agent string meets the specified user-agent string pattern requirements for the selected authentication realm. If the realm "allows" the browser's user-agent string, then the system submits the user's credentials to the authentication server. If the realm "denies" the browser's user-agent string, then the system does not submit the user's credentials to the authentication server.
•When administrators or users are mapped to a role - The authenticated user must be signed in from a browser whose user-agent string meets the specified user-agent string pattern requirements for each role to which the system may map the user. If the user-agent string does not meet the "allowed" or "denied" requirements for a role, then the system does not map the user to that role.
•When users request a resource - The authenticated, authorized user must make a resource request from a browser whose user-agent string meets the specified "allowed" or "denied" requirements for the resource policy corresponding to the user's request. If the user-agent string does not meet the "allowed" or "denied" requirements for a resource, then the system does not allow the user to access the resource.
The browser restrictions feature is not intended as a strict access control since browser user-agent strings can be changed by a technical user. It serves as an advisory access control for normal usage scenarios.
To specify browser restrictions:
1.Select the level at which you want to implement browser restrictions:
•Realm level - Navigate to:
•Administrators > Admin Realms > Select Realm > Authentication Policy > Browser
•Users > User Realms > Select Realm > Authentication Policy > Browser
•Role level - Navigate to:
•Administrators > Admin Realms > Select Realm > Role Mapping > Select|Create Rule based on Custom Expressions
•Administrators > Admin Roles > Select Role > General > Restrictions > Browser
•Users > User Realms > Select Realm > Role Mapping > Select|Create Rule based on Custom Expression
•Users > User Roles > Select Role > General > Restrictions > Browser
2.Choose one of the following options:
•Allow all users matching any user-agent string sent by the browser - Allows users to access the system or resources using any of the supported Web browsers.
•Only allow users matching the following User - agent policy-Allows you to define browser access control rules. To create a rule:
- For the User-agent string pattern, enter a string in the format
*browser_string*
where start (*) is an optional character used to match any character and browser_string is a case-sensitive pattern that must match a substring in the user-agent header sent by the browser. Note that you cannot include escape characters (\) in browser restrictions.
For example, the following is a browser sent user-agent header:Mozilla/5.0 (Windows NT 6.1; WOW64) AppleWebKit/537.22 (KHTML, like Gecko)where:•Mozilla/5.0 indicates compatibility with the Mozilla rendering engine.
•(Windows NT 6.1; WOW64) are the details of the system in which the browser is running.
•AppleWebKit/537.22 is the platform the browser users.
•(KHTML, like Gecko) is the browser platform details.
Using the above example, enter *Windows NT* as a string pattern for specifying the Windows NT system. For more details on user-agent strings, see your specific browser's documentation. - Select either:
- Click Add.
•Allow to allow users to use a browser that has a user-agent header containing the <browser_string> substring.
•Deny to prevent users from using a browser that has a user-agent header containing the <browser_string> substring.
3.Click Save Changes to save your settings.
Rules are applied in order, so the first matched rule applies.
Literal characters in rules are case sensitive, and spaces are allowed as literal characters.
For example, the string *Netscape* matches any user-agent string that contains the substring Netscape.
The following rule set grants resource access only when users are signed in using Internet Explorer 5.5x or Internet Explorer 6.x. This example takes into account some major non-IE browsers that send the 'MSIE' substring in their user-agent headers:
*Opera*Deny
*AOL*Deny
*MSIE 5.5*Allow
*MSIE 6.*Allow
Deny
Specifying Certificate Access Restrictions
When you install a client-side certificate on the device through the System > Configuration > Certificates > Trusted Client CAs page of the admin console, you can restrict system and resource access by requiring client-side certificates:
•When administrators or users try to sign in to Ivanti Connect Secure - The user must sign in from a machine that possesses the specified client-side certificate (from the proper certificate authority (CA) and possessing any optionally specified field/value pair requirements). If the user's machine does not possess the certificate information required by the realm, the user can access the sign-in page, but once the system determines that the user's browser does not possess the certificate, the system does not submit the user's credentials to the authentication server and the user cannot access features on the device.
To implement certificate restrictions at the realm level, navigate to:
•Administrators > Admin Realms > SelectRealm > Authentication Policy > Certificate
•Users > User Realms > SelectRealm > Authentication Policy > Certificate
•When administrators or users are mapped to a role - The authenticated user must be signed in from a machine that meets the specified client-side certificate requirements (proper certificate authority (CA) and optionally specified field/value pair requirements) for each role to which the system may map the user. If the user's machine does not possess the certificate information required by a role, then the system does not map the user to that role.
•Administrators > Admin Roles > SelectRole > General > Restrictions > Certificate
•Users > User Realms > Select Realm Role Mapping > Select|CreateRule > CustomExpression
•Users > User Roles > SelectRole > General > Restrictions > Certificate
•When users request a resource - The authenticated, authorized user must make a resource request from a machine that meets the specified client-side certificate requirements (proper certificate authority (CA) and optionally specified field/value pair requirements) for the resource policy corresponding to the user's request. If the user's machine does not possess the certificate information required by a resource, then the system does not allow the user to access the resource.
•Users > Resource Policies> SelectResource > SelectPolicy > Detailed RulesSelect|CreateRule > ConditionField
The user can perform realm, role mappings and create rules based on the Enhanced Key Usage (EKU) attribute in the certificates. This attribute can be parsed in certificates to create realm restrictions, role restrictions and role mapping based on rules that contained this attribute. Also, this is supported for custom expressions. The Enhanced Key Usage has two parts - the EKU Text and the EKU OID. The EKU text has information about the enhanced key usage - for example - "smart card logon", "wireless", "TLS Web Server Authentication", "E-mail Protection", "TLS Web Client Authentication" and so on. The OID is an identifier for this attribute and is a dotted number representation. The restrictions and role mappings can be done on either the text or the OID.
Specifying Password Access Restrictions
You can restrict system and resource access by password-length when administrators or users try to sign in to the device. The user must enter a password whose length meets the minimum password-length requirement specified for the realm. Note that local user and administrator records are stored in the system authentication server. This server requires that passwords are a minimum length of 6 characters by default, regardless of the value you specify for the realm's authentication policy.
To specify password restrictions:
1.Select an administrator or user realm for which you want to implement password restrictions.
Navigate to:
•Administrators > Admin Realms > Select Realm > Authentication Policy > Password
•Users > User Realms > Select Realm > Authentication Policy > Password
2.Choose one of the following options:
•Allow all users (passwords of any length) - Does not apply password length restrictions to users signing in to the device.
•Only allow users that have passwords of a minimum length - Requires the user to enter a password with a minimum length of the number specified.
This option is not applicable for IKEv2 users and therefore is not enforced for IKEv2 users.
3.Select Enable Password Management if you want to enable password management. You must also configure password management on the authentication server configuration page (local authentication server) or through an LDAP server.
4.If you have enabled a secondary authentication server, specify password length restrictions using the restrictions above as a guideline.
5.Click Save Changes to save your settings.
By default, the system requires that user passwords entered on the sign-in page be a minimum of four characters. The authentication server used to validate a user's credentials may require a different minimum length. The local authentication database, for example, requires user passwords to be a minimum length of six characters.
Specifying Session Limits
In addition to the access management options you may specify a limit for concurrent users. A user who enters a URL to one of this realm's sign-in pages must meet any access management and concurrent user requirements specified for the authentication policy before the system presents the sign-in page to the user.
Setting the minimum or maximum setting limit amount allows you to configure realms that are more likely to be available when the device is nearing the amount of licensed users.
Valid numbers for the minimum amount of sessions are between 0 and the license limit. A default of 0 means there is no limits. All of the realms minimum limits can add up to the license limit but cannot exceed it. You cannot modify an existing realm's minimum limit or add a new realm's minimum limit that exceeds the license limit. The maximum limit can be equal to or greater than the minimum limit for a particular realm. Value 0 for maximum limit means no user can log in to the realm.
You can also limit the number of concurrent users per session; a user can have multiple sessions. For example, if a user logs in from two machines in the same realm, an additional session is created. Each session counts towards the user license.
Users who enter through a realm with this feature enabled must have no more than the specified number of sessions open. If the user attempts to open a new session that exceeds the limit, a message appears that denies access or allows the user to continue or cancel.
When considering concurrent users per session, make note of the following:
•All session-related SSO attributes are saved in their respective session in the cache. These attributes are not shared with other sessions.
•All form-related SSO attributes are saved in their respective session in the cache. These attributes are not shared with other sessions.
•All Form-SSO related attributes are saved in their respective session in the cache. The Form SSO state will not be shared with other sessions. The admin configured Form SSO values will be shared across all sessions.
•End-user's home page changes are reflected across all sessions. Any changes to the following will appear in the other concurrent sessions:
•Bookmarks
•Panel sorting (Preferences > User Home)
•E-mail information, Daylight Saving Time (Preferences > General)
•Autostart Client Application Session (Preferences > Applications)
•Cached E-mail Info settings (Preferences > Advanced)
•Delete Cookies (Preferences > Advanced) now has options to let you remove cookies from the current session only or to remove cookies from all sessions.
•Delete Password (Preferences > Advanced) now has options to let you remove passwords from the current session only or to remove passwords stored by all sessions.
• Host Checker information is saved in each session. They are not shared across concurrent sessions.
•Log messages will contain session identifiers (concatenated at the end of the log message) to differentiate which session the message refers to.
•Each user session maintains its own VPN Tunneling information. This information is not shared between concurrent sessions. However, administrator network connect sessions are shared between concurrent sessions.
•If you log in to the device as administrator, the first session is edit mode. If you log in as an administrator in a concurrent session, that administrator is logged in as read-only mode.
•VPN Tunneling bandwidth allocation is enforced on a per-session basis. For example, if a user is allocated a 1M bandwidth then each user session has a 1M bandwidth. The total bandwidth for this user is the number of sessions of this user times 1M.
•Users can launch terminal services, JSAM or PSAM from any session. Session information is saved per each session; they are not shared across concurrent sessions. Multiple instances of terminal services, JSAM and PSAM cannot be started on the same client.
If you enable the multiple sessions per user feature, IKEv2 clients and VPN Tunneling clients may not be assigned the same IP address. For example, an IKEv2/VPN Tunneling client may be assigned a different VPN Tunneling VIP address each time they connect to the device when the system is obtaining the DHCP addresses from a DHCP server.
Use limits restrictions to set minimum and maximum concurrent users on the realm.
To specify the number of concurrent users limit restrictions:
1.Select an administrator or user realm for which you want to implement limits restrictions.
•Administrators > Admin Realms >SelectRealm> Authentication Policy > Limits
•Users > User Realms > SelectRealm > Authentication Policy > Limits
2.To limit the number of concurrent users on the realm, select Limit the number of concurrent users and then specify limit values for these options:
•Guaranteed minimum - You can specify any number of users between zero (0) and the maximum number of concurrent users defined for the realm, or you can set the number up to the maximum allowed by your license if there is no realm maximum.
•Maximum (optional) - You can specify any number of concurrent users from the minimum number you specified up to the maximum number of licensed users. If you enter a zero (0) into the Maximum field, no users are allowed to log into the realm.
3.Click Save Changes.
To specify the number of concurrent users per session limit restriction:
1.Select Authentication > Signing In > Sign-in Policies.
2.Select the Restrict access to administrators only to immediately terminate all user sessions from all nodes across the cluster. Once enabled, only administrator URLs are accessible across the cluster. Note that Administrators can attempt to sign in even if all rules on this page are disabled.
3.Select the Enable multiple user sessions check box to allow users to have multiple concurrent sessions, and specify whether the user can log in when the maximum number of sessions is reached:
•Deny any more session from the user-Displays a message saying the login is denied because it would exceed the maximum number of concurrent sessions.
•Allow the user to login-Allows the user to log in. If the Display open user session[s] warning notification option is enabled, the user can select which session to close; otherwise the session that has been idle the longest is closed automatically.
4.Select the Display open user session[s] warning notification check box to allow users who have met the maximum session count to close one of their existing sessions before continuing with the current log in. If this option is disabled, the system terminates the session that has been idle the longest. This option applies only if Enable multiple user sessions is enabled along with Allow the user to log in. Specify when the user is warned about concurrent sessions:
•Select Always to notify users each time they log in when they already have another active session
•Select If the maximum session has been exceeded to display the warning message only when the user's maximum session count has been met.
5.To specify the maximum number of concurrent sessions:
1.Select Users > User Realms > RealmName > Authentication Policy > Limits.
2.Specify the number of sessions permitted for users in the Maximum number of sessions per user text box.
3.Click Save Changes.
If you do not select the Enable multiple user sessions check box, only one session per user is allowed regardless of the value you specify in the Maximum number of sessions per user text box.
IF-MAP Federation Overview
You can configure a Ivanti Policy Secure device to store user session information for other Ivanti Policy Secure and Ivanti Connect Secure devices. Federation allows users to authenticate to a single Ivanti Connect Secure or Ivanti Policy Secure, and then access resources that are protected by any number of Ivanti firewall devices known as Infranet Enforcers that are controlled by different Infranet Controllers. Federation enhances network performance. If a user is required to log in to multiple Ivanti Connect Secure or Ivanti Policy Secure devices during the course of a day to access different resources, each device must perform authentication and Host-Checking, often with periodic Host Checker updates throughout the day. The overhead can lead to decreased performance not only on the devices, but also on the network and the endpoint. Imported IF-MAP sessions eliminate redundant logins and Host Checks.
Federation on the device uses the standard IF-MAP (Interface for Metadata Access Point) protocol to share session information and other data between connected devices over distributed networks. IF-MAP is a protocol defined by the Trusted Network Connect Working Group (TNC-WG) as a standard interface between different network elements and devices. Federation is accomplished using an IF-MAP server and IF-MAP clients.
It is important as an administrator to understand the fundamental underlying communication method for data transmission in a Federation network over IF-MAP. Policies that you configure on the device permit this communication.
In a federated network, the IF-MAP server functions as the repository, or data store for IF-MAP clients to use for publishing information regarding activity on the network. For example, IF-MAP clients can publish information about sessions on the network, and Juniper Networks IDP devices can communicate information about potential threats to the IF-MAP client for publishing. IF-MAP clients can search for information about sessions or threats, and an IF-MAP client can establish a subscription so the IF-MAP server notifies the client when other clients publish new or changed information. In addition, IF-MAP clients can purge data that is no longer valid. All transactions are initiated by the IF-MAP client.
IF-MAP Federation is available on all Ivanti Connect Secure devices with version 6.4 or greater. No licensing is required.
1.The endpoint authenticates through the IF-MAP client (Ivanti Connect Secure). The IF-MAP client publishes session information to the IF-MAP server.
2.The endpoint attempts to access protected resources that are behind the Infranet Enforcer.
3.The Infranet Enforcer notifies the Infranet Controller (also an IF-MAP client). The IF-MAP client searches for session information on the IF-MAP server.
4.The Infranet Controller subscribes to session information about the endpoint's IP address.
5.The Infranet Controller notifies the Infranet Enforcer that session information exists for the IP address attempting to access resources, and the Infranet Enforcer provisions an auth table entry.
6.Access is granted to the protected resources. If any session information about the user changes, the authenticating IF-MAP client publishes the new information. Having subscribed to the user's session information, the Infranet Controller will be aware of any changes and provision access in accordance with the changed session information.
For details about configuring the system to work in an IF-MAP Federated network with the Infranet Controller, see IF-MAP Feature Guide.
IF-MAP Federation Workflow
Configuring an IF-MAP Federated network requires coordination between administrators of the different devices that will be in the federated network.
This document describes IF-MAP deployments that include only Ivanti devices: Infranet Controllers, Ivanti Connect Secure devices, Infranet Enforcer firewalls, and Juniper Networks IDP. For implementations that incorporate third-party components, contact Ivanti Technical Support.
The mix of devices in the federated network is important when planning the network. Will your network consist of only Infranet Controllers, or will you incorporate Ivanti Connect Secure? Do the devices in your network have similar role mapping policies, or is each device different?
Determine and understand your goals for the federated network. The big picture guides your implementation as it becomes more complex. Ivanti recommends that you begin slowly. For example, start with a single role on each device, and then build the network incrementally.
In the simplest model, you can use the default policies. Using this model, you can quickly establish a federated network, and session information will automatically be shared among distributed devices in the network. This simple model should be adequate for most implementations in which the devices in the federated network have identical or very similar role mapping policies.
If your configuration requires more complex policies, you will need to perform a number of tasks to achieve your intended results. The following guidelines will help you plan your workflow:
•Ensure that communications between IF-MAP servers and IF-MAP clients is established
•Determine the resources that will be shared among the different devices
•Define who can access specific resources
•Distribute resources and users into roles
•Establish a naming convention that is shared and implemented between all administrators and devices
•Create Session-Export and Session-Import policies that reflect the role designations that you have configured on the devices
IF-MAP Federation Details
You can configure the system as an IF-MAP client for an IF-MAP server. You configure an Infranet Controller as an IF-MAP server. Any endpoint sessions with an IP address created on an IF-MAP server are automatically published to that IF-MAP server.
You can create source IP policies for endpoints that authenticate to the device to permit access to resources behind Infranet Enforcers (ScreenOS Enforcers and Ivanti Policy Secure s). Session-Export policies that you configure on the IF-MAP clients allow the clients to publish endpoint user data to the IF-MAP server. Devices that are IF-MAP clients can subscribe to the information on an IF-MAP server.
When a user accesses the device that is configured as an IF-MAP client, the client publishes basic session information, including the IP address, username and roles, to the IF-MAP server. The server stores the information as metadata. Other IF-MAP clients in the network can poll the server for metadata when session information is needed as a result of an endpoint attempting to access protected resources behind an Infranet Enforcer.
When an authenticated user from the device that is configured as an IF-MAP client attempts to access resources that are protected by an Infranet Enforcer for an Infranet Controller that is also configured as an IF-MAP client, the Infranet Controller automatically provisions an auth table entry for the user on the Infranet Enforcer to allow access without requiring the user to authenticate to the Infranet Controller.
The Infranet Enforcer as an IF-MAP client subscribes to session information and other data for the endpoint based on the originating IP address. The authenticating device (the original IF-MAP client) publishes any changes in session parameters to the IF-MAP server. Since the Infranet Controller that is protecting the accessed resources subscribes to the metadata on the Federation server, session information is always current.
The Infranet Enforcer allows or denies traffic based on the resource access policies that are configured on the Infranet Controller to which it is connected.
You configure server settings on the Infranet Controller that will be the IF-MAP server. You configure client settings on each of the Ivanti Connect Secure and Infranet Controller devices and that will be connected in the network.
In addition to the server and client settings, you configure Session-Export policies on Ivanti Connect Secure and Infranet Controllers that are IF-MAP clients You configure and Session-Import policies on Infranet Controller IF-MAP clients that are connected to Infranet Enforcers.
IF-MAP allows servers and clients to publish, search, poll, and subscribe to data within a network of IF-MAP servers and clients. All of the data from Ivanti Connect Secure in the network that is published to the IF-MAP server uses the IF-MAP protocol. Session-Export and Session-Import polices that you configure on Ivanti Connect Secure and Infranet Controller allow the devices to utilize the IF-MAP protocol to share session information.
Session-Export policies specify how to translate an endpoint's session on Ivanti Connect Secure or Ivanti Connect Secure into IF-MAP data. To translate session information into IF-MAP data, you enter detailed user information. Ivanti Connect Secure evaluates the Export policies to determine a session's IF-MAP roles, capabilities, identities, and device attributes and publishes the data to the IF-MAP server.
The Session-Import policies that you configure on Ivanti Policy Secure specify how the device should derive a username and a set of roles based on IF-MAP data that it receives from the IF-MAP server from other Ivanti Connect Secure devices. Import policies are similar to Role Mapping policies on a realm. You must be precise when configuring Export and Import policies, otherwise roles cannot be assigned properly.
The following figure depicts a scenario in which there are two Infranet Controllers configured as IF-MAP clients, one Ivanti Connect Secure device configured as an IF-MAP client, and another Infranet Controller configured as the IF-MAP server. Endpoints that authenticate through any of the IF-MAP clients can access protected resources behind the enforcement point attached to Infranet Controller 1.
The following figure depicts the IF-MAP Federated Network Topology:
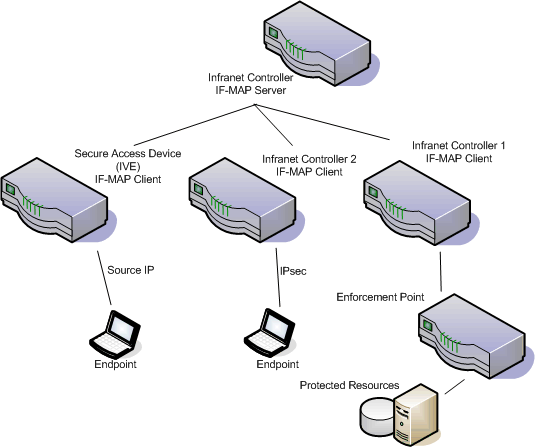
The interaction between the endpoints, the clients and the server are as follows:
The interaction between the endpoints, the clients and the server are as follows:
•An endpoint authenticates through Ivanti Connect Secure depicted in the figure and starts VPN Tunneling or Ivanti Secure Access Client.
•Ivanti Connect Secure provisions an IP address for the endpoint to use on the internal network. Once the endpoint's IP address on the internal network is known, Ivanti Connect Secure derives IF-MAP data from the endpoint's session.
•The Connect Secure IF-MAP client publishes the session information as IF-MAP data to the IF-MAP server using Session-Export policies.
•When the user attempts to access resources behind the enforcement point, access is blocked since the Infranet Enforcer has no information about the endpoint. The Infranet Enforcer sends out a dynamic discovery message that includes the endpoint's source IP address.
•Infranet Controller 1 uses the IP address to retrieve session data from the IF-MAP server.
•The Infranet Controller uses Session-Import policies to retrieve session data from the IF-MAP server.
The endpoint authenticating to Ivanti Connect Secure must be running VPN Tunneling.
Imported user sessions do not count against the maximum user count for either platform, as each user is counted on the Ivanti Connect Secure device from which they authenticated.
For details on configuring an IF-MAP Federation network, see IF-MAP Feature Guide.
IF-MAP Logging
IF-MAP related events are logged on both the IF-MAP server and the IF-MAP client.
Task Summary: Configuring IF-MAP Federation
The tasks listed in this topic are performed by a Ivanti Policy Secure administrator, in conjunction with an administrator for Ivanti Connect Secure. On Ivanti Connect Secure, you configure Session-Export policies and you configure IF-MAP client settings. For details on configuring an IF-MAP Federated network, see the IF-MAP Feature Guide.
To use IF-MAP Federation, perform the following tasks on Ivanti Policy Secure and Ivanti Connect Secure:
1.Enable dynamic auth table provisioning on any connected Infranet Enforcers that you want to use with Federation.
2.On Ivanti Policy Secure, configure IF-MAP server settings to permit the server to communicate with IF-MAP clients.
3.Configure IF-MAP client settings to permit clients to communicate with the IF-MAP server.
4.On Ivanti Policy Secure and Ivanti Connect Secure, coordinate Session-Import policies, Session-Export policies, roles, and resource access policies between all of the clients in the Federated network.
5.Configure Session-Export policies on Connect Secure to define how sessions are translated into IF-MAP data.
6.Configure Session-Import policies on Connect Secure that correspond with Export policies to translate IF-MAP data into roles.
7.On Policy Secure, configure Source IP policies for Connect Secure users who will use Source IP to access the network.
Configuring IF-MAP Server Settings
You must add all IF-MAP clients to the IF-MAP server. To add clients, you must specify the IP address and the security mechanism and credentials for the client.
For details on configuring an IF-MAP server, see IF-MAP Feature Guide.
Configuring the IF-MAP Federation Client
You must identify the IF-MAP server to each IF-MAP client. To add the server, you specify the IF-MAP URL of the server and how to authenticate to the server. Match the URL and security settings to equal those on the IF-MAP server(s) to which the IF-MAP client will connect.
To configure IF-MAP client settings on the devices that will be IF-MAP clients:
1.From the admin console select System > IF-MAP Federation > Overview.
2.Select the Enable IF-MAP Client check box.
3.Type the Server URL for IF-MAP Web service on the IF-MAP server. Append the server URL with /dana-ws/soap/dsifmap for all Ivanti IF-MAP servers.
4.Select the client Authentication method: Basic or Certificate.
•If you select Basic, enter a Username and Password. This is the same as the information that was entered on the IF-MAP server.
•If you select Certificate, select the Device Certificate to use.
•Ensure that the certificate of the CA that signed the IF-MAP server certificate is added from the System > Configuration > Certificates > Trusted Server CA page.
The IF-MAP client validates the IF-MAP server certificate: if validation fails, the connection fails. Ensure that the hostname in the IF-MAP URL on the client machine matches the hostname of the server certificate on the IFMAP server, and that the CA that signed the server certificate is configured as a trusted server CA on the IF-MAP client.
5.Click Save Changes.
IF-MAP Federated Network Timing Considerations
It is important that the time on all IF-MAP servers is correct, as timeout issues are critical to ensure that IF-MAP provides complete and timely information. The IF-MAP Federation is designed to fail secure. If any component in the network does not receive timely information, the IF-MAP metadata will be purged from the data stores.
The components are designed to fail-secure. If complete and timely information cannot be provided, a user's session will be deleted. For example, if the chain of connections between an IF-MAP client that publishes a session and a client that grants access to a resource breaks, the client that granted access will remove the session. The fail-secure time limit is three minutes.
The timeout limit for IF-MAP is three minutes and applies to the following events:
•An IF-MAP server (or cluster) loses contact with one of its IF-MAP clients
•An IF-MAP server (cluster) loses contact with one of the other IF-MAP server (clusters) in the IF-MAP federation
•A Ivanti IF-MAP client loses contact with its IF-MAP server (cluster) for too long
Session-Export and Session-Import Policies
You configure Session-Export policies on all of the Connect Secure and Infranet Controller devices in the Federated network that are IF-MAP clients. These policies allow IF-MAP clients to translate outgoing session information into IF-MAP data and incoming IF-MAP data into session information. These translations enable sessions to be shared between Connect Secure and Infranet Controller devices even if the devices sharing sessions have different role configurations.
To accurately configure Session-Export and Session-Import policies you need a minimal understanding of IF-MAP identifiers and IF-MAP metadata. An identifier is a unique value required for all metadata operations. Each instance of metadata is associated with an identifier. Examples of identifiers include access-request, identity, IP address, and MAC address. Examples of metadata include capability, role, and device-attribute.
IF-MAP recognizes two metadata types that are similar to roles on Connect Secure: IF-MAP roles and IF-MAP capabilities. An IF-MAP role is an attribute assigned to a user in the organization. When IF-MAP metadata is published to the IF-MAP server, this information could be one way to identify individuals on the network. This is somewhat different from the concept of roles. An IF-MAP capability is closer to the concept of a role. An IF-MAP capability is a collection of privileges assigned as a result of an access request. This is more analogous to a role since they are derived through role mapping in an authentication realm.
The data that is published to the IF-MAP server about a user session is derived by applying the Session-Export policies to the user session. The Session-Import policies are applied to the data from the IF-MAP server to assign a set of roles to the user.
When an endpoint attempts to access protected resources associated with Connect Secure, the device queries the IF-MAP server for data. The Infranet Controller uses Session- Import policies to derive roles and a username from the IF-MAP data. For example, you could configure a Session-Import policy that looks for a specific Host Checker policy (you specify the Host Checker policy in the Session-Import policy). If the Infranet Controller finds a match (in this case the Host Checker device attribute), the user can be assigned a role specified in the Session-Import policy.
All of the administrators who are configuring devices in the IF-MAP Federated network must agree on a set of capabilities, roles and device attributes and their meanings to be used with IF-MAP. Then, each administrator configures their device to map between local sessions and IF-MAP data. Figure 5 illustrates a coordinated IF-MAP Federated network configuration with policies that permit an example user to access protected resources.
The following figure depicts Session-Import and Session-Export Policies:

To further your understanding of Session-Import and Session-Export policies, please note the following Ivanti IF-MAP conventions:
To further your understanding of Session-Import and Session-Export policies, please note the following Ivanti IF-MAP conventions:
•The system maps to the identical IF-MAP username.
•A role is paired with an IF-MAP capability.
•Capabilities can have the same name as the roles they are paired with, or a different name.
•When different IF-MAP clients have different but equivalent role names (e.g. Legal and Law, both referring to members of the corporate legal department) a single IF-MAP capability must be chosen.
•Not every role needs to be paired with an IF-MAP capability: roles can be local to Connect Secure.
•After you decide on pairings between IF-MAP capabilities and the roles, you create a session export policy for each pairing. On an Infranet Controller that controls Infranet Enforcers, you create a session import policy.
•The only parameters for the policies are the roles and the IF-MAP capability; everything else is fixed.
Default Session-Export and Session-Import Policy Action
By default, Session-Import and Session-Export IF-MAP policies are configured to allow IF-MAP capabilities (the equivalent of roles) to be published to the IF-MAP server and retrieved from the IF-MAP server, provided there are matching roles on each IF-MAP client. You can open new Session-Import and Session-Export policies on each device, and then name and close the policies. Any matching roles that the IF-MAP clients in the federated network have can be used to access resources.
Advanced Session-Export and Session-Import Policies
By default, advanced policy actions are not visible unless you click the advanced options links on the Session-Export and Session-Import policy pages. In default mode, you configure Session-Export and Session-Import policies using IF-MAP capabilities and roles.
Device attributes, IF-MAP roles and identities can be accessed through the advanced options links. IF-MAP capabilities and Connect Secure roles should provide the functionality that most IF-MAP Federation requires.
Configuring Session-Export Policies
Session-Export policies determine how users are identified on the IF-MAP server when their session is published via IF-MAP: the policy sets the IF-MAP identifiers. You define attributes for users that will be used to determine role matching on different Infranet Controllers. For example, you might configure a Session-Export policy to specify that any users that belong to the "engineering" role should be identified with the "engineering" IF-MAP capability on the IF-MAP server. That identity will be included in the session information to which other IF-MAP clients subscribe. You configure corresponding Session-Import Policies on Infranet Controllers to identify which roles the user should be assigned.
You configure Session-Export policies based on Infranet Controller or Connect Secure roles, and users belonging to those roles can access resources on an Infranet Enforcer only if the role can be successfully matched with a role on the target Infranet Controller. You configure Session-Export policies on all Infranet Controller and Connect Secure devices for which you have users that will be allowed to access resources behind an Infranet Enforcer in the network.
When a user for whom Session-Export policies has been configured successfully authenticates to the network, the Session-Export policies are used to translate the user session into IF-MAP data which is then sent to the IF-MAP server. When the user attempts to access a resource that is protected by an Infranet Enforcer, the target Infranet Controller then attempts to translate the IF-MAP data for the user into a username and roles using the Session-Import policies that are configured on the second Infranet Controller device.
Administrative Domains in Session-Export Policies
In a Layer 2 environment, session information on the IF-MAP server includes a MAC address. If an export policy specifies an Administrative Domain, the domain is associated with the MAC address published to the IF-MAP server (the administrative domain is also associated with the identity published to the IF-MAP server).
A DHCP server assigns an IP address to the endpoint after authentication. An IF-MAP enabled DHCP server publishes an ip-mac link to IF-MAP, associating the endpoint's IP address with its IF-MAP session information.
Including administrative domains in MAC addresses allows the ip-mac link to be created based on the administrative domain.
If your IF-MAP Federated network spans different administrative domains, you should configure separate Session-Export policies for each domain to prevent MAC address spoofing. Each administrative domain should have an associated DHCP server and unique Session-Export policies.
Other aspects of the Session-Export policies within the IF-MAP Federated network can overlap.
To configure a Session-Export policy:
1.From the admin console select System > IF-MAP > Session-Export Policies.
2.Click New to create a new policy.
3.Type a Policy Name, and optionally a Description.
4.Optionally, add Available Roles to the Selected Roles column to determine the roles for which this policy should apply. If you do not add any roles, the policy applies to all sessions. However, if you have non-interactive devices such as printers that do not need access, you may want to manually add roles and exclude those roles with non-interactive devices.
5.Under Policy Actions, Select Set IF-MAP Capabilities and choose the applicable roles.
•Copy matching roles - Selecting this action copies all of the user roles that match the roles specified in the Roles section of this policy into the IF-MAP capabilities data.
•Copy ALL roles - Selecting this action copies all of the roles from the user session to the IF-MAP capabilities data.
•Set capabilities specified below - Enter capabilities, one per line.
6.Select Stop processing policies when this policy matches to specify that when this policy is matched, no more Session-Export policies should be applied.
7.Click Save Changes, or continue to configure Advanced Actions.
To configure advanced actions (generally not required for Infranet Controller and Connect Secure IF-MAP Federation):
1.Click the View Advanced Actions link. Additional options appear on the page.
2.Set IF-MAP Identity - If this action is chosen, enter the Identity and select an Identity Type from the menu. Identity is normally specified as <NAME>, which assigns the user's login name. Any combination of literal text and context variables may be specified. If you choose other for Identity Type, enter a unique Identity Type in the Other text box.
3.Optionally type the Administrative Domain for the Session-Export policy. This optional field is applied to identity and MAC address data. One example for using this field is in a large network environment with several domains in which a username could be duplicated. By entering the domain, you ensure that the correct user is identified.
4.Set IF-MAP Roles - If this action is selected, select the applicable roles.
•Copy matching roles - Selecting this action copies all of the user roles that match the roles specified in the Roles section of this policy into the IF-MAP capabilities data.
•Copy ALL roles - Selecting this action copies all of the roles from the user session to the IF-MAP capabilities data.
•Set roles specified below - Enter roles, one per line.
5.Set IF-MAP Device Attributes - Device attributes represent a passed Host Checker policy on the Infranet Controller or Connect Secure.
•Copy Host Checker policy names - The name of each Host Checker policy that passed for the session is copied to a device attribute.
•Set device attributes specified below - Type device attributes, one per line, into the text box.
6.Click Save Changes to save this advanced Session-Export policy.
You must create corresponding Session-Import policies that allow IF-MAP client Infranet Controllers that are connected to an Infranet Enforcer in front of protected resources to collect IF-MAP data from the IF-MAP server.
Session-Import Policies
The Session-Export policies that you create allow IF-MAP data that represents a session to be stored on the IF-MAP server. Session-Import policies specify how the Infranet Controller derives a set of roles and a username from the IF-MAP data in the IF-MAP server. Session-Import policies establish rules for importing user sessions from Connect Secure. Import policies allow you to match authenticated users with corresponding roles on the target device. For example, you might configure an Import policy to specify that when IF-MAP data for a session includes the "Contractor" capability, the imported session should have the "limited" role. Session-Import policies allow the Infranet Controller to properly assign roles based on information that the IF-MAP server provides.
You configure Session-Import policies on IF-MAP client IVEs that are connected to an Infranet Enforcer in front of protected resources. For information about configuring Session-Import policies, see IF-MAP Feature Guide.
Troubleshooting the IF-MAP Federated Network
Diagnostic tools on the Infranet Controller and Connect Secure can assist you with troubleshooting a federated network.
IF-MAP Client User Messages - On the IF-MAP client, logs information that is published and removed from the IF-MAP server.
•Enable IF-MAP Client User Messages from Log/Monitoring > User Access > Settings on the Infranet Controller and Connect Secure IF-MAP client.
IF-MAP Server Trace - On the IF-MAP server, logs the XML for all IF-MAP requests and responses.
•Enable IF-MAP Server Trace from Log/Monitoring > Events > Settings on the IF-MAP server.
IF-MAP Server Trace should only be enabled for troubleshooting purposes, as running this diagnostic incurs a large performance impact.
Viewing Active Users on the IF-MAP Client
On an IF-MAP client, you can view all of the sessions from other Infranet Controllers or Connect Secure devices that currently access the client (the imported sessions). Session information that can be viewed includes the username, roles, the user's endpoint IP address, and the IP address of the Infranet Controller or Connect Secure device that authenticated the user. You can select and remove sessions either temporarily or permanently. A temporarily removed session can be restored in response to a request for continued access. A permanently removed session cannot be restored.
To view, de-activate, or activate current sessions on an IF-MAP client:
1.Select System > IF-MAP > Active Users from the IF-MAP client admin console.
2.Select Imported or Exported.
3.Select Activate or De-activate.
Trusted Server List
The system uses two mechanisms to install and launch client software from a web browser:
•ActiveX controls (available only for Windows/IE)
•Java applets
With both mechanisms, the user is prompted to trust ActiveX controls and Java applets they have not run before. Inherent problems with these types of mechanisms are:
•When the user trusts an ActiveX control that control is trusted forever.
•When trusting a Java applet, users are trusting all code that is signed by the exact same code signing certificate.
To address the above, administrators can create a text file (called a whitelist) that contains a list of trusted devices, fully qualified domain names or IP addresses, one per line. Administrators can configure two types of whitelists:
•Admin whitelist - The admin whitelist file can be modified only by the endpoint administrator. The administrator must use SMS or other mechanism to copy the admin whitelist file to the end-user's system. Admin whitelist files are located in:
%ProgramFiles%\Pulse Secure\Whitelist.txt (Windows)
/usr/local/pulsesecure/whitelist.txt (Macintosh and Linux)
•User whitelist - Users can themselves make the decision to trust a device. When the user makes a decision to trust device, the device gets added to the user whitelist. User whitelist files are located in:
%AppData%\Pulse Secure\Whitelist.txt (Windows)
/~/Library/Application Support/Pulse Secure/whitelist.txt (Macintosh)
/~/.pulse_secure/whitelist.txt (Linux)
The trusted server list feature is for applications launched from a browser window. It does not apply to applications launched from the command-line or other means.
Administrator and User Configuration
The following is a snippet of a whitelist file:
qa.pulsesecure.netdev1.pulsesecure.net66.129.224.48
Whitelist files are not deleted when the software is removed.
There are two modes of enforcement:
•Allow Admin List Only - When software launches from the device that is not in the administrator whitelist, the launch fails and the user receives the error message "You are not allowed to launch software downloaded from <server>. Contact your system administrator for assistance." If the device is in the administrator whitelist, the launch proceeds as requested.
•Prompt - When software launches from the device that is not in the administrator whitelist or the user whitelist, the user is prompted if they want to launch the software with the message "Do you want to download, install and/or execute software from the following server". If the user declines, the launch fails. If the user accepts, the launch proceeds. The user also has the option to automatically add the device to the user whitelist file by selecting one of the following options from the message window:
•Always - Add the server to the user whitelist file and download, install or launch the software
•Yes - Download, install or launch the software but don't add the server to the user whitelist file
•No - Do not download, install or launch software and don't add the server to the user whitelist file
If the first line of the whitelist file contains "AllowAdminListOnly" (case insensitive) then Allow Admin List Only enforcement mode is used. Otherwise, prompt mode enforcement is used.
A snippet of a whitelist file using Allow Admin List Only enforcement is shown here:
AllowAdminListOnly qa.pulsesecure.net dev1.pulsesecure.net 66.129.224.48
Prompt enforcement is the default mode when you upgrade your software to the latest revision.
To add clusters to the whitelist file:
•For Active/Passive clusters, enter the VIP in the whitelist.
•For Active/Active clusters, enter the load balancer hostname in the whitelist.
White List Flow Chart
The following steps outline the process for determining whether to launch the software
1.f the URL of the page initiating the launch does not begin with https, abort the launch and notify the user.
2.ElsIe if the admin whitelist exists,
•If the origin site is listed in the whitelist, proceed with the launch.
•If the origin site is not in the whitelist and the whitelist starts with "AllowAdminListOnly", abort the launch and notify the user.
3.Else if the user whitelist exists,
•If the origin site is in the user whitelist, proceed with the launch.
4.Prompt the user if they trust the origin site.
5.If the user agrees to trust the origin:
•If they select Always, then add the server to user whitelist file.
•Proceed with the launch.
6.Abort the launch.