Upgrading Managed Appliances
After an appliance is registered on Pulse One, several upgrade operations are supported. You can:
•Upload one or more appliance system software packages on Pulse One, see Uploading an Appliance Software Package to Pulse One.
You must ensure that each appliance has its DMI enabled and configured correctly, see Checking DMI Settings.
•Upload one or more ESAP packages on Pulse One, see Uploading an Endpoint Security Assessment Plug-In Package.
An ESAP package is included in every system software package. However, Pulse Secure releases ESAP upgrade packages more frequently than system software versions. You may choose to upgrade the ESAP package more regularly than system software.
•Upgrade a single appliance, see Upgrading Software on an Appliance.
•Upgrade all appliances in an appliance group, see Upgrading Software on all Target Appliances in a Group.
•Upgrade both appliances in a cluster, see Upgrading Software on all Appliances in a Cluster.
•Schedule the upgrade of an appliance in two stages:
•First, schedule the upload of an image to a staging area on an appliance.
•Second, schedule the installation of a staged software package on an appliance.
For details, see Scheduling Upgrade-Related Tasks.
Uploading an Appliance Software Package to Pulse One
Before you can perform any software upgrade operations on PPS/PCS appliances, you must upload one or more appliance software packages to Pulse One.
You can upload up to three PPS appliance software packages and up to three PCS software packages.
To upload an appliance software package:
1.Log into Pulse One as an administrator.
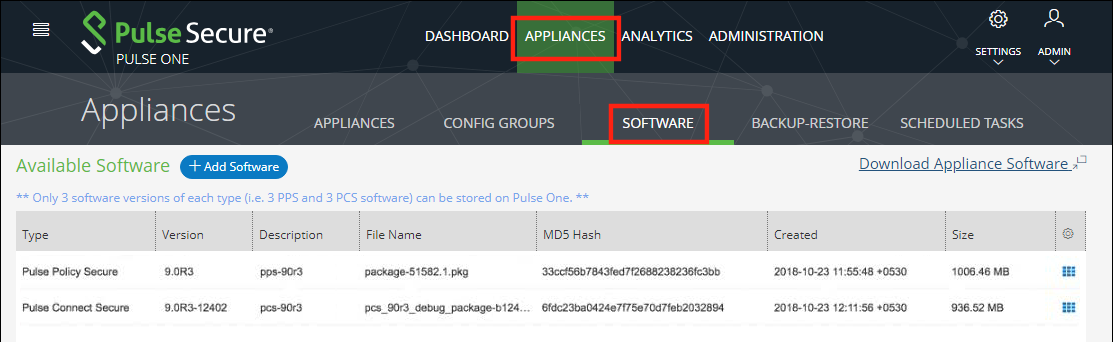
2.Click the Appliances menu and then the Software tab.
The Software tab lists all Available Software packages present on Pulse One. For example:
3.(Optional) If you do not have the required software images, click Download Appliance Software and download them from Pulse Support.
Any software package downloaded from the Pulse Support site should be available in local storage (not in Pulse One). It is the responsibility of the admin to upload packages to Pulse One.
4.Click Add Software.
The Upload Software dialog appears.
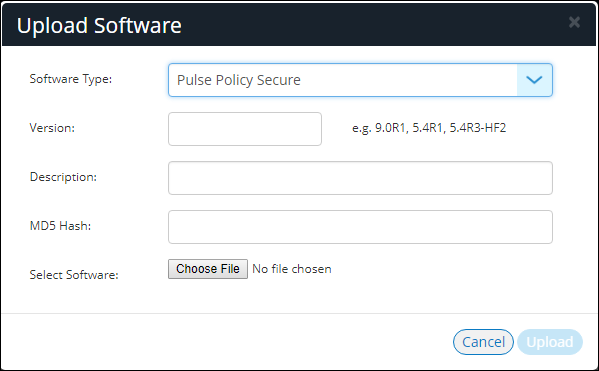
5.In the Upload Software dialog:
•For Software Type, select whether your software package is for Pulse Policy Secure or Pulse Connect Secure.
•Enter a Version number and a Description for the software package.
The version number is case sensitive and should use capital letters.
•Enter the MD5 Hash value for the software package.
You can get the MD5 value from the Pulse Support site. Alternatively, log into any LINUX machine where the file is downloaded, locate the software package file, and run the md5<package_file_name> command from the command line.
•For Select Software, click Browse and locate the software package file.
6.Click Upload.
The upload may take several minutes.
After the upload completes, the new package is added to the Available Software list. For example:

7.(Optional) If required, you can edit the details for an uploaded software package.
To do this, click the Actions icon for the software package, and then click Edit Software.
8.(Optional) If required, you can delete an uploaded software package.
To do this, click the Actions icon for the software package, and then click Delete Software.
You can now perform one or more appliance software upgrades.
Checking DMI Settings
Before you can upgrade an appliance from Pulse One, you must ensure that the appliance has Device Management Interface (DMI) enabled and configured correctly.
To check DMI settings:
1.Log into the appliance as an administrator.
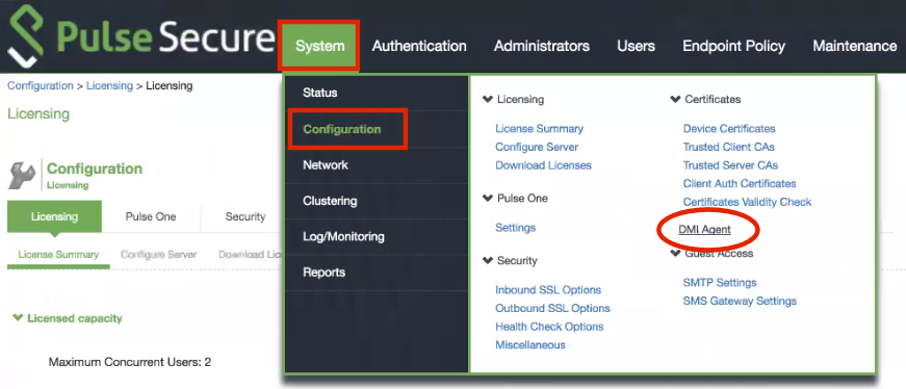
2.Access the DMI Agent settings for the appliance.
For example, on Pulse Policy Secure, click the System menu, then Configuration > DMI Agent.
3.The DMI Agent settings appear. For example, on Pulse Policy Secure:
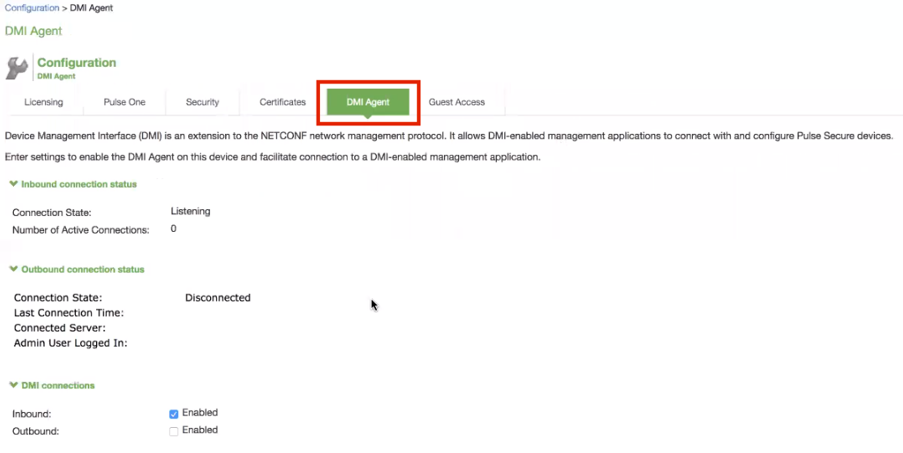
4.Ensure that inbound DMI connections are enabled. For example, on Pulse Policy Secure:
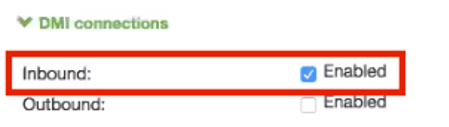
5.Ensure that inbound DMI connections are received on the correct port type and port number.
To do this, you need the DMI settings that you used when you registered the appliance, see Registering an Existing PCS/PPS Appliance. Specifically, you need the choice of whether to perform DMI over the internal port or the management port.
•For the Accept connections on setting, select the required interface type. That is, either the Internal Port or the Management Port.
•The TCP port number. The default is 830.
6.The DMI settings on the appliance are now configured correctly for software upgrades from Pulse One.
Upgrading Software on an Appliance
You can perform an immediate software upgrade on any registered appliance.
Alternatively, you can schedule one or more upgrade processes for a later time, see Scheduling Upgrade-Related Tasks.
Before you can perform an immediate software upgrade on an appliance, you must upload the required appliance software package, see Uploading an Appliance Software Package to Pulse One.
The appliance will continue to operate while it uploads the software package, but it will then reboot. The appliance will be offline until the upgrade completes. After the appliance is online again the upgrade is complete, but it may take several more minutes for the appliance to reconnect to Pulse One.
To perform a software upgrade for an appliance:
1.Log into Pulse One as an administrator.
2.Click the Appliances menu and then the Appliances tab.
The Appliances tab lists all appliances on Pulse One.
For example:

3.Click the Actions icon for the appliance you want to upgrade, and then click Upgrade Software.
The Upgrade Software dialog appears. For example:

4.For Select Software, choose the required software package for the upgrade.
Full details for the selected package are displayed.
5.To start the upgrade, click Upgrade.
The Task Status of the appliance updates to show that the upgrade of the appliance is pending. For example:
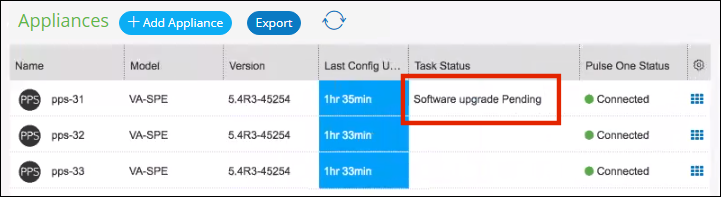
The Task Status changes as the process continues.
- The entire upgrade process may take up to an hour.
- All appliance configuration is preserved during this process.
•After the software update begins, the appliance uploads the specified software package. At this point, the appliance is still operational.
Do not log into an appliance during an upgrade using the credentials used for DMI. This may cause the upgrade to fail.
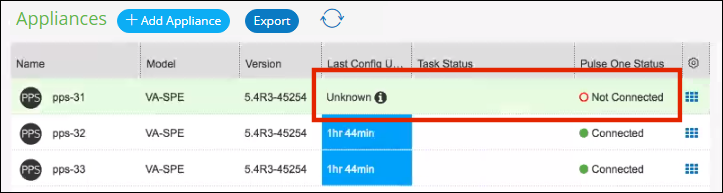
•After the software package upload is complete, the appliance reboots to complete the upgrade, and the connection between Pulse One and the appliance is lost. For example:
•After the appliance reboots, the upgrade is complete, but it may take several minutes to reconnect to the appliance from Pulse One.
Upgrading Software on all Target Appliances in a Group
You can perform an immediate software upgrade on the master appliance in an appliance group.
The target appliances in the group are upgraded automatically.
Alternatively, you can schedule one or more upgrade tasks for the master appliance at a later time, see Scheduling a Full Upgrade of an Appliance Group.
To upgrade all members of an appliance group:
1.Log into Pulse One as an administrator.
2.Click the Appliances menu and then the Config Groups tab.
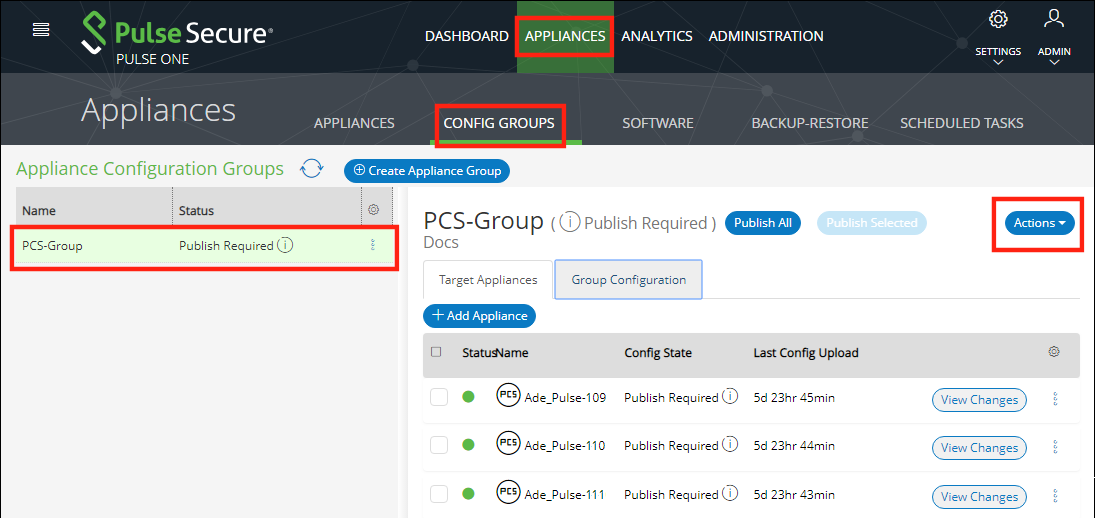
The Appliance Configuration Groups tab lists all appliance groups on Pulse One.
For example:
3.Click the Actions button for the appliance group you want to upgrade, and then click Upgrade Software.
The Upgrade Software dialog appears. For example:

4.For Select Software, choose the required software package for the upgrade.
Full details for the selected package are displayed.
5.To start the upgrade, click Upgrade.
6.Click the Appliances tab.
The Task Status of each appliance updates to show that the upgrade of the appliance is pending.
The Task Status of each appliance changes as the process continues.
- The entire upgrade process for an appliance may take up to an hour.
- All appliance configuration is preserved during this process.
•After an appliance software update begins, the appliance uploads the specified software package. At this point, the appliance is still operational.
Do not log into an appliance during an upgrade using the credentials used for DMI. This may cause the upgrade to fail.
•After the software package upload to an appliance is complete, the appliance reboots to complete the upgrade, and the connection between Pulse One and the appliance is lost.
•After the appliance reboots, the upgrade of the appliance is complete, but it may take several minutes to reconnect to the appliance from Pulse One.
After all members of the group (master and target appliances) have been upgraded, the upgrade of the group is complete.
Upgrading Software on all Appliances in a Cluster
Upgrading all appliances in a cluster is similar to the upgrade of a single appliance, see Upgrading Software on an Appliance.
You can perform an immediate software upgrade on one of the appliances in a cluster, as follows:
•For Active/Active clusters, you can only upgrade the Leader node. All other nodes upgrade automatically.
•For Active/Passive clusters, you can only upgrade the Passive node. The Active node upgrades automatically.
In both cases, all nodes will be offline for some time during the upgrade.
Alternatively, you can schedule the upgrade processes for a later time, see Scheduling Upgrade-Related Tasks.
Scheduling Upgrade-Related Tasks
You can schedule upgrade-related tasks so that they are performed automatically at specified times.
There are three types of scheduled task:
1.The publication of configuration changes from a master appliance to all group members.
This scheduled task type is only supported for appliance groups. It is not a requirement to publish all configuration changes before performing an upgrade, but you can optionally publish your configuration as part of your workflow if required.
2.The upload of a software package to a staging area on an appliance.
No installation is performed, and there is no loss of service.
3.The upgrade of an appliance based on a pre-staged software package.
There is a loss of service during the upgrade as the appliance must be rebooted.
To perform a full upgrade on an appliance or an appliance group, you must perform both task types.
The scheduling of these tasks can be suited to your network requirements.
The scheduling of tasks is supported for:
•Single appliances.
•Appliance groups. You schedule the tasks against the group, and all group members will automatically perform the designated task.
•Appliance clusters:
•For Active/Active clusters, you can only schedule tasks for the Leader node. After both the upload and the installation tasks are complete, all other nodes upgrade automatically.
•For Active/Passive clusters, you can only upgrade the Passive node. After both the upload and the installation tasks are complete, the Active node upgrades automatically.
You can initiate appliance upgrades using scheduled tasks as follows:
Scheduling a Full Upgrade from the Scheduled Tasks Tab
To schedule an upgrade of an individual appliance using a pair of tasks from the Scheduled Tasks tab:
1.Log into Pulse One as an administrator.
2.Click the Appliances menu and then the Scheduled Tasks tab.
The Scheduled Tasks tab lists all scheduled tasks on Pulse One. For example:
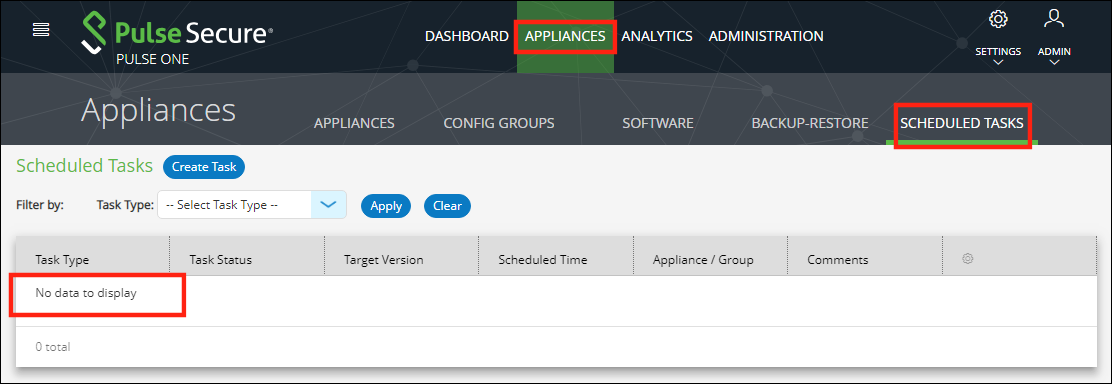
3.Click Create Task.
The Create Task dialog appears.
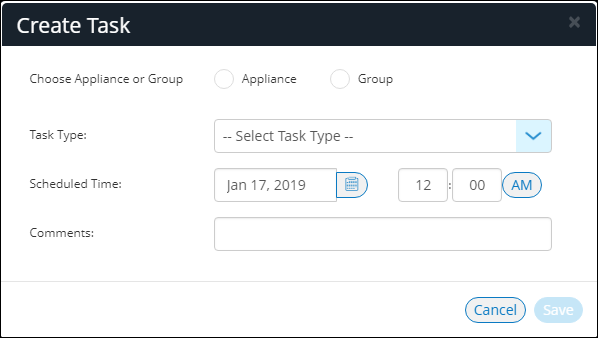
4.In the Create Task dialog:
•For Choose Appliance or Group, select either Appliance or Group. An additional property appears, from which your select the required appliance or group.
•For Task Type, select Stage a software package.
•For Target Version, select the required software upgrade package.
•For Scheduled Time, select the start time for the task.
•(Optional) Add Comments as required. These appear on the Scheduled Tasks list.
5.Click Save.
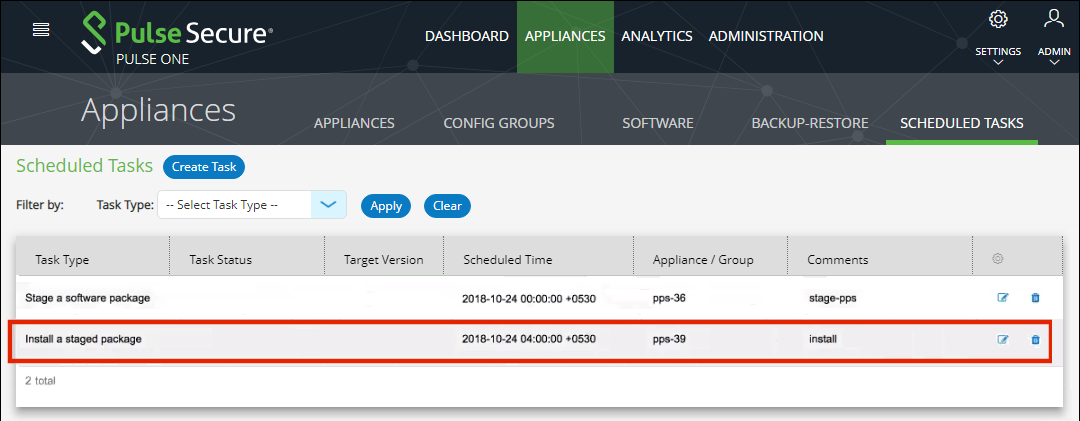
The new task is added to the list of Scheduled Tasks. For example:

6.To add the second task, click Create Task again.
7.In the Create Task dialog:
•For Choose Appliance or Group, select the same setting as for the first task, and select the same appliance or group.
•For Task Type, select Install a staged package.
•For Target Version, select the same package as for the first task.
•For Scheduled Time, select the start time for the task. This must allow sufficient time for the first task to complete.
•(Optional) Add Comments as required. These appear on the Scheduled Task list.
8.Click Save.
The new task is added to the list of Scheduled Tasks. For example:
9.(Optional) You can edit the details for a scheduled task by clicking the Edit icon for the task.
10.(Optional) You can cancel a scheduled task by clicking the Delete icon for the task.
11.(Optional) You can monitor the progress of scheduled tasks using one of the following methods:
•On the Scheduled Tasks tab. Here, the Task Status updates as a task starts and proceeds through to completion.
•From the Appliance Activities panel. To access this, click the Administration tab, and then the Appliance Activities option.
•From the Appliances tab, you can see status updates for individual appliances.
•From the Activities panel for an appliance on the right side of the Appliances tab.
Scheduling a Full Upgrade from the Appliances Tab
To schedule an upgrade of an individual appliance using a pair of scheduled tasks from the Appliances tab:
1.Log into Pulse One as an administrator.
2.Click the Appliances menu and then the Appliances tab.
The Appliances tab lists all appliances on Pulse One. For example:

3.Click the Actions icon for the appliance you want to upgrade, and then click Schedule Task.
The Schedule Task option is unavailable for:
•Target appliances. That is, appliances that are in an appliance group, other than the master.
•All non-Leader appliances in an Active/Active cluster.
•The Active node in an Active/Passive cluster.
The Create Task dialog appears.

4.In the Create Task dialog:
•For Task Type, select Stage a software package.
•For Target Version, select the required software upgrade package.
•For Scheduled Time, select the start time for the task.
•(Optional) Add Comments as required. These appear on the Scheduled Tasks list.
5.Click Save.
The new task is added to the list of scheduled tasks in the Scheduled Tasks tab. For example:

6.In the Appliances tab, click the Actions icon for the appliance you want to upgrade, and then click Schedule Task.
The Create Task dialog appears.
7.In the Create Task dialog:
•For Task Type, select Install a staged package.
•For Target Version, select the same package as for the first task.
•For Scheduled Time, select the start time for the task. This must allow sufficient time for the first task to complete.
•(Optional) Add Comments as required. These appear on the Scheduled Tasks list.
8.Click Save.
The new task is added to the list of scheduled tasks in the Scheduled Tasks tab.
9.(Optional) You can edit the details for a scheduled task by clicking the Edit icon for the task.
10.(Optional) You can cancel a scheduled task by clicking the Delete icon for the task.
11.(Optional) You can monitor the progress of scheduled tasks using one of the following methods:
•On the Scheduled Tasks tab. Here, the Task Status updates as a task starts and proceeds through to completion.
•From the Appliance Activities panel. To access this, click the Administration tab, and then the Appliance Activities option.
•From the Appliances tab, you can see status updates for individual appliances.
•From the Activities panel for an appliance on the right side of the Appliances tab.
Scheduling a Full Upgrade of an Appliance Group
You can schedule an upgrade of an all target appliances in an appliance group as a single task from the Config Groups tab. When each task triggers, the same operation is initiated simultaneously on all group members.
Before you upgrade a group, you can optionally publish any configuration changes from the master appliance to all group members. This can be performed as a separate scheduled task. You can also choose to publish a configuration to a group at any other time, see Distributing a Master Configuration.
To schedule an upgrade of an appliance group using a pair of scheduled tasks from the Config Groups tab:
1.Log into Pulse One as an administrator.
2.Click the Appliances menu and then the Config Groups tab.
The Config Groups tab lists all appliance groups on Pulse One.
3.(Optional) If there are unpublished configuration changes for the group, you can choose to publish the configuration changes to all target appliances before performing other scheduled tasks. To do this:
•Click the Actions icon for the appliance group you want to upgrade, and then click Schedule Task. The Create Task dialog appears.
•In the Create Task dialog, for Task Type, select Publish configuration.
•For Scheduled Time, select the start time for the task.
•(Optional) Add Comments as required. These appear on the Scheduled Tasks list.
•Click Save.
The new task is added to the list of scheduled tasks in the Scheduled Tasks tab.
4.Click the Actions icon for the appliance group you want to upgrade, and then click Schedule Task.
The Create Task dialog appears.
5.In the Create Task dialog:
•For Task Type, select Stage a software package.
•For Target Version, select the required software upgrade package.
•For Scheduled Time, select the start time for the task.
If you scheduled a Publish configuration task for this group, you must leave sufficient time for that task to complete.
•(Optional) Add Comments as required. These appear on the Scheduled Tasks list.
6.Click Save.
The new task is added to the list of scheduled tasks in the Scheduled Tasks tab.
7.In the Appliances tab, click the Actions icon for the appliance you want to upgrade, and then click Schedule Task.
The Create Task dialog appears.
8.In the Create Task dialog:
•For Task Type, select Install a staged package.
•For Target Version, select the same package as for the first task.
•For Scheduled Time, select the start time for the task.
Ensure that you leave sufficient time for the Stage a software package task to complete.
•(Optional) Add Comments as required. These appear on the Scheduled Tasks list.
9.Click Save.
The new task is added to the list of scheduled tasks in the Scheduled Tasks tab.
10.(Optional) You can edit the details for a scheduled task by clicking the Edit icon for the task.
11.(Optional) You can cancel a scheduled task by clicking the Delete icon for the task.
12.(Optional) You can monitor the progress of scheduled tasks using one of the following methods:
•On the Scheduled Tasks tab. Here, the Task Status updates as a task starts and proceeds through to completion.
•From the Appliance Activities panel. To access this, click the Administration tab, and then the Appliance Activities option.
•From the Config Group tab, you can see status updates for the group as a whole.
•From the Appliances tab, you can see status updates for each appliance group member.
•From the Activities panel for an individual appliance on the right side of the Appliances tab.