Appliance Management
Registering an Existing PCS/PPS Appliance
After Pulse One is installed and configured, the next step is to register one or more PCS/PPS appliances.
- This process requires sufficient appliance licensing capacity.
- You can also create and register a virtual PCS appliance for either AWS (see Creating and Registering a PCS Appliance VM on AWS) or vSphere (see Creating and Registering a PCS Appliance VM on vSphere).
To register an existing appliance:
1.Log into Pulse One as an administrator.
2.Click the Appliances menu and then the Appliances tab.
The Appliances tab displays all current appliances.
3.Click Add Appliance.
The Add Appliance dialog box appears.

4.Select Reister existing appliance and click Next.
The Register Appliance dialog appears.
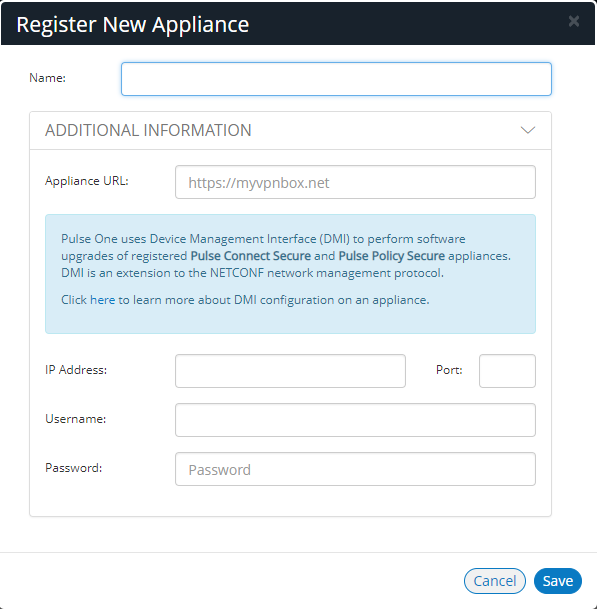
5.Enter the required Name for the appliance. For example: appliance.pcs.
6.Enter the management interface address of the appliance as the Appliance URL. Typically, this URL will end with “/admin”.
7.(Optional) If you want the appliance to support Device Management Interface (DMI) software upgrades directly from Pulse One:
•For IP Address, specify the IP Address on which the appliance is configured to receive DMI requests. This is either the internal interface or the management interface.
•For Port, specify the port on which the appliance is configured to receive DMI requests. Typically, this is 830.
•Specify the required admin Username and Password for the appliance. This will be used to receive DMI requests.
-
- DMI does not need to be configured for ESAP package uploads to appliances.
8.Click Save.
A dialog displays the required Registration Host and a Registration Code. For example:
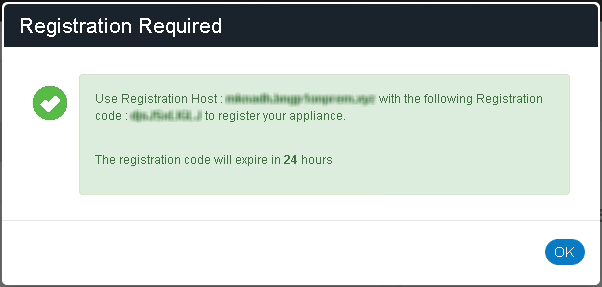
9.Record the Registration Host and Registration Code and close the dialog.
10.Switch to the appliance application (for example, PCS) and enter the Registration Host and a Registration Code in the appliance's panel, see Configuring an Appliance to Connect to Pulse One.
When the auto-registration process is complete, the appliance is added to Pulse One. The Pulse One console displays the appliance status as Connected in the Appliances list.
Editing Appliance Information
To edit appliance information:
1.Log into Pulse One as an administrator.
2.Click the Appliances menu and then the Appliances tab.
The Appliances tab displays all current appliances.
3.Select the required appliance from the list and click its Actions icon (![]() ).
).
4.From the menu options, select Edit Appliance Info.
5.In the Edit Appliance Info dialog, make the required changes.

If you want the Launch Appliance UI option to be available on the Actions menu for the appliance, specify the Appliance URL. This URL typically ends with “/admin”.
6.Click Save to update the appliance.
Launching the User Interface for an Appliance
You can launch the administration user interface for a registered appliance directly from the Appliances tab.
To support this, ensure that you have specified an Appliance URL property for the appliance. Where no Appliance URL is specified for an appliance, you can manually edit the appliance properties to specify one, see Editing Appliance Information.
To launch the admin UI for an appliance.
1.Log into Pulse One as an administrator.
2.Click the Appliances menu and then the Appliances tab.
The Appliances tab displays all current appliances.
3.Select the required appliance from the list and click its Actions icon (![]() ).
).
4.From the menu options, select Launch Appliance UI.
The graphical user interface for the appliance starts in a new tab of your browser.
Recognizing Critical Vulnerabilities
On Pulse One, the Appliances list displays all registered appliances. Summary information for each appliance includes a Version number for the appliance. A warning flag appears beside the version number if the version has known critical vulnerabilities. For example:
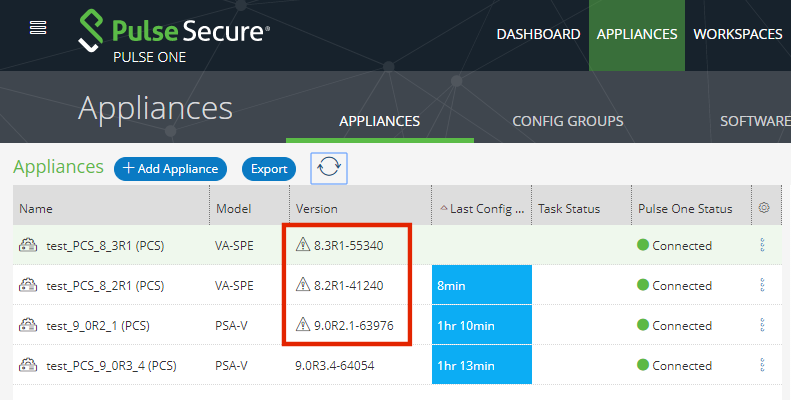
Hover over the Version number to see additional information.
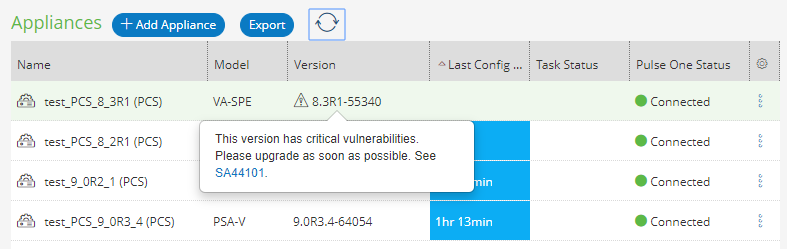
To upgrade the software on the appliance, see Upgrading Software on an Appliance.