SAML Single Sign-on
Pulse Connect Secure SAML 2.0 SSO Solutions
This section provides a brief overview of the Security Assertion Markup Language (SAML) standard produced and approved by the Organization for the Advancement of Structured Information Standards (OASIS).
Understanding SAML 2.0
This topic provides a reference to the Security Assertion Markup Language (SAML) standard and an overview of SAML 2.0 use cases.
About SAML
SAML is an XML-based framework for communicating user authentication, entitlement, and attribute information. The standard defines the XML-based assertions, protocols, bindings, and profiles used in communication between SAML entities. SAML is used primarily to implement Web browser single sign-on (SSO). SAML enables businesses to leverage an identity-based security system like Connect Secure to enforce secure access to web sites and other resources without prompting the user with more than one authentication challenge.
For complete details on the SAML standard, see the OASIS web site:
http://www.oasis-open.org/committees/tc_home.php?wg_abbrev=security
SAML Use Cases
This section provides a brief summary of the primary SAML use cases.
SAML SSO
SAML is primarily used to enable Web browser single sign-on (SSO). Pulse Secure client R5.0 or greater (Win and Mac) also supports SAML SSO. The user experience objective for SSO is to allow a user to authenticate once and gain access to separately secured systems without resubmitting credentials. The security objective is to ensure the authentication requirements are met at each security checkpoint.
In an SSO transaction, the SAML services implemented at each secured system exchange requests and assertions to determine whether to allow access. The SAML assertions used in SSO transactions include authentication statements and attribute statements.
SAML ACL
SAML can also be used to enforce access control list (ACL) permissions. In an ACL transaction, the SAML services implemented for each secured system exchange assertions to determine whether a user can access the resource. The SAML assertions used in ACL transactions include authorization requests and authorization decision statements.
SAML 2.0 Supported Features Reference
This topic provides an overview of Connect Secure support for Security Assertion Markup Language (SAML) single sign-on (SSO). It includes the following information related to SAML 2.0 support:
•Supported SAML SSO Deployment Modes
Supported SAML SSO Deployment Modes
In a SAML deployment, a SAML service provider is a secured resource (an application, web site, or service) that is configured to request authentication from a SAML identity provider. The SAML identity provider responds with assertions regarding the identity, attributes, and entitlements (according to your configuration). The exchange enforces security and enables the SSO user experience.
The system can act as a SAML service provider, a SAML identity provider, or both. The following sections provide illustrations:
•Connect Secure as a SAML Service Provider
•Connect Secure As a SAML Identity Provider (Gateway Mode)
•Connect Secure as a SAML Identity Provider (Peer Mode)
Connect Secure as a SAML Service Provider
If you are working with a partner that has implemented a SAML identity provider, you can deploy the system as a SAML service provider to interoperate with it, thereby enabling SSO for users who should have access to resources in both networks. In this model, the user is authenticated by the SAML identity provider. The system uses the SAML response containing the assertion to make an authentication decision.
The choices the identity provider makes to implement SAML determine the deployment choices, for example whether to use SAML 2.0 or SAML 1.1, whether to reference a published metadata configuration file, and whether to use a POST or artifact profile. When you deploy the system as a SAML service provider, you create a SAML authentication server configuration that references the partner SAML identity provider, and a set of access management framework objects (realm, role mapping rules, and sign-in policy) that reference the SAML authentication server.
When you configure the SAML service provider, some particular settings are necessary to support either identity-provider-initiated or service-provider-initiated SSO. The documentation for the configuration steps makes note of these settings. Regardless, you configure the SAML service provider to support both identity-provider-initiated and service-provider-initiated SSO.
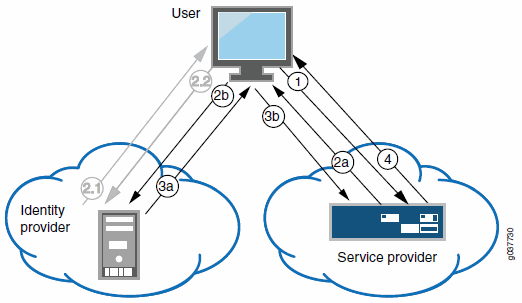
The following figure illustrates the flow of network communication in a service-provider-initiated SSO scenario with a Web browser client.
The following figure depicts the Connect Secure as a SAML Service Provider in a Service-Provider-Initiated SSO Scenario:
|
1 - The user clicks a link to access a resource. |
|
2a - The service provider sends an HTTP redirect status code (HTTP 302) to the user. The SAML request and all other SAML details are sent as URL parameters in the URL Location header. |
|
2b - The user sends an HTTP GET request to the identity provider. The SAML request and all other SAML details are sent as URL parameters. |
|
If the user already has a session with the identity provider, steps 2.1 and 2.2 are skipped. |
|
2.1 - If the user does not have a session, the identity provider sends an authentication challenge to the user. |
|
2.2 - The user enters sign-in credentials. |
|
3a - The identity provider sends a successful status code (HTTP 200 OK) to the user with a form in the HTML body. |
|
3b - The user sends the form to the service provider. |
|
4 - The external resource is delivered to the user's browser. |
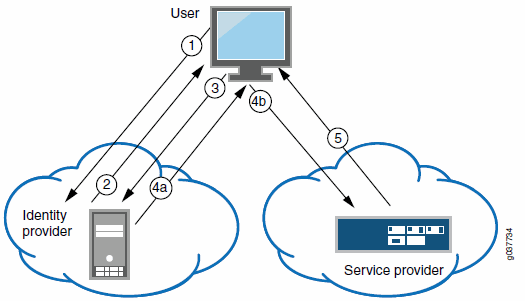
The following figure illustrates the flow of network communication in an identity-provider-initiated SSO scenario with a Web browser client.
The following figure depicts the Connect Secure as a SAML Service Provider in an Identity-Provider-Initiated SSO Scenario:
|
1 - The user authenticates to the identity provider. |
|
2 - The identity provider returns a portal page with links to external resources. |
|
3 - The user clicks a link for an external resource. |
|
4a - The identity provider sends a successful status code (HTTP 200 OK) to the user with a form in the HTML body. |
|
4b - The user sends the form to the service provider. |
|
5 - The external resource is delivered to the user's browser. |
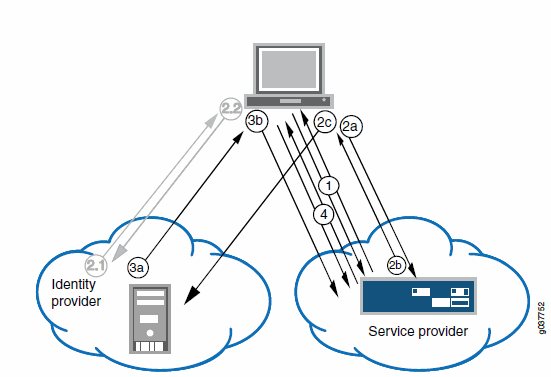
The following figure illustrates the flow of network communication when a user clicks a Pulse client connection.
The figure depicts the Connect Secure as a SAML Service Provider in a Pulse-Client-Initiated Connection:
|
1 - The user clicks the Pulse client connection. The Pulse client and system exchange IF-T/TLS messages. The Pulse client learns that authentication is a SAML exchange, and Pulse launches its embedded client Web browser. |
|
2a - The service provider sends an HTTP redirect status code (HTTP 302) to the user. The SAML request and all other SAML details are sent as URL parameters in the URL Location header. |
|
2b - The user sends an HTTP GET request to the identity provider. The SAML request and all other SAML details are sent as URL parameters. |
|
If the user already has a session with the identity provider, steps 2.1 and 2.2 are skipped. |
|
2.1 - If the user does not have a session, the identity provider sends an authentication challenge to the user. |
|
2.2 - The user enters sign-in credentials. |
|
3a - The identity provider sends a successful status code (HTTP 200 OK) to the user with a form in the HTML body. |
|
3b - The user sends the form to the service provider. |
|
4 - The setup client is run on the endpoint, and the Pulse client and system set up an SSL VPN tunnel. |
Connect Secure As a SAML Identity Provider (Gateway Mode)
When you deploy the system in front of enterprise resources that support SAML and have been configured as a SAML service provider, the system acts as a gateway for user access to the secured resource, just as it does with its other resource policies. In the SAML exchange, the system acts as a SAML identity provider. When deployed as a gateway, the SAML SSO communication is always identity-provider-initiated. The system maintains the session and uses its rewriting or pass-through proxy features to render data to the user.
In a gateway mode deployment, you configure the system as a SAML identity provider to correspond with the SAML service provider, and you create a SAML SSO resource policy configuration to determine the users and resources to which the SAML SSO experience applies. The SAML SSO resource policy supports two types of behavior that are possible with the HTTP responses sent by SAML service providers:
•The SAML service provider sends HTTP responses that can be handled by HTTP cookies and therefore do not require user interaction. In this case, the SAML SSO resource policy can be configured to use cookies to handle the HTTP transaction.
•The SAML service provider sends HTTP responses that require user interaction. For example, the SAML service provider might send an HTTP 200 OK with an embedded form that requires action from the user, execution of JavaScript, or data to be automatically submitted on load. Or, the resource might send an HTTP 3xx redirect that requires acceptance by the user. In these cases, the SAML SSO resource policy can be configured to forward the HTTP responses through the rewriter, which rewrites the HTTP response and sends it to the end user.
The following figure illustrates the communication that occurs when the SAML SSO policy is configured to handle the SAML service provider responses using cookies.
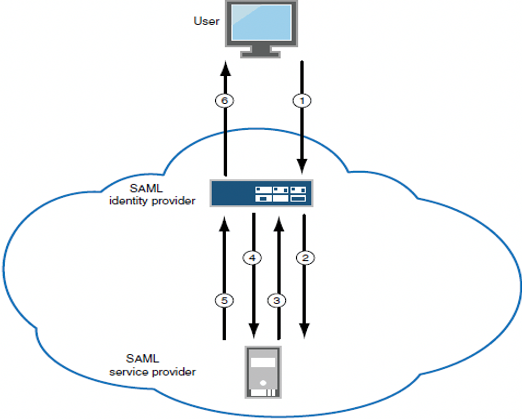
Connect Secure as a SAML Identity Provider (Gateway Mode) - User/Browser Action Not Required:
|
1 - User requests a SAML protected resource. |
|
2 - The system executes the SAML SSO policy and the identity provider sends an HTTP request containing the SAML assertion to the SAML service provider. |
|
3 - The SAML service provider sends an HTTP response. The SAML SSO process extracts the cookies from the response and stores them in the cookie cache. |
|
4 - The system rewriter process sends the request for the resource (sending the cookies received in step 3). |
|
5 - The SAML service provider sends the resource. |
|
6 - The system rewrites the resource and sends it to the user. |
The following figure illustrates the communication that occurs when the SAML SSO policy is configured to rewrite the SAML service provider responses and send them to the user/browser for action.
The following figure depicts the Connect Secure as a SAML Identity Provider (Gateway Mode) - User/Browser Action Required:
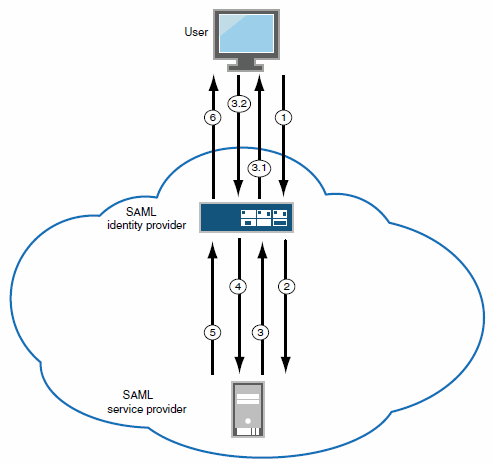
|
1 - User requests a SAML protected resource. |
|
2 - The system executes the SAML SSO policy and the system identity provider sends an HTTP request containing the SAML assertion to the SAML service provider. |
|
3 - The SAML service provider sends an HTTP response. The system SAML SSO process forwards the entire response to the rewriter. |
|
3.1 - The rewriter rewrites the response and sends it to the user. |
|
3.2 - The user/browser completes any action required and sends a response (an HTTP GET/POST request). |
|
4 - The rewriter processes it as any other HTTP web request and forwards to the SAML service provider. |
|
5 - The SAML service provider sends the resource. |
|
6 - The system rewrites the resource and sends it to the user. Steps 5 and 6 can involve many transactions related to Web browsing or use of the resource. |
Connect Secure as a SAML Identity Provider (Peer Mode)
When deployed to support access to external resources (for example, public cloud resources), the system does not have to be a gateway to user access. The user can access the external resource directly, and the traffic does not flow through the device. In a peer mode deployment, you configure the system as a SAML identity provider to correspond with the external SAML service provider, and you create a SAML External Apps SSO resource policy configuration to determine the users and resources to which the SAML SSO experience applies.
In a service-provider-initiated SSO scenario, the user requests a resource protected by the SAML service provider. The SAML service provider redirects the user to the sign-in page. The access management framework processes the authentication request, performs host checking rules and role mapping rules. If authentication is successful, the system redirects the user to the protected resource.
In an identity-provider-initiated SSO scenario, the user first creates a session. The access management framework processes are run when the user signs in. The SAML External Apps SSO policy is enforced when the user browses to the SAML protected external application.
When you configure the SAML identity provider, some settings are necessary to support either identity-provider-initiated or service-provider-initiated SSO. The documentation for the configuration steps makes note of these settings. Regardless, you configure the SAML identity provider to support both identity-provider-initiated and service-provider-initiated SSO.
The following figure illustrates the flow of network communication in a service-provider-initiated SSO scenario.
Connect Secure as a SAML Identity Provider (Peer Mode) in a Service-Provider-Initiated SSO Scenario:

|
1 - The user clicks a link to access a resource. |
|
2a - The service provider sends an HTTP redirect status code (HTTP 302) to the user. The SAML request and all other SAML details are sent as URL parameters in the URL Location header. |
|
2b - The user sends an HTTP GET request to the identity provider. The SAML request and all other SAML details are sent as URL parameters. |
|
If the user already has a session with the identity provider, steps 2.1 and 2.2 are skipped. |
|
2.1 - If the user does not have a session, the identity provider sends an authentication challenge to the user. |
|
2.2 - The user enters sign-in credentials. |
|
3a - The identity provider sends a successful status code (HTTP 200 OK) to the user with a form in the HTML body. |
|
3b - The user sends the form to the service provider. |
|
4 - The external resource is delivered to the user's browser. |
The following figure illustrates the flow of network communication in an identity-provider-initiated SSO scenario.
Connect Secure as a SAML Identity Provider (Peer Mode) in an Identity-Provider-Initiated SSO Scenario:
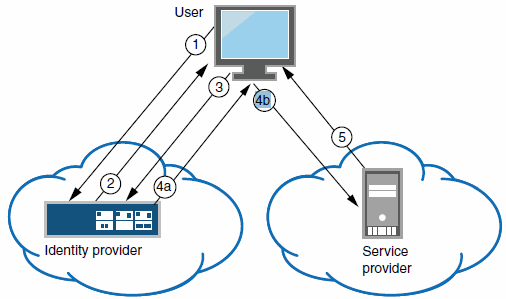
|
1 - The user authenticates to the identity provider. |
|
2 - The identity provider returns a portal page with links to external resources. |
|
3 - The user clicks a link for an external resource. |
|
4a - The identity provider sends a successful status code (HTTP 200 OK) to the user with a form in the HTML body. |
|
4b - The user sends the form to the service provider. |
|
5 - The external resource is delivered to the user's browser. |
Supported SAML SSO Profiles
The following table summarizes support for SAML 2.0 deployment profiles.
|
Profile |
Message Flows |
Binding |
Service Provider |
Identity Provider (Gateway) |
Identity Provider (Peer) |
|
Web browser SSO |
<AuthnRequest> from service provider to identity provider |
HTTP redirect |
Supported |
- |
Supported |
|
HTTP POST |
Not supported |
- |
Supported |
||
|
HTTP artifact |
Not supported |
- |
Not supported |
||
|
Identity provider <Response> to service provider |
HTTP POST |
Supported |
Supported |
Supported |
|
|
HTTP artifact |
Supported |
Supported |
Supported |
||
|
Authentication context classes sent in <RequestedAuthnContext> |
HTTP POST |
All authentication context classes |
- |
Password-Protected, TimeSyncToken, and TLSClient only |
|
|
HTTP artifact |
All authentication context classes |
- |
Password-Protected, TimeSyncToken, and TLSClient only |
||
|
Basic attribute profile |
Simple <Attribute> statements (name-value pairs) as part of assertions |
HTTP POST |
Consumes and stores Attribute statements |
Sends Attribute statements |
Sends Attribute statements |
|
HTTP artifact |
|||||
|
Assertion query / request |
Artifact resolution <ArtifactResolve> <ArtifactResponse> |
SOAP |
Supported |
Supported |
Supported |
|
Single logout |
Logout request |
HTTP redirect |
Supported |
Not supported |
Not supported |
|
HTTP POST |
Not supported |
Not supported |
Not supported |
||
|
HTTP artifact |
Not supported |
Not supported |
Not supported |
||
|
SOAP |
Not supported |
Not supported |
Not supported |
||
|
Logout response |
HTTP redirect |
Supported |
Not supported |
Not supported |
|
|
HTTP POST |
Not supported |
Not supported |
Not supported |
||
|
HTTP artifact |
Not supported |
Not supported |
Not supported |
||
|
SOAP |
Not supported |
Not supported |
Not supported |
Connect Secure does not act as an Attribute Authority.
FIPS Support Notes
Historically, in FIPS deployments, private keys were managed in a way that can be problematic for SAML functionality that depends on access to the private key. The following table summarizes our support for SAML for FIPS deployments.
The following table describes the SAML Support for FIPS Deployments
|
|
SAML 2.0 |
SAML 1.1
|
||
|
Release |
Service Provider |
Identity Provider |
Consumer |
Producer |
|
8.0 and above |
Device certificate signing is supported; however, the ECDSA certificates is not supported. There are no other limitations. |
Device certificate signing is supported; however, the ECDSA certificates is not supported. There are no other limitations. |
No limitations |
Artifact profile only |
SAML 2.0 Configuration Tasks
This section includes the tasks you perform to enable and configure SAML services.
Configuring System-Wide SAML Settings
This section describes tasks related to configuring system-wide SAML settings.
Configuring Global SAML Settings
The system-wide SAML settings impact all SAML service provider and identity provider instances.
To configure global SAML settings:
1.Select System > Configuration > SAML.
2.Click the Settings button to display the configuration page.
3.Complete the settings described in the following table.
4.Click Save Changes.
The following table lists SAML Global Configuration Guidelines
|
Settings |
Guidelines |
|
Timeout value for metadata fetch request |
Specify the number of seconds after which a download request is abandoned. If the peer SAML entity publishes its metadata at a remote location, the system downloads the metadata file from the specified location. |
|
Validity of uploaded/downloaded metadata file |
Specify the maximum duration for which the system considers the metadata file of the peer SAML entity to be valid. If the metadata file provided by the peer SAML entity contains validity information, the lower value takes precedence. |
|
Host FQDN for SAML |
Specify the fully qualified domain name for the Connect Secure host. The value you specify here is used in the SAML entity ID and the URLs for SAML services, including: Entity ID for SAML service provider and SAML identity provider instances. The SAML entitiy ID is the URL where the system publishes its SAML metadata file. Single sign-on service URL Single logout service URL Assertion consumer service URL Artifact resolution service URL BEST PRACTICE: The system uses HTTPS for these services. Therefore, we recommend that you assign a valid certificate to the interface that has the IP address to which this FQDN resolves so that users do not see invalid certificate warnings. |
|
Alternate Host FQDN for SAML |
Optional. If you have enabled the Reuse Existing NC (Pulse) Session on the SAML Identity Provider Sign-In page, specify the fully qualified domain name used to generate the SSO Service URL. Set up your DNS service to ensure that the alternate hostname resolves to a different IP address when a session is established and when not established. We recommend the following DNS behavior: If the NC (Pulse) session is not established, the IP address of the alternate hostname should resolve to the public IP address on the device external port. If the NC (Pulse) session is established, the IP address of the alternate hostname should resolve to the private IP address on the device internal port. BEST PRACTICE: The system uses HTTPS for this service. Therefore, we recommend that you assign a valid certificate to the interface that has the IP address to which this FQDN resolves so that users do not see invalid certificate warnings. |
|
Update Entity IDs |
Use this button to regenerate the SAML entity IDs of all configured service providers and identity providers. Typically, you take this action when the Host FQDN for SAML is changed. |
Managing SAML Metadata Files
You use the System > Configuration > SAML pages to maintain a table of SAML metadata files for the SAML service providers and identity providers in your network. Using SAML metadata files makes configuration easier and less prone to error.
You can add the metadata files to the system by:
•Uploading a metadata file.
•Retrieving the metadata file from a well-known URL.
To add metadata files:
1.Select System > Configuration > SAML.
2.Click New Metadata Provider to display the configuration page.
3.Complete the settings described in the following table.
4.Save the configuration.
The following table lists the SAML Metadata Provider Configuration Guidelines:
|
Settings |
Guidelines |
|
Metadata Provider Location Configuration |
Select one of the following methods: Local. Browse and locate the metadata file on your local host or file system. Remote. Enter the URL of the metadata file. Only http and https protocols are supported. |
|
Metadata Provider Verification Configuration |
|
|
Accept Untrusted Server Certificate |
If you specify a URL for the metadata provider, select this option to allow the system to download the metadata file even if the server certificate is not trusted. This is necessary only for HTTPS URLs. |
|
Accept Unsigned Metadata |
If this option is not selected, unsigned metadata is not imported. Signed metadata is imported only after signature verification. |
|
Signing Certificate |
Browse and locate the certificate that verifies the signature in the metadata file. This certificate overrides the certificate specified in the signature of the received metadata. If no certificate is uploaded here, then the certificate present in the signature of the received metadata is used. Select the Enable Certificate Status Checking option to verify the certificate before using it. Certificate verification applies both to the certificate specified here and the certificate specified in the signature in the metadata file. |
|
Metadata Provider Filter Configuration |
|
|
Roles |
Select whether the metadata file includes configuration details for a SAML service provider, identity provider, or Policy Decision Point. You may select more than one. If you select a role that is not in the metadata file, it is ignored. If none of the selected roles are present in the metadata file, the system returns an error. |
|
Entity IDs To Import |
Enter the SAML Entity IDs to import from the metadata files. Enter only one ID per line. Leave this field blank to import all IDs. This option is available only for uploading local metadata files. |
The Refresh button downloads the metadata files from the remote location even if these files have not been modified. This operation applies only to remote locations; local metadata providers are ignored if selected.
To refresh a metadata file:
1.Select System > Configuration > SAML.
2.Select the metadata file to refresh and click Refresh.
3.To delete a metadata file:
4.Select System > Configuration > SAML.
5.Select the metadata file to delete and click Delete.
Configuring Connect Secure as a SAML 2.0 Service Provider
This topic describes how to configure the system as a SAML service provider. When the system is a SAML service provider, it relies on the SAML identity provider authentication and attribute assertions when users attempt to sign in to the device. Note that authentication is only part of the security system. The access management framework determines access to the system and protected resources.
The system supports:
•HTTP Redirect binding for sending AuthnRequests
•HTTP Redirect binding for sending/receiving SingleLogout requests/responses
•HTTP POST and HTTP Artifact bindings for receiving SAML responses
•RequestedAuthnContext context class specifications
Before you begin:
•Check to see whether the SAML identity provider uses HTTP POST or HTTP Artifact bindings for SAML assertions.
•Check to see whether the SAML identity provider has published a SAML metadata file that defines its configuration. If the SAML identity provider metadata file is available, configuration is simpler and less prone to error.
•Complete the system-wide SAML settings if you have not already done so. Select System > Configuration > SAML > Settings. For details, see Configuring Global SAML Settings
•Add metadata for the SAML identity provider to the metadata provider list if you have not already done so. Select System > Configuration > SAML. For details, see Managing SAML Metadata Files.
The sign-in URL for which a session needs to be established for the system as a service provider is identified by the RelayState parameter (HTTP URL parameter for artifact and HTML form parameter for POST.) In a service provider initiated case, the system populates RelayState as an HTTP URL parameter while sending AuthnRequest. In the IdP-Initiated scenario (Connect Secure is a service provider and there is a third-party IdP), the IdP must be configured to set the appropriate Sign-in URL of the system in the RelayState parameter of the HTML form containing the SAML response. For more information, see the SAML 2.0 specification.
To configure the system as a SAML service provider:
1.Select Authentication > Auth. Servers.
2.Select SAML Server from the New list and then click New Server to display the configuration page.
3.Complete the settings as described in the Table.
4.Save the configuration.
After you save changes for the first time, the page is redisplayed and now has two tabs. Use the Settings tab to modify any of the settings pertaining to the SAML server configuration. Use the Users tab to monitor user sessions.
Next steps:
•Configure the access management framework to use the SAML authentication server. Start with realm and role mapping rules. For details, see "Creating an Authentication Realm" and Specifying Role Mapping Rules for an Authentication Realm
•Configure a sign-in policy. When using a SAML authentication server, the sign-in policy can map to a single realm only. For details, see Defining a Sign-In Policy
The following table lists the SAML Service Provider Profile:
|
Settings |
Guidelines |
|
Specify a name to identify the server instance. |
|
|
Settings |
|
|
SAML Version |
Select 2.0. |
|
SA Entity Id |
This value is prepopulated. It is generated by the system, based on the value for the Host FQDN for SAML setting on the System > Configuration > SAML > Settings page. |
|
Configuration Mode |
Select Manual or Metadata. If a metadata file or location is available from the SAML identity provider, use the metadata option to make configuration simpler and less prone to error. To upload or set the location for the published metadata file, select System > Configuration > SAML and click the New Metadata Provider button. |
|
Identity Provider Entity ID |
The identity provider entity ID is sent as the Issuer value in the assertion generated by the SAML identity provider. If you use the metadata option, this setting can be completed by selecting the identity provider entity ID from the list. The list is populated by the identity provider entities defined in metadata files added to the System > Configuration > SAML page. If you complete this setting manually, specify the Issuer value in assertions generated by the SAML identity provider. Typically, you ask the SAML identity provider administrator for this setting. |
|
Identity Provider Single Sign-On Service URL |
The identity provider SSO service URL is a URL provisioned by the SAML identity provider. The setting is required to support service-provider-initiated SSO. If missing, the system cannot successfully redirect the user request. If you use the metadata option, this setting can be completed by selecting the SSO service URL from the list. The list is populated by the identity provider entities defined in metadata files added to the System > Configuration > SAML page. If you complete this setting manually, ask the SAML identity provider administrator for this setting. |
|
User Name Template |
Specify how the system is to derive the username from the assertion. If the field is left blank, it uses the string received in the NameID field of the incoming assertion as the username. If you choose a certificate attribute with more than one value, the system uses the first matched value. For example, if you enter <certDN.OU> and the user has two values for the attribute (ou=management, ou=sales), the system uses "management". To use all values, add the SEP attribute to the variable. For example, if you enter <certDN.OUT SEP=":">, the system uses "management:sales". The attributes received in the attribute statement in the incoming assertion are saved under userAttr. These variables can also be used with angle brackets and plain text. If the username cannot be generated using the specified template, the login fails. If the NameID filed of the incoming assertion is of type X509Nameformat, then the individual fields can be extracted using system variable "assertionNameDN". |
|
Allowed Clock Skew (minutes) |
Specify the maximum allowed difference in time between the system clock and the SAML identity provider server clock. NOTE: SAML is a time sensitive protocol. The time-based validity of a SAML assertion is determined by the SAML identity provider. If the SAML identity provider and SAML service provider clocks are askew, the assertion can be determined invalid, and you will receive the following error: "SAML Transferred failed. Please contact your system administrator. Detail: Failure: No valid assertion found in SAML response." We recommend you use NTP to ensure the clocks are synchronized and that you set an Allowed Clock Skew value that accommodates any expected or permissible skew. |
|
Support Single Logout |
Single logout is a mechanism provided by SAML for logging out a particular user from all the sessions created by the identity provider. Select this option if the system must receive and send a single logout request for the peer SAML identity provider. If you use the metadata option, the Single Logout Service URL setting can be completed by selecting the SLO service URL from the list. The list is populated by the identity provider entities defined in metadata files added to the System > Configuration > SAML page. The system sends Single Logout requests to this URL. In addition, if you use the metadata option, the Single Logout Response URL setting is completed based on your selection for Single Logout Service URL. If the identity provider has left this setting empty in its metadata file, the system sends the Single Logout response to the SLO service URL. If you complete these settings manually, ask the SAML identity provider administrator for guidance. The Support Single Logout service for the identity provider must present a valid certificate. For example, the hostname in a single logout request URL must be the same as the Common Name of the certificate presented by the identity provider of that hostname. If an invalid certificate is presented, the single logout feature may not work as intended. |
|
|
|
|
SSO Method |
|
|
Artifact |
When configured to use the Artifact binding, the system contacts the Artifact Resolution Service (ARS) to fetch the assertion using SOAP protocol. If the ARS is hosted on a HTTPS URL, then the certificate presented by the ARS is verified by the system. For this verification to pass successfully, the CA of the server certificate issued to the identity provider ARS must be added to the trusted server CA on the system. Complete the following settings to configure SAML using the HTTP Artifact binding: Source ID. Enter the source ID for the identity provider ARS. Source ID is Base64-encoded, 20-byte identifier for the identity provider ARS. If left blank, this value is generated by the system. Source Artifact Resolution Service URL. For metadata-based configuration, this field is completed automatically from the metadata file and is not configurable. For manual configurations, enter the URL of the service to which the SP ACS is to send ArtifactResolve requests. ArtifactResolve requests are used to fetch the assertion from the artifact received by it. SOAP Client Authentication. Select HTTP Basic or SSL Client Certificate and complete the related settings. If you use an SSL client certificate, select a certificate from the device certificate list. Select Device Certificate for Signing. Select the device certificate the system uses to sign the AuthnRequest sent to the identity provider SSO service. If you do not select a certificate, the system does not sign AuthnRequest. Select Device Certificate for Encryption. Select the device certificate the system uses to decrypt encrypted data received in the SAML response. The public key associated with the device certificate is used by the identity provider for encryption. |
|
POST |
When configured to use the POST binding, the system uses a response signing certificate to verify the signature in the incoming response or assertion. The certificate file must be in PEM or DER format. The certificate you select should be the same certificate used by the identity provider to sign SAML responses. Complete the following settings to configure SAML using the HTTP POST binding: Response Signing Certificate. If you use the metadata-based configuration option, select a certificate from the list. The list is populated by the identity provider entities defined in metadata files added to the System > Configuration > SAML page. If you configure these settings manually, browse to and upload the certificate to be used to validate the signature in the incoming response or assertion. If no certificate is specified, the certificate embedded in the response is used. Enable Signing Certificate status checking. Select this option to check the validity of the signing certificate before verifying the signature. This setting applies to any certificate used for signature verification. If this option is enabled, the response will be rejected if the certificate is revoked, expired, or untrusted. If this option is selected, the certificate CA must be added to the system Trusted Client CA store. If this option is not enabled, then the certificate is used without any checks. Select Device Certificate for Signing. Select the device certificate the system uses to sign the AuthnRequest sent to the identity provider SSO service. If you do not select a certificate, the system does not sign AuthnRequest. Select Device Certificate for Encryption. Select the device certificate the system uses to decrypt encrypted data received in the SAML response. The public key associated with the device certificate is used by the identity provider for encryption. |
|
Authentication Context Classes |
Use the Add and Remove buttons to select authentication context classes to be sent in the authentication requests to the SAML identity provider. These are included in the RequestedAuthnContext element. In the OASIS standard, an authentication context is defined as "the information, additional to the authentication assertion itself, that the relying party may require before it makes an entitlements decision with respect to an authentication assertion." This feature supports all authentication context classes specified in the SAML 2.0 OASIS Authn Context specification. For example, if you select X509, the system sends the following context: <samlp:RequestedAuthnContext> <saml:AuthnContextClassRef xmlns:saml="urn:oasis:names:tc:SAML:2.0:assertion"> urn:oasis:names:tc:SAML:2.0:ac:classes:X509</saml:AuthnContextClassRef> </samlp:RequestedAuthnContext> In response, the SAML IdP sends the context data along with the authentication results. The system stores the context data in the session cache, and it can be specified in user attribute role mapping rules. Specify a comparison attribute within the RequestedAuthnContext element. The comparison attribute specifies the relative strengths of the authentication context classes specified in the request and the authentication methods offered by a SAML IdP. The following values specified in the SAML 2.0 OASIS core specification can be selected: exact - Requires the resulting authentication context in the authentication statement to be the exact match of at least one of the authentication contexts specified. minimum - Requires the resulting authentication context in the authentication statement to be at least as strong as one of the authentication contexts specified. maximum - Requires the resulting authentication context in the authentication statement to be stronger than any one of the authentication contexts specified. better - Requires the resulting authentication context in the authentication statement to be as strong as possible without exceeding the strength of at least one of the authentication contexts specified. Select the same value that is configured on the SAML IdP. If none is specified in the SAML IdP configuration, the implicit default is exact. |
|
Service Provider Metadata Settings |
|
|
Metadata Validity |
Enter the number of days the system metadata is valid. Valid values are 0 to 9999. 0 specifies the metadata does not expire. |
|
Do Not Publish SA Metadata |
Select this option if you do not want the system to publish the metadata at the location specified by the system Service Entity ID field. |
|
Download Metadata |
This button appears only after you have saved the authentication server configuration. Use this button to download the metadata of the current SAML service provider. |
|
User Record Synchronization |
|
|
Enable User Record Synchronization |
Allow users to retain their bookmarks and individual preferences regardless of which device they log in to. |
|
Logical Auth Server Name |
Specify the server name if you have enabled user record synchronization. |
Configuring Connect Secure as a SAML 2.0 Identity Provider
This topic describes how to configure the system as a SAML identity provider.
Configuration Overview
Implementing the system as a SAML identity provider includes the following basic steps.
1.Configure system-wide SAML settings. Select System > Configuration > SAML > Settings. See Configuring Global SAML Settings.
2.Add SAML metadata provider files. Select System > Configuration > SAML. See Managing SAML Metadata Files.
3.Configure Sign-In SAML metadata provider settings. See Configuring Sign-in SAML Metadata Provider Settings.
4.Configure Sign-In SAML identity provider settings. See Configuring Sign-in SAML Identity Provider Settings
5.Configure peer service provider settings. See Configuring Peer SAML Service Provider Settings
6.Configure a resource policy:
•For gateway mode deployments, configure a SAML SSO resource policy. See Configuring a SAML SSO Resource Policy for Gateway Mode Deployments
•For peer mode deployments, configure a SAML SSO external applications policy. See Configuring a SAML External Applications SSO Policy
Configuring Sign-in SAML Metadata Provider Settings
Sign-in SAML metadata provider settings determine how the system identity provider metadata is published.
To configure the identity provider metadata publication settings:
1.Select Authentication > Signing In > Sign-In SAML > Metadata Provider to display the configuration page.
2.Complete the settings described in the following table.
3.Click Save Metadata Provider to save your changes.
The following table lists the Sign-in SAML Identity Provider Metadata Provider Configuration Guidelines:
|
Settings |
Guidelines |
|
Entity ID |
This value is prepopulated. It is generated by the system, based on the value for the Host FQDN for SAML setting on the System > Configuration > SAML > Settings page. |
|
Metadata Validity |
Specify the maximum duration for which a peer SAML entity can cache the system SAML metadata file. Valid values are 1 to 9999. The default is 365 days. |
|
Do Not Publish SA Metadata |
Select this option if you do not want the system to publish the metadata at the location specified by the system Entity ID field. You can use this option to toggle off publication without deleting your settings. |
|
Download Metadata |
Use this button to download the system SAML identity provider metadata. |
Configuring Sign-in SAML Identity Provider Settings
The settings defined in this procedure are the default settings for the system SAML identity provider communication with all SAML service providers. If necessary, you can use the peer service provider configuration to override these settings for particular service providers.
To configure sign-in SAML identity provider settings:
1.Select Authentication > Signing In > Sign-In SAML > Identity Provider to display the configuration page.
2.Complete the settings described in the following table.
3.Save the configuration.
The following table lists the Sign-in SAML Identity Provider Configuration Guidelines:
|
Settings |
Guidelines |
|
Basic Identity Provider (IdP) Configuration (Published in Metadata) |
|
|
Protocol Binding to use for SAML Response |
Select POST, Artifact, or both, depending on your total requirements. |
|
Signing Certificate |
Select the certificate used to sign the SAML messages sent by the system. The certificates listed here are configured on the System > Configuration > Certificate > Device Certificates page. |
|
Decryption Certificate |
Select the certificate used to decrypt the SAML messages sent by peer service providers. The public key associated with this certificate is used by the peer service provider to encrypt SAML messages exchanged with this identity provider. The decryption certificate must be configured if the peer service provider encrypts the SAML messages sent to the system. The certificates listed here are configured on the System > Configuration > Certificate > Device Certificates page. |
|
Other Configurations |
Reuse Existing NC (Pulse) Session. This feature applies to a service-provider-initiated SSO scenario - that is, when a user clicks a link to log into the service provider site. The service provider redirects the user to the identity provider SSO Service URL. If this option is selected, a user with an active NC/Pulse session is not prompted to authenticate. The system uses information from the existing session to form the SAML response. Accept unsigned AuthnRequest. In a service-provider-initiated SSO scenario, the SP sends an AuthnRequest to the identity provider. This AuthnRequest could be either signed or unsigned. If this option is unchecked, the system rejects unsigned AuthnRequests. Note that the system also rejects signed AuthnRequests if signature verification fails. |
|
Service-Provider-Related IdP Configuration |
|
|
Relay State |
SAML RelayState attribute sent to the service provider in an identity-provider-initiated SSO scenario. If left blank, the RelayState value is the URL identifier of the resource being accessed. |
|
Session Lifetime |
Suggest a maximum duration of the session at the service provider created as a result of the SAML SSO. Select one of the following options: None. The identity provider does not suggest a session duration. Role Based. Suggest the value of the session lifetime configured for the user role. Customized. If you select this option, the user interface displays a text box in which you specify a maximum in minutes. |
|
Sign-In Policy |
Select the sign-in URL to which the user is redirected in a service-provider-initiated scenario. The list is populated by the sign-in pages configured on the Authentication > Signing In > Sign-in Policies page. The user is not redirected if he or she already has a session with the system and had authenticated through this sign-in policy. |
|
Force Authentication Behavior |
In an service-provider-initiated scenario, the service provider sends an AuthnRequest to the identity provider. If the service provider AuthnRequest includes the ForceAuthn attribute set to true and the user has a valid session, this setting determines how the identity provider responds. Select one of the following options: Reject AuthnRequest. Do not honor the SAML SSO request. Re-Authenticate User. Invalidate the user session and prompt for reauthentication. This setting prevails over the Pulse session reuse setting. |
|
User Identity |
|
|
Subject Name Format |
Format of the NameIdentifier field in the generated assertion. Select one of the following options: DN. Username in the format of DN (distinguished name). Email address. Username in the format of an e-mail address. Windows. Username in the format of a Windows domain qualified username. Other. Username in an unspecified format. |
|
Subject Name |
Template for generating the username that is sent as the value of the NameIdentifier field in the assertion. You may use any combination of available system or custom variables contained in angle brackets and plain text. |
|
Web Service Authentication |
These settings apply when the HTTP Artifact binding is used. |
|
Authentication Type |
Method used to authenticate the service provider assertion consumer service to the identity provider on the system. Select one of the following options: None. Do not authenticate the assertion consumer service. Username/Password. If you select this option, use the controls to specify username and password settings. Certificate. For certificate-based authentication, the Client CA of the service provider should be present in the system Trusted Client CA list (located on the System > Configuration > Certificates > Trusted Client CAs page). |
|
Artifact Configuration |
These settings apply when the HTTP Artifact binding is used. |
|
Source ID |
This is the Base64-encoded, 20-byte identifier of the Artifact Resolution Service on the identity provider. |
|
Enable Artifact Response Signing and Encryption |
If checked, the identity provider signs and encrypts the artifact response. |
|
Attribute Statement Configuration |
Attributes to be sent in SAML Attribute statements can be specified manually as name-value pairs, or you can configure an option to fetch name-value pairs from an LDAP server (or you can specify both manual entries and LDAP entries). |
|
Attribute Name |
An ASCII string. |
|
Friendly Name |
A more readable friendly name for the attribute. This is optional (an option included in the SAML standard). |
|
Attribute Value |
The attribute value can be specified as a hard-coded string, a custom variable, or a user attribute variable. System conventions for specifying user and custom tokens and variables apply. The value can be a combination of a string and a user or custom variable. For example: Email::<customVar.email>. The value can also be a combination of user and custom variables and hardcoded text. For example: mydata=<USER><REALM><customVar.email>. |
|
Value Type |
Select Single-Valued or Multivalued. A single-valued attribute can be a combination of a string and a user or custom variable. If there are multiple single-valued attributes configured with the same attribute names, they are combined and sent as a multivalued attribute. Select Multivalue if you want every individual token defined in the Attribute Value column to be sent as a separate AttributeValue. For example: <element ref="saml:AttributeValue" minOccurs="0" maxOccurs="unbounded"/> If the Attribute value is given as <USER>mars<REALM>pulsesecure<ROLE> and the value type is marked as Multivalued, then the values sent as part of attribute statement are sent as follows: Username Realmname Role Note that only the tokens ['<>'] will be considered when processing a Multivalued attribute marked. The remaining data (for example mars, jupiter) is discarded. Specifying the token <ROLE> will send only one role. To send all roles, specify the Attribute value with the syntax <ROLE SEP=",">. If you specify <ROLE SEP=","> as a single-valued attribute, it is sent as a single string with "," separated roles. If you specify <ROLE SEP=","> as a multi-valued attribute, each role is sent in a separate <AttributeValue> element. Encryption is set at the assertion level. You cannot encrypt individual attributes. |
|
Directory Server |
To fetch attribute name-value pairs from an LDAP server, complete the following settings: Directory Server - Select the LDAP server from the list. You must add the LDAP server to the Authentication > Auth. Servers list before it can be selected. Username for lookup - Enter a username template for LDAP lookup. The default is the variable <USERNAME>. The <USERNAME> variable stands for the login credential the user entered when logging in. The value can contain contextual characters as well as variables for substitution. Attribute Name - Type an LDAP attribute name, such as cn. The attribute name is fetched from the LDAP server and sent as SAML Attribute statements as part of a SAML assertion. Friendly Name - A more readable friendly name for the attribute. This is optional (an option included in the SAML standard). With the LDAP option, the SAML IdP sends attributes in the form configured on the backend LDAP server. If the LDAP server returns an attribute value in multi-valued form, then the SAML attribute statement will also be in multi-valued form. |
Configuring Peer SAML Service Provider Settings
The peer service provider list defines the set of service providers configured to communicate with the system SAML identity provider. When you add a peer service provider to the list, you can customize the SAML identity provider settings used to communicate with the individual service provider. If the service provider provides a SAML metadata file, you can use it to simplify configuration, or you can complete more detailed manual steps. If available, we recommend you use metadata so that configuration is simpler and less prone to error.
To configure peer SAML service provider settings:
1.Select Authentication > Signing In > Sign-In SAML > Identity Provider.
2.Under Peer Service Provider Configuration, create a list of service providers that are SAML peers to the system SAML identity provider. To add a service provider to the list, click Add SP to display the configuration page.
3.Complete the settings described in the following table.
4.Save the configuration.
The following table lists the Peer Service Provider Configuration Guidelines:
|
Settings |
Guidelines |
|
Configuration Mode |
Select Manual or Metadata. |
|
Service Provider Configuration - Metadata |
|
|
Entity Id |
If you use metadata, select the SAML entity ID of the service provider. This list contains all the service providers specified in all the metadata files added to the System > Configuration > SAML page. |
|
Select certificates manually |
When you use the metadata configuration, the system SAML identity provider iterates through all the signature verification certificates specified when verifying the incoming SAML messages coming from the service provider. Similarly, when encrypting the SAML messages going out, the system SAML identity provider encrypts the messages with the first valid encryption certificate encountered in the metadata. Select this option to override this default behavior and select certificates manually. |
|
Signature Verification Certificate |
If you select the Select certificates manually option, select the certificate to be used by the identity provider to verify the signature of incoming SAML messages. |
|
Encryption Certificate |
If you select the Select certificates manually option, select the certificate to be used if the assertions sent by the identity provider must be encrypted. |
|
Service Provider Configuration - Manual |
|
|
Entity Id |
If you are completing a manual configuration, ask the SAML service provider administrator for this setting. |
|
Assertion Consumer Service URL |
SAML service provider URL that receives the assertion or artifact sent by the identity provider. |
|
Protocol Binding supported by the Assertion Consumer Service at the SP |
Select POST, Artifact, or both. This setting must be consistent with the SAML identity provider configuration. |
|
Default Binding |
If both POST and Artifact bindings are supported, which is the default? Post Artifact This setting must be consistent with the SAML identity provider configuration. |
|
Signature Verification Certificate |
Upload the certificate to be used by the identity provider to verify the signature of incoming SAML messages. If no certificate is specified, the certificate embedded in the incoming SAML message is used for signature verification. |
|
Encryption Certificate |
Upload the certificate to be used if the assertions sent by the identity provider must be encrypted. If not certificate is specified, the assertions sent by the identity provider are not encrypted. |
|
Certificate Attribute Configuration for Artifact Resolution Service |
Optional. Specify attributes that must be present in the certificate presented to the Artifact Resolution Service (ARS) at the identity provider by the service provider assertion consumer service. This option appears only if the SAML service provider supports the HTTP Artifact binding, the system SAML identity provider has been configured to support the HTTP Artifact binding, and the Web service authentication type specified for the service provider is Certificate. Certificate Status Checking Configuration |
|
Enable signature verification certificate status checking |
Select this option to enable revocation checks for the signing certificate. Uses the configuration on the System > Configuration > Certificates > Trusted Client CAs page. |
|
Enable encryption certificate status checking |
Select this option to enable revocation checks for the encryption certificate. Uses the configuration on the System > Configuration > Certificates > Trusted Client CAs page. |
|
Customize identity provider Behavior |
|
|
Override Default Configuration |
Select this option to set custom behavior of the system SAML identity provider for this SP instance. If you select this option, the user interface displays the additional options listed next. |
|
Reuse Existing NC (Pulse) Session |
This option cannot be enabled here if it is not selected for the sign-in SAML identity provider default settings. |
|
Accept unsigned AuthnRequest |
Individual service providers can choose to accept unsigned AuthnRequest. |
|
Relay State |
SAML RelayState attribute sent to the service provider in an identity-provider-initiated SSO scenario. If left blank, the RelayState value is the URL identifier of the resource being accessed. |
|
Session Lifetime |
Suggest a maximum duration of the session at the service provider created as a result of the SAML SSO. Select one of the following options: None. The identity provider does not suggest a session duration. Role Based. Suggest the value of the session lifetime configured for the user role. Customized. If you select this option, the user interface displays a text box in which you specify a maximum in minutes. |
|
Sign-In Policy |
Select the Sign-In URL to which the user is redirected in a service-provider-initiated scenario. The list is populated by the sign-in pages configured in Authentication > Signing In > Sign-in Policies. The user is not redirected if he or she already has an active session and had authenticated through this sign-in policy. |
|
Force Authentication Behavior |
In an service-provider-initiated scenario, the service provider sends an AuthnRequest to the identity provider. If the service provider AuthnRequest includes the ForceAuthn attribute set to true and the user has a valid session, this setting determines how the identity provider responds. Select one of the following options: Reject AuthnRequest. Do not honor the SAML SSO request. Re-Authenticate User. Invalidate the user session and prompt for reauthentication. This setting prevails over the Pulse session reuse setting. |
|
User Identity |
|
|
Subject Name Format |
Format of NameIdentifier field in generated Assertion. Select one of the following options: DN. Username in the format of DN (distinguished name). Email address. Username in the format of an e-mail address. Windows. Username in the format of a Windows domain qualified username. Other. Username in an unspecified format. |
|
Subject Name |
Template for generating the username that is sent as the value of the NameIdentifier field in the assertion. You may use any combination of available system or custom variables contained in angle brackets and plain text. |
|
Web Service Authentication |
These settings apply when the HTTP Artifact binding is used. |
|
Authentication Type |
Method used to authenticate the service provider assertion consumer service to the identity provider on the system. Select one of the following options: None. Do not authenticate the assertion consumer service. Username/Password. Use the controls to specify username and password settings. Certificate. For certificate-based authentication, the client CA of the service providers should be present in the system trusted client CA list (located on the System > Configuration > Certificates > Trusted Client CAs page). |
|
Artifact Configuration |
These settings apply when the HTTP Artifact binding is used. |
|
Source ID |
This is the Base64-encoded, 20-byte identifier of the Artifact Resolution Service on the identity provider. |
|
Enable Artifact Response Signing and Encryption |
If checked, the identity provider signs and encrypts the Artifact response. |
|
Attribute Statement Configuration |
|
|
Send Attribute Statements |
Select this option if the SAML SP requires additional attributes to be sent with SAML assertions. If you enable attribute statements, select one of the following configuration options: Use IdP Defined Attributes-Send attributes based on the default settings for the system SAML identity provider communication with all SAML service providers. Customize IdP Defined Attributes-Selectively configure the attributes that are sent for this particular peer SAML SP. Attributes to be sent in SAML Attribute statements can be specified manually as name-value pairs, or you can configure an option to fetch name-value pairs from an LDAP server (or you can specify both manual entries and LDAP entries). If you select this option, configure the settings described next. |
|
Attribute Name |
An ASCII string. |
|
Friendly Name |
A more readable friendly name for the attribute. This is optional (an option included in the SAML standard). |
|
Attribute Value |
The attribute value can be specified as a hard-coded string, a custom variable, or a user attribute variable. System conventions for specifying user and custom tokens and variables apply. The value can be a combination of a string and a user or custom variable. For example: Email::<customVar.email>. The value can also be a combination of user and custom variables and hardcoded text. For example: mydata=<USER><REALM><customVar.email>. |
|
Value Type |
Select Single-Valued or Multivalued. A single-valued attribute can be a combination of a string and a user or custom variable. If there are multiple single-valued attributes configured with the same attribute names, they are combined and sent as a multivalued attribute. Select Multivalue if you want every individual token defined in the Attribute Value column to be sent as a separate AttributeValue. For example: <element ref="saml:AttributeValue" minOccurs="0" maxOccurs="unbounded"/> If the Attribute value is given as <USER>mars<REALM>pulsesecure<ROLE> and the value type is marked as multivalued, then the values sent as part of attribute statement are sent as follows: Username Realmname Role Note that only the tokens ['<>'] will be considered when processing a multivalued attribute marked. The remaining data (for example mars, jupiter) is discarded. Specifying the token <ROLE> will send only one role. To send all roles, specify the Attribute value with the syntax <ROLE SEP=",">. If you specify <ROLE SEP=","> as a single-valued attribute, it is sent as a single string with "," separated roles. If you specify <ROLE SEP=","> as a multivalued attribute, each role is sent in a separate <AttributeValue> element. Encryption is set at the assertion level. You cannot encrypt individual attributes. |
|
Directory Server |
To fetch attribute name-value pairs from an LDAP server, complete the following settings: Directory Server-Select the LDAP server from the list. You must add the LDAP server to the Authentication > Auth. Servers list before it can be selected. Username for lookup-Enter a username template for LDAP lookup. The default is the variable <USERNAME>. The <USERNAME> variable stands for the login credential the user entered when logging in. The value can contain contextual characters as well as variables for substitution. Attribute Name-Type an LDAP attribute name, such as cn. The attribute name is fetched from the LDAP server and sent as SAML Attribute statements as part of a SAML assertion. Friendly Name-A more readable friendly name for the attribute. This is optional (an option included in the SAML standard). With the LDAP option, the SAML IdP sends attributes in the form configured on the backend LDAP server. If the LDAP server returns an attribute value in multivalued form, then the SAML attribute statement will also be in multivalued form. |
Configuring a SAML SSO Resource Policy for Gateway Mode Deployments
When deployed as a gateway in front of enterprise resources, the SAML SSO policy acts like other resource policies. When deployed as a gateway, the SAML SSO communication can be configured as either identity-provider-initiated or service-provider-initiated. The system maintains the session and uses its rewriting or pass-through proxy features to render data to the user. You use a SAML SSO resource policy when the protected resource supports SAML SSO and has been configured as a SAML service provider.
To configure a SAML SSO resource policy:
1.Select Users > Resource Policies > Web.
2.Use the tabs to display the SSO > SAML page.
3.If your administrator view is not configured to show SAML policies, click the Customize button in the upper-right corner of the page and select the SSO and SAML check boxes.
4.Click New Policy to display the configuration page.
5.Complete the settings described in the following table.
6.Save the configuration.
The following table lists the SAML SSO Resource Policy Configuration Guidelines:
|
Settings |
Guidelines |
|
Name |
Type a name for the policy. |
|
Description |
Type a description that would be meaningful to other administrators. |
|
Resources |
Specify the fully qualified domain name for the resources for which this policy applies. These are the resources protected at the SAML service provider. |
|
Roles |
Select one of the following options: Policy applies to ALL roles. To apply this policy to all users Policy applies to SELECTED roles. To apply this policy only to users who are mapped to roles in the Selected roles list. Make sure to add roles to this list from the Available roles list. Policy applies to all roles OTHER THAN those selected below. To apply this policy to all users except for those who map to the roles in the Selected roles list. Make sure to add roles to this list from the Available roles list. |
|
Action |
Select one of the following options: Use the SAML SSO defined below. Typically, this is the setting you use for a SAML SSO resource policy. The system SAML identity provider/SAML service provider makes the SSO request when a user tries to access a SAML resource specified in the Resources list. Do NOT use SAML. The system does not perform an SSO request. Use this if there is a problem with the SAML service provider and you want to allow access. Use Detailed Rules. Use this option to configure advanced rules. |
|
SAML SSO Details |
|
|
SAML Version |
Select 2.0. |
|
SAML SSO Type |
From 9.1R2 release, an administrator has the option to choose between IdP (PCS) or SP to initiate SAML single sign on Select the required SAML SSO Type: IdP-Initiated: PCS (configured as Identity Provider) initiated SAML SSO. SP-Initiated: Service Provider initiated SAML SSO in Rewriter mode. |
|
Service Provider Entity ID |
Select the service provider entity ID. The service provider entity IDs listed here are configured on the Authentication > Signing In > Sign-in SAML > Identity Provider > Peer Service Provider pages. |
|
Cookie Domain |
Enter a comma-separated list of domains to which the system sends the SSO cookie. |
|
Rewrite Response from SP |
Select this option if the SAML service provider generates HTTP responses that require user/browser action, such as submission of a form, JavaScript execution, redirection to a different location, and other similar behavior. If you select this option, the system rewrites the HTTP responses sent by the SAML service provider and sends them to the user. |
Configuring Service Provider Initiated SAML SSO
From 9.1R2 release, Pulse Secure supports SP-initiated SAML SSO when PCS is configured as IdP in gateway mode. PCS uses the existing user session in generating SAML assertion for the user for SSO.
In SP-Initiated SSO, the sequence is as follows:
1.A user logs into PCS and clicks bookmark (SP-Initiated SAML SSO resource).
2.PCS sends the request to SP.
3.SP responds with SAML AuthnRequest to PCS as the user is not authenticated to SP.
4.PCS posts SAML assertion to SP.
5.SP sends the resource to PCS.
6.PCS rewrites the resource and provides access to the user.
To configure a SAML SSO resource policy:
1.Select Users > Resource Policies > Web.
2.Use the tabs to display the SSO > SAML page.
If your administrator view is not configured to show SAML policies, click the Customize button in the upper-right corner of the page and select the SSO and SAML check boxes.
3.Click New Policy to display the configuration page.
4.In the SAML SSO Details section, select SAML SSO Type as SP-Initiated.
5.Complete other settings described in the following table.
6.Save the configuration.
Configuring a SAML External Applications SSO Policy
When deployed to support access to external resources (for example, public cloud resources), the system does not have to be a gateway to user access. The user can access the external resource directly, and the traffic does not flow through the device. To enable SAML SSO in these deployments, you configure the system as a SAML identity provider to correspond with the external SAML service provider, and you configure a SAML external applications SSO policy to determine the users and resources to which the SAML SSO experience applies.
To configure a SAML External Apps SSO resource policy:
1.Select Users > Resource Policies > Web.
2.Use the tabs to display the SSO > SAML External Apps SSO page.
3.If your administrator view is not configured to show SAML policies, click the Customize button in the upper-right corner of the page and select the SSO and SAML check boxes.
4.Click New Policy to display the configuration page.
5.Complete the settings described in the following table.
6.Click Save Changes.
The following table lists the SAML SSO External Applications Policy Configuration Guidelines:
|
Settings |
Guidelines |
|
Name |
Type a name for the policy. |
|
Description |
Type a description that would be meaningful to other administrators. |
|
Resources |
Specify the fully qualified domain name for the resources for which this policy applies. These are the resources protected at the SAML service provider. |
|
Roles |
Select one of the following options: Policy applies to ALL roles. To apply this policy to all users. Policy applies to SELECTED roles. To apply this policy only to users who are mapped to roles in the Selected roles list. Make sure to add roles to this list from the Available roles list. Policy applies to all roles OTHER THAN those selected below. To apply this policy to all users except for those who map to the roles in the Selected roles list. Make sure to add roles to this list from the Available roles list. |
|
Action |
Select one of the following actions: Use the SAML SSO defined below. Typically, this is the setting you use for a SAML SSO resource policy. The system SAML identity provider makes the SSO request when a user tries to access to a SAML resource specified in the Resources list. Do NOT use SAML. The system does not perform an SSO request. Use this if there is a problem with the SAML service provider and you want to allow access. Use Detailed Rules. Use this option to configure advanced rules. |
|
SAML SSO Details |
|
|
Service Provider Entity ID |
Select the service provider entity ID. The service provider entity IDs listed here are configured on the Authentication > Signing In > Sign-in SAML > Identity Provider > Peer Service Provider pages. |
Configuring a SAML 2.0 ACL Web Policy
To configure the system as a policy enforcement point, you must create a SAML ACL web policy.
To configure a SAML ACL web policy:
1.In the admin console, select Users > Resource Policies > Web.
2.Use the tabs to display the Access > SAML ACL page.
If your administrator view is not configured to show SAML policies, click the Customize button in the upper-right corner of the page and select the SAML ACL check box.
3.On the SAML Access Control Policies page, click New Policy.
4.Complete the settings described in the following table.
5.Click Save Changes.
6.On the SAML Access Control Policies page, order the policies according to how you want the system to evaluate them. Keep in mind that once the system matches the resource requested by the user to a resource in a policy's (or a detailed rule's) Resource list, it performs the specified action and stops processing policies.
The following table lists the SAML ACL Web Policy Settings:
|
Setting |
Description |
|
Name |
Type a name for the policy. |
|
Description |
Type a description that would be meaningful to other administrators. |
|
Resources |
Specify the fully qualified domain name for the resources for which this policy applies. These are the resources protected at the SAML service provider. |
|
Roles |
Select one of the following options: Policy applies to ALL roles. To apply this policy to all users. Policy applies to SELECTED roles. To apply this policy only to users who are mapped to roles in the Selected roles list. Make sure to add roles to this list from the Available roles list. Policy applies to all roles OTHER THAN those selected below. To apply this policy to all users except for those who map to the roles in the Selected roles list. Make sure to add roles to this list from the Available roles list. |
|
Action |
Select one of the following options: Use the SAML Access Control checks defined below. The system performs an access control check to the specified URL using the data specified in the SAML Access Control Details section. Do not use SAML Access. The system does not perform an access control check. Use Detailed Rules. Use this option to configure advanced rules. |
|
SAML Access Control Details |
SAML Version. Select 2.0. Configuration Mode. If you select manual, complete the SAML Access Control details. If you select Metadata, select the policy decision point to use. If the metadata option is disabled, you have not defined or uploaded a metadata file on the System > Configuration > SAML page. SAML Web Service URL. Completed automatically if using metadata. If you configure manually, enter the URL of the access management system SAML server. For example, enter https://hostname/ws. SAML Web Service Issuer. Enter the hostname of the issuer, typically the hostname of the access management system. You must enter unique string that the SAML Web service uses to identify itself in authorization assertions. |
|
Authentication Type |
Select one of the following options: None-Do not authenticate the system. Username-Authenticate using a username and password. Enter the username and password that the system must send the Web service. Certificate Attribute-Authenticate using a certificate signed by a trusted certificate authority. If you have more than one certificate installed on the system, use the drop-down list to select which certificate to send to the Web service. |
|
User Identity |
Subject Name Type-Specify which method the system and SAML Web service should use to identify the user. Select one the following options: DN-Send the username in the format of a DN (distinguished name) attribute. Email Address-Send the username in the format of an e-mail address. Windows-Send the username in the format of a Windows domain qualified username. Other-Send the username in another format agreed upon by the system and the SAML Web service. Subject Name-Use variables to specify the username to the SAML Web service. Or, enter static text. You must send a username or attribute that the SAML Web service will recognize. Device Issuer-Enter a name that uniquely identifies the SAML authority, such as the device hostname. |
|
|
|
|
Maximum Cache Time |
You can eliminate the overhead of generating an authorization decision each time the user requests the same URL by indicating that the system must cache the access management system's authorization responses. Enter the amount of time the system should cache the responses (in seconds). |
|
Ignore Query Data |
By default, when a user requests a resource, the system sends the entire URL for that resource (including the query parameter) to the SAML Web service and caches the URL. You can specify that the system should remove the query string from the URL before requesting authorization or caching the authorization response. |
Example: Implementing SAML 2.0 Web Browser SSO for Google Apps
This example shows how to implement SAML 2.0 Web browser SSO for Google Apps.
Topology
When deployed to support access to external resources (for example, public cloud resources), the system does not have to be a gateway to user access. The user can access the external resource directly, and the traffic does not flow through the device. You configure the system as a SAML identity provider to correspond with the external SAML service provider, and you configure a SAML SSO external applications policy to determine the users and resources to which the SAML SSO experience applies.
When you configure the SAML identity provider, some settings are necessary to support either identity-provider-initiated or service-provider-initiated SSO. The documentation for the configuration steps makes note of these settings. Regardless, you configure the SAML identity provider to support both identity-provider-initiated and service-provider-initiated SSO.
The following figure illustrates the flow of network communication in a service-provider-initiated SSO scenario:
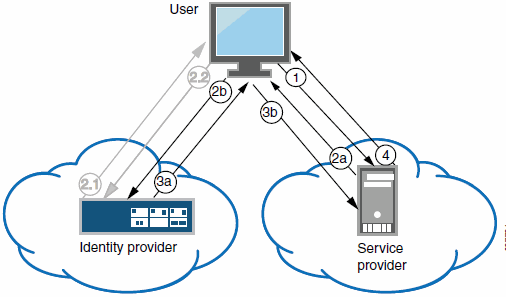
Connect Secure as a SAML Identity Provider (Peer Mode) in a Service-Provider-Initiated SSO Scenario:
|
1 - The user clicks a link to access a resource. |
|
2a - The service provider sends an HTTP redirect status code (HTTP 302) to the user. The SAML request and all other SAML details are sent as URL parameters in the URL Location header. |
|
2b - The user sends an HTTP GET request to the identity provider. The SAML request and all other SAML details are sent as URL parameters. |
|
If the user already has a session with the identity provider, steps 2.1 and 2.2 are skipped. |
|
2.1 - If the user does not have a session, the identity provider sends an authentication challenge to the user. |
|
2.2 - The user enters sign-in credentials. |
|
3a - The identity provider sends a successful status code (HTTP 200 OK) to the user with a form in the HTML body. |
|
3b - The user sends the form to the service provider. |
|
4 - The external resource is delivered to the user's browser. |
The following figure illustrates the flow of network communication in an identity-provider-initiated SSO scenario.
Connect Secure as a SAML Identity Provider (Peer Mode) in an Identity-Provider-Initiated SSO Scenario:
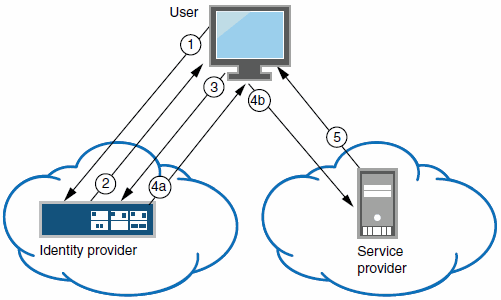
|
1 - The user authenticates to the identity provider. |
|
2 - The identity provider returns a portal page with links to external resources. |
|
3 - The user clicks a link for an external resource. |
|
4a - The identity provider sends a successful status code (HTTP 200 OK) to the user with a form in the HTML body. |
|
4b - The user sends the form to the service provider. |
|
5 - The external resource is delivered to the user's browser. |
Configuring the Google Apps SAML Service Provider
To configure the Google Apps SAML service provider:
1.Log into the Google Apps control panel. The URL is similar to the following: https://www.google.com/a/cpanel/acmegizmo.com.
2.Click Advanced Tools in the menu bar.
3.Click the Set up single sign-on (SSO) link to display its configuration page, as shown in the following figure.
4.Configure the SAML service provider settings as described in the following table.
5.Click Save Changes.
The following figure depicts the Google Apps Advanced Tools: SSO:
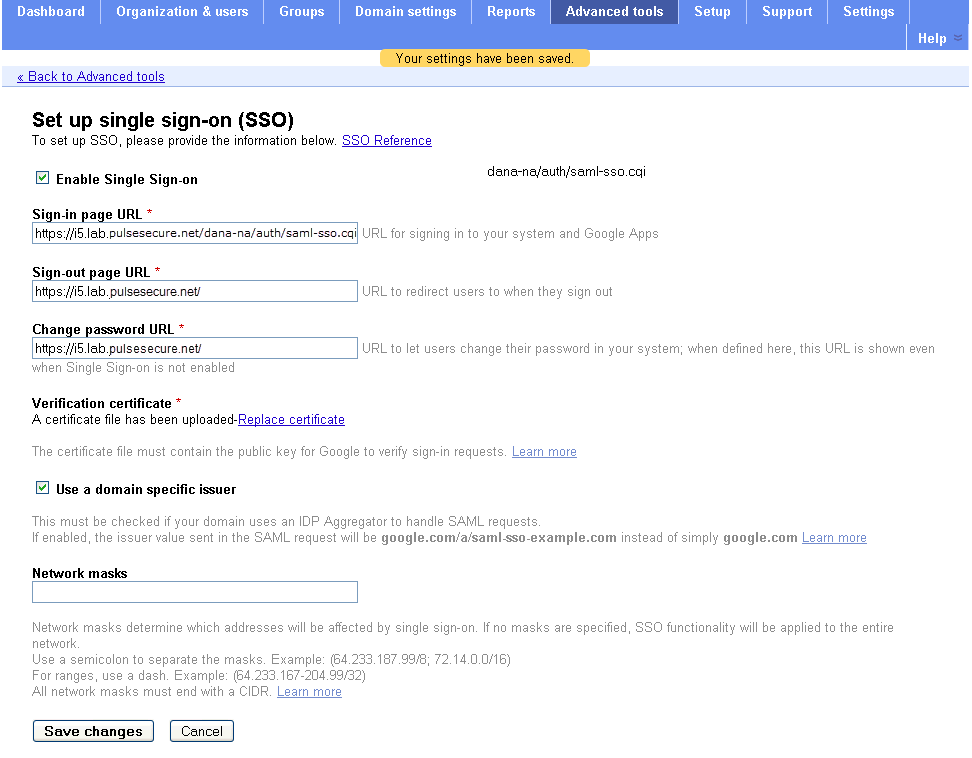
The following table lists the Google Apps SSO Configuration:
|
Settings |
Guidelines |
|
Enable Single Sign-on |
Select this option. |
|
Sign-in page URL |
Type the URL of the system SAML SSO service. The URL formed with the primary host FQDN for SAML has the following form: https://SAMLHostName/dana-na/auth/saml-sso.cgi For example: https://i5.lab.pulsesecure.net/dana-na/auth/saml-sso.cgi The URL formed with the alternate host FQDN for SAML (to support Pulse/NC session detection) has the following form: https://i5pulse.lab.pulsesecure.net/dana-na/auth/saml-sso.cgi |
|
Sign-out page URL |
We recommend using the URL for the sign-in page for the realm associated with the system SAML identity provider. Users who already have a session will be directed to the sign-in page and can decide whether to log out from the system or not. The default sign-in URL has the form: https://FQDN For example: https://i5.lab.pulsesecure.net/ |
|
Change password URL |
We recommend using the URL for the sign-in page for the realm associated with the system SAML identity provider. The system provides password management capabilities for some back-end auth servers (such as AD, LDAP, or Local Auth). When implemented, the password management capabilities are accessed from the sign-in page. The default sign-in URL has the form: https://FQDN For example: https://i5.lab.pulsesecure.net/ |
|
Verification certificate |
Click Browse and select the device certificate. Then click Upload and ensure that the certificate is saved. |
|
Use a domain specific issuer |
Select this option. |
|
Network masks |
Do not select. |
Configuring the Connect Secure SAML Identity Provider
You configure the system SAML identity provider settings to match the Google Apps SAML service provider settings.
To configure the SAML identity provider settings:
1.Select System > Configuration > SAML > Settings to complete the global SAML settings. These settings apply to all of your SAML deployments. The following figure shows an example of SAML global settings.
The following figure depicts the SAML Global Settings:
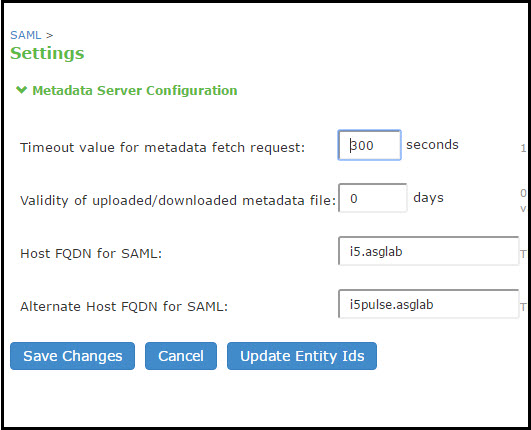
2.Select Authentication > Signing In > Sign-In SAML > Identity Provider to configure SAML identity provider settings. These settings apply to all of your deployments where the device is a SAML identity provider. The following figure depicts the SAML Identity Provider Settings: shows an example of SAML identity provider settings.
The following figure depicts the SAML Identity Provider Settings:
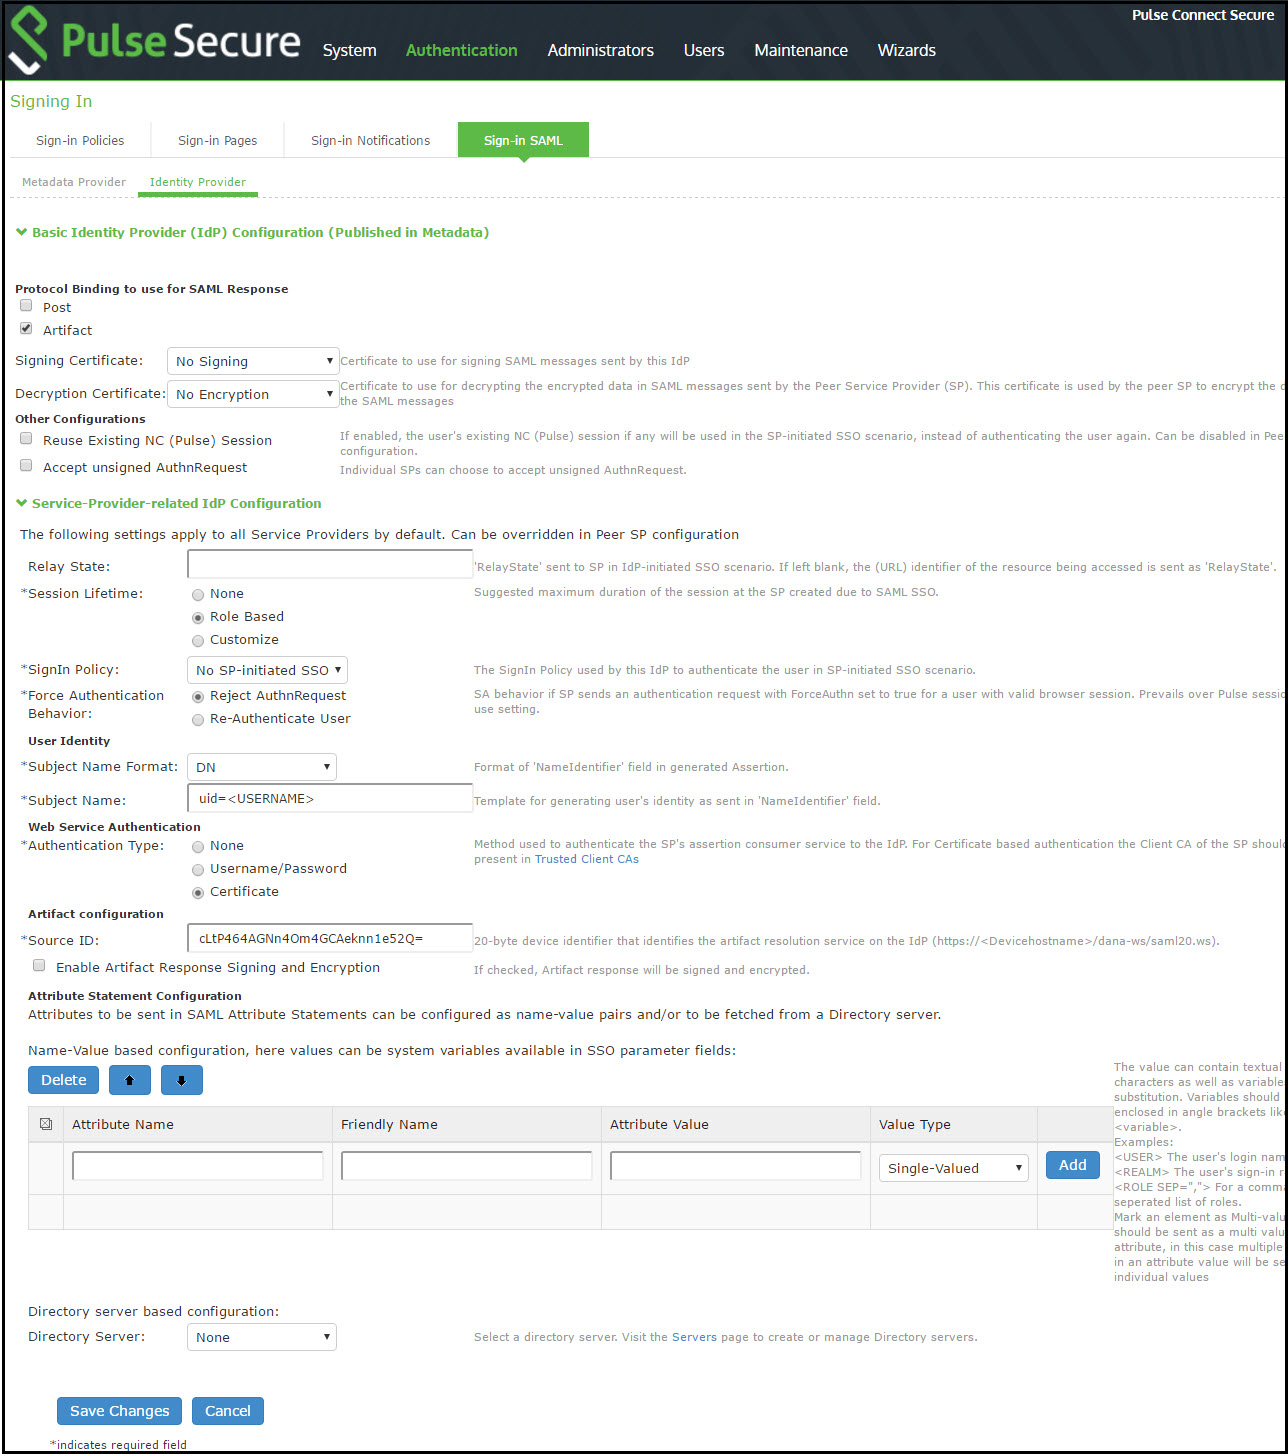
3.On the SAML Sign-In Identity Provider page, click Add SP and complete the settings for communication with Google Apps. Google Apps does not publish metadata, so the configuration is manually configured. The Google SAML service provider uses the HTTP POST binding and takes usernames in e-mail address format. The following figure shows an example of SP settings for Google Apps.
The following figure depicts the Peer SP Settings:
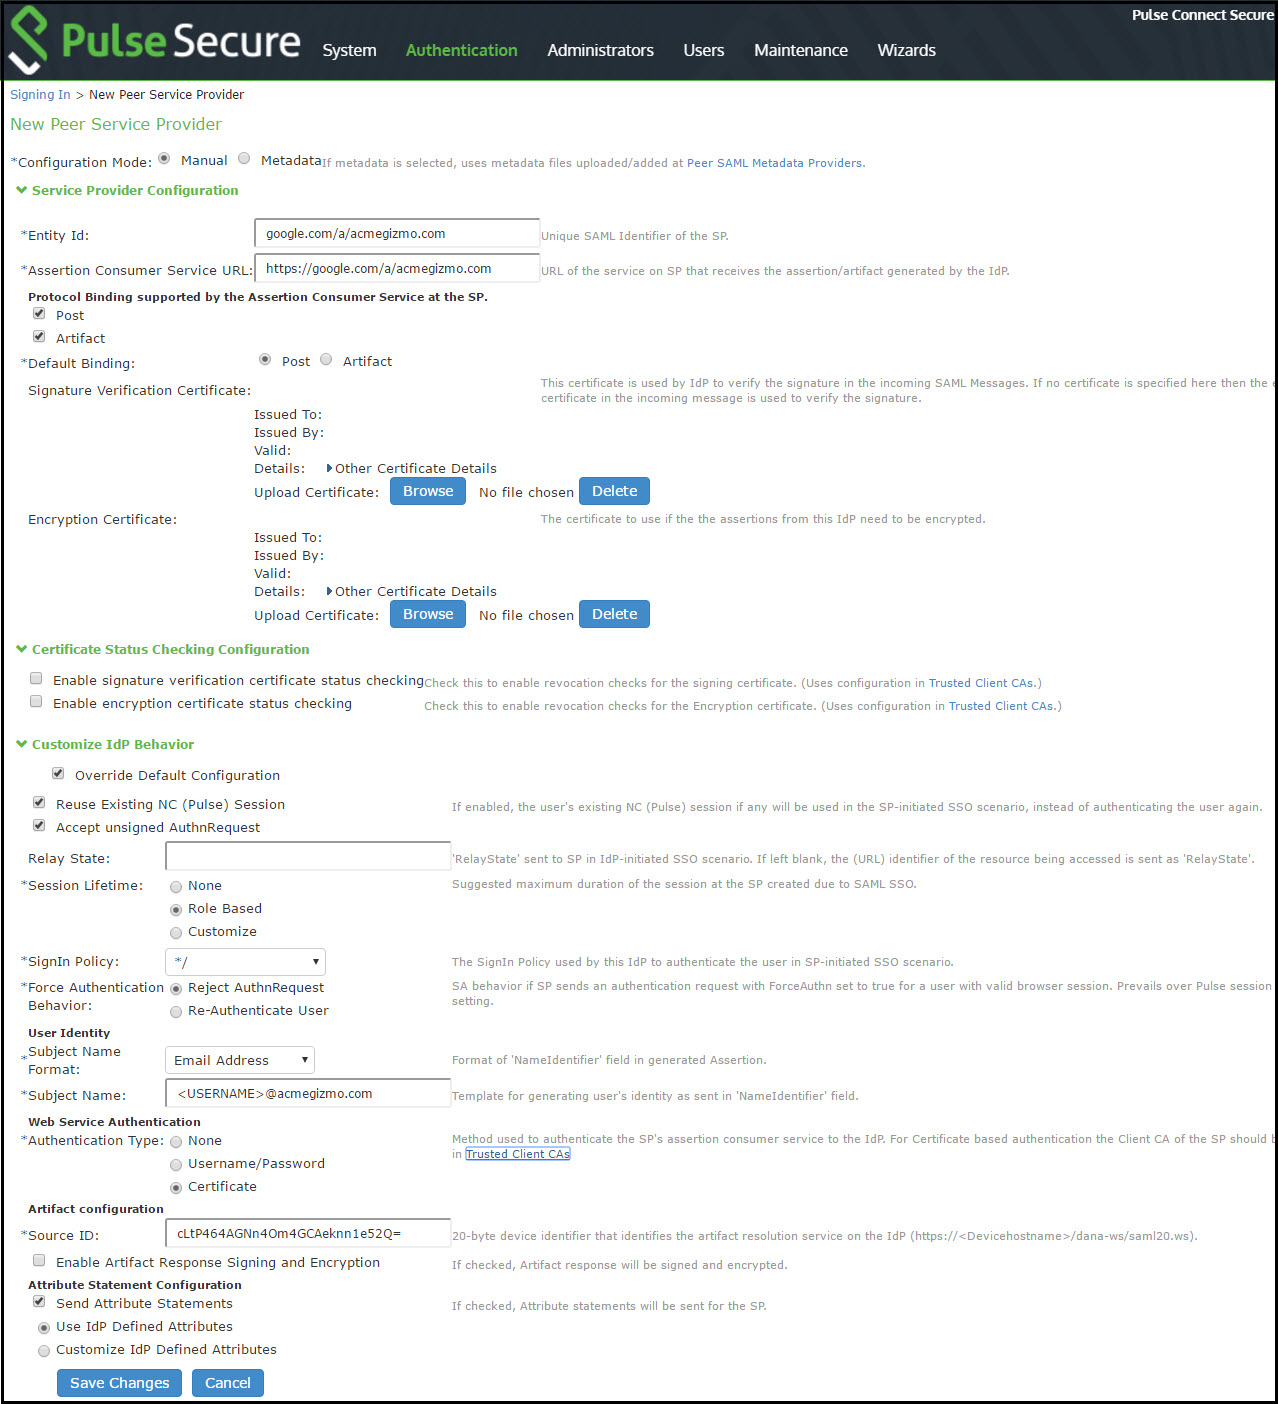
4.Select Users > Resource Policies > Web > SAML External Apps SSO and complete settings for the external applications policy that controls the users and the resources that can use the SSO implementation. The following figure shows an example of an SAML external applications SSO policy for Google Apps.
The following figure depicts the SAML External Apps SSO Policy Settings:
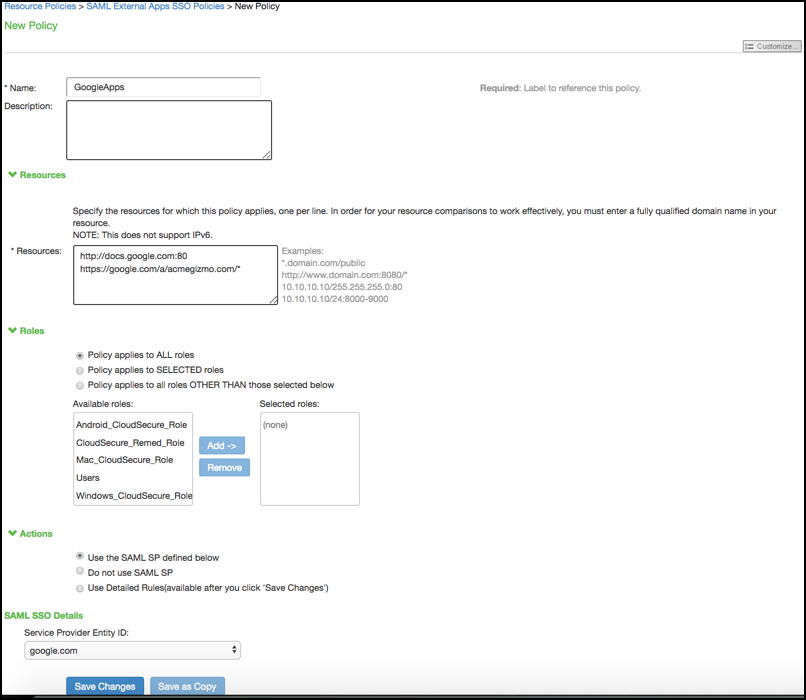
Verifying the Google Apps SAML SSO Deployment
Access a Google Docs or Google Apps resource as a non-admin user to verify the solution works as expected.
Use a browser plugin such as HTTP Watch if you want to trace the SAML communication between the SAML service provider and SAML identity provider.
To verify service-provider-initiated SSO:
1.Make sure you are not logged into the device or Google.
2.Open a Web browser and open a location on Google Docs or Google Apps. Google Apps redirects you to the sign-in page to authenticate.
3.Log in.
The access management framework processes the authentication request, performs host checking rules and role mapping rules. If authentication is successful, the system redirects you to the Google Docs or Google Apps location you had requested.
To verify Pulse/NC session detection for service-provider-initiated SSO:
1.Make sure you are not logged into the device or Google.
2.Use Pulse or VPN tunneling client to create an SSL VPN connection.
3.Open a Web browser and open a location on Google Docs or Google Apps.
You should not have to authenticate to access the Google Docs or Google Apps location.
To verify identity-provider-initiated SSO:
•Use the system admin console to create a bookmark to a location on Google Docs or Google Apps.
•As a user, log in to the device.
•Click the bookmark link to the Google Docs or Google Apps location.
You should not have to authenticate to access the Google Docs or Google Apps location.
Using SAML AuthnContext Class Variables in Role Mapping and Web ACL Rules
This topic describes how to use Security Assertion Markup Language (SAML) AuthnContext class variables in access management framework rules. For information about SAML AuthnContext class variables, refer to the SAML 2.0 OASIS Authn Context specification.
Configuring SAML AuthnContext Class Variables in the Authentication Server Configuration
In deployments where the system is a SAML service provider (SAML SP), you can configure the SAML SP to request authentication context classes from the SAML identity provider (SAML IdP). The SAML SP includes these in the RequestedAuthnContext element. In response, the SAML IdP sends the context data along with the authentication results.
The system stores the authnContext data in the session cache. You can use the system variable named samlAuthnContextClass to create rules based on AuthnContext in role mapping and resource policies.
To specify the SAML AuthnContext class variables in the SAML SP configuration:
1.Select Authentication > Auth. Servers.
2.Create a new SAML server configuration or edit one you have already created.
Figure shows the SAML server configuration page. Red boxes highlight the configuration elements for AuthnContext classes.
3.Select the AuthnContext classes that you want to request from the SAML IdP, and select a comparison method.
This feature supports all authentication context classes described in the SAML 2.0 OASIS Authn Context specification.
The comparison method values are defined in the SAML 2.0 OASIS core specification. You should specify the same values that have been configured on the SAML IdP. If none is specified in the SAML IdP configuration, the implicit default is exact.
4.Save the configuration.
The following figure depicts the Authentication Server Configuration Page:
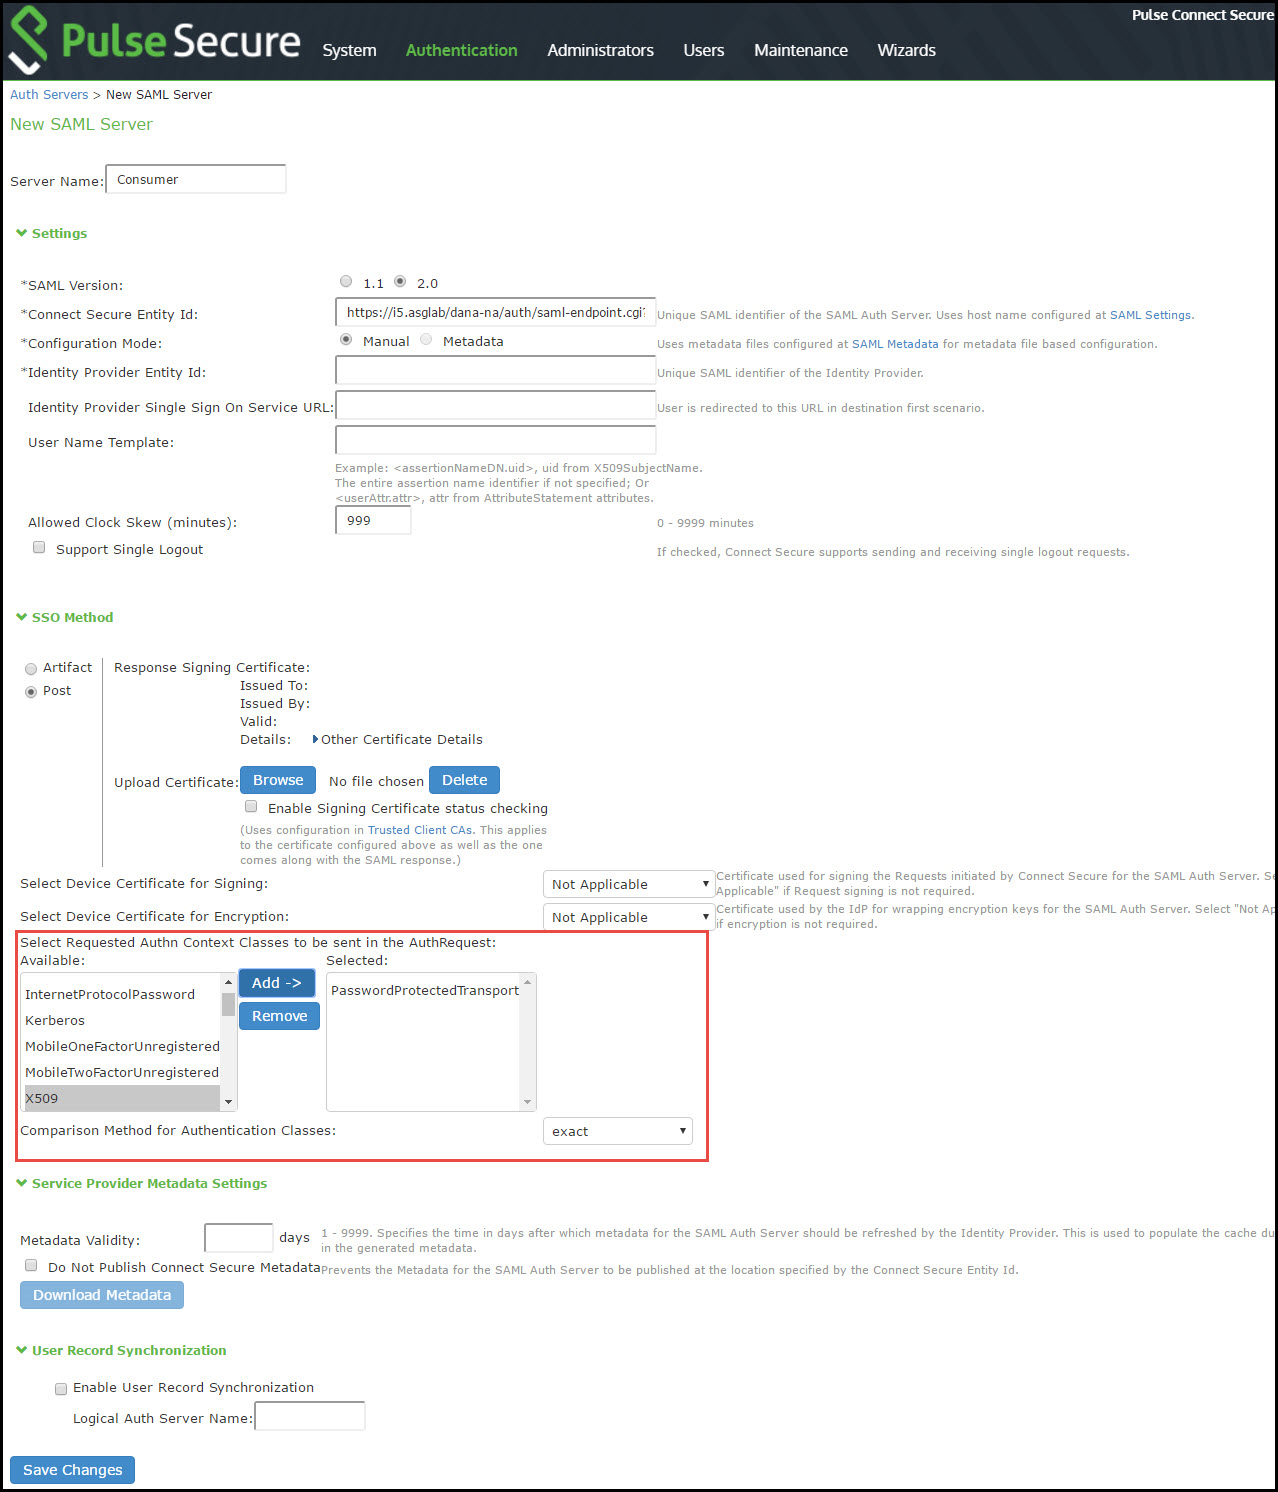
Configuring a Role Mapping Rule Based on a SAML AuthnContext Class Variable
You can use role mapping rule custom expressions to include AuthnContext class data as a factor in role determination.
To configure role mapping rules:
1.Select Users > User Realms.
2.Create a new realm or edit a realm you have already created.
3.Click New Rule to display the configuration page.
4.Select Custom Expression and click Update to redisplay the configuration page with the controls related to custom expressions.
The following figure shows the configuration page.
5.Click Expressions to display the server catalog dialog box.
The next figure shows the dialog box.
6.Select samlAuthnContextClass, select an operator, and click Insert Expression.
7.Edit the expression template to match the AuthnContextClassRef data expected from the SAML IdP.
8.Save your changes to the variable expression and return to the rule configuration page.
9.Select the expression, roles for the rule, and the stop option (if desired).
10.Save your changes to the rule configuration and return to the realm configuration page.
11.Reorder the rules if necessary.
12.Save the realm configuration.
The following figure depicts the Role Mapping Rule Configuration Page:
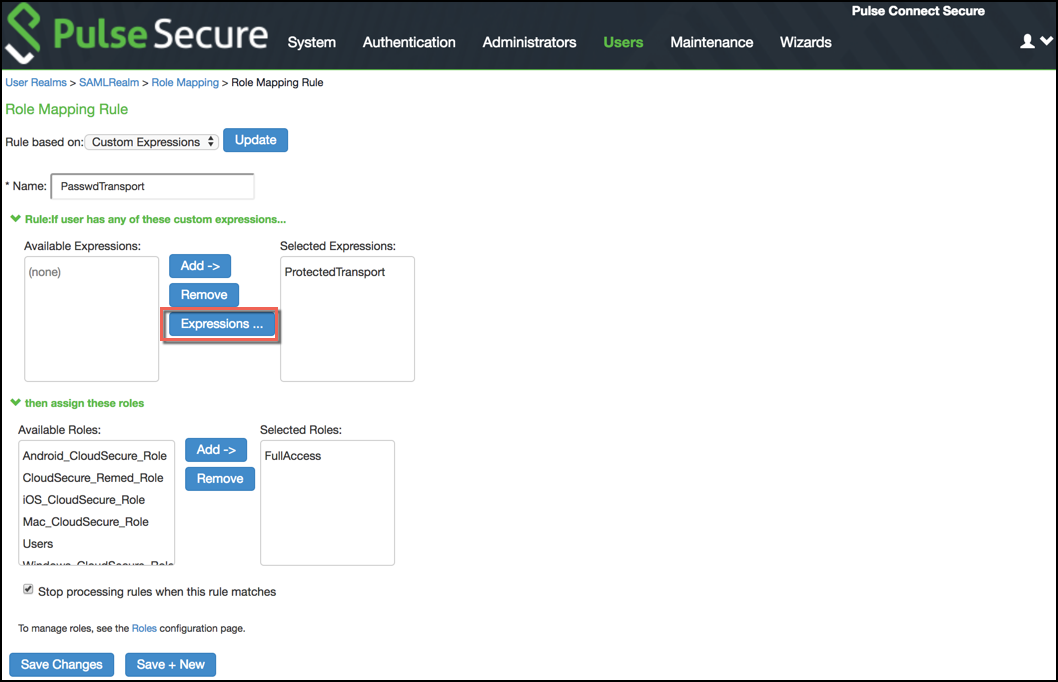
The following figure depicts the Server Catalog Expressions and Variables:
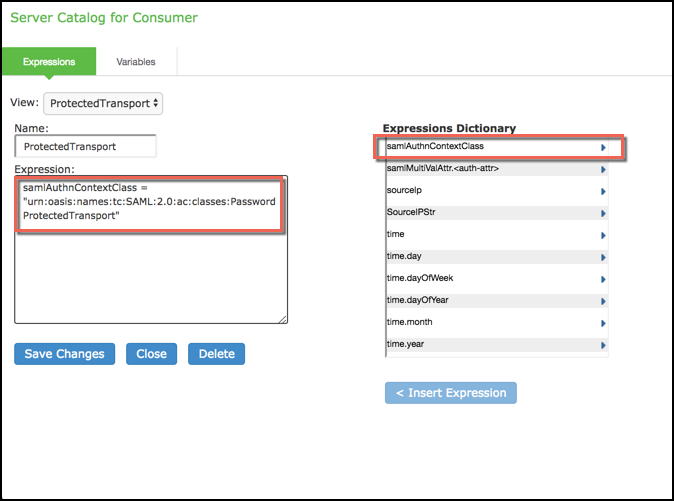
Configuring a Web ACL Policy Rule Based on a SAML AuthnContext Class Variable
You can use the resource policy detailed rules configuration to include AuthnContext class data as a factor in resource access determinations. This example shows how to use a SAML AuthnContext class variable in Web ACL detailed rules. In the same manner, you can use the AuthnContext class variable in detailed rules for other resource policies.
To configure a resource policy:
1.Select Resource Policies > Web > Web ACL.
2.Create a new policy or edit a policy you have already created.
3.Click the Detailed Rules tab for the policy.
4.Click New Rule to display the detailed rules configuration page.
The following figure shows the detailed rule configuration page.
5.Under Conditions, select samlAuthnContextClass, select an operator, and click Insert Expression.
6.Edit the condition expression template to match the AuthnContextClassRef data expected from the SAML IdP.
7.Select a rule action and resources to which the rule applies, and save your changes to return to the policy configuration page.
8.Reorder the rules if necessary.
9.Save the configuration.
The following figure depicts the Detailed Rule Configuration Page:
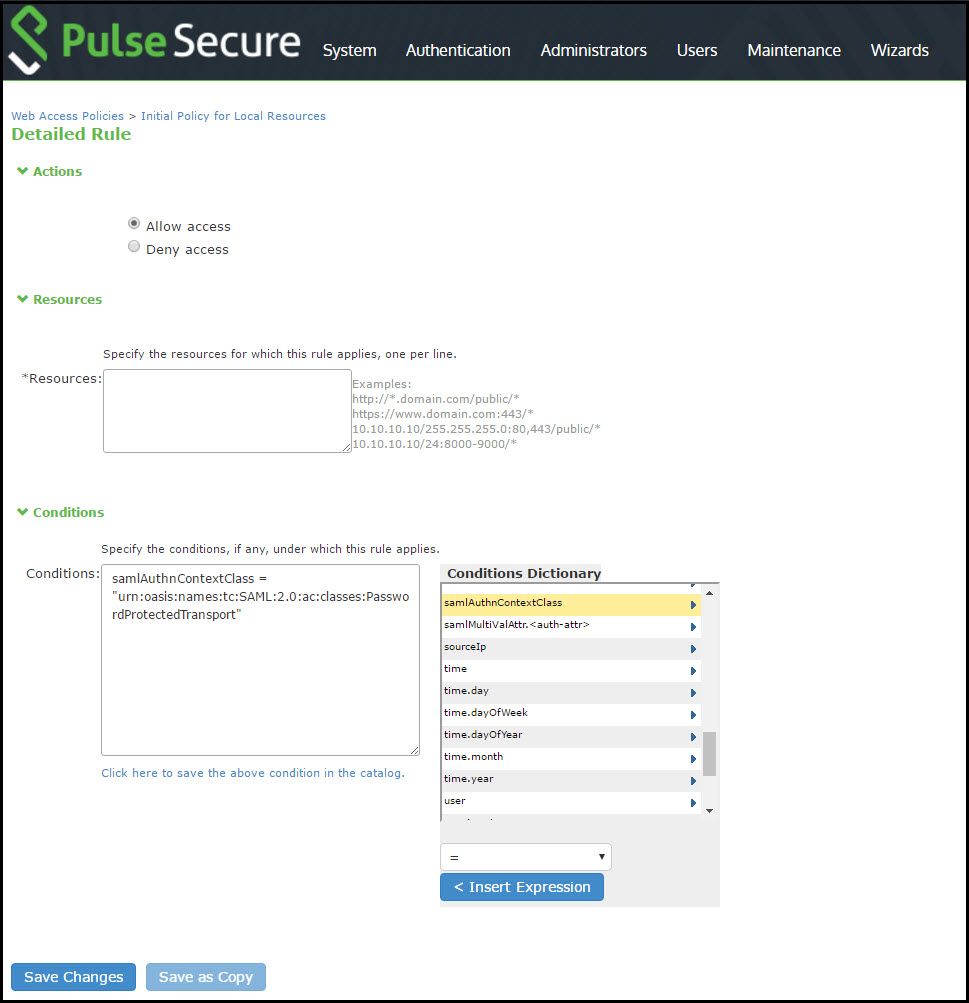
Using Policy Tracing Logs to Verify the SAML AuthnContext Class Variable Is Used in Rules
You can use policy tracing logs to verify your configuration.
To create a policy trace log:
1.Select Troubleshooting > User Sessions > Policy Tracing to display the configuration page.
2.Specify the username, realm, and source IP address if you know it. If you provide the source IP address, the policy trace log can include events that occur before the user ID is entered into the system.
3.Select the events to trace.
4.Click Start Recording.
5.Initiate the action you want to trace, such as a user sign in.
6.Click View Log to display the policy trace results log.
7.Click Stop Recording when you have enough information.
The following figure shows policy trace results. The highlighted entries show the data populated to the samlAuthnContextClass system variable, as well as the role mapping rule that was matched.
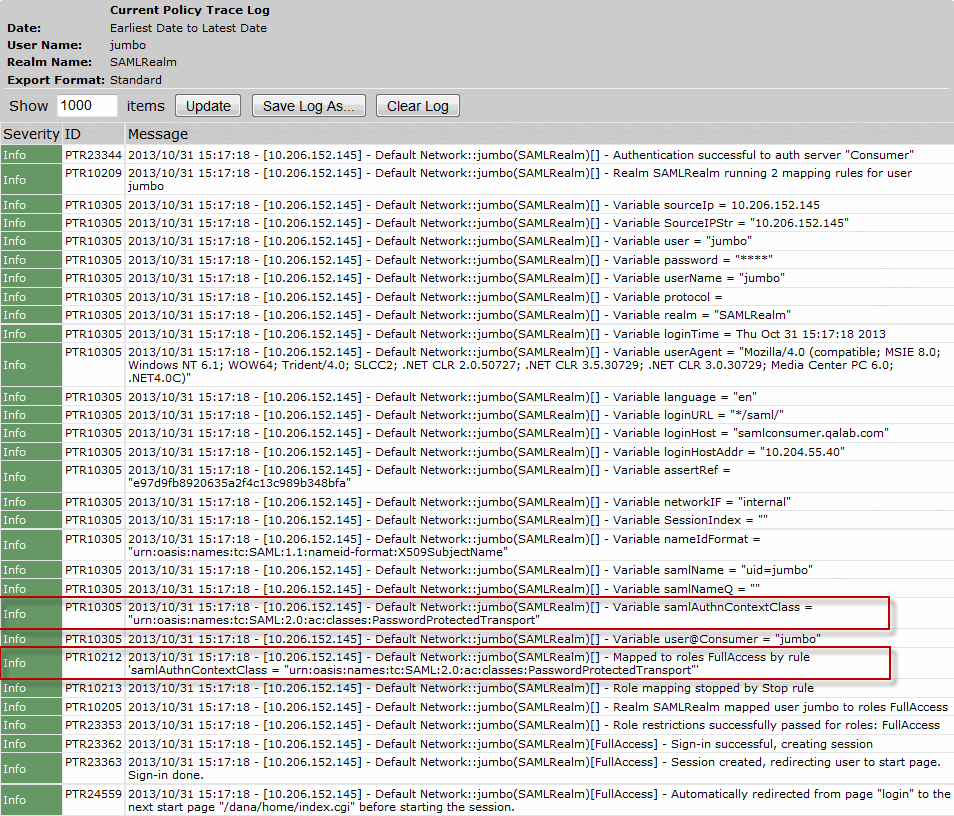
Investigating a "No valid assertion found in SAML response" Error
Problem Description: SAML is a time sensitive protocol. The time-based validity of a SAML assertion is determined by the SAML identity provider. If the SAML identity provider and SAML service provider clocks are askew, the assertion can be determined invalid, and authentication fails.
Environment: In the scenario described here, the system is deployed as a SAML service provider in a SAML 2.0 deployment.
Symptoms: In this scenario, the following error is returned to the user after the user has submitted credentials to the SAML identity provider:
SAML Transferred failed. Please contact your system administrator.
Detail: Failure: No valid assertion found in SAML response."
Cause: To investigate the error:
1.Select Maintenance > Troubleshooting > Monitoring > Debug Logs to display the Debug Log configuration page, shown in the following figure.
The following figure depicts the Debug Log Page:

2.Turn debug logging on, set Debug Log Detail Level to 10, and Event Codes to saml.
3.Reproduce the action that results in the error-in this case, user access to the resource associated with the SAML service provider that prompts the user to submit credentials to the SAML identity provider.
4.Click Save Debug Log.
The console displays the Save As dialog box.
5.Save the file to a location your local host or a location that you can access when sending mail. The file is an encrypted file, so do not try to open it and analyze it yourself.
6.E-mail the debug log to Pulse Secure Global Support Center.
Pulse Secure Global Support Center will use the file to diagnose the issue. In the debug log, the following log lines indicate issues with the time-based validity of the assertion:
verifySubjectConfirmationData: assertion has expired
processConditions: assertion has expired [NotOnOrAfter condition failed]
processConditions: assertion is not yet Valid [NotBefore condition failed]
These log lines indicate a clock sync issue only if failure of the time-based validity check is unexpected. The same log lines might appear in the debug log to indicate an assertion has expired as expected.
|
Solution |
We recommend you use NTP to ensure the clocks are synchronized and that you set an Allowed Clock Skew value that accommodates any expected or permissible skew. Properly synchronized clocks avoid unexpected failure. |
To configure NTP:
1.Select System > Status to display the System Status page.
2.Next to System Date & Time, click Edit to display the Date and Time page.
3.Specify the settings for the same NTP server used by the SAML identity provider.
4.Save your configuration.
To be NDcPP compliant, NTP Update Interval needs to be limited to 60 minutes. This is to avoid the potential drift becoming too excessive.
To set the Allowed Clock Skew value:
1.Select Authentication > Auth. Servers.
2.Select the SAML authentication server you want to configure to display its configuration page.
3.Specify a number of minutes in the Allowed Clock Skew to accommodate any expected or permissible skew.
4.Save your configuration.
Pulse Connect Secure SAML 1.1 Support
The trend in SAML deployments is converging on the SAML 2.0 specification. Pulse Connect Secure continues to support SAML 1.1. The following sections reprint previous information we have provided about SAML 1.1 deployments:
•SAML Version 1.1 Configuration Tasks
About SAML Version 1.1
The following topics provide background information about SAML version 1.1:
•Understanding SAML 1.1 Profiles
•Understanding SAML 1.1 Assertions
•Creating a Trust Relationship Between SAML 1.1 Systems
Understanding SAML 1.1
The system enables you to pass user and session state information between the device and another trusted access management system that supports the Security Assertion Markup Language (SAML). SAML provides a mechanism for two disparate systems to create and exchange authentication and authorization information using an XML framework, minimizing the need for users to re-enter their credentials when accessing multiple applications or domains.
SAML exchanges are dependent upon a trusted relationship between two systems or domains. In the exchanges, one system acts as a SAML authority (also called an asserting party or SAML responder) that asserts information about the user. The other system acts as a relying party (also called a SAML receiver) that relies on the statement (also called an assertion) provided by the SAML authority. If it chooses to trust the SAML authority, the relying party authenticates or authorizes the user based on the information provided by the SAML authority.
The system supports two SAML use case scenarios:
•The system as the SAML authority-The user signs into a resource by way of the device first, and all other systems are SAML receivers, relying on the system for authentication and authorization of the user. Under this scenario, the system can use either an artifact profile or a POST profile.
•The system as the SAML receiver-The user signs into another system on the network first, and the system is the SAML receiver, relying on the other system for authentication and authorization of the user.
For example, in the first scenario, an authenticated user named John Smith may try to access a resource protected by an access management system. When he does, the system acts as a SAML authority and declares This user is John Smith. He was authenticated using a password mechanism." The access management system (the relying party) receives this statement and chooses to trust the system (and therefore trust that the system has properly identified the user). The access management system may still choose to deny the user access to the requested resource (for instance, because John Smith has insufficient access privileges on the system), while trusting the information sent by the system.
In the second scenario, John Smith signs in to his company portal and is authenticated using an LDAP server sitting behind the company's firewall. On the company's secure portal, John Smith clicks a link to a resource protected by the system. The following process occurs:
•The link redirects John Smith to an intersite transfer service on the company portal, which constructs an artifact URL. The artifact URL contains a reference to a SAML assertion stored in the company portal's cache.
•The portal sends the URL to the system, which can decide whether or not to link to the reference.
•If the system links to the reference, the portal sends a SOAP message containing the SAML assertion (an XML message containing the user's credentials) to the system, which can then decide whether or not to allow the user access to the requested resource.
SOAP requests generated by the system (when configured as a SAML 1.1 consumer) are not signed.
•If the system allows the user access, the system presents to the user the requested resource.
•If the system rejects the SAML assertion, or the user credentials, the system responds to the user with an error message.
When configuring the system, you can use SAML for:
•Single sign-on (SSO) authentication-In a SAML SSO transaction, an authenticated user is seamlessly signed into another system without resubmitting his credentials. In this type of transaction, the system can be either the SAML authority or the SAML receiver. When acting as the SAML authority, the system makes an authentication statement, which declares the user's username and how he was authenticated. If the relying party (called an assertion consumer service in SAML SSO transactions) chooses to trust the system, the user is seamlessly signed into the assertion consumer service using the username contained in the statement.
When acting as the SAML receiver, the system requests credential confirmation from the SAML authority, which is the other access management system, such as LDAP or another authentication server. The SAML authority sends an assertion by way of a SOAP message. The assertion is a set of XML statements that the system must interpret, based on criteria that the system administrator has specified in a SAML server instance definition. If the system chooses to trust the asserting party, the system allows the user to sign in seamlessly using the credentials contained in the SAML assertion.
•Access control authorization-In a SAML access control transaction, the system asks an access management system whether the user has access. In this type of transaction, the system is the relying party (also called a policy enforcement point in access control transactions). It consumes and enforces an authorization decision statement provided by the access management system (SAML authority), which declares what the user is allowed to access. If the SAML authority (also called a policy decision point in access control transactions) declares that the user has sufficient access privileges, the user may access the requested resource
The system does not generate authorization decision statements-it only consumes them.
In addition to providing users access to a URL based on the authorization decision statement returned by a SAML authority, the system also allows you to define users' access rights to a URL using system-only mechanisms (Users > Resource Profiles > Web Applications/Pages tab). If you define access controls through the system as well as through a SAML authority, both sources must grant access to a URL for a user to access it. For example, you may configure a access policy that denies members of the "Users" role access to www.google.com, but configure another SAML policy that bases a user's access rights on an attribute in an access management system. Even if the access management system permits users access to www.google.com, users are still denied access based on the access policy.
When asked if a user may access a resource, access management systems that support SAML may return a response of permit, deny, or indeterminate. If the system receives an indeterminate response, it denies the user access.
The session timeouts on the system and your access management system may not coordinate with one another. If a user's access management system session cookie times out before his destination signaling identifier (DSID) cookie times out, then single sign-on between the two systems is lost. The user is forced to sign in again when he times out of the access management system.
Understanding SAML 1.1 Profiles
The system accepts authentication assertions generated by a SAML authority using either an artifact profile or a POST profile. This feature allows a user to sign in to a source site or portal without going through the system first, and then to access the system with single sign-on (SSO) through the SAML consumer service.
As a result, the user who authenticates elsewhere can access resources behind the device without signing in again.
Using the Artifact Profile and POST Profile
The two supported profiles provide different methods of accomplishing the same task. The end user's goal is to sign in to all desired resources once, without experiencing multiple sign-in pages for different resources or applications. Although the end user wants transparency, you, the administrator, want to ensure complete security across the resources on your system, regardless of the servers or sites represented.
The artifact profile requires that you construct an automated request-response HTTP message that the browser can retrieve based on an HTTP GET request.
The POST profile requires that you construct an HTML form that can contain the SAML assertion, and which can be submitted by an end user action or a script action, using an HTTP POST method.
Using the Artifact Profile Scenario
The SAML server generally supports the following artifact profile scenario:
1.The user accesses a source site through a browser. The source site might be a corporate portal using a non-Connect Secure authentication access management system.
2.The source site challenges the user for username and password.
3.The user provides username and password, which the source site authenticates through a call to an LDAP directory or other authentication server.
4.The user then clicks a link on the source site, which points to a resource on a server that is protected behind the device.
5.The link redirects the user to the intersite transfer service URL on the source site. The source site pulls an authentication assertion message from its cache and encloses it in a SOAP message. The source site constructs a SAML artifact (a Base64 string) that it returns to the browser in a URI along with the destination and assertion address.
6.The destination site queries the authenticated assertion from the source site, based on the artifact it receives from the source site.
7.The system accepts the assertion as a valid authentication if the elapsed time falls within the allowable clock skew time. If the user also meets the other policy restrictions, the system grants the user access to the requested resource.
The main tasks you are required to fulfill to support the system as the relying party with the artifact profile include:
•Implement the assertion consumer service, which:
•Receives the redirect URL containing the artifact.
•Generates and sends the SAML request.
•Receives and processes the SAML response.
•Integrate the assertion consumer service with the existing system process, which:
•Maps the SAML assertion to a local user.
•Creates a user session.
•Performs local authorization.
•Serves the resource or denies access.
Using the POST Profile Scenario
The SAML server generally supports the POST profile scenario, as follows:
1.The end user accesses the source web site, hereafter known as the source site.
2.The source site verifies whether or not the user has a current session.
3.If not, the source site prompts the user to enter user credentials.
4.The user supplies credentials, for example, username and password.
5.If the authentication is successful, the source site authentication server creates a session for the user and displays the appropriate welcome page of the portal application.
6.The user then selects a menu option or link that points to a resource or application on a destination web site.
7.The portal application directs the request to the local intersite transfer service, which can be hosted on the source site. The request contains the URL of the resource on the destination site, in other words, the TARGET URL.
8.The intersite transfer service sends an HTML form back to the browser. The HTML FORM contains a SAML response, within which is a SAML assertion. The response must be digitally signed. Typically, the HTML FORM will contain an input or submit action that will result in an HTTP POST. This can be a user-clickable Submit button or a script that initiates the HTTP POST programmatically.
9.The browser, either due to a user action or by way of an auto-submit action, sends an HTTP POST containing the SAML response to the destination web site's assertion consumer service.
10.The replying party's assertion consumer (in this case, on the destination web site) validates the digital signature on the SAML response.
11.If valid, the assertion consumer sends a redirect to the browser, causing the browser to access the TARGET resource.
12.The system, on the destination site, verifies that the user is authorized to access the destination site and the TARGET resource.
13.If the user is authorized to access the destination site and the TARGET resource, the system returns the TARGET resource to the browser.
The main tasks you are required to fulfill to support the system as the relying party with the POST profile include:
•Implement the assertion consumer service, which receives and processes the POST form
•Integrate the assertion consumer service with the existing process, which:
•Maps the SAML assertion to a local user.
•Creates a user session.
•Performs local authorization.
•Serves the resource or denies access.
Understanding SAML 1.1 Assertions
Each party in the request-response communication must adhere to certain requirements. The requirements provide a predictable infrastructure so that the assertions and artifacts can be processed correctly.
•The artifact is a Base64-encoded string of 40 bytes. An artifact acts as a token that references an assertion on the source site, so the artifact holder-the Connect Secure device-can authenticate a user who has signed in to the source site and who now wants to access a resource protected by the system. The source site sends the artifact to the device in a redirect, after the user attempts to access a resource protected by the system. The artifact contains:
•TypeCode - A 2-byte hex code of 0x0001 that identifies the artifact type.
•SourceID - A Base64-encoded string of 20 bytes that determines the source site identity and location. You can use OpenSSL or similar Base64 encoding tool to generate the encoded string. The system maintains a table of SourceID values and the URL for the corresponding SAML responder. The system and the source site communicate this information in a back channel. On receiving the SAML artifact, the system decodes it and ensures that it is 20 bytes. It determines whether or not the SourceID belongs to a known source site, and, if it does, obtains the site location before sending a SAML request. The source site generates the SourceID by computing the SHA-1 hash of the source site's own URL.
•AssertionHandle - A 20-byte random value that identifies an assertion stored or generated by the source site. At least 8 bytes of this value should be obtained from a cryptographically secure RNG or PRNG.
•The intersite transfer service is the identity provider URL on the source site (not the Connect Secure device). Your specification of this URL in the admin console enables the system to construct an authentication request to the source site, which holds the user's credentials in cache. The request is similar to the following example:
GET http://<intersite transfer hostname and path>?TARGET=<Target>...<HTTP-Version><other HTTP 1.0 or 1.1 components>
In the preceding sample, <intersite transfer hostname and path> consists of the hostname, port number, and path components of the intersite transfer URL at the source and where Target=<Target> specifies the requested target resource at the destination (Connect Secure protected) site. This request might look like:
GET http://10.56.1.123:8002/xferSvc?TARGET=http://www.dest.com/sales.htm
•The intersite transfer service redirects the user's browser to the assertion consumer service at the destination site-in this case, the Connect Secure device. The HTTP response from the source site intersite transfer service must be in the following format:
<HTTP-Version> 302 <Reason Phrase>
<other headers>
Location: http://<assertion consumer hostname and path>?<SAML
searchpart><other HTTP 1.0 or 1.1 components>
In the preceding sample, <assertion consumer hostname and path> provides the hostname, port number, and path components of an assertion consumer URL at the destination site and where <SAML searchpart>= …TARGET=<Target> …SAMLart=<SAML artifact>… consists of one target description, which must be included in the <SAML searchpart> component. At least one SAML artifact must be included in the SAML <SAML searchpart> component. The asserting party can include multiple SAML artifacts.
You can use status code 302 to indicate that the requested resource resides temporarily under a different URI.
If <SAML searchpart> contains more than one artifact, all of the artifacts must share the same SourceID.
The redirect might look like:
•The user's browser accesses the assertion consumer service, with a SAML artifact representing the user's authentication information attached to the URL.
The HTTP request must appear as follows:
In the preceding sample, <assertion consumer hostname and path> provides the hostname, port number, and path components of an assertion consumer URL at the destination site.
<SAML searchpart>= …TARGET=<Target>…SAMLart=<SAML artifact> …
A single target description MUST be included in the <SAML searchpart> component. At least one SAML artifact MUST be included in the <SAML searchpart> component; multiple SAML artifacts MAY be included. If more than one artifact is carried within <SAML searchpart>, all the artifacts MUST have the same SourceID.
You should not expose the assertion consumer URL unless over SSL 3.0 or TLS 1.0. Otherwise, transmitted artifacts might be available in plain text to an attacker.
•The issuer value is typically the URL of the source site. You can specify the <ISSUER> variable, which will return the issuer value from the assertion.
•The username template is a reference to the SAML name identifier element, which allows the asserting party to provide a format for the username. The SAML specification allows for values in the following formats:
•Unspecified - Indicates that interpretation of the content is left up to the individual implementations. In this case, you can use the variable assertionName.
•E-mail Address - Indicates that the content is in the form of an e-mail address. In this case, you can use the variable assertionName.
•X.509 Subject Name - Indicates that the content is in the form of an X.509 subject name. In this case, you can use the variable assertionNameDN.<RDN>.
•Windows Domain Qualified Name - Indicates that the content is a string in the form of DomainName\Username.
•You should define the username template to accept the type of username your SAML assertion contains.
•You can prevent eavesdropping on the SAML artifact by synchronizing the clocks on the source and destination sites. The system provides an Allowed Clock Skew attribute that dictates the maximum time difference allowed between the system and the source site. The system rejects any assertions whose timing exceeds the allowed clock skew.
Creating a Trust Relationship Between SAML 1.1 Systems
In order to ensure that SAML-enabled systems are only passing information between trusted sources, you must create a trust relationship between the applications that are sending and receiving information.
Configuring Trusted Application URLs
In a trust relationship, you must provide the SAML-enabled systems with the URLs they need to contact each other. In some transactions, only the system that initiates the transaction (the Connect Secure device) needs to know the URL of the other system. (The system uses the URL to initiate the transaction.) In other transactions (SSO transactions using artifact profiles), you need to configure each system with the URL of the other.
The following list shows the different transaction types and the URLs you must configure for each:
•SSO transactions: Artifact profile - On Connect Secure, you must enter the URL of the assertion consumer service. For example, use https://hostname/acs.
You must also enter the following URL for the system on the assertion consumer service. For example, use https://<SecureAccessHostname>/dana-ws/saml.ws.
•SSO transactions: POST profile - On Connect Secure, you must enter the URL of the assertion consumer service. For example, use https://hostname/acs.
•Access control transactions - On Connect Secure, you must enter the URL of the SAML Web service. For example, use https://hostname/ws.
Configuring an Issuer
Before accepting a statement from another system, a SAML-enabled entity must trust the issuer of the statement. You can control which issuers a system trusts by specifying the unique strings of the trusted issuers during the system's configuration. (When sending a statement, an issuer identifies itself by including its unique string in the statement. SAML-enabled applications generally use hostnames to identify issuers, but the SAML standard allows applications to use any string.) If you do not configure a system to recognize an issuer's unique string, the system will not accept that issuer's statements.
The following list shows the different transaction types and the issuers you must configure for each:
•SSO transactions-You must specify a unique string on the system (typically its hostname) that it can use to identify itself and then configure the access management system to recognize that string.
•Access control transactions-You must specify a unique string on the access management system (typically its hostname) that it can use to identify itself and then configure the system to recognize that string.
Configuring Certificates
Within SSL transactions, the server must present a certificate to the client, and then the client must verify (at minimum) that it trusts the certificate authority who issued the server's certificate before accepting the information. You can configure all of the system SAML transactions to use SSL (HTTPS).
Configuring SSO Transactions: Artifact Profile
Artifact profile transactions involve numerous communications back and forth between the system and the access management system. The methods you use to pass data and authenticate the two systems affect which certificates you must install and configure.
The following list shows the different artifact profile configuration options that require special certificate configurations:
•All artifact profile transactions-Regardless of your artifact profile configuration, you must install the certificate of the CA that signed the system Web server certificate on the access management system. (The system requires the access management system to use an SSL connection when requesting an authentication statement. In an SSL connection, the initiator must trust the system to which it is connecting. By installing the CA certificate on the access management system, you ensure that the access management system will trust the CA that issued the system certificate.)
•Sending artifacts over an SSL connection (HTTPS GET requests)-If you choose to send artifacts to the access management system using an SSL connection, you must install the access management system's root CA certificate on the system. (In an SSL connection, the initiator must trust the system to which it is connecting. By installing the access management system's CA certificate on the system, you ensure that the system will trust the CA that issued the access management system's certificate.) You can install the root CA from the System > Configuration > Certificates > Trusted Client CAs page in the admin console. If you do not want to send artifacts over an SSL connection, you do not need to install any additional certificates.
To enable SSL-based communications from the system to the access management system, enter a URL that begins with HTTPS in the SAML Assertion Consumer Service URL field during the system configuration. You may also need to enable SSL on the access management system.
•Transactions using certificate authentication-If you choose to authenticate the access management system using a certificate, you must:
•Install the access management system's root CA certificate on the system. You can install the root CA from the System > Configuration > Certificates > Trusted Client CAs page in the admin console.
•Specify which certificate values the system should use to validate the access management system. You must use values that match the values contained in the access management server's certificate.
If you do not choose to authenticate the access management system, or if you choose to use username/password authentication, you do not need to install any additional certificates.
Configuring SSO Transactions: POST Profile
In a POST profile transaction, the system sends signed authentication statements to the access management system. Generally, it sends them over an SSL connection (recommended), but in some configurations, the system may send statements through a standard HTTP connection.
The following list shows the different POST profile configuration options that require special certificate configurations:
•All POST profile transactions-Regardless of your POST profile configuration, you must specify which certificate the system should use to sign its statements. You can choose a certificate in the Users > Resource Policies > Web > SSO SAML > [Policy] > General page in the admin console. Then, you must install the device certificate on the access management system. You can download the certificate from the System > Configuration > Certificates > Device Certificates > [Certificate] > Certificate Details page.
•Sending POST data over an SSL connection (HTTPS)-If you choose to send statements to the access management system using an SSL connection, you must install the access management system's root CA certificate on the system. (In an SSL connection, the initiator must trust the system to which it is connecting. By installing the access management system's certificate on the system, you ensure that the system will trust the CA that issued the access management system's certificate.) You can install the root CA from the System > Configuration > Certificates > Trusted Client CAs page in the admin console. If you do not want to post statements over an SSL connection, you do not need to install any additional certificates.
To enable SSL-based communications from the system to the access management system, enter a URL that begins with HTTPS in the SAML assertion consumer service URL field during the system configuration. You may also need to enable SSL on the access management system.
Configuring Access Control Transactions
In an access control transaction, the system posts an authorization decision query to the access management system. To ensure that the access management system responds to the query, you must determine which certificate options are required by your configuration.
The following list shows the different access control configuration options that require special certificate configurations:
•Sending authorization data over an SSL connection-If you choose to connect to the access management system using an SSL connection, you must install the access management system's root CA on the system. (In an SSL connection, the initiator must trust the system to which it is connecting. By installing the access management system's certificate on the system, you ensure that the system will trust the CA that issued the access management system's certificate.) You can install the root CA from the System > Configuration > Certificates > Trusted Client CAs page in the admin console.
•Transactions using certificate authentication-If you choose to use certificate authentication, you must configure the access management system to trust the CA that issued the certificate. Optionally, you may also choose to accept the certificate based on the following additional options:
•Upload the certificate public key to the access management system.
•Validate the system using specific certificate attributes.
These options require that you specify which certificate the system should pass to the access management system. You can choose a certificate in the Users > Resource Policies > Web > SAML ACL > [Policy] > General page in the admin console.
To determine how to configure your access management system to validate the certificate, see your access management system's documentation. If your access management system does not require certificate authentication, or if it uses username/password authentication, you do not need to configure the system to pass the access management server a certificate. If you do not specify a trust method, your access management system may accept authorization requests from any system.
Configuring User Identity
In a trust relationship, the two entities must agree on a way to identify users. You may choose to share a username across systems, select an LDAP or certificate user attribute to share across systems, or hardcode a user ID. (For example, you may choose to set the Subject Name field to "guest" to easily allow access across systems.)
To ensure that the two systems are passing common information about users, you must specify which information the system should pass using options in the User Identity section of the Users > Resource Policies > Web > SAML SSO > [Policy] > General page and the Users > Resource Policies > Web > SAML ACL > [Policy] > General page. Choose a username or attribute that the access management system will recognize.
SAML Version 1.1 Configuration Tasks
The following topics describe how to configure the features that support SAML version 1.1:
•Creating a SAML 1.1 Server Instance
•Configuring SAML 1.1 SSO Profiles
•Creating a SAML 1.1 SSO POST Profile
•Creating a SAML 1.1 ACL Resource Policy
Creating a SAML 1.1 Server Instance
To create a new SAML server instance:
1.In the admin console, choose Authentication > Auth. Servers.
Select SAML Server from the New list, and then click New Server. Complete the settings as described in the following table.
2.Click Save Changes.
After you save changes for the first time, the page is redisplayed and now has two tabs. The Settings tab allows you to modify any of the settings pertaining to the SAML Server instance. The Users tab lists valid users of the server.
The following table lists the SAML Authentication Server (SAML 1
|
Setting |
Guideline |
|
Name |
Specify a name to identify the server instance. |
|
Settings |
|
|
SAML Version |
Select 1.1. |
|
Source Site Inter-Site Transfer Service URL |
User is redirected to this URL in destination first scenario. |
|
Issuer Value for Source Site |
Typically, the URI or hostname of the issuer of the assertion. |
|
User Name Template |
Enter the mapping string from the SAML assertion to a user realm. For example, enter <assertionNameDN.CN> to derive the username from the CN value in the assertion. |
|
Allowed Clock Skew |
The maximum allowed difference in time between the system clock and the source site clock. |
|
SAML is a time sensitive protocol. The time-based validity of a SAML assertion is determined by the SAML identity provider. If the SAML identity provider and SAML service provider clocks are askew, the assertion can be determined invalid, and you will receive the following error: SAML Transferred failed. Please contact your system administrator. Detail: Failure: No valid assertion found in SAML response. We recommend you use NTP to ensure the clocks are synchronized and that you set an Allowed Clock Skew value that accommodates any expected or permissible skew. |
|
|
SSO Method |
|
|
Artifact |
Source ID. A Base64-encoded string of 20 bytes that the system uses to recognize an assertion from a given source site. Source SOAP Responder Service URL SOAP Client Authentication. Select HTTP Basic or SSL Client Certificate and complete the related settings. SOAP requests generated by the system (when configured as a SAML 1.1 consumer) are not signed. |
|
POST |
Response Signing Certificate. Enter the name of, or browse to locate, the PEM-formatted signing certificate, which is loaded for the SAML response signature verification. The certificate you select should be the same certificate used for signing the SAML response at the source site. The source site may send this certificate along with the SAML response, depending on the source site configuration. By default, the system performs signature verification of the SAML response first on the locally configured certificate. If a certificate is not configured locally in the SAML authentication server, then the system performs the signature verification on the certificate included in the SAML response from the source site. Enable Signing Certificate status checking. Select this option to check the validity of the signing certificate configured in the SAML authentication server POST profile. It is possible that the certificate has already expired or has been revoked. |
|
User Record Synchronization |
|
|
Enable User Record Synchronization |
Allow users to retain their bookmarks and individual preferences regardless of which device they log in to. |
|
Logical Auth Server Name |
Logical name of the authentication server. |
Configuring SAML 1.1 SSO Profiles
When enabling SSO transactions to a trusted access management system, you must indicate whether the access management system should "pull" user information from Connect Secure or whether Connect Secure should "push" it to the access management system. You indicate which communication method the two systems should use by selecting a profile during configuration. A profile is a method that two trusted sites use to transfer a SAML statement. When configuring the system, you may choose to use an artifact or POST profile.
When you choose to communicate using the artifact profile (also called browser/artifact profile), the trusted access management server "pulls" authentication information from the system.
The following figure shows the SAML communication process when the implementation uses the artifact profile.
The following figure depicts the Artifact Profile:
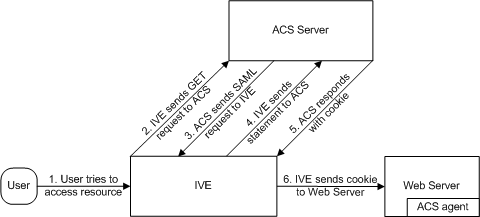
The system and an assertion consumer service (ACS) use the following process to pass information:
1.The user tries to access a resource-A user is signed into the device and tries to access a protected resource on a Web server.
2.The system sends an HTTP or HTTPS GET request to the ACS-the system intercepts the request and checks whether it has already performed the necessary SSO operation to honor the request. If not, the system creates an authentication statement and passes an HTTP query variable called an artifact to the assertion consumer service.
An artifact profile is a Base64-encoded string that contains the source ID of the source site (that is, a 20-byte string that references the system) and a randomly generated string that acts as a handle to the authentication statement. (Note that a handle expires 5 minutes after the artifact is sent, so if the assertion consumer service responds after 5 minutes, the system does not send a statement. Also note that the system discards a handle after its first use to prevent the handle from being used twice.)
3.The ACS sends a SAML request to the system-The assertion consumer service uses the source ID sent in the previous step to determine the location of the device. Then the assertion consumer service sends a statement request wrapped in a SOAP message to the following address on the system:
https://<<ivehostname>/danaws/saml.ws
The request includes the statement handle passed in the previous step.
The system only supports type 0x0001 artifacts. This type of artifact passes a reference to the source site's location (that is, the source ID of the system), rather than sending the location itself. To handle type 0x0001 artifacts, the assertion consumer service must maintain a table that maps source IDs to the locations of partner source sites.
4.The system sends an authentication statement to the ACS-the system uses the statement handle in the request to find the correct statement in the system cache and then sends the appropriate authentication statement back to the assertion consumer service. The unsigned statement contains the user's identity and the mechanism he used to sign into the device.
5.The ACS sends a cookie to the system-The assertion consumer service accepts the statement and then it sends a cookie back to the system that enables the user's session.
6.The system sends the cookie to the Web server-the system caches the cookie to handle future requests. Then the system sends the cookie in an HTTP request to the Web server whose domain name matches the domain in the cookie. The Web server honors the session without prompting the user for credentials.
If you configure the system to use artifact profiles, you must install the Web server certificate on the assertion consumer service.
To write a SAML SSO artifact profile resource policy:
1.In the admin console, select Users > Resource Policies > Web.
2.If your administrator view is not already configured to show SAML policies, make the following modifications:
•Click the Customize button in the upper right corner of the page.
•Select the SSO check box.
•Select the SAML check box below the SSO check box.
•Click OK.
3.Use the tabs to display the SSO > SAML page.
4.Click New Policy.
5.On the New Policy page, enter:
•A name to label this policy.
•A description of the policy (optional).
6.In the Resources section, specify the resources to which this policy applies.
7.In the Roles section, specify:
•Policy applies to ALL roles-To apply this policy to all users.
•Policy applies to SELECTED roles-To apply this policy only to users who are mapped to roles in the Selected roles list. Make sure to add roles to this list from the Available roles list.
•Policy applies to all roles OTHER THAN those selected below-To apply this policy to all users except for those who map to the roles in the Selected roles list. Make sure to add roles to this list from the Available roles list.
8.In the Action section, specify:
•Use the SAML SSO defined below-The system performs a single-sign on (SSO) request to the specified URL using the data specified in the SAML SSO details section. The system makes the SSO request when a user tries to access a SAML resource specified in the Resources list.
•Do NOT use SAML-The system does not perform an SSO request.
•Use Detailed Rules-To specify one or more detailed rules for this policy.
9.In the SAML SSO Details section, specify:
•SAML Assertion Consumer Service URL-Enter the URL that the system should use to contact the assertion consumer service (that is, the access management server). For example, https://<hostname>:<port>/dana-na/auth/saml-consumer.cgi. (Note that the system also uses this field to determine the SAML recipient for its assertions.)
If you enter a URL that begins with HTTPS, you must install the assertion consumer service's root CA on the system.
•Profile-Select Artifact to indicate that the assertion consumer service should "pull" information from the system during SSO transactions.
•Source ID-Enter the source ID for the system. It must be a Base64-encoded string. The system decodes it and ensures that it is 20 bytes. You can use OpenSSL or other Base64 tool to generate the Base64-encoded string.
The system identifier (that is, the source ID) must map to the following URL on the assertion consumer service: https://<ivehostname>/dana-ws/saml.ws
•Issuer-Enter a unique string that the system can use to identify itself when it generates assertions (typically its hostname).
You must configure the assertion consumer service to recognize the unique string.
1.In the User Identity section, specify how the system and the assertion consumer service should identify the user:
•Subject Name Type-Specify which method the system and assertion consumer service should use to identify the user:
•DN-Send the username in the format of a DN (distinguished name) attribute.
•Email Address-Send the username in the format of an e-mail address.
•Windows-Send the username in the format of a Windows domain qualified username.
•Other-Send the username in another format agreed upon by the system and the assertion consumer service.
•Subject Name-Use variables to specify the username that the system should pass to the assertion consumer service. Or, enter static text.
You must send a username or attribute that the assertion consumer service will recognize.
2.In the Web Service Authentication section, specify the authentication method that the system should use to authenticate the assertion consumer service:
•None-Do not authenticate the assertion consumer service.
•Username-Authenticate the assertion consumer service using a username and password. Enter the username and password that the assertion consumer service must send.
•Certificate Attribute-Authenticate the assertion consumer service using certificate attributes. Enter the attributes that the assertion consumer service must send (one attribute per line). For example, use cn=sales. You must use values that match the values contained in the assertion consumer service certificate.
If you select this option, you must install the assertion consumer service root CA on the system.
1.Cookie Domain-Enter a comma-separated list of domains to which we send the SSO cookie.
2.Click Save Changes.
3.On the SAML SSO Policies page, order the policies according to how you want the system to evaluate them. Keep in mind that once the system matches the resource requested by the user to a resource in a policy's (or a detailed rule's) Resource list, it performs the specified action and stops processing policies.
Creating a SAML 1.1 SSO POST Profile
When you choose to communicate using a POST profile (also called browser/POST profile), the system "pushes" authentication data to the access management system using an HTTP POST command over an SSL 3.0 connection.
The following figure shows the SAML communication process when the implementation uses the POST profile:

The system and an access management system use the following process to pass information:
1.The user tries to access a resource-A user is signed into the device and tries to access a protected resource on a Web server.
2.The system posts a statement-the system intercepts the request and checks whether it has already performed the necessary SSO operation to honor the request. If not, the system creates an authentication statement, digitally signs it, and posts it directly to the access management server. Since the statement is signed, the access management server must trust the certificate authority that was used to issue the certificate. Note that you must configure which certificate the system uses to sign the statement.
3.The AM establishes a session-If the user has the proper permissions, the access management server sends a cookie back to the system that enables the user's session.
4.The system sends the cookie to the Web server-the system caches the cookie to handle future requests. Then the system sends the cookie in an HTTP request to the Web server whose domain name matches the domain in the cookie. The Web server honors the session without prompting the user for credentials.
If you configure the system to use POST profiles, you must install the assertion consumer service's root CA on the system and determine which method the assertion consumer service uses to trust the certificate.
To write a SAML SSO POST profile resource policy:
1.In the admin console, select Users > Resource Policies > Web.
2.If your administrator view is not already configured to show SAML policies, make the following modifications:
1.Click the Customize button in the upper right corner of the page.
2.Select the SSO check box.
3.Select the SAML check box below the SSO check box.
4.Click OK.
5.Use the tabs to display the SSO > SAML page.
6.Click New Policy.
7.On the SAML SSO Policy page, enter:
•A name to label this policy.
•A description of the policy (optional).
8.In the Resources section, specify the resources to which this policy applies.
9.In the Roles section, specify:
•Policy applies to ALL roles-To apply this policy to all users.
•Policy applies to SELECTED roles-To apply this policy only to users who are mapped to roles in the Selected roles list. Make sure to add roles to this list from the Available roles list.
•Policy applies to all roles OTHER THAN those selected below-To apply this policy to all users except for those who map to the roles in the Selected roles list. Make sure to add roles to this list from the Available roles list.
10.In the Action section, specify:
•Use the SAML SSO defined below-The system performs a single-sign on (SSO) request to the specified URL using the data specified in the SAML SSO details section. The system makes the SSO request when a user tries to access a SAML resource specified in the Resources list.
•Do NOT use SAML-The system does not perform an SSO request.
•Use Detailed Rules-To specify one or more detailed rules for this policy.
11.In the SAML SSO Details section, specify:
•SAML Assertion Consumer Service URL-Enter the URL that the system should use to contact the assertion consumer service (that is, the access management server). For example, use https://hostname/acs.
•Profile-Select POST to indicate that the system should "push" information to the assertion consumer service during SSO transactions.
•Issuer-Enter a unique string that the system can use to identify itself when it generates assertions. Typically, the issuer string is a hostname.
You must configure the assertion consumer service to recognize the unique string.
3. Signing Certificate-Specify which certificate the system should use to sign its assertions.
1.In the User Identity section, specify how the system and the assertion consumer service should identify the user:
2.Subject Name Type-Specify which method the system and assertion consumer service should use to identify the user:
•DNDN-Send the username in the format of a DN (distinguished name) attribute.
•Email Address-Send the username in the format of an e-mail address.
•Windows-Send the username in the format of a Windows domain qualified username.
•Other-Send the username in another format agreed upon by the system and the assertion consumer service.
3.Subject Name-Use variables to specify the username that the system should pass to the assertion consumer service. Or, enter static text.
You must send a username or attribute that the assertion consumer service will recognize.
4.Cookie Domain-Enter a comma-separated list of domains to which we send the SSO cookie.
5.Click Save Changes.
6.On the SAML SSO Policies page, order the policies according to how you want the system to evaluate them. Keep in mind that once the system matches the resource requested by the user to a resource in a policy's (or a detailed rule's) Resource list, it performs the specified action and stops processing policies.
Creating a SAML 1.1 ACL Resource Policy
When enabling access control transactions to a trusted access management system, the system and trusted access management system exchange information using the method shown in the following figure.
The following figure depicts the Access Control Policies:
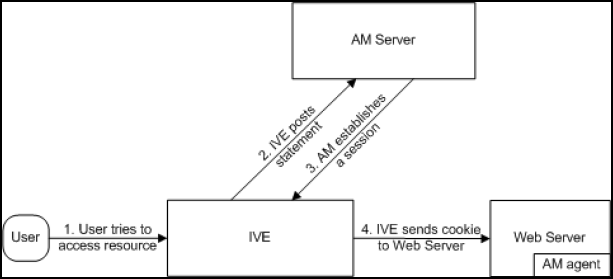
The system and an access management system use the following process to pass information:
1.The user tries to access a resource-A user is signed into the system and tries to access a protected resource on a Web server.
2.The system posts an authorization decision query-If the system has already made an authorization request and it is still valid, the system uses that request. (The authorization request is valid for the period of time specified in the admin console.) If it does not have a valid authorization request, the system posts an authorization decision query to the access management system. The query contains the user's identity and the resource that the access management system needs to authorize.
3.The access management system posts an authorization decision statement-The access management system sends an HTTPS POST containing a SOAP message that contains the authorization decision statement. The authorization decision statement contains a result of permit, deny, or indeterminate.
4.The system sends the request to the Web browser-If the authorization decision statement returns a result of permit, the system allows the user access. If not, the system presents an error page to the user telling him that he does not have the proper access permissions.
If you configure the system to use access control transactions, you must install the SAML Web service root CA on the system.
To create a SAML access control resource policy:
1.In the admin console, select Users > Resource Policies > Web.
2.
If your administrator view is not already configured to show SAML policies, make the following modifications:
1.Click the Customize button in the upper right corner of the page.
2.Select the SAML ACL check box below the Access check box.
3.Click OK.
4.Use the tabs to display the Access > SAML ACL page.
5.On the SAML Access Control Policies page, click New Policy.
6.On the New Policy page, enter:
•A name to label this policy.
•A description of the policy (optional).
3. In the Resources section, specify the resources to which this policy applies.
4. In the Roles section, specify:
•Policy applies to ALL roles-To apply this policy to all users.
•Policy applies to SELECTED roles-To apply this policy only to users who are mapped to roles in the Selected roles list. Make sure to add roles to this list from the Available roles list.
•Policy applies to all roles OTHER THAN those selected below-To apply this policy to all users except for those who map to the roles in the Selected roles list. Make sure to add roles to this list from the Available roles list.
5. In the Action section, specify:
•Use the SAML Access Control checks defined below-The system performs an access control check to the specified URL using the data specified in the SAML Access Control Details section.
•Do not use SAML Access-The system does not perform an access control check.
•Use Detailed Rules-To specify one or more detailed rules for this policy.
6. In the SAML Access Control Details section, specify:
•SAML Web Service URL-Enter the URL of the access management system's SAML server. For example, use https://hostname/ws.
•Issuer-Enter the hostname of the issuer, which in most cases is the hostname of the access management system.
You must enter a unique string that the SAML Web service uses to identify itself in authorization assertions.
7. In the User Identity section, specify how the system and the SAML Web service should identify the user:
•Subject Name Type-Specify which method the system and SAML Web service should use to identify the user:
•DN-Send the username in the format of a DN (distinguished name) attribute.
•Email Address-Send the username in the format of an e-mail address.
•Windows-Send the username in the format of a Windows domain qualified username.
•Other-Send the username in another format agreed upon by the system and the SAML Web service.
•Subject Name-Use variables to specify the username that the system should pass to the SAML Web service. Or, enter static text.
You must send a username or attribute that the SAML Web service will recognize.
8. In the Web Service Authentication section, specify the authentication method that the SAML Web service should use to authenticate the system:
•None-Do not authenticate the system.
•Username-Authenticate the system using a username and password. Enter the username and password that the system must send the Web service.
•Certificate Attribute-Authenticate the system using a certificate signed by a trusted certificate authority. If you have more than one certificate installed on the system, use the drop-down list to select which certificate to send to the Web service.
If you select this option, you must install the Web server certificate on the access management system Web server and determine which method the SAML Web service uses to trust the certificate.
9. In the Options section, specify:
•Maximum Cache Time-You can eliminate the overhead of generating an authorization decision each time the user requests the same URL by indicating that the system must cache the access management system's authorization responses. Enter the amount of time the system should cache the responses (in seconds).
•Ignore Query Data-By default, when a user requests a resource, the system sends the entire URL for that resource (including the query parameter) to the SAML Web service and caches the URL. You can specify that the system should remove the query string from the URL before requesting authorization or caching the authorization response.
10. Click Save Changes.
11. On the SAML Access Control Policies page, order the policies according to how you want the system to evaluate them. Keep in mind that once the system matches the resource requested by the user to a resource in a policy's (or a detailed rule's) Resource list, it performs the specified action and stops processing policies.