Appendix: Managing the Services Director Using the CLI
Starting the CLI
After you have created the virtual appliance in vSphere, you can administer and manage the Services Director using the CLI or GUI. This chapter describes how to perform configuration tasks using the CLI only.
For the purposes of this chapter, it is assumed that the hostname of your Services Director is amnesiac , and that a DNS server is in place.
Logging in to the CLI
1.Open the Services Director in a Telnet or SSH client program such as PuTTy.
2.Log into the Services Director as an administrator:
login as: admin
Ivanti, Inc. Services Director
admin@amnesiac:<password specified in the graphical Setup Wizard>
Last login: Tue Aug 4 10:09:03 2015 from <IP-address>
amnesiac >
3.Start configuration mode:
amnesiac > enable
amnesiac # configure terminal
amnesiac (config) #
You can now enter CLI commands.
Importing the SSL Certificate, Key, and Licenses
If you did not complete licensing using the graphical Setup Wizard (see the Pulse Secure Services Director Getting Started Guide), you must import the following files into the Services Director before you can create instances:
•SSL certificate and key
•Services Director license
•Bandwidth license key
•Legacy FLA license (if you are not using the pre-installed Universal License)
•Traffic Manager images, if required.
If you have not received your license files, contact Ivanti Licensing for assistance.
1.Log into the Services Director and start the CLI. See Starting the CLI.
2.To import an SSL certificate and key, you must provide the file path to the certificate and key file. For example, an http, ftp, or scp URL (scp://username:password@host/path).
amnesiac (config) # ssc import-cert-key scp://username:[email protected]/sd_archive/cert_key.pem
Certificate and Private Key imported successfully
amnesiac (config) # show ssc certificate
>>certificate and key is displayed
3.To import a Services Director (Enterprise) license, you must provide the file path to the license file. For example, an http, ftp, or scp URL (scp://username:password@host/path).
amnesiac (config) # ssc import-lic file scp://username:[email protected]/sd_archive/ent-license
License imported successfully
amnesiac (config) # show ssc license-file
XXX-XXXXXXX-XXXX-X-XXXX-XXXX-XXXX
4.Import the enterprise bandwidth license key into the Services Director. To do this, provide the license key you obtained from your account representative.
amnesiac (config) # ssc license enterprise throughput add XXX-XXXXXX-XXXX-X-XXXX-XXXX-XXXX
Importing a Legacy FLA License
If you intend to use Traffic Managers whose version is below 10.1, or Traffic Managers for which the REST API is disabled, you must now install a Legacy FLA license, and create a license resource for it inside the Services Director.
1.To import a Legacy FLA License (for example fla-ssl-ssc ), you must provide the file path. For example, an http, ftp, or scp URL (scp://username:password@host/path ).
amnesiac (config) # ssc stm import-lic file scp://username:[email protected]/sd_archive/fla-ssl-ssc
License imported successfully
amnesiac (config) # show ssc stm license-file
>>the license file is displayed
2. To create a license resource:
amnesiac (config) # ssc license create license-name fla-ssl-ssc
+--------+--------+
| Field | Value |
+--------+--------+
| info | Active |
| status | Active |
+--------+--------+
3.You can confirm that the Services Director process is running:
amnesiac (config) # show ssc service
SSC service status: running
Importing a Traffic Manager Image
If you want to create and configure Traffic Managers on an external instance host, you must load one or more Traffic Manager images onto the Services Director.
1.You must import the Traffic Manager image (that is, the tarball) and create a version resource for the software image. (For example, stm101.) To import an image, you must provide the file path. For example, an http, ftp, or scp URL (scp://username:password@host/path ).
amnesiac (config) # ssc stm import-image file scp://[email protected]/sd_archive/ZeusTM_101_Linux-x86_64.tgz
amnesiac (config) # show ssc stm images
Imported Ivanti, Inc. Traffic Manager Images
----------------------------------------
ZeusTM_101_Linux-x86_64.tgz
2. To create a version resource:
amnesiac (config) # ssc version create version-name stm101 vfilename ZeusTM_101_Linux-x86_64.tgz vdirectory ZeusTM_101_Linux-x86_64.tgz
+-------------------+-----------------------------+
| Field | Value |
+-------------------+-----------------------------+
| info | Active |
| status | Active |
| version_filename | ZeusTM_101_Linux-x86_64.tgz |
| version_directory | None |
+-------------------+-----------------------------+
Where:
•version-name is a unique name for the Traffic Manager image.
•vfilename is the name of the Traffic Manager image.
•vdirectory is the name of directory to which tarball extracts; if none, specify the tarball name.
To delete an image, run the command: no ssc stm image-file <image name>.
Enabling Passwordless SSH Communication
You must create a public SSH key to enable passwordless communication between the Services Director and an instance host. This SSH key will be used for all instance hosts.
1.In a terminal session for the Primary Services Director, create an SSH public key for the administrator user to perform passwordless communication to the instance host.
amnesiac (config) # show ssh client private
No user identities configured.
SSH authorized keys:
amnesiac (config) # ssh client generate identity user root
amnesiac (config) # show ssh client private
User Identities:
User admin:
>>ssh public and private keys are displayed
2.In a terminal session for the instance host (user sscadmin), inject the SSH public key for the Services Director’s admin user into the instance host:
$ user root sshkey "ssh-rsa <public_key> admin"
Added public SSH key for user (root)
3.Repeat steps 1) and 2) for the Secondary Services Director.
Creating a Feature Pack for Instances
You must create a feature pack in the Services Director before you can create instances. A feature pack describes a set of licensable features that you can apply to a Traffic Manager instance. A feature pack is the same as a SKU or a subset of features in a SKU.
When you deploy or modify a Traffic Manager instance, the feature pack controls what licensable features are allowed (but does not specify bandwidth limits). Creating a feature pack in the Services Director requires you to base the pack on a SKU and to give it a unique name.
amnesiac (config) # ssc feature-pack create fpname default-fp stm-sku STM-400
+---------- ----------------+
| Field | Value |
+----- ---------------------+
| info | Active |
| status | Active |
| stm_sku | STM-400 |
| excluded | None |
+-----------+---------------+
Syntax: ssc feature-pack create fpname <resource-unique-name> stm-sku <SKU-for-feature-pack>
Working with User Authentication for a vTM
You can apply user authentication to a vTM from the Services Director VA CLI in two ways:
•During the self-registration of a vTM, see Working with User Authentication for a vTM.
•After registration of the vTM, see Working with User Authentication for a vTM.
Both of these methods require the user authentication resources to already be configured.
Defining User Authentication Using the CLI
1.Create the required authenticator resource using the following CLI commands:
•ssc authenticator create ldap
•ssc authenticator create radius
•ssc authenticator create tacacs_plus
For a detailed description of authenticator resource properties, see authenticator Resource.
2.Create any required permission_group resources using the following CLI command:
•ssc permission-group create
For a detailed description of permission_group resource properties, see permission_group Resource.
3.Create an access_profile resource, combining an authenticator with the required permission groups. To do this, use the following CLI commands:
•ssc access-profile create
•ssc access-profile add-perm-group
For a detailed description of access_profile properties, see access_profile Resource.
See Pulse Secure Services Director Command Reference for details of all CLI commands.
Working with User Authentication for a vTM
Self-registration is described in the Pulse Secure Services Director Getting Started Guide.
Self-registration requests are generated by the vTM itself, and cannot be created using the CLI.
To change the state of a self-registration request, use the following CLI commands:
•ssc registration update registration-id <reg-id> state decline reason <reason>
•ssc registration update registration-id <reg-id> state blacklist
•ssc registration update registration-id <reg-id> state pending
However, when you transition the request to Accepted, in addition to several extra mandatory parameters, you can also specify the required access profile:
•ssc registration update registration-id <reg-id> state accept instance-name <name> owner <owner> feature-pack <feature_pack> bandwidth <bandwidth> access_profile <access_profile>
See the Pulse Secure Services Director Command Reference for details of all commands.
For a detailed description of all registration resource properties, see registration Resource.
Working with User Authentication for a vTM
To apply user authentication to a registered vTM, update the instance resource to include the access_profile property:
ssc instance update instance-name <instance_id> access-profile <access_profile>
When you do this, the authenticator and permission groups in the access profile are applied to the vTM. Existing authenticators and permission groups may be overwritten, but none will be deleted. All members of a cluster are affected.
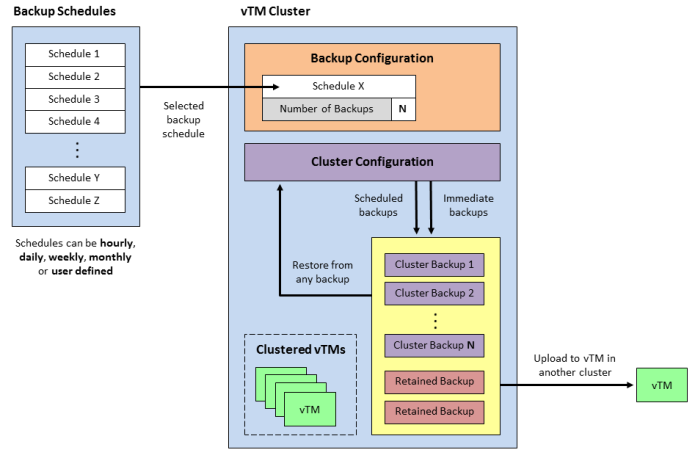
Working with Backup Schedules and Cluster Backups
A Traffic Manager cluster gathers Virtual Traffic Managers (vTMs) together and operates them under a shared cluster configuration.
The configuration of the cluster can be backed up automatically on a regular basis according to a backup schedule.
The following provides an overview of automatic cluster backup operations.
See the Pulse Secure Services Director Getting Started Guide for a full description of these workflows.
You can view clusters with the following commands:
•ssc cluster list - displays a list of all clusters names.
•show ssc cluster cluster-name - displays full details for a specified cluster.
You can create, update and view cluster backup schedules with the following commands:
•ssc backup vtm-cluster create schedule - creates a new cluster backup schedule.
•ssc backup vtm-cluster update schedule - updates a specified cluster backup schedule.
•show ssc backup vtm-cluster schedules - displays a list of all cluster backup schedule names.
•show ssc backup vtm-cluster schedule - displays a specified cluster backup schedule.
You can associate a cluster with a cluster backup schedule with the following commands:
•ssc cluster create cluster-name schedule - creates a new cluster that is associated with the specified cluster backup schedule.
•ssc cluster update cluster-name schedule - updates a specified cluster to associate it with the specified cluster backup schedule.
You can view cluster backups with the following commands:
•show ssc backup vtm-cluster cluster-name backups - displays a list of all backup names for a specified cluster.
•show ssc backup vtm-cluster cluster-name backup-name - displays a specified backup.
You can perform manual cluster backup operations with the following commands:
•ssc backup vtm-cluster cluster-name backup now - this requests an immediate manual backup for a cluster.
•ssc backup vtm-cluster cluster-name restore backup-name - this requests a restore to a specified cluster of a specified backup.
•ssc backup vtm-cluster cluster-name upload backup-name - this requests an upload of a specified backup to a specified Traffic Manager instance.
Each of these commands creates a backup task. You can view tasks and re-attempt failed tasks with the following commands:
•show ssc backup vtm-cluster cluster-name tasks - displays a list of all task IDs for a specified cluster.
•show ssc backup vtm-cluster cluster-name task - displays a specified task.
•ssc backup vtm-cluster cluster-name task retry - re-attempts a failed specified task.
For full details of all commands, refer to the Pulse Secure Services Director Command Reference.
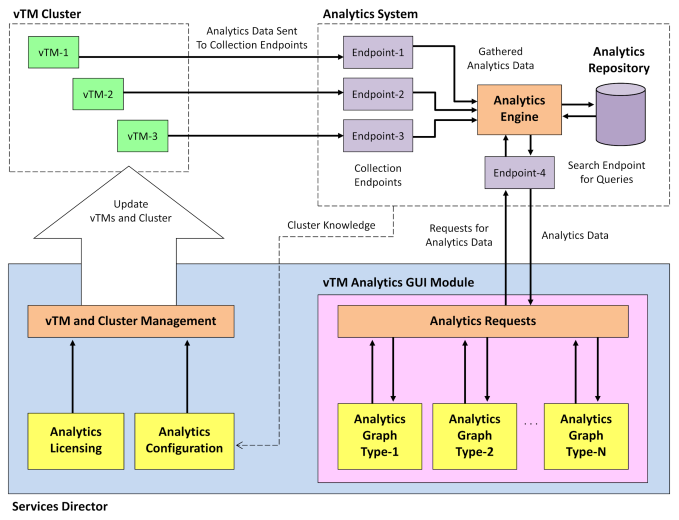
Working with vTM Analytics
Services Director supports the configuration and implementation of analytics on a cluster of externally-deployed Virtual Traffic Managers (vTMs).
Each Pulse Secure Virtual Traffic Manager at version 17.2 or later supports vTM Analytics. vTM Analytics enables a vTM to send operational data to an Analytics System. This cluster can then be queried by the Services Director, which can then display tailored graphical reports about the vTMs in its estate.
The vTM Analytics process proceeds as follows:
See the Pulse Secure Services Director Getting Started Guide for a full description of these workflows.
On the Services Director, you create:
•Collection Endpoints and a single Search Endpoint that record the interfaces to your Analytics System. In the Command Line Interface, use the following commands:
•show ssc search-endpoint
•show ssc collection-endpoint
•ssc search-endpoint list
•ssc collection-endpoint list
•ssc search-endpoint create
•ssc collection-endpoint create
•ssc search-endpoint delete
•ssc collection-endpoint delete
•ssc search-endpoint update
•ssc collection-endpoint update
•Log Export Types to define the files and transaction data that will be exported. In the Command Line Interface, use the following commands:
•show ssc log-export
•ssc log-export list
•ssc log-export create
•ssc log-export delete
•ssc log-export update
•An Analytics Profile collects the Log Export Types that are required on your vTM cluster. In the Command Line Interface, use the following commands:
•show ssc analytics-profile
•ssc analytics-profile list
•ssc analytics-profile create
•ssc analytics-profile delete
•ssc analytics-profile update
You can then apply an Analytics Profile to the vTM cluster from your Services Director. This configures all vTMs in the vTM cluster to communicate with your Analytics System using the provided interfaces, and starts the export of the specified files and transaction data.
In the Command Line Interface, use the following commands to view and update your Discovered vTM cluster to include an Analytics Profile. This will initiate the automatic configuration of the vTMs in your cluster.
•show ssc cluster cluster-name
•ssc cluster list
•ssc cluster update cluster-name
For full details of all commands, refer to the Pulse Secure Services Director Command Reference.
Exporting a Database
To export the MySQL inventory database from the CLI:
ssc database local db-file export
The name of the exported database file is chosen automatically, using the following format:
sscdb_dump_<VA_version>_<timestamp>.sql
Generating a Self-Signed SSL Server Certificate
The Services Director is commonly deployed using self-signed certificate/key pairs, using the self-signed server certificate in the Legacy FLA License. Ivanti recommends that you do not use a CA-signed certificate.
The Setup Wizard enables you to generate a self-signed certificate. However, you can choose to generate a self-signed SSL certificate before starting the Setup Wizard. To do this, at the Linux prompt, enter:
$ openssl req -x509 -nodes -newkey rsa:2048 -keyout key.pem -out cert.pem -days 3650
|
Parameter |
Description |
|
req |
Specifies an X509 certificate signing request management. |
|
-x509 |
Specifies a self-signed certificate rather than a certificate request. |
|
-nodes |
Specifies that the private key will not be encrypted (otherwise, the server needs a password to start). |
|
-newkey rsa:2048 |
Generates a new certificate request and sets the key size. |
|
-keyout key.pem |
Sets the target for the new private key. |
|
-out cert.pem |
Sets the target for the certificate. |
|
-days 3650 |
Specifies the duration of the certificate (default is 30 days). A longer period may be desirable as a fresh FLA license will need to be generated and then deployed to all STM instances when the certificate expires. |
The FLA license does not accept composite certificates that include a server certificate along with other information or certificates created by ssh-keygen.
Verify the SSL Certificate
1.At the Linux prompt, enter:
$ openssl x509 -in certificate.crt -noout
This command either succeeds silently for a valid certificate, or reports errors.
2.To verify a signed certificate, enter:
$ openssl verify <certificate name>
Generating Metering Logs
To extract metering logs using the Services Director VA CLI, use the following command:
amnesiac (config) # ssc log metering generate [backup [yes|no]]
In this example, the backup switch indicates whether to regenerate all logs up to the most recent log generation. Any new logs since the most recent log generation will always be included. A maximum of ten metering logs can be generated by this process.
To generate metering logs using the Services Director VA, see the Pulse Secure Services Director Getting Started Guide.
Accessing the Operating System Shell
The operating system shell is available so that you can issue commands.
Once you have accessed the operating system shell, the OS Shell function is automatically enabled in the Services Director VA GUI. This cannot be disabled once enabled.
1.Connect to the CLI:
login as: admin
Pulse Services Director
[email protected]'s password:
Last login: Tue Sep 11 09:43:12 2016 from 10.62.134.242
amnesia > enable
amnesia # configure terminal
amnesia (config) #
2.Start the OS shell:
amnesia (config) # _shell
[admin@amnesia ~]#
You are now in the operating system shell.
3.To exit the OS shell, type ctrl + D.