Using an Instance Host with a Software Services Director
Introduction
This section describes how to deploy Traffic Managers to an instance host from a software form-factor Services Director.
Other form-factor configurations are supported:
•To deploy Traffic Managers to an instance host from a Services Director VA, see Using an Instance Host with a Services Director VA
•To register externally-deployed Traffic Managers, see Registering Externally-Deployed Traffic Managers.
See also Services Director Form-Factors and Working with an Instance Host.
Overview: Using an Instance Host with a Software Services Director
This section describes how to deploy Traffic Manager instances from a system that combines a software form-factor Services Director with an instance host.
This section assumes that you have installed, licensed and configured your software form-factor Services Director.
An instance host is an Ubuntu or RedHat / CentOS machine (virtual or physical) that is configured specifically for the purpose of allowing Services Director to deploy instances to it. Please see the release notes for details of currently supported versions. In this guide we have assumed the use of Ubuntu 14.04.
If you want an instance host that will support interaction with a Services Director VA, see Using an Instance Host with a Services Director VA.
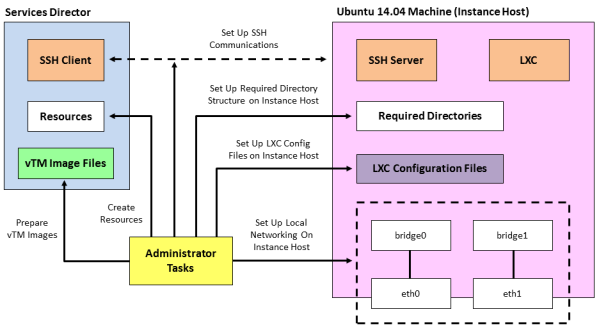
To create an instance host, the required steps are:
1.Create an Ubuntu 14.04 machine and its network interfaces, see Creating the Instance Host.
Ensure that an SSH Server is present on the Ubuntu 14.04 machine.
2.On the Ubuntu 14.04 machine, set up the required directory structures on the Ubuntu 14.04 machine, see Preparing the Directory Structure.
3.Set up local networking (interfaces/NICs and bridges) on the Ubuntu 14.04 machine, see Configuring the Local Network. Exact details will depend on your networking requirements (see example below).
4.On the Ubuntu 14.04 machine, set up an LXC configuration file for each required LXC container, see Creating an LXC Container Configuration File.
5.Establish SSH communications between the software form-factor Services Director and the Ubuntu 14.04 machine, see Configuring Passwordless SSH.
6.Transfer any required Virtual Traffic Manager (vTM) images onto the Services Director, see Preparing Traffic Manager Images.
7.Create any required resources (versions, feature packs and legacy FLA if required) on the Services Director VA, see Creating Required Resources.
8.Register the instance host on the Services Director, see Adding an Instance Host to the Software Services Director.
For example:
Once these steps are complete the instance host is ready.
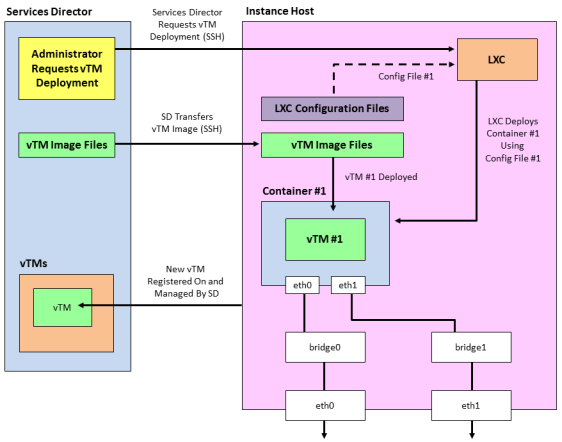
To create a vTM on the instance host, request the deployment from the Services Director, see Deploying a Traffic Manager to an Instance Host. The following events then occur automatically:
•The Services Director contacts the instance host using SSH to request that LXC deploys a vTM on the instance host.
•Services Director transfers the required vTM image file to the instance host.
•LXC retrieves the required LXC configuration file based on the information passed from the Services Director.
•LXC uses the LXC configuration file to create an LXC container and configure its interfaces.
•The instance host uses the required vTM image to deploy a vTM to the LXC container.
•The new vTM is added to the list of vTMs that are in the estate of the Services Director.
Once these events are complete, the first vTM is ready for use.
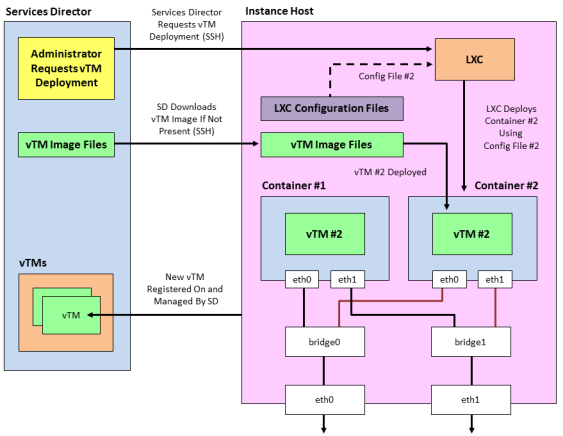
You can repeat this process to deploy a second (and subsequent) vTMs onto the same instance host. This is broadly similar to the first vTM. Please note that:
•This requires a different LXC configuration file.
•A second container configuration file must already exist or be created. You cannot deploy a second vTM to the same container as the first vTM.
•A vTM image file is only transferred to the instance host if the vTM image file is not already cached there.
•All other events are the same as for the first vTM.
Creating and Configuring an Instance Host
You can use an instance host (either virtual or physical) with both the software form-factor Services Director and the Services Director VA.
Creating the Instance Host
To create an instance host, you must first create an Ubuntu 14.04 machine. During this process, you will need:
•The IP address and hostname that is required for the instance host.
•The IP address for the management interface (eth0).
•An IP address for each of the required network interfaces (eth1, eth2, and so on).
At least two network cards are required for the host. In the case of virtual machine the second network card must have the promiscuous flag enabled so that it can receive all packets from the hypervisor.
•Optionally, the IP address(es) of the DNS name server(s).
Perform the following steps:
1.Create a machine to contain the Ubuntu 14.04 operating system. This machine can be either virtual or physical.
The machine's management network interface must be accessible from the Services Director.
2.Install the Ubuntu 14.04 operating system using the standard set-up software.
3.Ensure that the Ubuntu 14.04 machine has SSH server installed and running.
4.Install LXC and bridge utilities on the Ubuntu 14.04 machine to enable container deployment:
$ apt-get update
$ apt-get install lxc bridge-utils
Preparing the Directory Structure
You must prepare the Ubuntu 14.04 instance host directory structure to receive the required Traffic Manager files. These are required when you register the instance host on the Services Director.
1.On the instance host, create a directory to place files for use. For example, for Traffic Manager image files and license files. For example:
/var/cache/ssc
2.Then, create a parent directory for all deployed Traffic Managers. For example:
/root/install
3.Check that suitable permissions are set for both of the new directories (from steps 1 and 2).
Services Director assumes that all required directories on the instance host have read/write/execute permissions for the root user / group. Check this on the instance host:
$ stat --format=%a <directory>
And set if required by using:
$ chmod 770 <directory>
Configuring the Local Network
Configure a virtual network on the instance host for the Traffic Manager instance. Typically, this configuration requires setting up a virtual bridge (using, for example, Linux bridge or Open vSwitch), then configuring the Linux container to attach to the bridge when running Traffic Manager.
You must disable the default bridge configured by LXC. This is unsuitable for Services Director operations.
1.On the instance host, edit the /etc/network/interfaces file and configure the network interfaces and bridges as required. For example:
# The loopback network interface
auto lo
iface lo inet loopback
# The primary network interface
auto eth0
iface eth0 inet static
address XX.XX.XX.XX
netmask YY.YY.YY.YY
gateway BB.BB.BB.BB
# dns-* options are implemented by the resolvconf package, if installed
dns-nameservers DD.DD.DD.DD
dns-search cam.demo.com
# The primary bridge
auto br0
iface br0 inet static
bridge_ports eth1
bridge_fd 0
address EE.EE.EE.EE
netmask FF.FF.FF.FF
# The secondary network interface
auto eth1
iface eth1 inet static
address 0.0.0.0
In this example, there is a Linux bridge setup to which LXC containers can attach virtual network interfaces.
2.You must now disable the LXC default bridge. Edit the /etc/default/lxc-net file and set the following:
USE_LXC_BRIDGE="false"
Also comment out any other lines that contain 'LXC_*='.
3.You must now turn off strict return path filtering. Edit the /etc/sysctl.conf file:
net.ipv4.conf.default.rp_filter=2
net.ipv4.conf.all.rp_filter=2
4.Either reboot, or restart the networking services. This ensures that the networking configuration is correct and the default LXC bridge is removed.
Creating an LXC Container Configuration File
Traffic Manager instances can cohabit on an instance host using LXC containers.
LXC containers support network isolation and a degree of resource isolation. The software form-factor Services Director expects prepared container configuration files in advance of instance deployment. You must put these files in the installation root directory of the instance host.
Before you create an LXC container for a Traffic Manager, you must create an LXC configuration file. This file describes the properties for the container.
1.On the instance host, create an LXC configuration text file.
This must be located in the parent directory for installations (see Preparing the Directory Structure). For example, in the /root/install directory.
The container configuration file must include networking entries for your Traffic Manager instance IP address. You can use either Linux virtual networking or Open vSwitch to set up network isolation for your Traffic Manager instance.
The filename of the container configuration file must match the FQDN or IP address of the required container. That is: <container-fqdn-or-ip>.conf.
This filename must be specified as the container_name property when you deploy the instance.
For Instance resources that are not able to use the Universal FLA License, <container-fqdn-or-ip>.conf must match the value of the lxc.utsname used in the file, and the management_address specified in the REST request.
2.Create contents for the LXC container configuration file. For example:
lxc.network.type = veth
lxc.network.flags = up
lxc.network.link = br0
lxc.network.ipv4 = XX.XX.XX.XX/SS
lxc.network.ipv4.gateway = YY.YY.YY.YY
lxc.utsname = vtm-mgmt.example.com
In this example:
•XX.XX.XX.XX/SS is the IP address and subnet mask of the LXC container network.
•YY.YY.YY.YY is the IP address of the subnetwork gateway inside the LXC container.
•If the Legacy FLA License is in use for this instance, the filename of the container configuration file must be vtm-mgmt.example.com.conf.
Configuring the Services Director Software
Before you register the instance host and deploy Traffic Managers to it, you must perform the following tasks:
•Enable passwordless SSH communication between the Services Director and the instance host, see Enabling Passwordless SSH Communication.
•Transfer any required Traffic Manager images to the Services Director, see Preparing Traffic Manager Images.
•Create any required version resources on the Services Director, see Creating a Version Resource.
•If you cannot use Universal FLA Licensing, create any required Legacy FLA license resources on the Services Director, see Creating a Legacy FLA License Resource.
•Create any required feature pack resources on the Services Director, see Creating a Feature Pack Resource.
You can also verify that these have been created, see Verifying a Resource.
Enabling Passwordless SSH Communication
The Services Director uses passwordless SSH to communicate with your instance host. Passwordless SSH enables the Services Director to copy files and remotely run commands to deploy, start, stop, upgrade, and delete Traffic Manager instances.
Each Services Director in a cluster of Services Directors has its own unique SSH authentication key pair.
When you add a new instance host to the Services Director, you must set up passwordless SSH between each Services Director and the new instance host.
1.If do not yet have an SSH authentication key pair for your Services Director, run the following command on the Services Director.
You must be logged in as the user used to run the Services Director software.
ssh-keygen -t rsa
When prompted, enter a blank pass-phrase, and accept the default key location. This operation results in the generation of these key files:
•~/.ssh/id_rsa (certificate)
•~/.ssh/id_rsa.pub (public key)
This SSH authentication key pair will be used for SSH passwordless communication between this Services Director and any instance hosts.
2.Use the ssh-copy-id command (included in the openssh-client package) to install your public key to the instance host authorized_keys file. For example:
ssh-copy-id root@<instancehost>
3.Return to the command line of the Services Director and connect to the new instance host by SSH as the root user. If you are successful, the credentials for passwordless SSH are correctly set up.
After these credentials have been set up, you can add the host to the Services Director system by means of a REST request. See Adding an Instance Host to the Software Services Director.
Preparing Traffic Manager Images
1.Obtain your Virtual Traffic Manager (vTM) installation image (that is, a .TGZ file) from Ivanti Support and store them locally.
2.Log into the Services Director and transfer the local .TGZ image files into the directory you created to place files for use, see Preparing the Directory Structure. For example: /var/cache/ssc.
The vTM image files are not replicated automatically between the Services Director nodes. You must manually transfer the files into both nodes.
Creating Required Resources
You must create any required version, and feature pack resources.
Also, if you are unable to use Universal FLA Licensing, you must create a Legacy FLA License resource.
Creating a Version Resource
After you have added the required Virtual Traffic Manager (vTM) installation images to the Services Director, you can create all required version resources.
Each version resource represents a software version number for a vTM release. This is associated with the image file that is used to deploy a Traffic Manager that has this version.
Perform the following procedure to create a REST API version resource. For detailed information about the properties for this resource, see version Resource.
1.To create a version resource, perform a PUT request:
https://<sdhost>:<port>/api/tmcm/2.9/version/11.0
Use the following JSON structure as the body of your request:
{
"version_filename" : "ZeusTM_110_Linux-x86_64.tgz",
"info" : "Version 11.0"
}
In this example, the 11.0 version resource is associated with the ZeusTM_110_Linux-x86_64.tgz image file.
Creating a Legacy FLA License Resource
If you unable to use Universal FLA Licensing, you must create a Legacy FLA license resource using the REST API. For detailed information about the properties for this resource, see license Resource.
1.Obtain all required FLA-style license keys. For details about retrieving your licenses, see Retrieving Ivanti, Inc. vTM and Services Director Product Licenses.
2.Put the retrieved license keys into the directory you created to place files for use, see Preparing the Directory Structure. For example: /var/cache/ssc.
3.To create a license resource for an FLA-style license key file (for example flexlic1), perform a PUT request:
https://<sdhost>:<port>/api/tmcm/2.9/license/flexlic1
Include the following JSON structure as the body of your request:
{
"info" : "This is the resource for the flexlic1 license"
}
You can pass an empty JSON structure ({} ) to the license resource because there are no mandatory properties for this resource type.
Creating a Feature Pack Resource
To complete the set of supporting resources required by a Traffic Manager instance, you must specify one or more feature packs with the required feature sets. The value of the property of the feature pack resource must be the name of one of the available sku resources created when the Services Director was installed. The choice of SKU depends on a combination of:
•the features you want to enable on the instances that will use the feature pack.
•the available licensed bandwidth for the SKU (for Enterprise Licensed customers).
•the metered cost of the SKU (for Cloud Service Provider licensed customers).
Perform the following procedure:
1.To create a feature_pack resource (for example, STM-U-CSP-200-FP), perform a PUT request:
https://<sdhost>:<port>/api/tmcm/2.9/feature_pack/STM-U-CSP-200-FP
Use the following JSON structure as the body of your request to define the SKU:
{
"stm_sku" : "STM-U-CSP-200",
"excluded" : ""
}
The excluded property is a space-separated list of features that are specifically excluded from the default list of features specific to each SKU, see the feature_pack Resource.
In this example, STM-U-CSP-200 represents an available sku resource in the Services Director that is compatible with your Services Director base license.
2.When complete, the following response is displayed:
{
"info": "",
"status": "Active",
"stm_sku": "STM-400",
"add_on_skus": [],
"excluded": ""
}
Verifying a Resource
You can use the Services Director REST API to verify that all the required files are present and accessible. Perform a file status check GET request to verify that the Services Director can find and access the files that are referred to in any of the defined resources.
To verify that the Services Director can find and access the Traffic Manager package and license key files, perform a file status check GET request:
https://<sdhost>:<port>/api/tmcm/2.9/status/files
The following output is displayed:
{
"licenses": [{
"href": "/api/tmcm/2.9/license/flexlic1",
"name": "flexlic1",
"present": true,
"filename": "/var/lib/ssc/flexlic1"
}],
"versions": [{
"href": "/api/tmcm/2.9/version/11.0",
"name": "11.0",
"present": true,
"filename": "/var/lib/ssc/ZeusTM_110_Linux-x86_64.tgz"
}]
}
In the above example, the present property showing as true indicates that the file is in place. If it is false, the file must be placed in the location indicated.
Adding an Instance Host to the Software Services Director
To complete the introduction of an instance host, you must register it on your software form-factor Services Director.
Once all preparations are complete, perform the following procedure:
1.To create the instance host, perform a PUT request:
https://myssccontroller.mydomain.com:8000/api/tmcm/2.9/host/ myhost-01.mydomain.com
Include the following JSON structure as the body of your request:
{
"cpu_cores":"0-3",
"work_location":"/space/workspace",
"install_root":"/space/install",
"username":"root",
"retained_info_dir":"/space/retain",
}
2.Test the registered host by making a REST request to get the host resource, with the addition of the ?status_check=true query parameter. For example, make the request to:
https://myssccontroller.mydomain.com:8100/api/tmcm/2.9/host/myhost-01.mydomain.com?status_check=true
The response will include a status_check property that will be an empty object if the host is correctly configured for deployments.
If not, status_check will have a further setup_errors property describing the problems found with the host.
Deploying a Traffic Manager to an Instance Host
After you have completed preparations to deploy a Traffic Manager instance, you can deploy it to the instance host.
You will need to be aware of:
•The properties required when deploying the instance, see Properties for a Deployed Instance.
•The configuration and container options you want to specify when deploying the instance, see Specifying Configuration Options and Container Options.
There are two common deployment scenarios:
•Deploying a Traffic Manager instance with a fixed unique identifier and a changeable user-facing name. This enables Traffic Manager names to be changed and for names of deleted Traffic Manager instances to be re-used under most circumstances. See Deploying a Traffic Manager Instance with a UUID and a Tag.
Ivanti, Inc. recommends this approach wherever possible.
•Deploying a Traffic Manager instance with a permanent chosen name. See Deploying a Traffic Manager Instance with a Chosen Name.
As a part of the deployment process for all deployed instances, a check of the FLA license is performed automatically, although this feature may optionally be disabled. See Checking the Health of an FLA License Automatically.
Instances can be also be registered using the procedures described in the Pulse Secure Services Director Getting Started Guide.
Properties for a Deployed Instance
The table below describes the REST API properties for a deployed instance in an LXC container.
When you create the instance, make sure you assign the same name to both the instance and the container, because the instance uses the container name as its hostname.
For details of all instance properties, see instance Resource.
|
Property |
Description |
|
host_name |
The name of the Traffic Manager instance host on which you deploy the instance. This name must match the name of the instance host that was created. This property is a fully-qualified domain name, or may optionally be an IP address where Universal Licensing is used. You must create a host entry before you create an instance. |
|
container_name |
The name of the LXC container for the Traffic Manager instance. This name must match the name of the required container configuration (.conf ) file in the installation directory. Do not include the .conf file extension. You must create an appropriate container configuration file of the form <containername>.conf in the install_root directory of the container host. For example, a container_name of stm1.example.com requires a container configuration file named stm1.example.com.conf. The container configuration file must set lxc.utsname to the container name for the licensing server to operate correctly. |
|
container_configuration |
A space-separated string used to set up the default network gateway inside the LXC container. See Specifying Container Options. Use this format: "{\"gateway\":\"<ip_address>\"}" This is the IP address raised on the bridge interface to which this container is connected. Ivanti recommends the use of the container_configuration_json property instead of this property. When you specify this property, do not specify the container_configuration_json property. |
|
container_configuration_json |
A JSON data structure that is equivalent to the container_configuration property, but which avoids the need to perform JSON escaping. Ivanti recommends the use of this property rather than container_configuration. See Specifying Container Options. When you specify this property, do not specify the container_configuration property. |
|
owner |
Specify who owns the instance. |
|
stm_version |
The name of the Traffic Managerversion resource for the instance. |
|
stm_feature_pack |
The name of the feature_pack resource associated with the Traffic Manager instance. This feature pack represents the set of features that are available for the instance. |
|
license_name |
The name of the FLA license resource you want to use for this instance. When you modify this property, the Services Director updates the license on the Traffic Manager instance. |
|
rest_enabled |
Should set to true. This is required to enable monitoring and to allow licenses to be pushed to instances, and for the use of Universal FLA licensing. |
|
config_options |
A space-separated string used to define configuration options. See Specifying Configuration Options. If you specify the cluster_id property, then you must also set the config_options property to include admin_ui=yes and start_flipper=yes. The config_options property is visible in the graphical user interface of the Services Director VA. It is listed for an expanded instance on the vTM Instances page as Extra Options. Refer to the Pulse Secure Services Director Getting Started Guide. Ivanti recommends the use of the config_options_json property instead of this property. Whenever the config_options property is set, all currently modified options must be specified again in the REST call. Any options that are not specified will lose their current value and be reset to their default value. Any change to the config_options settings on a deployed instance will cause a restart of the instance. Externally-deployed instances are not affected. When you specify this property, do not specify the config_options_json property. |
|
config_options_json |
A JSON data structure that is equivalent to the config_options property. See Specifying Configuration Options. Ivanti recommends the use of this property rather than config_options property. When you specify this property, do not specify the config_options property. |
|
bandwidth |
The maximum allowed bandwidth for the Traffic Manager instance (in Mbps). |
|
tag |
A text property which provides an alternative way of referring to an instance. Unlike the unique ID for an instance, the tag value can be changed or re-used, subject to some restrictions. See Understanding the Tag Property. |
|
cpu_usage |
A string that describes which CPUs are used for this Traffic Manager instance. The CPU affinity is defined using the lxc.cgroups.cpuset setting in the container configuration file, in which case cpu_usage is set to an empty string. Any change to the cpu_usage settings of a deployed instance will cause a restart of the instance. Externally-deployed instances are not affected. |
|
cluster_id |
Optionally, the name of a cluster resource to which the instance belongs. If you specify an entry for this property, it must refer to a cluster resource. This must be a User-Created cluster, and not a Discovered cluster. The cluster_id property cannot be changed after you create an instance. Instances must be added to a cluster when you create them. (This requirement also applies to the first instance in a cluster.) If you specify the cluster_id property , then you must also set the config_options property to include admin_ui=yes and start_flipper=yes. |
|
management_address |
When using Legacy licensing, the management_address property is typically the same as the lxc.utsname and the container configuration filename (minus the .conf file extension). This property is a fully-qualified domain name, or an IP address where Universal Licensing is used. For example, if the container configuration filename is: stm1.example.com.conf and the lxc.utsname is defined as follows: lxc.utsname = stm1.example.com then the management_address is defined as follows: management_address = stm1.example.com |
Specifying Configuration Options and Container Options
When deploying and configuring either deployed and externally-deployed instances, you can specify two sets of options:
•Configuration options, see Specifying Configuration Options.
•Container options, see Specifying Container Options.
These option sets can be specified as either a space-separated string, or as a JSON data structure.
Specifying Container Options
When you specify container options, you can use either the container_configuration or container_configuration_json properties.
For example, for the container_configuration property, you can specify:
"container_configuration": "{\"gateway\":\"10.62.128.1\"}"
Alternatively, you can specify this as a JSON data structure in the container_configuration_json property:
"container_configuration_json": {"gateway": "10.62.128.1" }
Ivanti, Inc. recommends the use of the container_configuration_jsonproperty rather than container_configuration property.
Once one of these properties is set, the result of any GET will show the container_configuration and container_configuration_json properties set to equivalent values. See instance Resource.
Specifying Configuration Options
When you specify container options, you can use either the config_options or config_options_json properties.
For example, for the config_options property, you can specify:
"config_options": "admin_ui=yes start_flipper=no java!enabled=yes
webcache!size=5mb flipper!monitor_interval=1000 snmp!community=notpublic "
Alternatively, you can specify this as a JSON data structure in the config_options_json property:
"config_options_json": {
"admin_ui": true,
"start_flipper": false,
"java": {
"enabled": true
},
"webcache": {
"size": "5mb"
},
"flipper": {
"monitor_interval": 1000
},
"snmp": {
"community": "notpublic"
}
}
Ivanti, Inc. recommends the use of the config_options_json property rather than the config_options property.
Once one of these properties is set, the result of any GET will show the config_options and config_options_json properties set to equivalent values. See instance Resource.
Deploying a Traffic Manager Instance with a UUID and a Tag
Perform this procedure to create a Traffic Manager instance whose name can be changed, and may be re-used for another instance after deletion.
Ivanti, Inc. recommends the use of tags when creating an instance.
The resource name for the instance is an automatically-generated unique identifier. This cannot be changed after it is assigned, and is unique among all Traffic Manager instances (included deleted instances).
However, the Traffic Manager instance also has a "user-facing" name stored as its tag property. This can be changed as required, but it must always be unique among non-deleted Traffic Manager instances, see Understanding the Tag Property. The tag must be a valid alphanumeric name suitable for use in a URI. For example, stm1.
1.Choose a Traffic Manager instance host to which you want to deploy the instance. This is the fully-qualified domain name for your LXC container, or may optionally be the IP address of your container if Universal FLA Licensing is used.
2.To create the instance resource with a unique identifier, perform a POST request. For example, the URI for a POST request to create an instance with an automatically-generated unique identifier is:
https://<sdhost>:<port>/api/tmcm/2.9/instance
This request supports the following URL parameters:
•?managed=true to indicate that this is a deployed instance. However, this is the default setting, and can be omitted for deployed instances.
•?override_fla_check=true to prevent an automatic FLA license check before deployment. The default setting is false. That is, an automatic FLA license check is performed. You can also disable the FLA license check at the Services Director level. See Disabling the FLA Health Checker.
Use the following example JSON structure as the body of your request:
{
"owner" : "Demo Corp",
"stm_version" : "11.0",
"host_name": "1h1.mydomain.com",
"container_name": "1c1.mydomain.com",
"container_configuration": "{\"gateway\": \"XX.XX.XX.XX\" }",
"config_options": "admin_ui=yes",
"cpu_usage": "0",
"stm_feature_pack": "STM-U-CSP-400-FP",
"bandwidth": 100,
"tag": "stm1",
"rest_enabled": true,
"license_name": "flexlic1",
"management_address": "1m1.mydomain.com"
}
In this example:
•XX.XX.XX.XX is the IP address of your gateway.
•When the container_name and container_configuration properties are used, the container_name_json and container_configuration_json properties are not required. See Specifying Configuration Options and Container Options.
•1c1.mydomain.com is the LXC container. This property is a fully-qualified domain name, or an IP address where Universal Licensing is used.
•1m1.mydomain.com is the management host. This is the same as 1c1.mydomain.com.
•The tag property is set to stm1.
The REST API response indicates that the instance is scheduled to deploy.
3.A check of the FLA license is performed automatically, unless prevented in step 2 by the ?override_fla_check=true URL parameter.
•If the license check fails, this procedure ends. The instance has a status of Failed to Deploy, and a deployment action shows as Blocked.
•If the license check succeeds, this procedure continues.
See Checking the Health of an FLA License Automatically.
4.To poll the Services Director until the instance is successfully deployed, perform a GET request for the URI of the instance that you created, using its tag to identify it. For example:
https://<sdhost>:<port>/api/tmcm/2.9/instance/stm1
The response to this request contains a JSON structure representing the instance resource. This contains additional properties, one of which gives the status of the instance.
If the deployment fails, you will first need to identify and resolve the the issue identified in the block_reason property of the associated deployment action. Then, you must remove the installation directory for the instance. You are then able to re-attempt the deployment by setting the Blocked deployment action to a Waiting state.
Deploying a Traffic Manager Instance with a Chosen Name
Perform this procedure to create a Traffic Manager instance when you have chosen a permanent unique identifier (name) for instance. Your chosen name must use a valid alphanumeric name suitable for use as a directory name and as part of a URI. For example, stm1.
Ivanti, Inc. recommends the use of tags when creating an instance, see Deploying a Traffic Manager Instance with a UUID and a Tag.
1.Choose a Traffic Manager instance host to which you want to deploy the instance. This is the fully-qualified domain name for your LXC container, or may optionally be the IP address of your container if Universal FLA Licensing is used.
2.To create the named instance resource, perform a PUT request. For example, the URI for a PUT request to create an instance called stm1 is:
https://<sdhost>:<port>/api/tmcm/2.9/instance/stm1
This request supports the following URL parameters:
•?managed=true to indicate that this is a deployed instance. However, this is the default setting, and can be omitted.
•?override_fla_check=true to prevent an automatic FLA license check before deployment. The default setting is false. That is, an automatic FLA license check is performed. You can also disable the FLA license check at the Services Director level. See Disabling the FLA Health Checker.
Use the following example JSON structure as the body of your request:
{
"owner" : "Demo Corp",
"stm_version" : "11.0",
"host_name": "1h1.mydomain.com",
"container_name": "1c1.mydomain.com",
"container_configuration": "{\"gateway\": \"XX.XX.XX.XX\" }",
"config_options": "admin_ui=yes",
"cpu_usage": "0",
"stm_feature_pack": "STM-U-CSP-400-FP",
"bandwidth": 100,
"tag": "",
"rest_enabled": true,
"license_name": "flexlic1",
"management_address": "1m1.mydomain.com"
}
In this example:
•XX.XX.XX.XX is the IP address of your gateway.
•When the container_name and container_configuration properties are used, the container_name_json and container_configuration_json properties are not required. See Specifying Configuration Options and Container Options.
•1c1.mydomain.com is the LXC container. This property is a fully-qualified domain name, or an IP address where Universal Licensing is used.
•1m1.mydomain.com is the management host. This is the same as 1c1.mydomain.com.
•tag is an optional text property which provides an alternative way of referring to an instance in the URI. In this example, the fixed (permanent) resource name of stm1 is sufficient, and the tag is not set. You can set the tag (and use it to refer to the instance) later if required. See Understanding the Tag Property.
The REST API response indicates that the instance is scheduled to deploy.
3.A check of the FLA license is performed automatically, unless prevented in step 2 by the ?override_fla_check=true URL parameter.
•If the license check fails, this procedure ends. The instance has a status of Failed to Deploy, and a deployment action shows as Blocked.
•If the license check succeeds, this procedure continues.
See Checking the Health of an FLA License Automatically.
4.To poll the Services Director until the instance is successfully deployed, perform a GET request for the URI of the instance that you created. For example:
https://<sdhost>:<port>/api/tmcm/2.9/instance/stm1
The response to this request contains a JSON structure representing the instance resource. This contains additional properties, one of which gives the status of the instance.
If the deployment fails, you will first need to identify and resolve the the issue identified in the block_reason property of the associated deployment action. Then, you must remove the installation directory for the instance. You are then able to re-attempt the deployment by setting the Blocked deployment action to a Waiting state.
Making Database-Only Updates
The Services Director uses the inventory database to store and maintain information about the state of each Traffic Manager instance it is aware of. This information includes the current status of each instance. For example, Inactive or Active.
However, the Services Director does not actively monitor this state. If you start or stop a Traffic Manager instance outside of the Services Director, it is unaware of this change of state.
You can use these techniques to resolve this monitoring issue:
•Issue a GET REST API request for the Traffic Managerinstance resource, including the URL parameter status_check=true. The Services Director actively checks the state of the Traffic Manager instance and updates the stored status where it can determine that the stored state is incorrect.
•Issue a PUT REST API request to modify the Traffic Managerinstance resource and set the status property to the known correct state with URL parameter deploy=false. The Services Director updates the status of the Traffic Manager instance in the inventory database but does not attempt to start or stop the instance itself.
You can also use a database-only update if you need to update the recorded admin user password. This action is useful if the password has been set or changed on the Traffic Manager instance directly.