Installing the Services Director VA on KVM-QEMU
Overview: Services Director VA on KVM-QEMU
The Pulse Secure Services Director Virtual Appliance is supported for production use on the KVM-QEMU hypervisor running on either an Ubuntu 18.04 or a RHEL/CentOS 6.x/7.x server.
The Services Director VA is available on KVM-QEMU as a 64-bit version only.
Perform the following steps to install and configure the Services Director VA on KVM-QEMU:
All required files must be in accessible locations in your infrastructure during the installation process. For example, locate the files on an accessible server, or your local machine.
This procedure assumes that you have DHCP or DNS enabled as required by your network.
1.Obtain the Services Director Kernel Virtual Machine (KVM) image in QCOW2 format from Ivanti Support. See Obtaining the Services Director VA KVM Image.
2.Obtain the Services Director license from your Ivanti account team. For details about obtaining your license keys, see Obtaining Services Director Licenses.
3.Prepare a server that supports KVM. Supported servers are Ubuntu 18.04 and RHEL/CentOS 6.x/7.x.
4.Install the Services Director QCOW2 virtual machine on your server. This process creates the Services Director VA. See Creating the Services Director VA on a KVM Server.
5.Access the Services Director VA. See Accessing the Services Director VA on KVM.
6.The Setup Wizard runs automatically. Use the wizard to configure your Primary Services Director VA. See Running the Services Director VA Setup Wizard.
7.Review and configure the Settings for the Services Director VA, see Installing the Services Director VA on KVM-QEMU.
8.Repeat steps 3 - 6 for the Secondary Services Director to form a High Availability (HA).
Obtaining the Services Director VA KVM Image
The Services Director VA is provided by Ivanti Support as a KVM image in QCOW2 format. This image contains the files necessary to create a Services Director VA on a KVM-QEMU hypervisor on all supported server platforms.
You obtain the Services Director KVM image in QCOW2 format from Ivanti Support.
Obtaining Services Director Licenses
License tokens are automatically emailed to you when you order your product. If you have not received your license tokens, contact your Ivanti sales representative.
You must redeem your license tokens at the Ivanti License Redemption Portal. To redeem a license token you must have a support site login and password, and a self-signed SSL certificate.
You cannot use a CA-signed certificate.
All licenses are emailed to you as attachments.
You will receive a Legacy FLA License as part of the redemption process. However, if you intend to use only Virtual Traffic Manager (vTM) instances that are at version 10.1 (or later), each with its REST API enabled, you do not need to install this Legacy FLA license. You will instead use a Universal License that comes pre-installed with the Services Director.
Creating the Services Director VA on a KVM Server
To create the Services Director VA on a KVM server, you must install the Services Director KVM image on a KVM server. There are many virtualization systems in common use; the following two examples describe the installation of your Services Director VA:
•Using the command line interface (CLI) of the libvirt toolset. See Creating a VM Using the libvirt Command Line Interface.
For detailed information about libvirt, refer to https://libvirt.org/.
•Using the graphical user interface (GUI) of the Virtual Machine Manager graphical toolset. See Creating a VM Using the VMM Graphical User Interface.
For detailed information about VMM, refer to https://virt-manager.org/.
However your image is installed, the following settings must be used for the virtual machine:
•X86_64 architecture.
•Four virtual CPUs.
•8192 MB (8 GB) of memory.
•Write-through caching mode.
•Two Ethernet adapters with an e1000 model, connected using a bridge.
•A hard drive with IDE or VIRTIO bus type for the KVM image in QCOW2 format.
The installation and configuration of your chosen toolset is outside the scope of this document. Refer to your tool’s documentation for details.
Creating a VM Using the libvirt Command Line Interface
To perform this procedure, you must have the required tools installed on a KVM-QEMU hypervisor, and be familiar with installing, configuring, and managing VMs.
1.Copy the KVM image to an appropriate designated directory (storage pool). Your System Administrator determines which storage pool to use. Give the file a unique name. For example, the filename might be of the form “image_xx.qcow2”. Images can only be used once.
For the purposes of this example, this directory is /vms/pool/sd0.
2.Install the required VM by issuing a virt-install command using the following syntax:
virt-install --import
--name=<servicedirector_name>
--disk <image_pool_path>/image.qcow2,format=qcow2,bus=<bus>,cache=writethrough
--os-type=linux
--network bridge=<bridge_name>,model=<model for primary interface>
--network bridge=<bridge_name>,model=<model for auxiliary interface>
--ram=8192 --arch=x86_64 --vcpus=4
Where bus can be set to either 'ide' or 'virtio'.
For example:
virt-install --import
--name=sd_kvm_07
--disk /vms/pool/sd0/image.qcow2,format=qcow2,bus=ide,cache=writethrough
--os-type=linux
--network bridge=br0,model=e1000
--network bridge=br0,model=e1000
--ram=8192 --arch=x86_64 --vcpus=4
After the installation completes, a number of background initialization tasks take place. As a result, the CLI will offer reduced functionality for a short period. Ivanti recommends waiting at least two minutes before attempting to access the Services Director.
3.List the VMs on this hypervisor:
virsh list
The response includes your VM (along with other VMs, if any):
Id Name State
--------------------------------
356 pchaudh-07 running
542 sramakrishnan-0b running
593 sd_kvm_07 running
4.Access the console of the VM you have just deployed:
virsh console <vm_name>
For example:
virsh console sd_kvm1
To exit the console, use ctrl+].
Creating a VM Using the VMM Graphical User Interface
To perform this procedure, you must have the required tools installed on a KVM-QEMU hypervisor, and be familiar with installing, configuring, and managing VMs.
1.Copy the KVM image to an appropriate designated directory (storage pool). Your System Administrator determines which storage pool to use. The image filename must be “image.qcow2”.
For the purposes of this example, this directory is /var/lib/libvirt/images.
2.Start the VMM GUI:
virt-manager --connect=qemu+ssh://my-kvm-host.com/system
In this command, my-kvm-host.com is the host machine name.
An SSH tunnel is used to connect to the KVM-QEMU host. You must have an SSH account and corresponding public key stored on this machine for authentication.
Refer to the VMM documentation for information on alternative connection methods.
3.Click New to start the process of creating a new virtual machine.
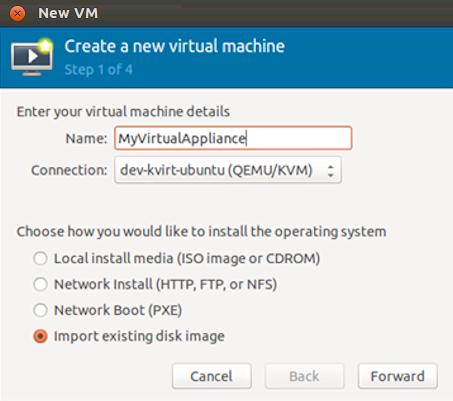
4.Enter a Name for your virtual appliance that corresponds with the name used for the disk image file.
5.Select Import existing disk image from the list of options.
6.Click Forward to proceed.
The next page of the wizard appears:
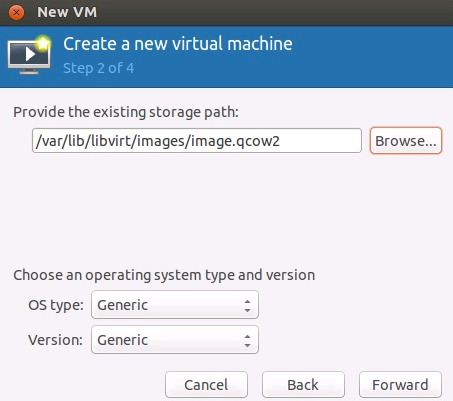
7.Click Browse to select the storage pool location and disk image file for this virtual machine.
8.Ensure that the OS type is Generic.
9.Ensure that the Version is Generic.
10.Click Forward to proceed. The next page of the wizard appears:
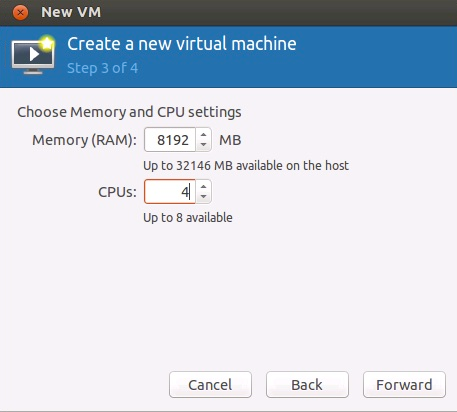
11.Set the Memory (RAM) to 8192 MB
12.Set the CPUs to 4.
13.Click Forward to proceed. The next page of the wizard appears:
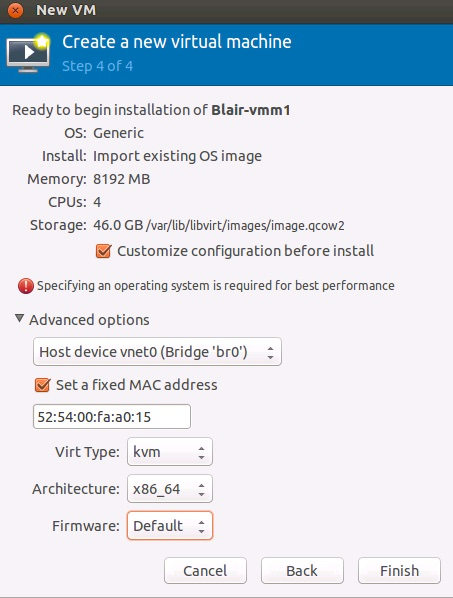
14.Check that the summary information is correct.
15.Ensure that the Customize configuration before install check box is selected.
16.Expand Advanced options.
17.Set Architecture to x86_64.
18.Click Finish. A configuration dialog box appears.
19.Select Disk 1 to update disk settings:
•Under Advanced Options, ensure that Storage format is set to qcow2.
•Under Advanced Options, ensure that Disk bus is set to either IDE or Virtio.
•Under Performance Options, ensure that Cache mode is set to writethrough.
•Click Apply.
20.Select Virtual Network Interface to view Virtual Network Interface settings.
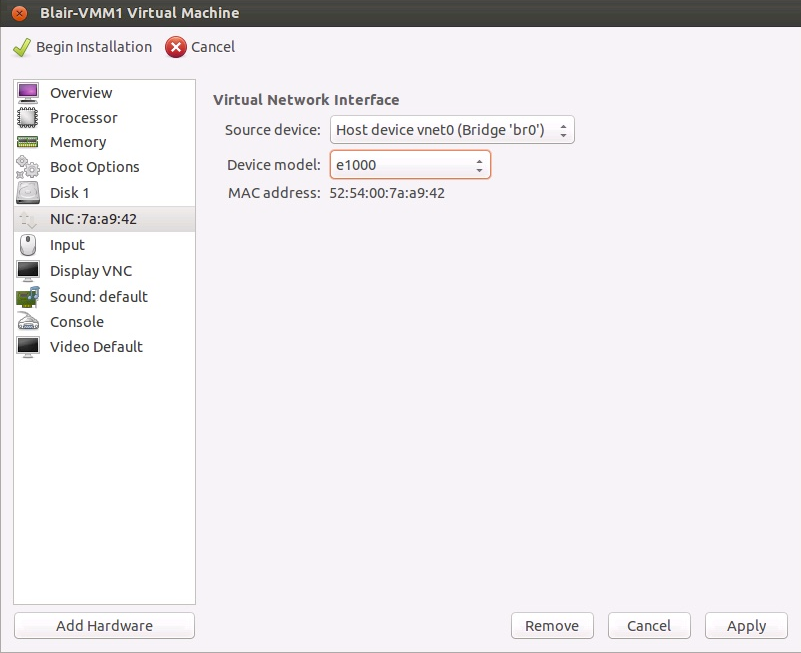
21.Ensure that the Source device is the br0 bridge.
22.Set the Device model to e1000.
23.Click Apply.
24.Click Add Hardware.
25.Click Network. The dialog box updates.
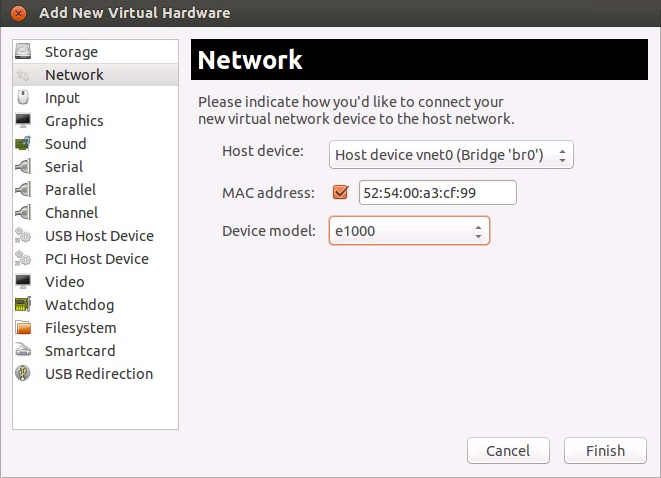
26.Ensure that the Host device is the br0 bridge.
27.Set the Device model to e1000.
28.Click Finish.
29.Select Begin installation to complete the installation process.
After the installation completes, a number of background initialization tasks take place. As a result, the CLI will offer reduced functionality for a short period. Ivanti recommends waiting at least two minutes before attempting to access the Services Director VA.
Accessing the Services Director VA on KVM
To access the Services Director VA, you need the IP address of its management interface.
If DHCP is available, you need to find out the allocated IP address.
1.Log in to the Services Director VA using the KVM console.
Do not use the jump-start setup wizard.
2.Obtain the allocated DHCP IP address of the VA using the following commands:
<host> > enable
<host> # show interfaces
If DHCP is not available, complete the following steps:
1.Log in to the Services Director VA using the KVM console.
2.Use the jump-start setup wizard to set:
•A static IP address.
•A netmask.
•The default gateway IP address.
You can access the Services Director VA with a browser, and configure the Services Director VA using the Setup Wizard, see Installing the Services Director VA on KVM-QEMU.