Running the Services Director VA Setup Wizard
Overview: Setup Wizard
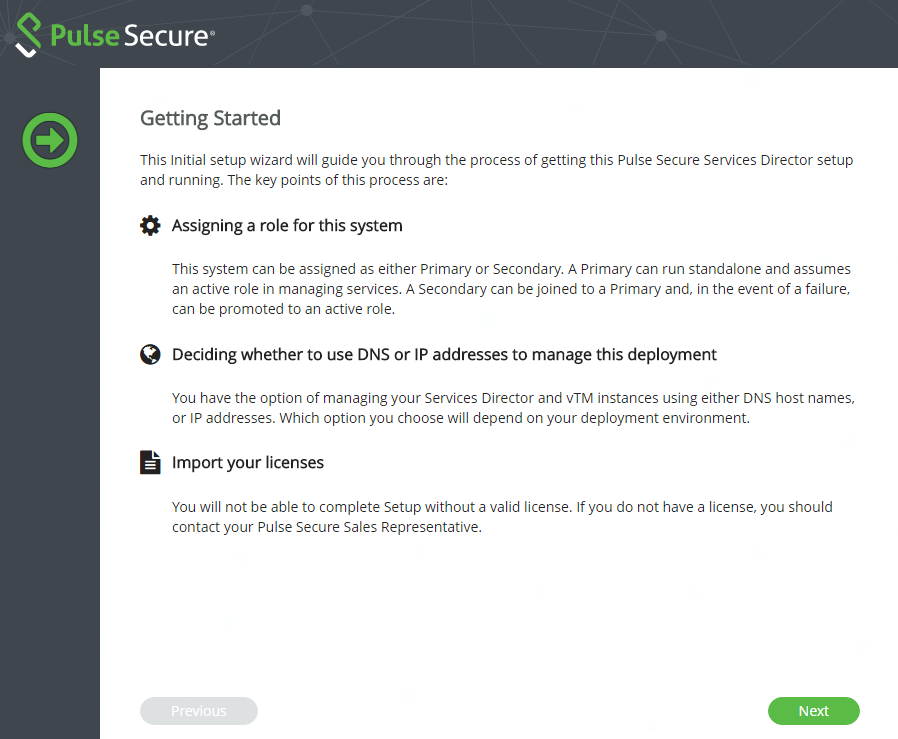
After you have created/launched a Services Director VA on the required platform, you configure the Services Director VA using the Setup Wizard. The Setup Wizard enables you to:
•Select the role for this Services Director. That is, either Primary or Secondary.
•A Primary Services Director can run as a standalone node, and assumes an active role in managing services.
•A Secondary Services Director is joined to the Primary Services Director and can be promoted to the active role in the event of a failure.
When a Secondary Services Director is joined to the Primary Services Director in the Setup Wizard, a High Availability (HA) pair is formed.
•Specify a Service Endpoint Address for the Services Director.
If the Service Endpoint Address is in a private network behind a NAT device, you must specify both the internal and external IP addresses for the Service Endpoint Address.
•Select whether to manage your Services Director (and vTM instances) using DNS hostnames or IP addresses. The option you choose depends on your deployment environment.
•Establish your licenses. This includes the Services Director License, plus any additional Resource Licenses (for bandwidth and analytics). These are required to complete the setup of the Services Director.
•Define a master password. This password is used to encrypt the administration passwords of all Virtual Traffic Managers (vTMs).
The Setup Wizard automatically starts the first time you log in to the Services Director VA with a browser.
The Setup Wizard is also used during recovery after a Services Director failure. For details, refer to the Pulse Services Director Advanced User Guide.
Installing and Configuring a Primary Services Director
To install and configure a Primary Services Director, perform the following procedure:
1.Start the Setup Wizard process, see Starting the Setup Wizard.
2.Define a Service Endpoint Address (SEA), see Defining a Service Endpoint Address.
3.Redeem a license token, see Redeeming a License Token.
4.Generate a self-signed SSL certificate, see Generating a Self-Signed SSL Certificate.
5.Add certificates and licenses, see Adding Certificates and Licenses.
6.Complete the installation, see Completing the Services Director Installation.
Starting the Setup Wizard
When you log into your Services Director for the first time, the Services Director VA Setup Wizard starts automatically.
1.Access your Services Director VA in a browser window using its IP address. Typically, this will be the elastic IP address assigned to the node.
Do not use your intended SEA, as this is not associated with the instance at this point.
An End User License Agreement (EULA) statement appears.
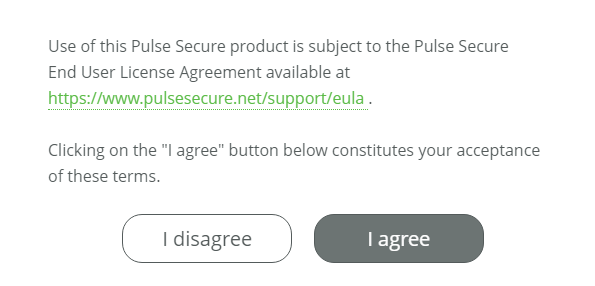
2.Click I agree to continue.
3.Log in using the default admin user (admin) and the default password.
•For vSphere and KVM, the default password is password.
•For AWS, the default password is the one your retrieved from the Services Director instance, see Retrieving the Default Password for a Services Director Instance.
4.Click Sign In.
The Setup Wizard starts automatically.
5.Click Next.
The Set Administration Credentials page appears. This page requires you to reset the default password for the admin login.
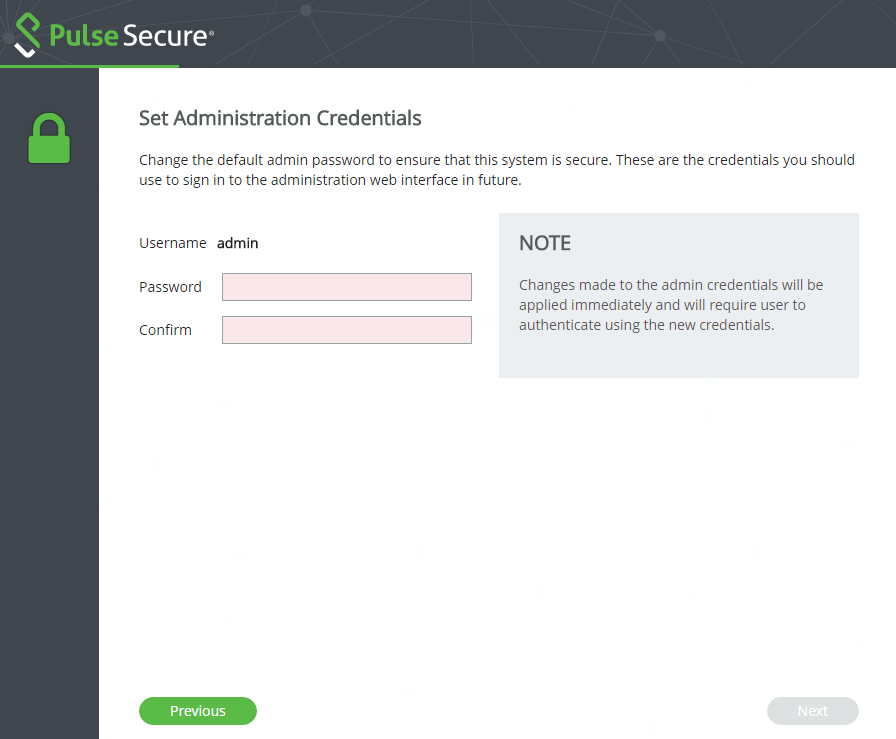
6.Enter (and confirm) a password.
The percent ("%") and UNICODE characters are not supported for this password.
Administration credentials can be updated at any time after the Services Director VA is operational. See Updating Administration Credentials.
7.Click Next.
The Services Director VA login page appears.
8.Log into the Services Director VA using the new password.
On all platforms but AWS, the Network Configuration page appears.
If your Services Director VA is on AWS, continue from step 11.
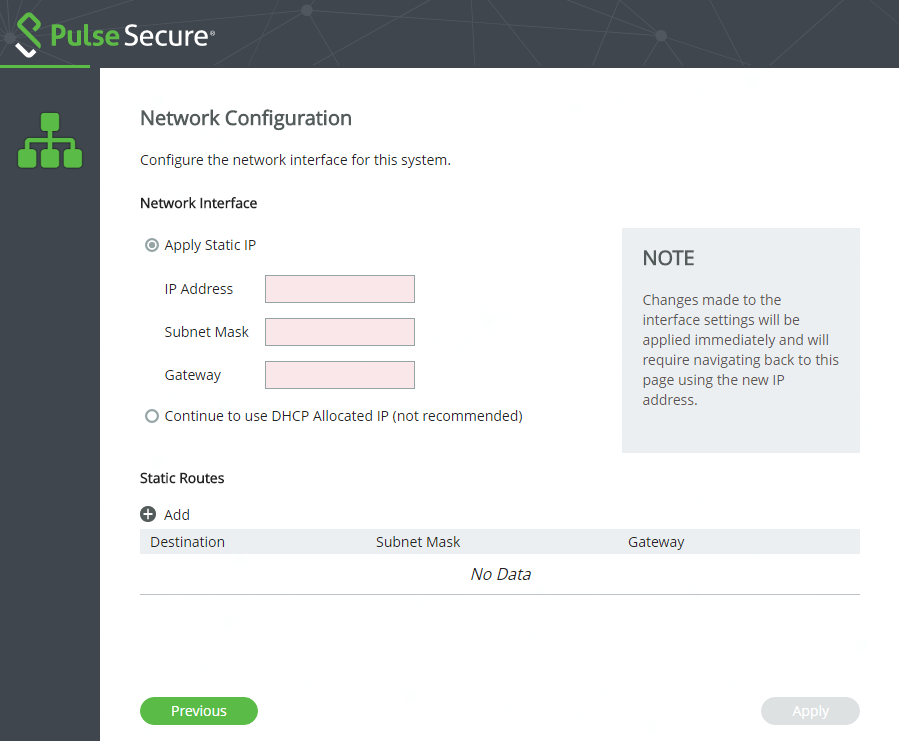
9.Select one of the following options:
•Static IP. Then, complete an IP Address for the node (not the SEA), a Subnet Mask and a Gateway.
The system will confirm that the gateway can be pinged.
•DHCP Allocated IP. Ivanti does not recommend the use of this option. A DHCP server must be available so that the system can request the IP address from it.
10.Click Apply.
A progress screen appears while the network interface is configured.
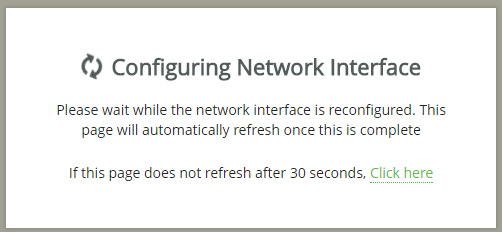
The outcome of this process depends on whether you selected Static IP or DHCP Allocated IP.
•Static IP. The browser will automatically access the wizard using the specified IP address. Log in, and continue the Setup Wizard.
•DHCP Allocated IP. Manually direct your browser to the allocated IP to continue this wizard. Log in, and continue the Setup Wizard.
The Hostname and DNS page appears. This page enables you to choose whether to manage your Services Director using either IP addresses or DNS.
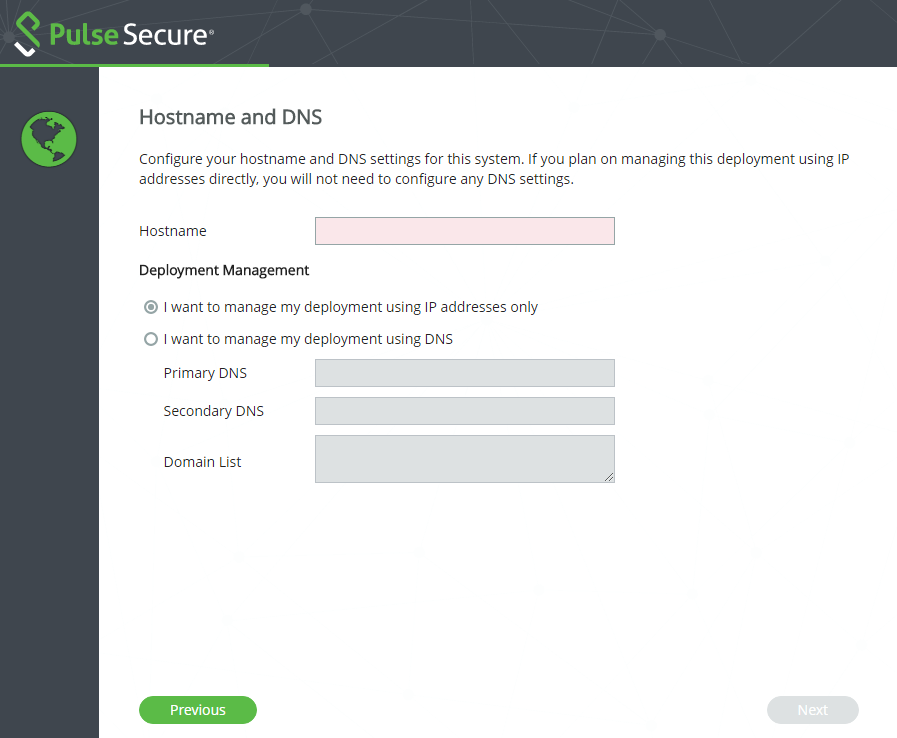
11.On the Hostname and DNS page, enter the management address for the Services Director as the Hostname.
•If this management address can be resolved using DNS, enter its hostname.
•If this management address cannot be resolved using DNS, enter its IP address.
Where no DNS is configured, the use of hostnames should be avoided in the product.
12.Select one of the following options:
•I want to manage my deployment using IP addresses only. Select this where no DNS is configured.
Ensure that you specify the Services Director’s IP address as its Hostname (see above).
•I want to manage my deployment using DNS. This requires you to have one or more configured DNS name servers in place.
Ensure that you specify a resolvable hostname as the Services Director’s Hostname (see above). Then, specify:
•Primary DNS
•Secondary DNS (Optional)
•Domain List (Optional) An ordered list of domain names. If you specify domains, the system automatically finds the appropriate domain for each of the hosts that you specify in the system.
13.Click Next.
The Select Assignment page appears.
This page enables you to select the role of the Services Director.
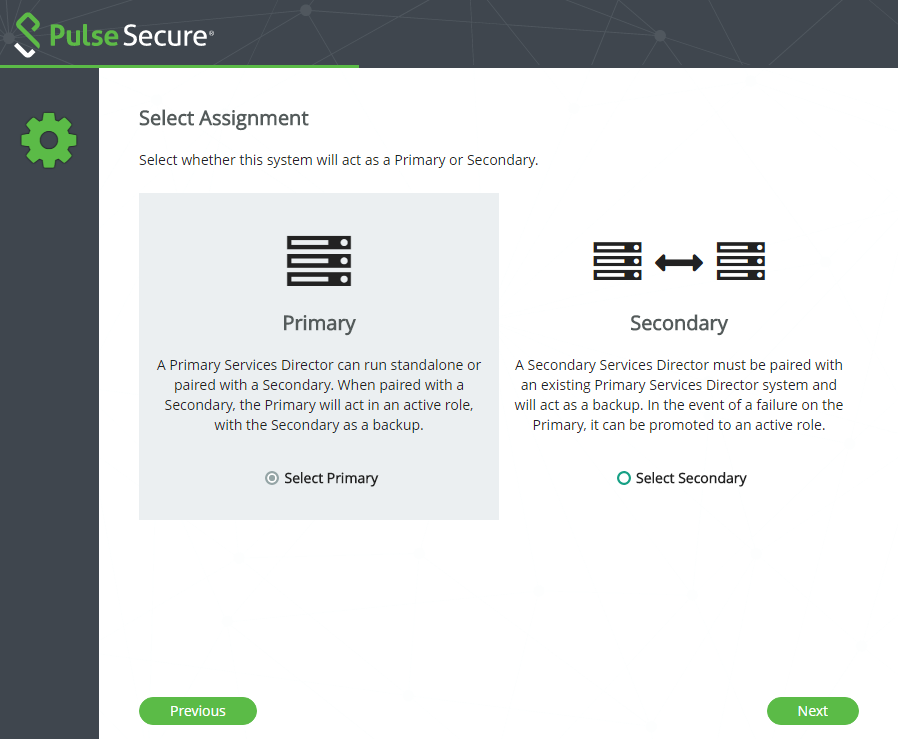
14.Click Select Primary to indicate that the Services Director will act as a Primary Services Director, either as a standalone node or in an HA Pair.
15.Click Next.
You can now add a Service Endpoint Address, see Defining a Service Endpoint Address.
Defining a Service Endpoint Address
The Service Endpoint Address page appears.
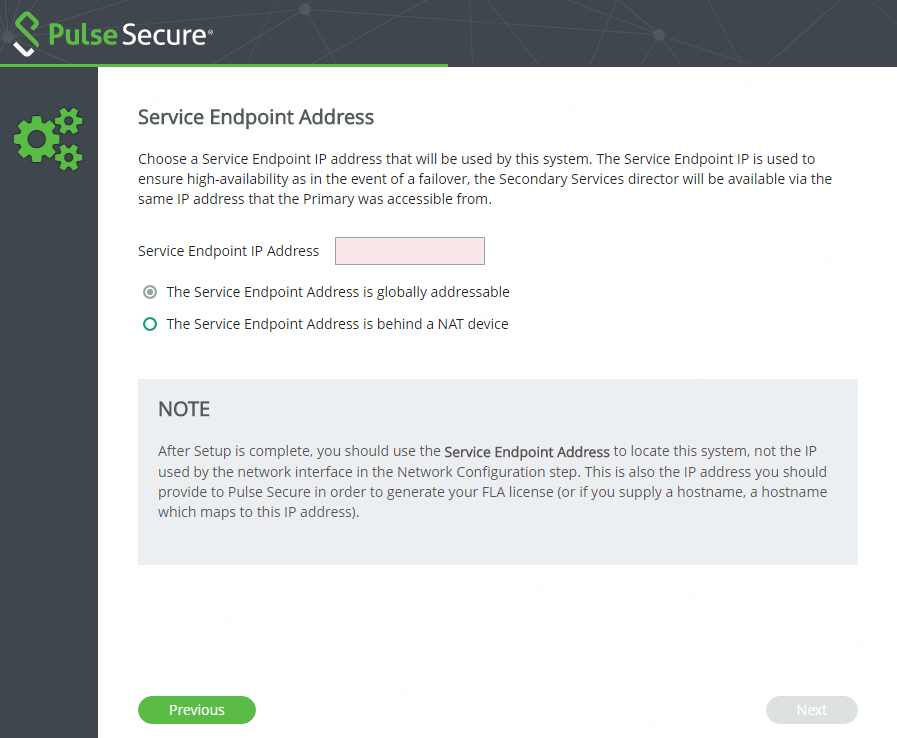
16.If the Service Endpoint Address (SEA) for the Services Director HA pair will be routed to directly by the vTMs in its estate:
•Select The Service Endpoint Address is globally addressable.
•Enter the required Service Endpoint IP Address for the Services Director HA pair.
A Service Endpoint Address is required for a standalone Primary Services Director. It must be different from the IP address of the Primary Services Director.
17.If the SEA for the Services Director HA pair is behind a NAT device (from the point of view of the vTMs that will be in its estate):
•Select The Service Endpoint Address is behind a NAT device. The available properties update to include an External IP Address.
•Enter the internal NAT SEA for your Services Director HA pair as the Service Endpoint IP Address.
•Enter the external NAT address for your Services Director HA pair as the External IP Address.
A Service Endpoint Address is required for a standalone Primary Services Director. It must be different from the IP address of the Primary Services Director.
18.Click Next.
The Restore from Backup page appears.
This page enables you to restore a backup of your Services Director after a failure. Refer to the Pulse Services Director Advanced User Guide for details.
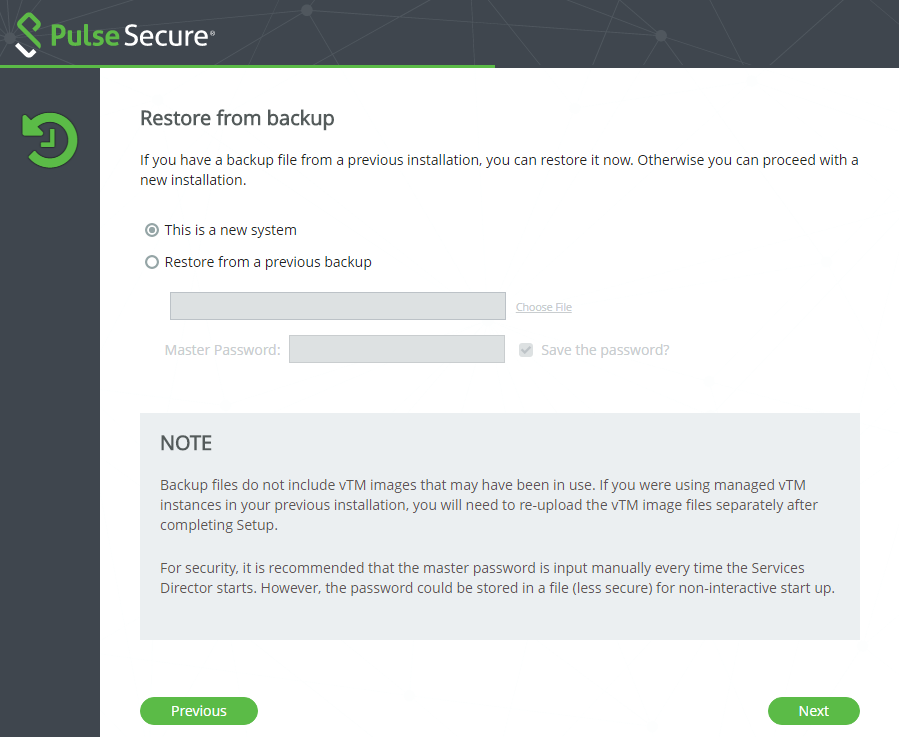
19.Click This is a new appliance and then click Next.
The Install License page appears.
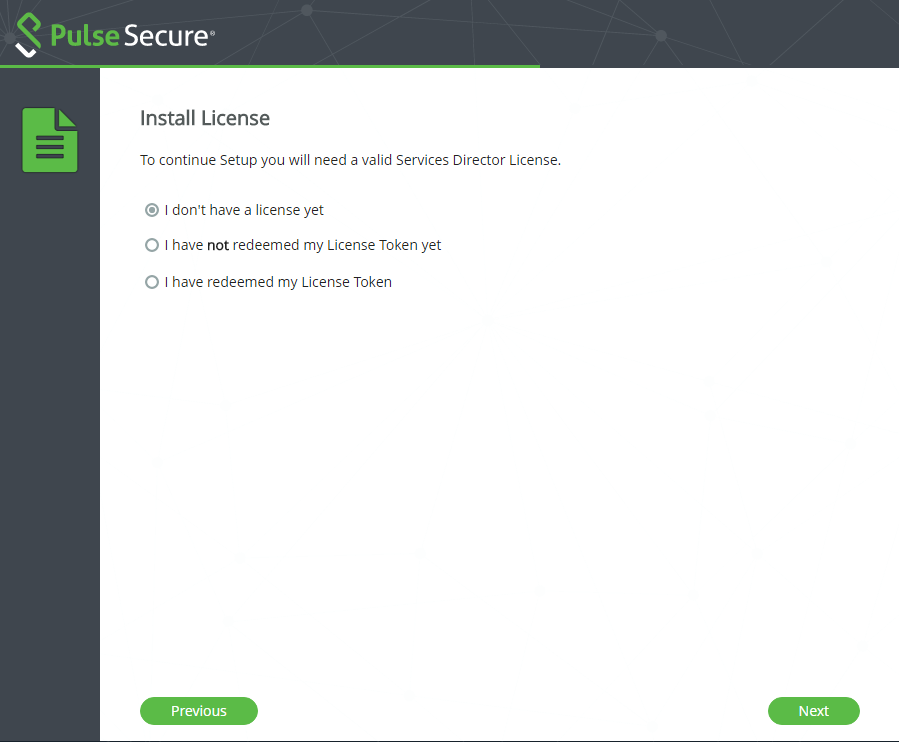
20.Select one of the following options:
•I have redeemed my License Token. You can now add your licenses. Click Next, and continue from Adding Certificates and Licenses.
•I have not redeemed my License Token yet. The Setup Wizard will guide you through this process. Click Next, and continue from Redeeming a License Token.
•I don’t have a license yet. If you have not obtained a License Token, you cannot proceed with the Setup Wizard at this time. See Obtaining Services Director Licenses.
Close the Setup Wizard.
Redeeming a License Token
After you indicate that you have an unredeemed license token, the SSL Certificate Generate page appears. An SSL certificate is required to redeem your token. You can provide your own certificate, or the system can generate one for you.
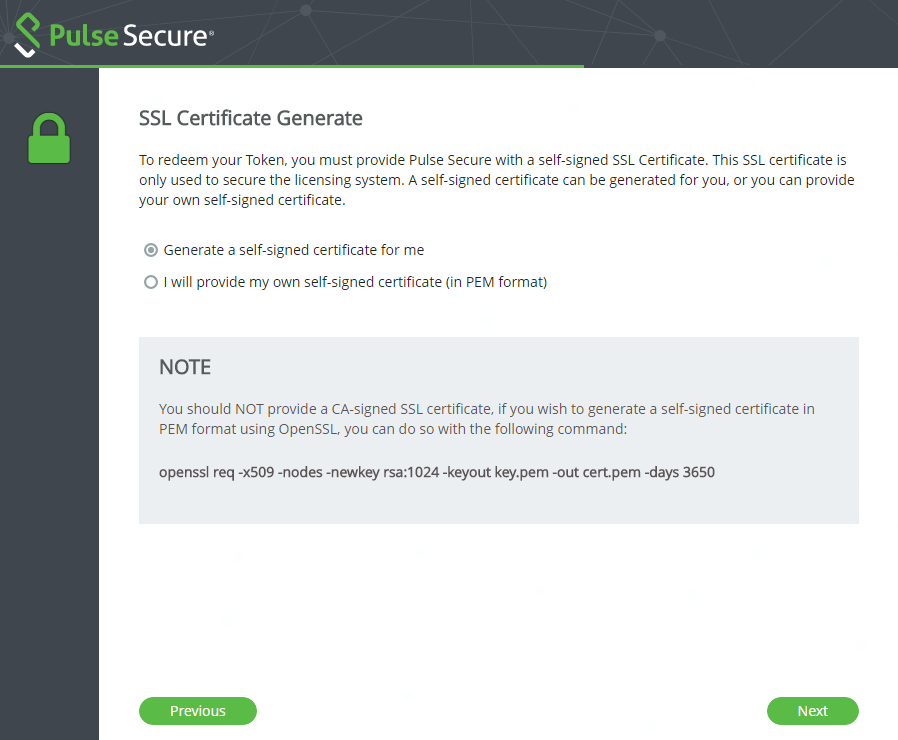
Select one of the following options:
•Generate a signed certificate for me. This selection will instruct the system to create a signed certificate that can be used to redeem your License Token with Ivanti. Click Next, and continue from Generating a Self-Signed SSL Certificate.
•I will provide my own self-signed certificate. This selection requires you to have a self-signed SSL certificate. You cannot use a CA-signed certificate. Click Next, and continue from Adding Certificates and Licenses.
Generating a Self-Signed SSL Certificate
After you choose to have Services Director generate a self-signed SSL certificate, the SSL Certificate Download page appears. An SSL certificate is required to redeem your token.
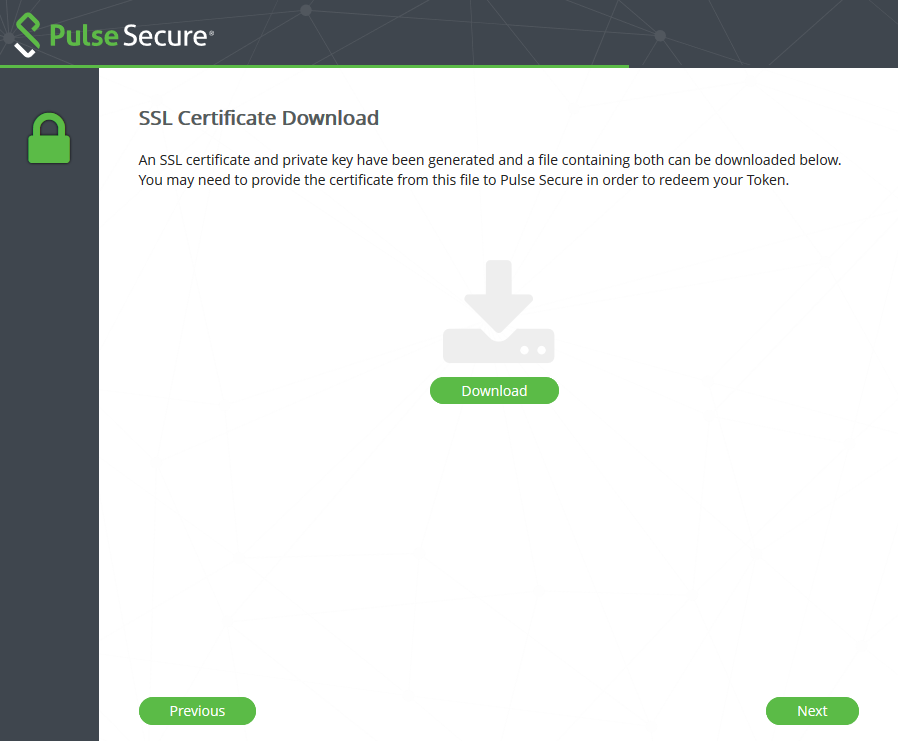
1.Click Download and choose a location for the file. The self-signed SSL certificate file downloads.
2.Click Next.
The Contact Pulse Secure to Redeem Your Token page appears. This page provides advice about how to redeem your token.
You cannot proceed with the Setup Wizard until you have redeemed your token.
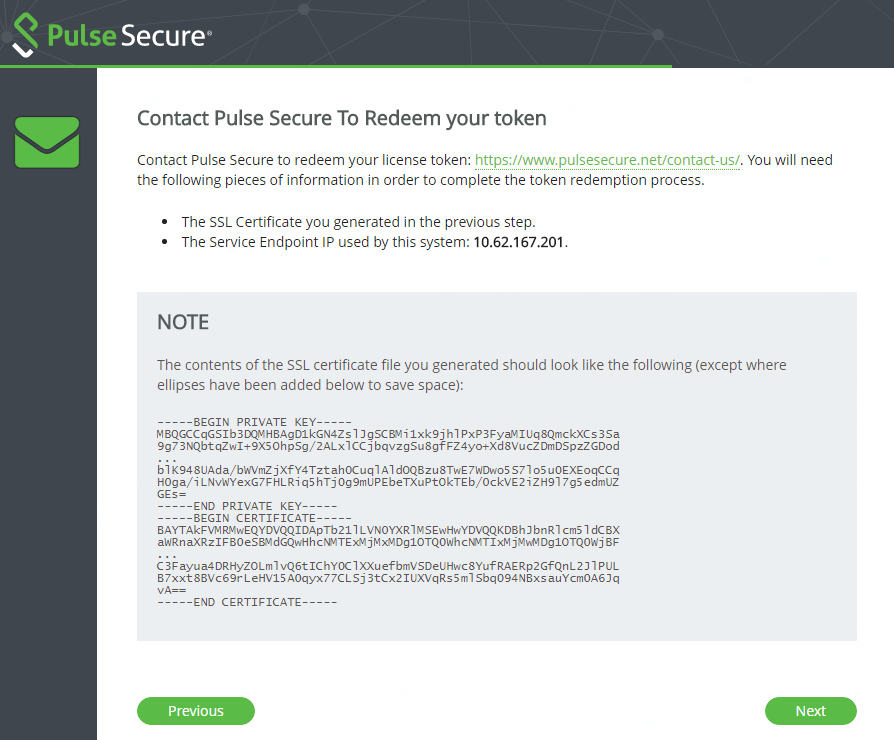
3.To redeem your License Token, visit the Ivanti License Redemption Portal.
•Your License Token.
•Your self-generated SSL certificate.
•The Service Endpoint Address.
Once you have your licenses, continue from Adding Certificates and Licenses.
Adding Certificates and Licenses
After you have redeemed your License Token, the SSL Certificate Upload page appears. This page enables you to input your certificate. The text of the certificate can be pasted in manually. Alternatively, you can identify individual Private/public key files, or a single combined file.
If you previously chose to generate a self-signed certificate using the Setup Wizard, you will bypass this screen. This is because the Services Director already has the SSL certificate.
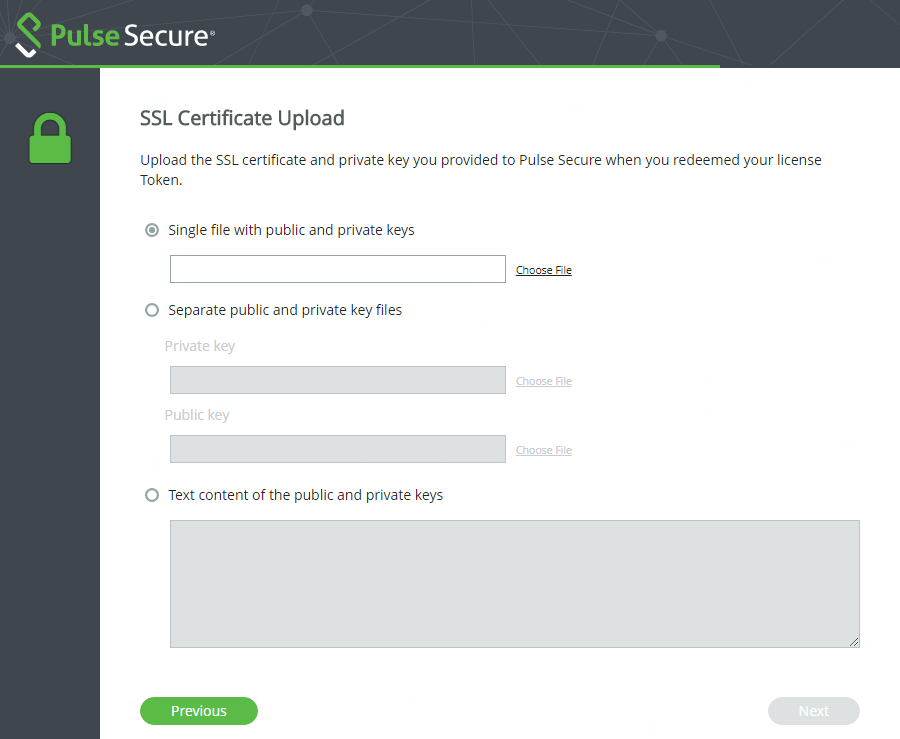
1.Select one of the following options:
•Single file with public and private keys. Then, click Choose File to locate the certificate file.
•Separate public and private key files. Then, click Choose File to locate each file.
•Text content of the public and private keys. Then, paste the required text in.
The selected text/file(s) are then verified. If successful, the Next button becomes available.
The SSL certificate can be changed after the Services Director VA is operational. See Updating the SSL Certificate.
2.Click Next.
The Services Director Master Password page appears. This page enables you to define a master password. A master password is required to:
•To decrypt stored password information whenever the Virtual Machine for this Services Director VA node restarts.
•To create a new Services Director VA from a previously-saved backup, see Recovering from a Services Director Failure).
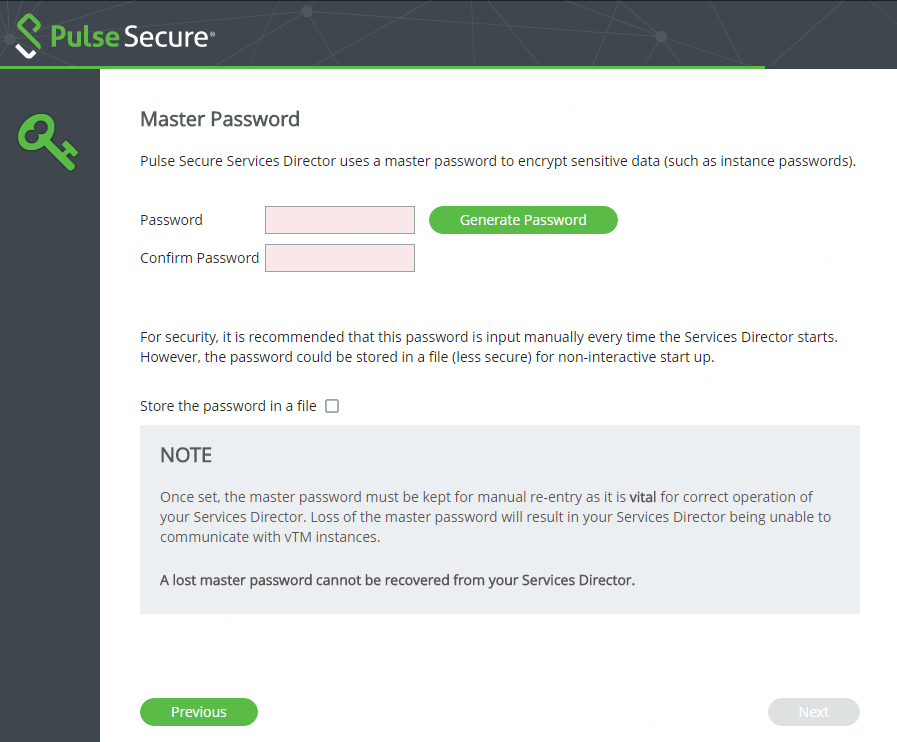
3.To set the master password, perform one of the following operations.
•Enter a password and confirm the password.
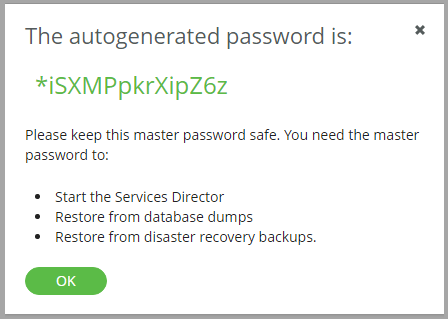
•Click Generate Password. The Password and Confirm Password fields are populated automatically and a dialog box is displayed.
 p
p
Record the password, click OK to close the information dialog box, and then confirm that you have stored the password in the next dialog box.
It is essential that the master password (whether chosen yourself or generated automatically) is recorded and can be retrieved. Ivanti recommends that this password is recorded in a secure location that is separate from the Services Director VA.
4.Choose whether to store the password internally for automatic use:
•Select the Store the password in a file check box to store the master password within the Services Director VA. The password will be automatically available whenever the Virtual Machine for a Services Director VA restarts. However, you must enter the master password manually when you create a Services Director VA from a backup file.
•Clear the Store the password in a file check box to not record the master password. You must to enter the master password manually whenever the Virtual Machine for a Services Director VA restarts, and when you create a Services Director VA from a backup file.
See Entering the Master Password After a Virtual Machine Restart for details of restarting a VM.
5.Click Next.
The Services Director License page appears.
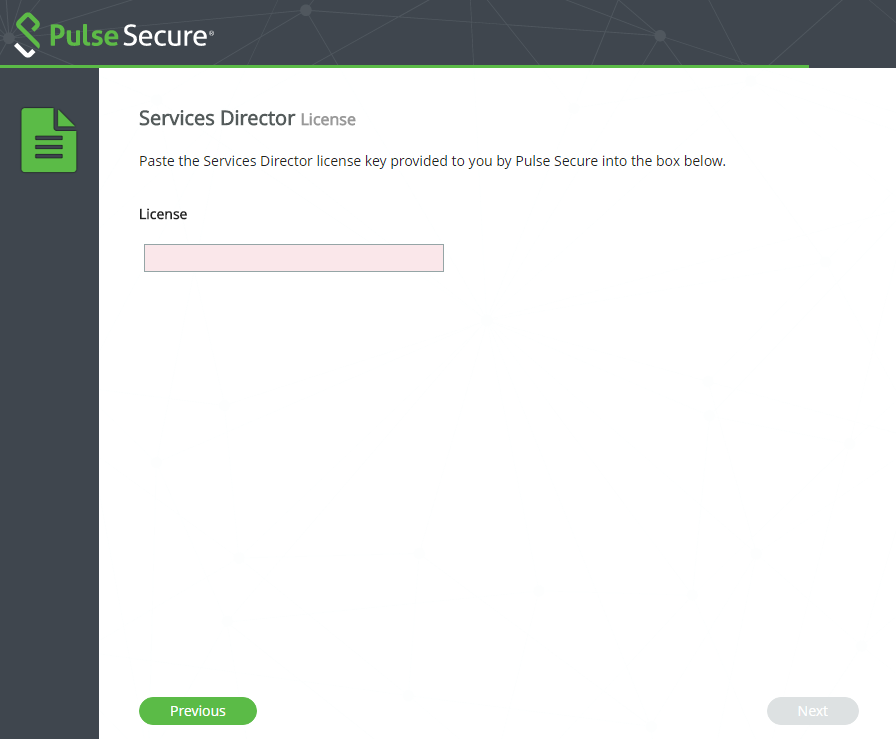
6.Enter the License text. This is validated automatically. Once validation completes, either:
•A success message is displayed, and the Next button becomes available. OR
•A failure message is displayed. You must repeat this step.
7.Click Next.
The Services Director FLA License page appears.
This page enables you to add a Legacy FLA license if you are using a vTM at version 10.0 (or earlier), or wish to disable the REST API for any of your vTM instances.
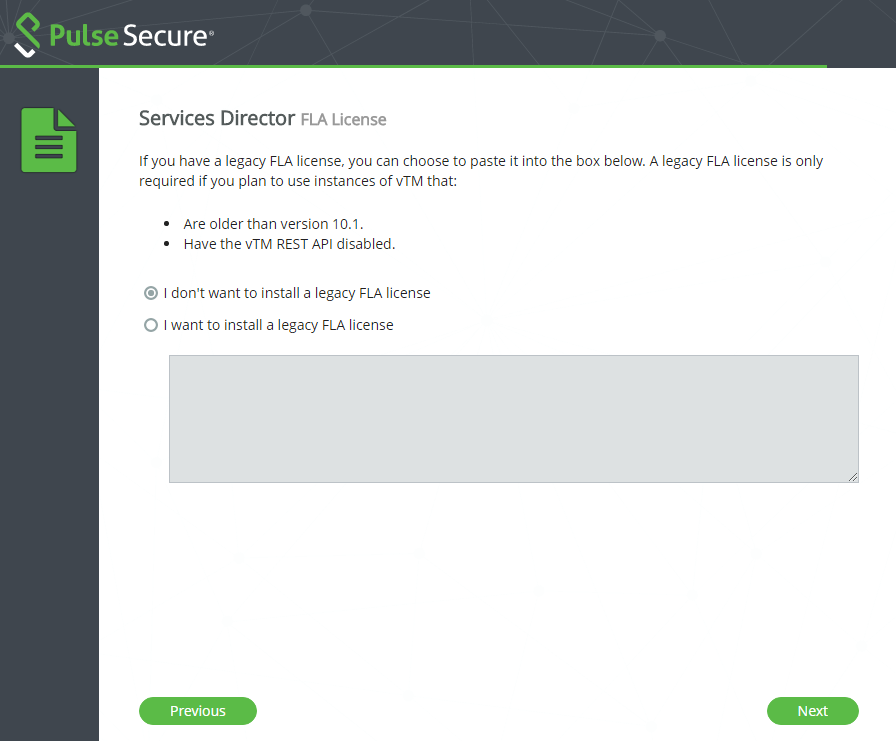
8.Select one of the following options:
•I don’t want to install a legacy FLA license. You will do this for one of the following reasons:
•You want to use the installed Universal FLA License. To support this selection, all of your vTM instances must be running version 10.1 (or later) with the REST API enabled.
•You do not want to install a Legacy FLA License at this time. This can be entered using the Services Director VA graphical interface after it is deployed.
A default Feature Pack will not be created, but this can be created at a later date. See Adding a Feature Pack to the Services Director.
Continue from the next step.
•I want to install a legacy FLA license. You will do this if any of your vTMs are running at version 10.0 (or earlier) or have their REST API disabled. Paste the text of your Legacy FLA License into the box. This is validated automatically.
9.Click Next.
The Services Director Additional Licenses page appears.
•If you have and Resource Licenses, either for bandwidth or analytics, use this page to enter them.
•If you do not have Resource Licenses at this point, you can still continue with the Setup Wizard. You can enter these licenses using the Services Director VA after it is deployed.
•If you have a Cloud Services Provider (CSP) License for your Services Director, you do not require Resource Licenses, and can ignore this page.
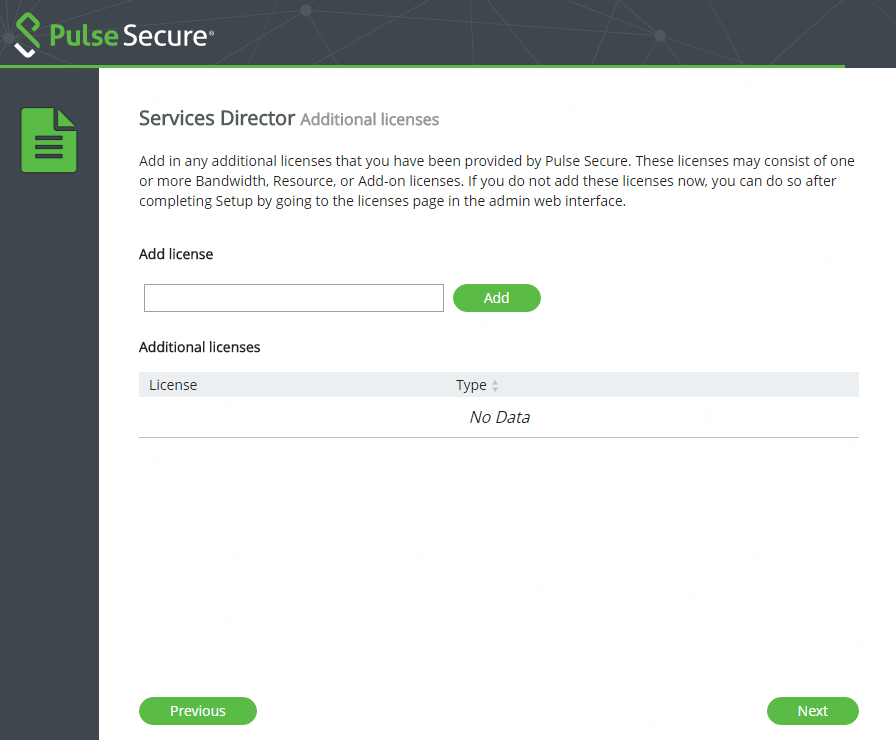
10.Enter a license number and click Add.
This license is validated automatically. Once validation completes, the license is listed in the Additional licenses table, along with its type.
11.Repeat the previous step to add all available licenses.
12.Click Next.
The Email alerts page appears.
This page enables you to optionally enter email notification details for your Services Director. This ensures that you receive email notifications for events and failures.
You do not have to enter this information now. It can be entered using the Services Director VA after it is deployed. See Updating Email Settings.
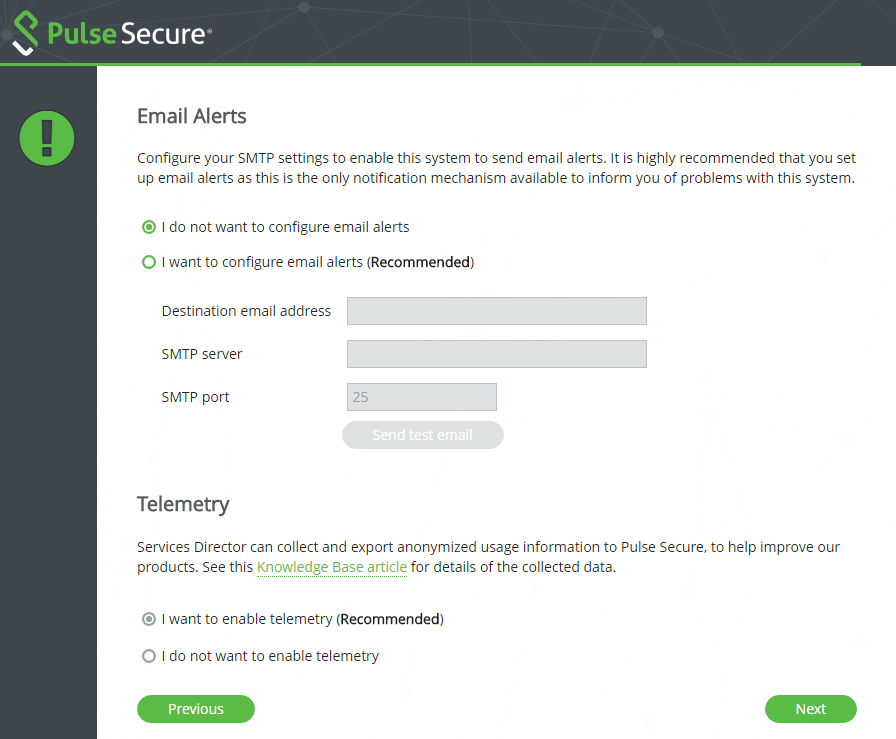
13.Under Email Alerts, select one of the following options:
•I do not want to configure email alerts. This option enables you to bypass this step. This information can be entered using the Services Director VA graphical interface after it is deployed. See Updating Email Settings.
•I want to configure email alerts. This is the recommended option. Then, provide:
•A Destination email address.
•An SMTP server. This is either the hostname or IP address of the SMTP server in your network.
•An SMTP port number. Typically, you will use the default port number, 25.
14.Click Send test email to confirm these settings.
You must have external access for SMTP traffic for this feature to function.
15.Under Telemetry, select whether you want Services Director to collect and export anonymized usage information to Pulse Secure.
This setting can be changed from the General Settings page at any time, see Updating Telemetry Settings.
16.Click Next, and continue from Completing the Services Director Installation.
Completing the Services Director Installation
After all information is gathered, the Applying Settings page appears. This page configures the system based on collected information. For example:
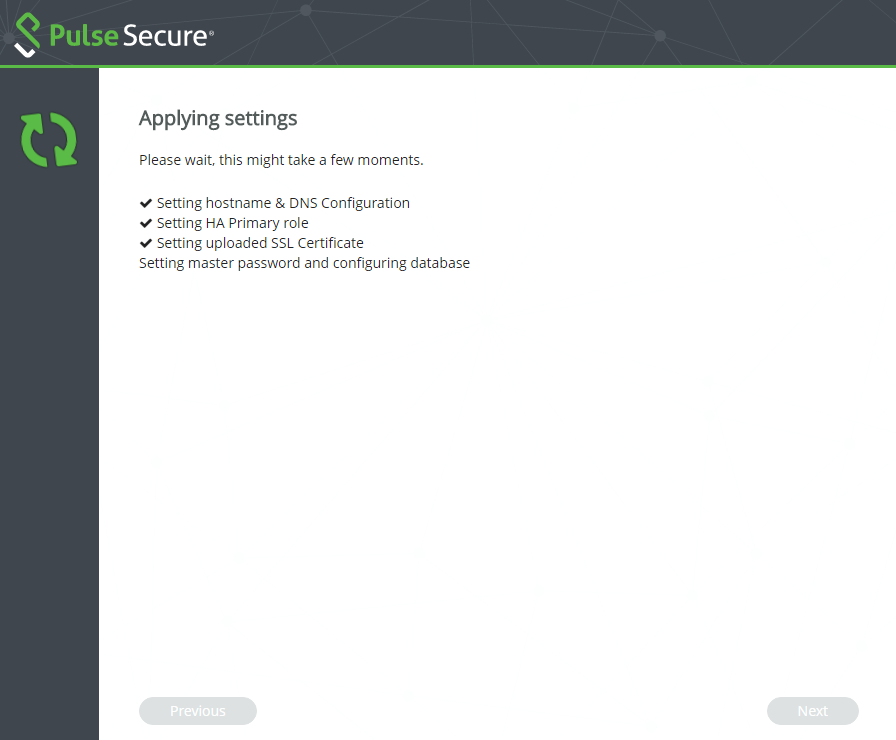
Once this is complete, the Setup Complete page appears.
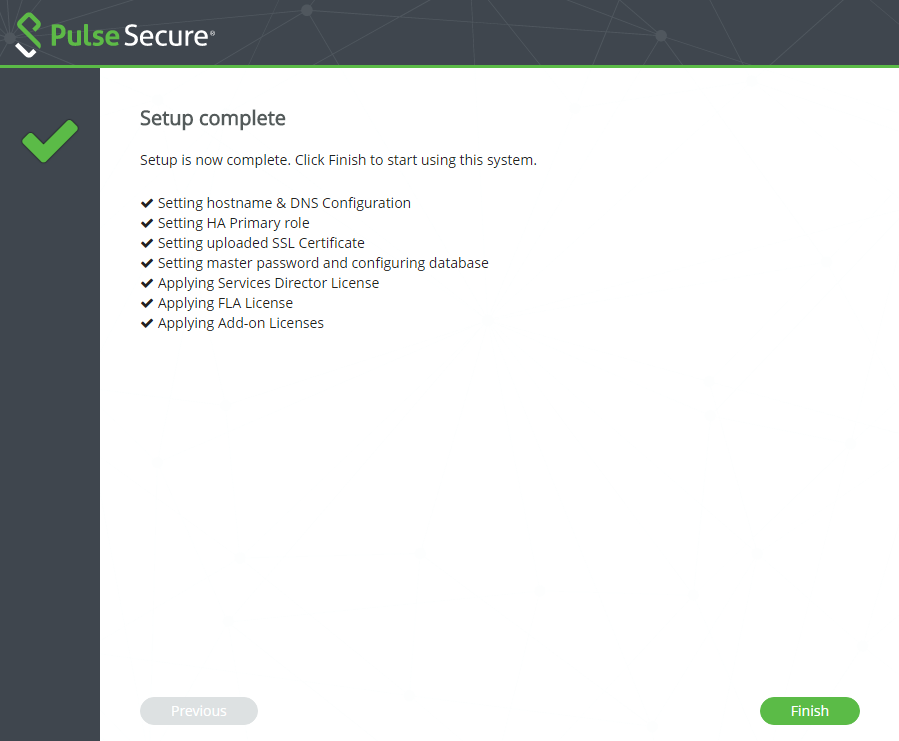
1.Click Finish to close the Setup Wizard.
Once the Setup Wizard completes, your Services Director node is ready for use.
2.(Optional) you can now create a Secondary Services Director, and join it to the Primary Services Director. See Installing and Configuring a Secondary Services Director.
Once the Setup Wizard completes, it cannot be rerun. Many of the options chosen in the Setup Wizard can be reconfigured from inside the Services Director VA, but others can only be reconfigured from the Command-Line Interface (CLI). See Pulse Services Director Advanced User Guide and the Pulse Secure Services Director Command Reference for full details.
Installing and Configuring a Secondary Services Director
The process for creating a Secondary Services Director is similar to the installation for a Primary Services Director.
1.Repeat the installation process for a Primary Services Director (see Starting the Setup Wizard) until you reach the following screen:

2.Click Select Secondary.
The Join to an Existing Primary page appears.
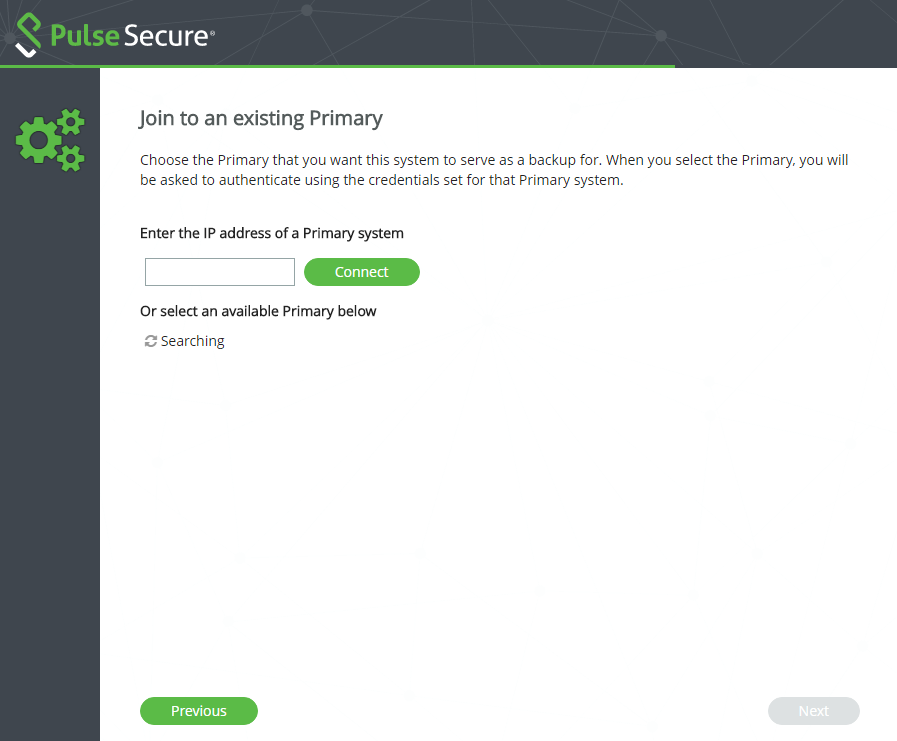
3.To connect to an existing Primary Services Director, either:
•Select the Primary Services Director from the list.
This option is not supported by the AWS platform.
•Enter the IP address of the Primary Services Director.
On the AWS platform, this must be the Primary Private IP Address of the instance.
4.Click Connect.
The page updates to include an Enter Credentials panel.

5.Under Enter credentials, enter an administration login details for the Primary Services Director.
6.Click Authenticate.
The credentials are confirmed.
7.Click Next.
The Services Director Master Password page appears.
This page requires you to enter the master password that you chose for the Primary Services Director VA. This is required to:
•To decrypt stored password information whenever the Virtual Machine for this Services Director VA node restarts.
•To create a new Services Director VA from a previously-saved backup, see Recovering from a Services Director Failure).
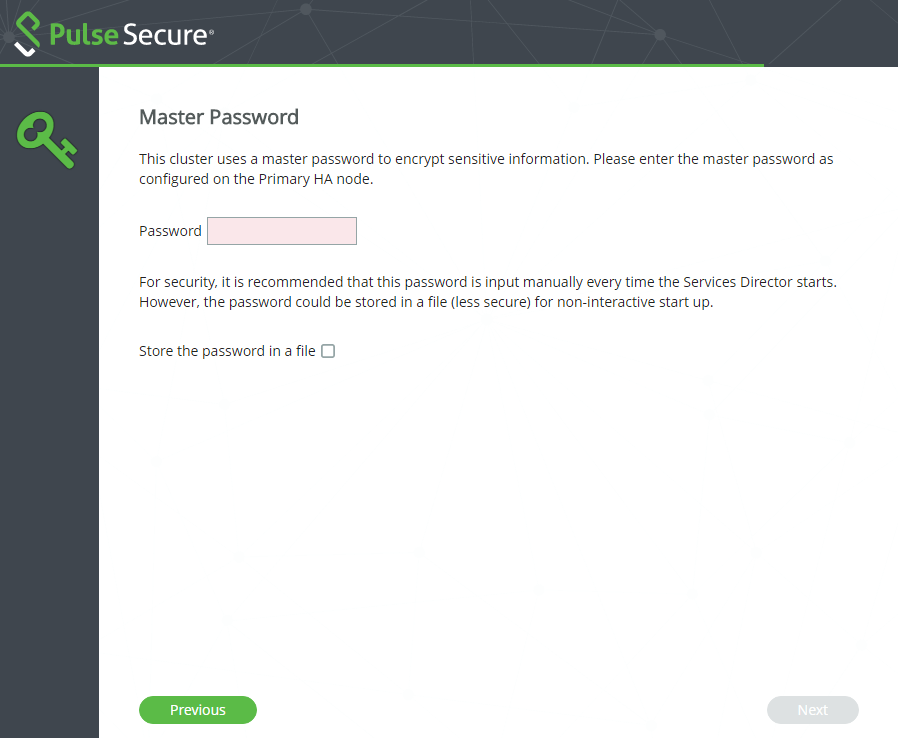
8.Enter the master password. The password is validated immediately.
9.Choose whether to store the password internally for automatic use:
•Select the Store the password in a file check box to store the master password within the Services Director VA. The password will be automatically available whenever the Virtual Machine for a Services Director VA restarts. However, you must enter the master password manually when you create a Services Director VA from a backup file.
•Clear the Store the password in a file check box to not record the master password. You must to enter the master password manually whenever the Virtual Machine for a Services Director VA restarts, and when you create a Services Director VA from a backup file.
See Entering the Master Password After a Virtual Machine Restart for details of restarting a VM.
10.Click Next.
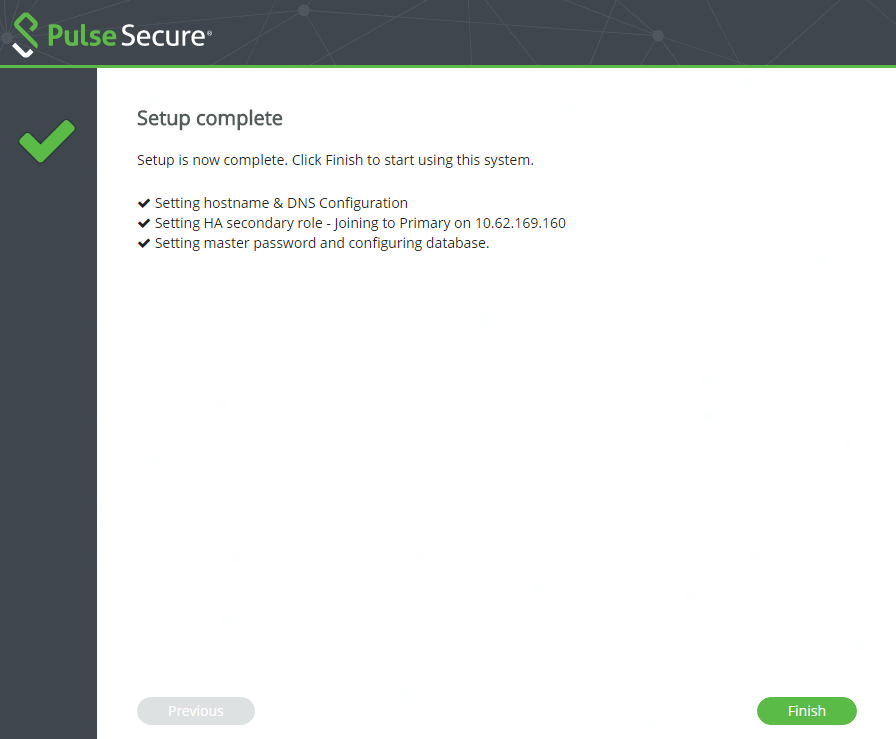
The Secondary Services Director now joins with the Primary Services Director to form a HA pair. The progress of this process appears on the Applying Settings page.
Once this process completes, the Setup Complete page appears.
Accessing your Services Director VA
Once the Setup Wizard is complete, you can access the Services Director VA using a secure (https) URL in a browser:
•For an HA pair, you access the Active Services Director using the Service Endpoint IP address.
If the Services Director HA pair is in a private network behind a NAT device, access the Active Services Director using the external IP address of the Service Endpoint Address.
•You can access a standalone Services Director using its IP address or Service Endpoint IP address.
•You can access the Primary Services Director directly using its IP address.
•You can access the Secondary Services Director directly using its IP address.
Log in to the Services Director VA. The Home page appears:
![]()
The header displays two coloured indicators:
•The first is an indication of system health. This includes: high availability, the Services Director license, and the availability of the service.
•A healthy system displays a green circle, and an unhealthy system displays an orange warning triangle.
•The second is an indicator for metering discrepancies for the vTMs within the estate of the Services Director VA.
A healthy metering system results in a green meter. An unhealthy metering system displays as an orange warning meter. See Processing Virtual Traffic Manager Metering Discrepancy Warnings.
At this point, no vTMs are registered on the Services Director VA.
The Home page always displays:
•The Total Instances of vTM vTMs registered on the Services Director.
Immediately after the Services Director is installed, there are zero registered vTMs.
•The Bandwidth Allocation for all Bandwidth Licenses that were installed during the Setup Wizard.
Immediately after the Services Director is installed, there are zero allocations.
•The Analytics Nodes for all Analytics Resource Pack Licenses that were installed during the Setup Wizard.
Immediately after the Services Director is installed, there are zero licensed nodes.
Optionally, you may wish to fine-tune settings for the Services Director VA. See Updating Services Director VA Settings.
Otherwise, you can now proceed with the registration of vTMs and additional system configuration. See Adding Virtual Traffic Managers to the Services Director.