Recovering from a Services Director Failure
Overview: Recovering from a Services Director Failure
A backup is an encapsulated Services Director configuration. The contents of the backup can be used by the Services Director VA to restore a Services Director configuration.
Backups are made locally according to a backup schedule.
Local backups are copied to a remote server according to a separate schedule.
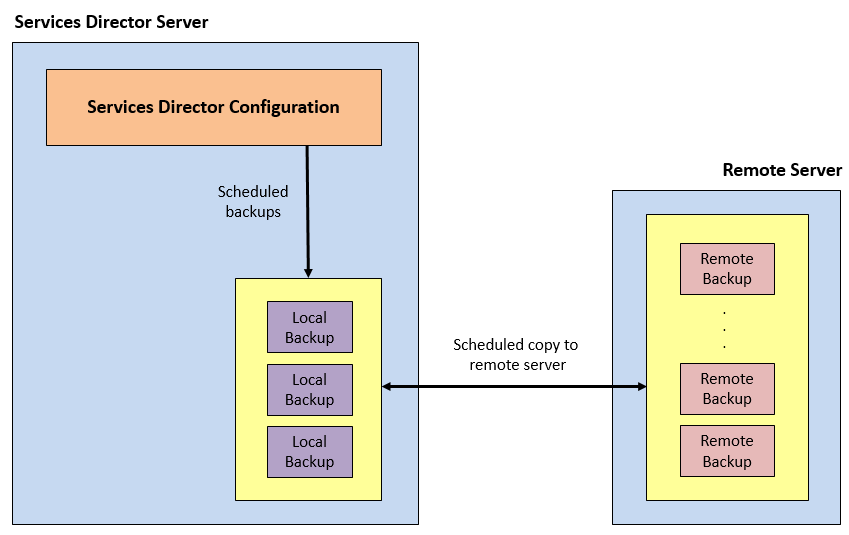
Where an HA pair is in use, the backup configuration is created on the Active node only. Backups are always restored to an Active (or new Primary) node. Standby nodes always take their configuration from the Active node.
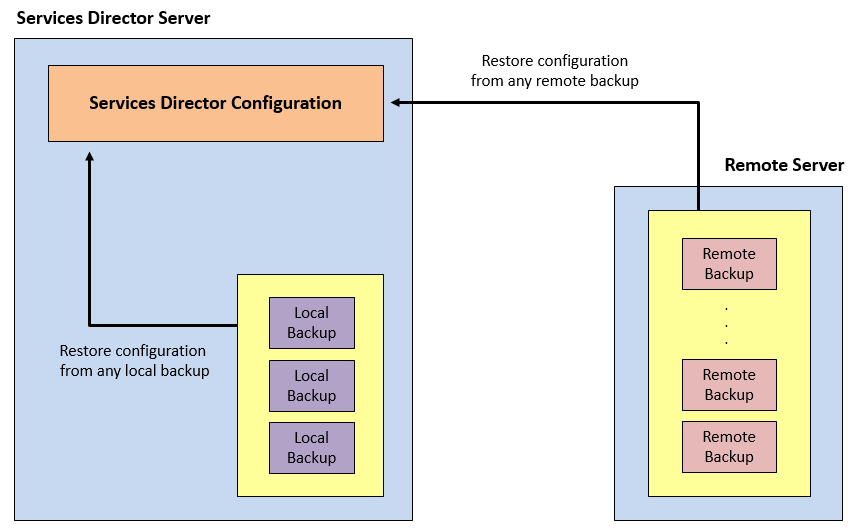
A Services Director VA’s configuration can be restored from any backup (either local or remote). You may wish to do this to recover a specific configuration, or to reverse recent changes.
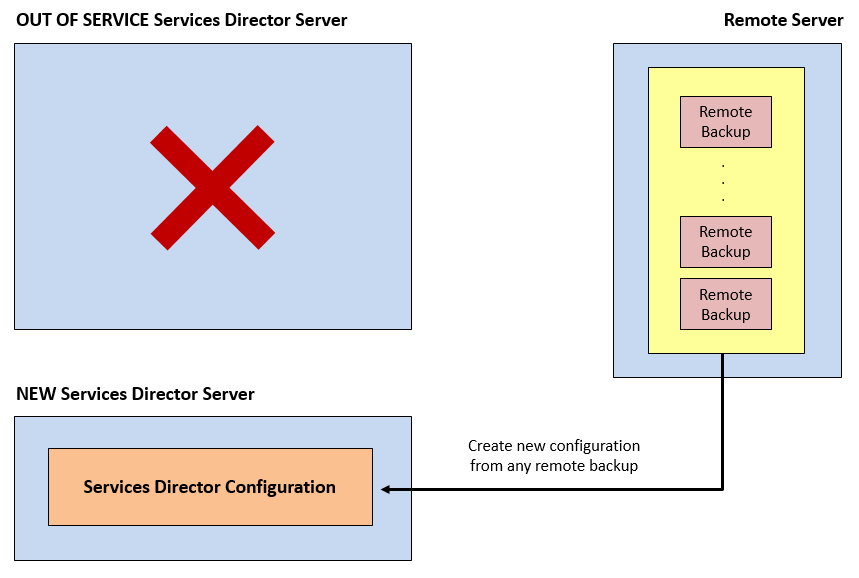
After the failure of a Services Director, a new Services Director VA can be created from the configuration stored in a remote backup.
Understanding a Backup File
A backup file is a zipped collection of Services Director configuration files. This includes:
•ssc_build_version.txt: Version string of VA. For example, 19.1.0-mainline.
•ssc_certificate.txt: Certificate and private key used by SD core software, for HTTPS connections.
•ssc_cfg_backup_mysql_dump_<date>_<time>: MySQL dump for SD database tables.
•ssc_cfg_ini.txt: Configuration snippet of SD core configuration.
•ssc_fla_license.txt: List of licenses used by SD. Includes full license strings.
•Universal license and other license files.
•ssc_mgmt_settings.txt: Email configuration.
•user_credentials_node.txt: Password hash of admin user.
The backup file does not include:
•The master password.
•The vTM image files. These must be loaded to both Services Director nodes manually.
•A record of the backup schedule and remote server details.
•SSH keys required for passwordless SSH access.
•Knowledge of HA pairs, hostnames or IP addresses.
Configuring a Scheduled Backup Schedule
The Services Director VA uses a defined backup schedule for a standalone Services Director node or the Active node in an HA pair.
Do not create a backup schedule from the Standby node in an HA pair. A Standby node always takes its configuration from the Active node.
The backup schedule defines:
•The frequency of local backups, and the maximum number of backup files to retain.
•The identity and credentials of a remote file server.
You must set up this remote server before starting the backup configuration process. The server must accept either SCP or FTP connections (or both), and have the required directory structure.
•The frequency of the copy process of local backups to the remote server.
Services Director VA has no influence over the number of backup files stored on the remote server, or the management of these files. This is a user activity outside Services Director VA.
Configuring the Backup Schedule
1.Access your Active Services Director VA from a browser, using the Service Endpoint Address of your Services Director.
Do not create a backup schedule from the Standby node in an HA pair. Backups are always created from the Active node.
2.Log in as the administration user. The Home page appears.
3.Click the System menu, and then click Disaster Recover: Backup and Restore. The Backup and Restore page appears.
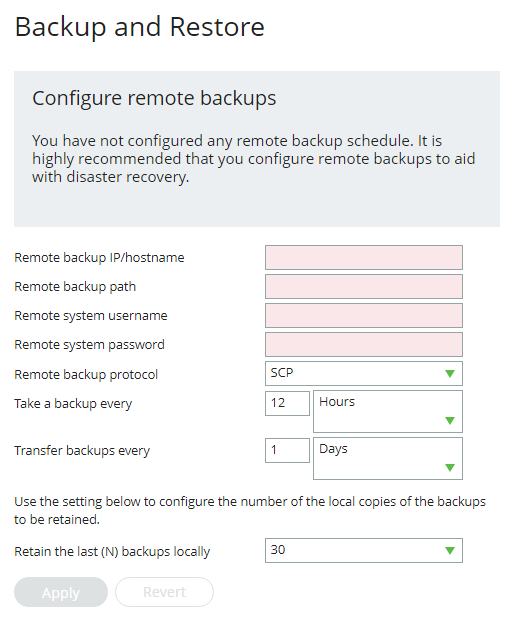
This example indicates that no backup configuration currently exists.
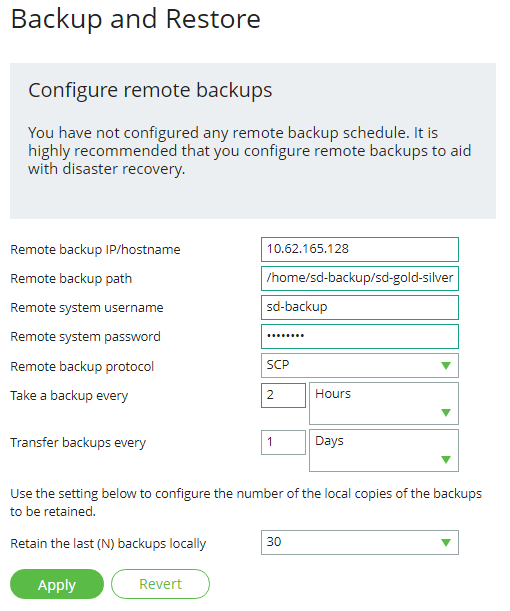
4.Enter the details for the remote server:
•Remote backup IP/hostname: This is the IP address or FQDN of the remote server.
•Remote backup path: This identifies a directory on the remote server for the backups.
This requires a "full path" directory structure. Relative paths cannot be used.
•Remote system username: The user name for the remote server.
•Remote system password: The password for the user.
•Remote backup protocol: The file transfer protocol for the remote backup server. This is either FTP or SCP. Use SCP for secure encrypted transfers.
5.Define the frequency for the local backup. Under Take a backup every:
•Select the units for the backup. This can be Minutes, Hours (default) or Days.
•Enter the number of the selected units.
Minutes can range from 1-59, Hours from 1-23 and Days from 1-31. The default is 12.
For example: 30 Minutes.
6.Define the frequency for copying local backups to the remote server. This will typically be a longer frequency than the one used for local backups. Under Transfer backups every:
•Select the units for the backup. This can be Minutes, Hours or Days (default).
•Enter the number of the selected units.
Minutes can range from 1-59, Hours from 1-23 and Days from 1-31. The default is 1.
For example: 1 Days.
7.Select the maximum number of local backups as Retain the last (N) backups locally. The default is 30. This value must be at least equal to the number of backups between remote copies, else backup files will be lost.
The most recent backup files are retained. Any older files are deleted if this limit is exceeded.
8.Click Apply to confirm the backup schedule.
An empty test file is sent immediately to the remote server.
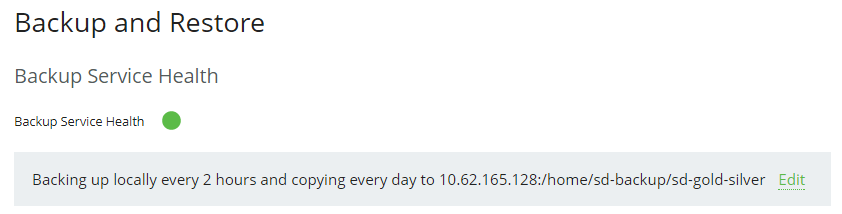
The backup configuration, including a status indicator, is included on the Backup and Restore page.
9.Log in to the remote server and ensure that the backup test file is present. If this is not present, check the details for your remote server on the Backup and Restore page. An error message will explain the issue.
The first local backup will be created after the full duration of the local backup frequency. For example, after 2 Hours. The file name has the following general form:
backup_<IP_address>_<datestamp>_<timestamp>.zip
For example:
backup_10.62.167.199_2017-09-13_23-32-01.zip
The first copy of local files to the remote server will occur after the full duration of the remote copy frequency. For example, after 1 Days. Any local backup files that are not present on the remote server are copied over.
Updating the Backup Schedule
1.Access your Active Services Director VA from a browser, using the Service Endpoint Address of your Services Director.
Do not update a backup schedule from the Standby node in an HA pair. Backups are always updated from the Active node.
2.Log in as the administration user. The Home page appears.
3.Click the System menu, and then click Disaster Recover: Backup and Restore. The Backup and Restore page appears. This displays a summary of your current backup schedule, and includes a status indicator.

4.Click Edit to display the full details.
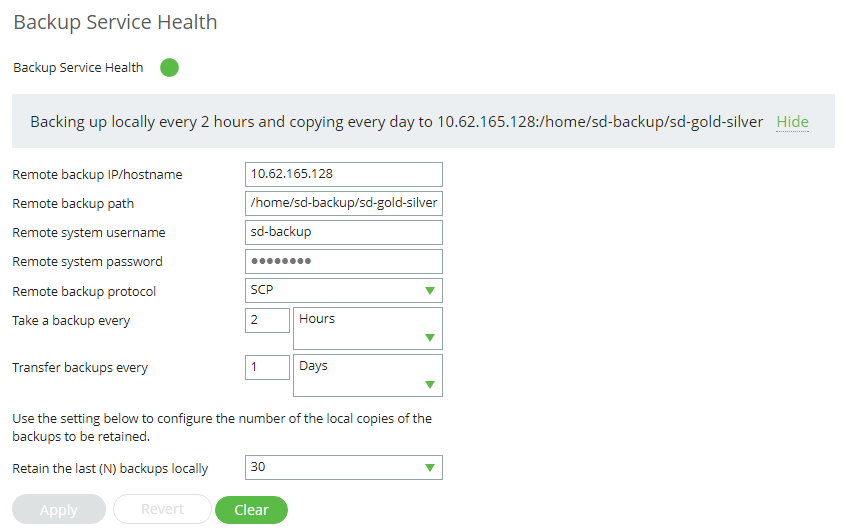
5.Make the required changes to your schedule.
Remote backup path requires a "full path" directory structure. Relative paths cannot be used.
6.Click Apply to confirm the changes.
The first local backup will be created after the full duration of the local backup frequency. For example, after 20 minutes.
The first copy of local files to the remote server will occur after the full duration of the remote copy frequency. For example, after 1 day.
Restoring a Services Director from a Local Backup
A Services Director VA’s configuration can be restored from a local backup. You may wish to do this to recover a specific configuration, or to reverse recent changes.
The backup file does not include any vTM image files that you have imported. However, a list of these images is included in the backup, and this list is displayed the end of the process. These must be loaded to both Services Director nodes manually.
1.Access your Active Services Director VA graphical interface from a browser, using the Service Endpoint Address of your Services Director.
Do this from a browser, using the Service Endpoint Address of your Services Director.
Do not restore a configuration from the Standby node in an HA pair. Backups are always restored on the Active node.
2.Log in as the administration user. The Home page appears.
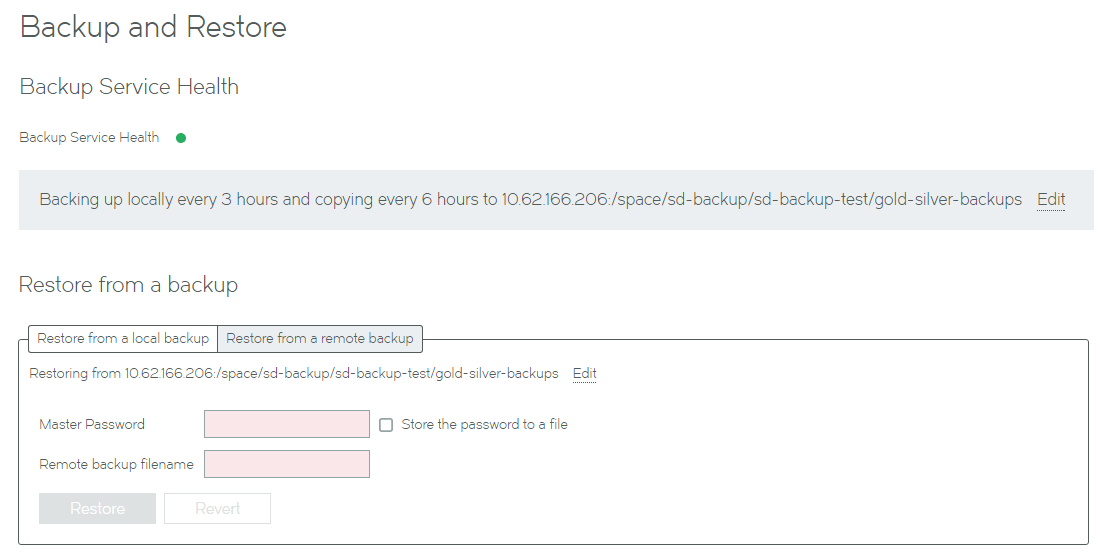
3.Click the System menu, and then click Disaster Recover: Backup and Restore. The Backup and Restore page appears.
This page contains a summary of the current backup schedule, a backup service health indicator, and provides access to the restore functions.
4.Click the Restore from a local backup tab.
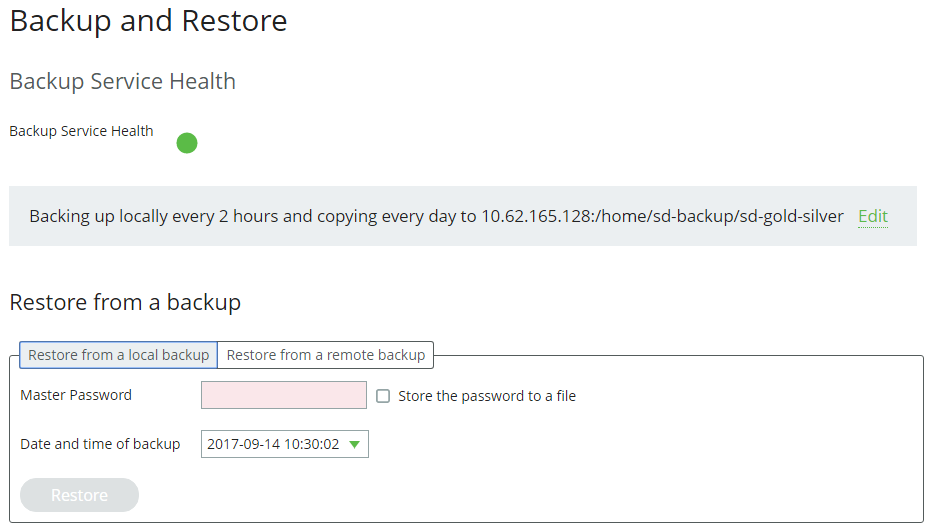
5.Enter the Master Password that was in place when the backup was taken.
6.Select the required local backup from the pull-down list.
The file names have the following general form:
backup_<IP_address>_<datestamp>_<timestamp>.zip
7.(Optional) Select the Store the password to a file check box to store the master password internally for future use.
8.Click Restore to start the restore process.
Once the process completes, the Services Director will be configured in the same way as the original Services Director, including vTMs in its estate.
When the restore completes, any vTM image files referenced in the backup will not be present on your Services Director. You will need to reload them into the vTM images page if this is the case.
The vTM image files must be loaded to both Services Director nodes manually.
Refer to the Pulse Services Director Advanced User Guide for full details.
Restoring a Services Director from a Remote Backup
A Services Director VA’s configuration can be restored from a remote backup. You may wish to do this to recover a specific configuration, or to reverse recent changes.
The Services Director VA is not able to list available backup files on the remote server. You must know the name of the file you wish to restore from before beginning this process.
The backup file does not include any vTM image files that you have imported. However, a list of these images is included in the backup, and this list is displayed at the end of the process. These must be loaded to both Services Director nodes manually.
1.Access your Active Services Director VA from a browser, using the Service Endpoint Address of your Services Director.
Do this from a browser, using the Service Endpoint Address of your Services Director.
Do not restore a configuration from the Standby node in an HA pair. Backups are always restored on the Active node.
2.Log in as the administration user. The Home page appears.
3.Click the System menu, and then click Disaster Recover: Backup and Restore. The Backup and Restore page appears.
This page contains a summary of the current backup schedule, a backup service health indicator, and provides access to the restore functions.
4.Click the Restore from a remote backup tab.
5.Enter the Master Password that was current when the remote backup was taken.
6.Enter the name of the remote backup file. The file names have the following general form:
backup_<IP_address>_<datestamp>_<timestamp>.zip
For example:
backup_10.62.167.199_2015-09-09_05-52-02.zip
7.If you want to change the source of the remote backup:
•Click Edit. The dialog expands to show additional fields.
•Enter new details for the remote server:
•Remote backup IP/hostname - this is the IP address or FQDN of the remote server.
•Remote backup path - this identifies a directory on the remote server for the backups. This requires a "full path" directory structure. Relative paths cannot be used.
•Remote system username - the user name for the remote server.
•Remote system password - the password for the user.
•Remote backup protocol - the file transfer protocol for the remote backup server. This is either FTP or SCP. Use SCP for secure encrypted transfers.
•Click Apply to confirm the changes.
8.(Optional) Select the Store the password to a file check box to store the master password internally for future use.
9.Click Restore to start the restore process.
Once the process completes, the Services Director will be configured in the same way as the original Services Director, including vTMs in its estate.
When the restore completes, any vTM image files referenced in the backup will not be present on your Services Director. You will need to reload them from the vTM images page if this is the case.
The vTM image files must be loaded to both Services Director nodes manually.
Refer to the Pulse Services Director Advanced User Guide for full details.
Restoring a Services Director Using the Setup Wizard
After the failure of a Services Director, you can create a new Primary Services Director VA from a remote backup file. This process uses the Setup Wizard. You can then create a new Secondary Services Director VA and pair it with the recovered Primary Services Director VA.
A new Secondary Services Director VA will receive its configuration from the Primary. You do not need to use a restore process when you create the Secondary.
Note that:
•If your new Services Director VA uses a different Service Endpoint Address than the one used for the original Services Director VA, the FLA Licensing of vTM instances will be disrupted.
•A Service Endpoint Address is still required a standalone Primary Services Director. It must be different from the IP address of the Primary Services Director.
•The Services Director VA is unconfigured at this point, and has no record of the remote server. The required backup file must be downloaded from the remote server to the local machine before beginning the backup.
The backup file does not include any vTM image files that you have imported. However, a list of these images is included in the backup, and this list is displayed at the end of the process. These must be loaded to both Services Director nodes manually.
•You require the master password for the original Services Director VA.
Perform the following process:
1.Create a new virtual machine for the Services Director VA using your chosen platform.
2.Start the VM and make a note of its assigned IP address.
3.Access the Services Director VA in a browser window using its IP address.
The Setup Wizard starts.
4.Work through the Setup Wizard until you reach the Service Endpoint Address page.
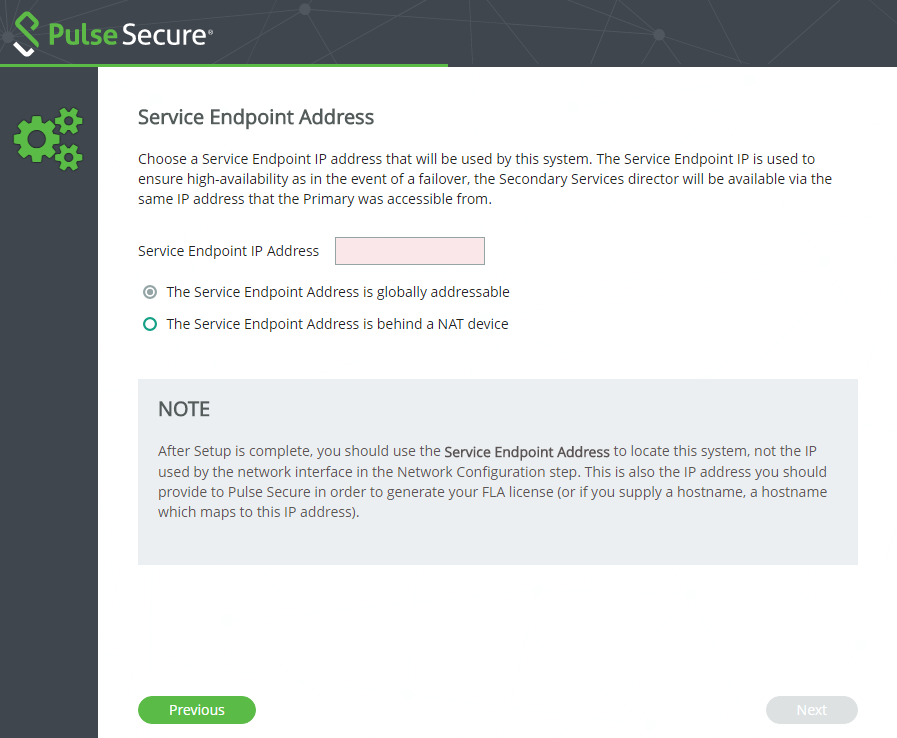
5.If the Service Endpoint Address for the Services Director HA pair is globally addressable:
•Select The Service Endpoint Address is globally addressable.
•Enter the Service Endpoint IP Address for the Services Director HA pair.
6.If Service Endpoint Address for the Services Director HA pair is in a private network behind a NAT device:
•Select The Service Endpoint Address is behind a NAT device. The available properties update to include an External IP Address.
•Enter the internal NAT Service Endpoint Address for your Services Director HA pair as the Service Endpoint IP Address.
•Enter the external NAT address for your Services Director HA pair as the External IP Address.
7.Click Next. The Restore from Backup page appears.

8.Click Restore from a previous backup.
9.Click Choose file and locate the backup file. This file must already be downloaded from the remote server to a local machine. The file names have the following general form:
backup_<IP_address>_<datestamp>_<timestamp>.zip
10.Enter the Master Password for the Services Director VA that created the backup.
11.Click Next. The Applying Settings page appears.
This page configures the system based on retrieved configuration information.
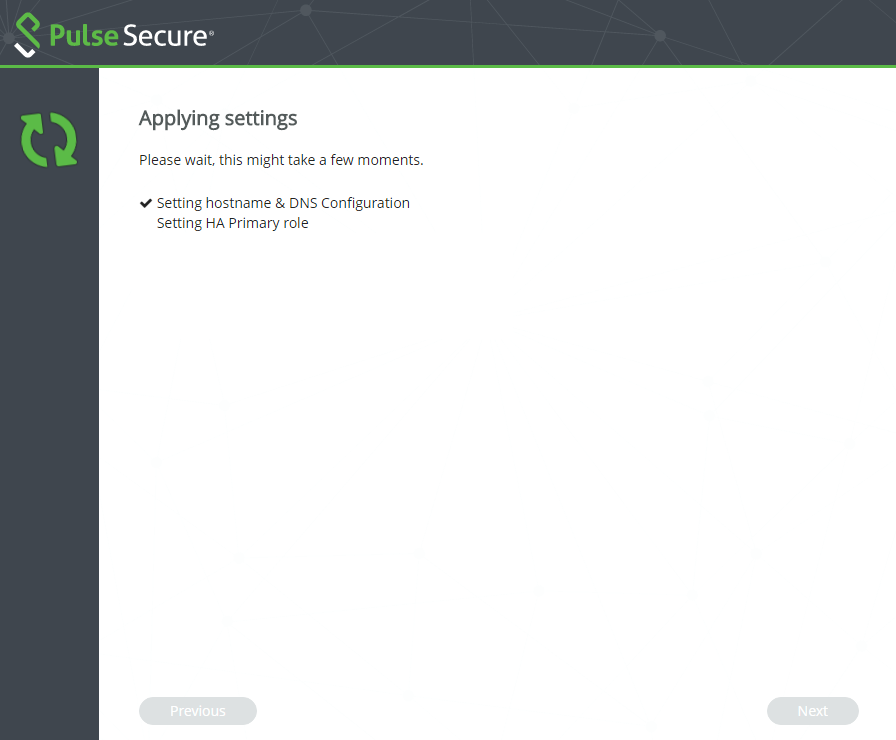
When this is complete, the Setup Complete page appears.
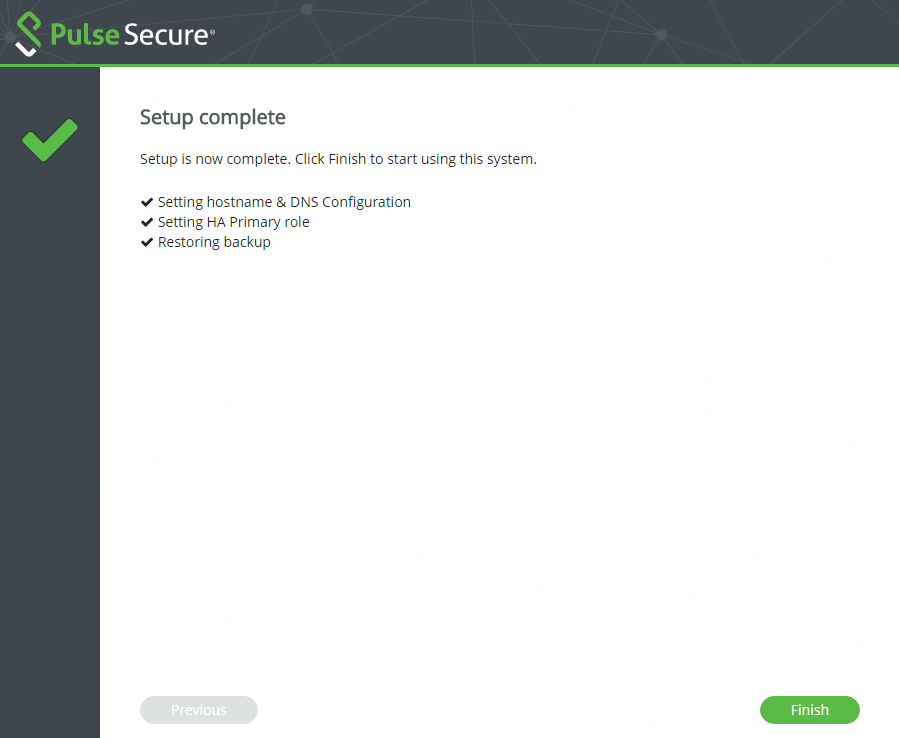
Once the process completes, the Services Director will be configured in the same way as the original Services Director, including vTMs in its estate.
Any vTM image files referenced in the backup will not be present on your Services Director. You will need to reload them from the vTM images page if this is the case. These must be loaded to both Services Director nodes manually. Refer to the Pulse Services Director Advanced User Guide for full details.
12.Click Finish. The Home page is displayed.
13.(Optional) Click the Services menu, and then click Services Director: vTM Instances. The vTM Instances page appears.
This page indicates the licensing state of each vTM.
All vTMs that were present in the original configuration should now be present.
If you are using a different Service Endpoint Address to the one used by the FLA Licensing in the backup, the licensing of the vTMs will be disrupted. Each affected vTM will enter a grace period (six weeks). For example:
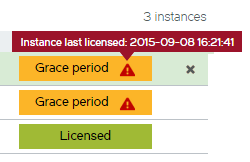
In this case, generate a FLA license that is keyed to the new Service Endpoint Address. Then, relicense your vTM instances. See Relicensing a Virtual Traffic Manager Instance.
14.Click the System menu, and then click Disaster Recovery: Backup and Restore. The Backup and Restore page appears.
No backup schedule will be present. This information is not saved in the backup.
15.(Optional) Create a new backup schedule. See Configuring a Scheduled Backup Schedule.
The restore process is then complete.
After the restore process is complete for the Primary Services Director VA, you can then create a new Secondary Services Director VA, and join it to the Primary. See Preparing to Install the Services Director Virtual Appliance.
A new Secondary Services Director VA will receive its configuration from the Primary. You do not need to use a restore process when you create the Secondary.
Starting and Stopping the Services Director Service
You can perform a number of master password tasks from the System menu.
Restarting the Services Director VA
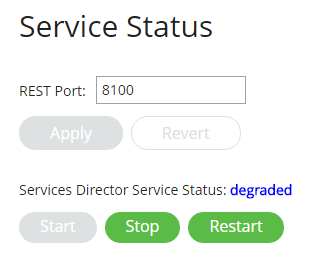
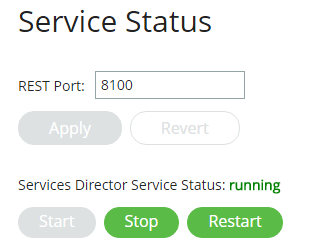
You can stop, start and restart your Services Director service at any time from the System > Service Status page.
•When the system is running, click Stop to stop the service.
•When the system is running, click Restart to stop and then start the service.
•When the system is not running, click Start to start the service.
All changes are immediate.
You are not required to enter the master password during this operation. The master password is only required when restarting the Virtual Machine for a Services Director VA. See Entering the Master Password After a Virtual Machine Restart.
Entering the Master Password After a Virtual Machine Restart
You can restart the Virtual Machine (VM) for a Services Director VA at any time.
•If you chose to store the master password internally when you configured the Services Director VA node, you do not need to enter the master password after a VM restart.
•If you did not store the master password internally, you must enter the master password to unlock access to vTMs.
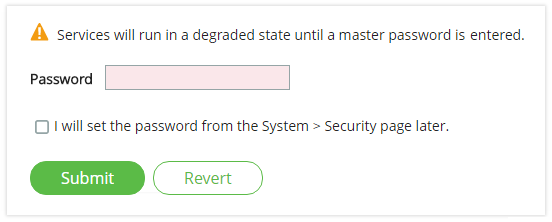
When the Services Director VA is accessed for the first time after a VM restart, the following dialog box appears:
There are two scenarios:
•If you know the master password, you will typically enter it immediately. See Entering the Master Password Immediately After a Restart.
•If you do not know the master password, but are an administration user, you may want to access the Services Director VA to access functionality that is unrelated to vTMs. For example, to access system logs. You will enter the password at some point afterwards, and regain access to vTM instances. See Entering the Master Password Later.
Entering the Master Password Immediately After a Restart
If you know the master password, you will typically enter it immediately.
You may receive an e-mail notification of a raised master_password_fail alarm before you enter the new master password on the Services Director VA.
1.On the master password dialog box, enter the master Password.
2.Click Submit. This unlocks access to the Services Director VA.
3.To confirm access to vTMs, click the Services menu, and then click Services Director: vTM Instances. The vTM Instances page appears. This page will include all of your vTMs.
Entering the Master Password Later
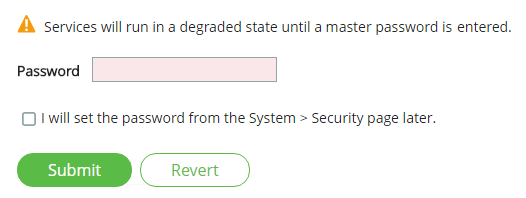
If you do not know the master password, but are an administration user, you may want to access the Services Director VA to access functionality that is unrelated to vTM instances. Under these circumstances, you can choose to enter the master password at a later point.
If the VM is restarted again, this choice remains in place.
You may receive an e-mail notification of a raised master_password_fail alarm before you enter the new master password on the Services Director VA.
Choosing to Enter the Master Password Later
1.On the master password dialog box, click the I will set the password from the System Security page later check box.
2.Click Submit.
This unlocks access to the Services Director VA. However, until you enter the master password, the Services Director service status is Degraded. This is indicated on the System > Service Status page.
You will have no access to vTMs while in this state.
When you are ready to recover from this Degraded state, you must enter the master password.
Entering the Master Password
1.Click the System Menu, then click Security. The Security Settings page appears.
2.Enter the master password.
3.(Optional) Select the Store the password to a file check box to store the master password internally for future use.
4.Click Submit.
The Security Settings page updates, but no further action is required on this page.
5.Click the System menu, then click Service Status. The Service Status page appears, which enables you to confirm that the Degraded state has changed to Running.
6.To confirm access to vTMs, click the Services menu, and then click Services Director: vTM Instances. The vTM Instances page appears. This page will include all of your vTMs.